Wednesday, January 16, 2013

Samples Equals New Quilt??

Yesterday, I was thinking about making some samples for the upcoming class I am teaching at the end of the month. My Mother-in-Law is helping me with the samples for the Braided Irish Chain class as she is making her own quilt for my nephew.  So that easily took care of samples for that class.  My Flying in Squares class however was another matter.  I knew I needed samples on how to make no waste flying geese and then enough squares and geese to show how to put the blocks together.  However, I didn't really want to make 2 or 3 blocks that would end up being widow blocks and I wasn't really feeling like making a new Flying in Squares quilt.

So, I thought about it for a bit and then remembered a sketch that I had been playing with in EQ7 a few weeks earlier.  It has flying geese and squares, bingo!!!  It was easy to pick fabrics, I had a Cuzco by Kate Spain layer cake and it perfectly matches the Terrain prints in my Flying in Squares quilt.  Since I plan to hang this new quilt on the sewing room wall next to the Flying in Squares quilt it was a perfect fit!!


It was a little hard at first to cut into the fabrics.  I love Cuzco and that makes me want to just keep it on the shelf and pet it.  (Please tell me I am not the only one that has struggles with this)  But after a few minutes of admiring the beautiful prints and colors the cutting commenced.  I have to admit, there were several times when I was cutting that I thought to myself how crazy this is.  I have so many projects on my plate right now and I decide that rather than make a few samples, I might as well make another quilt.  Crazy but oh so much fun!!


I got all the prints cut and was ready to move onto the background when I realized I was completely out of solid white.   Horror!!  I was totally in the groove and didn't want to wait so I went to my scrap bin.  I had scraps in Kona white, Bella white, Bella Snow, and a few others I don't even know.  There was not enough in any one print but enough if I used it all :)  I debated for a bit and then decided, why not??  Neutral colored quilts seem to be all the rage at the moment so why not a mixed neutral background.  Time will tell if this was a wise decision or not :)


Oh, and the pattern . . . time will tell on that too :)  Now I just need to feed the kids and put them down for naps so I can get to some sewing :)
Pin It!

Tuesday, January 15, 2013

Half Way There

I have been working on my whole cloth quilting here and there. I have found in this last week that I haven't had a lot of time to sew so I am only about half way through.  It is also pretty slow going as the lines are about 1/4" apart so that makes for a lot of quilting.  But even with that I am so super excited with how it is coming out.   It has so much texture to it, I just love it!!   I really think it is going to look great with the design that idea that I want to finish it with ;)


And speaking of free motion quilting, I signed up for the Machine Quilting Negative Space class by Angela Walters on Craftsy.  I have been thinking about taking this class for some time and when I got an email from Craftsy that there classes were on sale for $9.99 I couldn't resist.  I have watched the first class and am really enjoying it!!  I am very excited about what I have learned so far and I can't wait to incorporate her lessons into my quilting.  Oh, and those squares sketched at the top, totally a new favorite quilting design.  Got to try that on fabric soon!!

And this is totally random, but I was so happy about it that I had to post a picture.  I used to make bread about every 2 weeks.  Then I just sort of fell out of the habit.  I think it has been a whole year since I have made bread.  So yesterday, with the freezing temperatures inspiring me to make something warm and comforting, I made up a batch of dough, and we enjoyed 3, right from the oven, loafs of bread with dinner.  Oh ya, I was pretty high on the awesome mom scale last night at dinner :)


Pin It!

Monday, January 14, 2013

Starburst Quilt-A-Long - Cutting

**  NOTE  - This post is part of a series of posts for the Starburst Quilt-A-Long.  If you would like to join (and have a chance to win one of the $75.00 Gift Certificate grand prizes sponsored by The Intrepid Thread ) you can find a list of the post links here :)  Once again, here is the schedule, but if you want to work ahead you can use the tutorial  just be sure to take pictures of your weekly assignments so you can link them up for weekly prizes :)


January 14 - Cutting Post
January 21 - Goose in the Corner and Half Square Triangles
January 28 - Flying Geese
February 4 - Building Blocks - At least 2
February 11 - Finish Blocks and Sashing
February 18 - Baste it, Quilt it, Bind It
March 4 - Starburst Parade and Grand Prizes

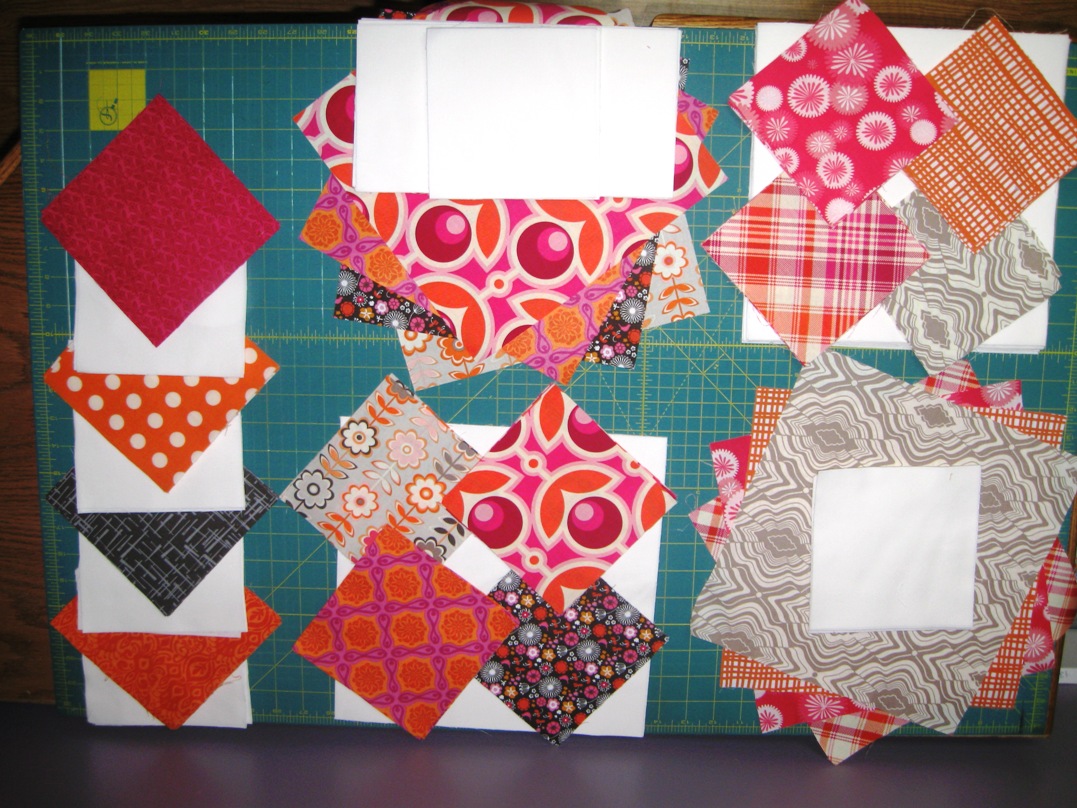
So here we are at January 14th and this weeks assignment is cutting your fabric!!   Now I was hoping to show you lots of fun pictures of my new fabric that I will be using, but there was a bit of a post office mishap and my fabric is a little stuck in transit.  (But I should be able to track it down today.)  So, for the mean time, I will just show you some fun random fabric pictures :)

THIS WEEKS ASSIGNMENT - CUTTING

Now, before you just jump on into cutting, you have to make some decisions.  This is going to determine the layout of your quilt.  So, I am going to show you the way I decide a layout.   With that said, there are a million ways to do your layout so don't feel like you need to do it this way, it is just a help in getting started :)   If you have already done this, feel free to skip down to the cutting directions :)

Start by laying your 12 fat quarters out so you can see all of those pretty fabrics.


Now I like to get an equal balance of tones so I like to separate my fabrics into 3 groups, that each have 4 prints and I separate them by lightest tones, medium tones, and darkest tones.


 Once your tones are separated, its time to look vertical.  Now you are making 4 groups of 3, but once again, I like to keep a dark, medium, and light in each group. Each vertical group of 3 represents a star, so you are moving prints around horizontally until you like each of the 3 groupings.  So for example, I didn't like the 2 pearl bracelets in the grouping 3 so I moved them.  When I did this I got two of the same prints in grouping 4 but liked that.  Just keep shuffling until you like all 4 groupings.


Lastly, you need to decide which fabric in each grouping will be for which part of the Starburst.  The Starburst consists of a Center Star, Star Surround  and Burst Points.  I find it easiest to label each and then take a photo to refer to when I start cutting everything up, if you don't like referring to photos, just write your groupings and fabric assignments down somewhere to refer to :)  For this fabric, I decided that I wanted my dark prints to all be the center star, so they really pop :)  Then I decided, I wanted the 2 medium grey's to be burst points, but I labeled them 1 and 4 so that they would be opposite each other in the quilt layout.  From there, I figured the other 2 burst points could be done in the lights to contrast.  Once you start making a few decisions  the rest just falls into place.  


So, now that you have your decisions all made, you are ready to cut :)  Now, I promise to add some more photos here soon, so if you are nervous about cutting from a chart, just wait a day or 2.  I just didn't want to cut into these fabrics as my intended fabrics are stuck at the post office ;)

EDIT - My fabrics finally arrived and these are my groupings ;)


Oh, and if you are having trouble seeing the chart, just click on it, and it will come up larger ;)
* Sew WOF strips together to create the desired length of sashing.

Cut your fabrics according to the chart above.  Remember to refer to the column of the size quilt you want to make :)   And remember, press your fabric before cutting to aid in accurate cutting.

EDIT - I just found out that the post office managed to send my fabric package back instead of holding onto it.  So I have gone ahead and made some cutting diagrams as I won't have my fabric until later this week.  The blue is the 24" blocks, the pink is the 32" blocks and the green is the 40" blocks.  I hope these help and if you have questions, please don't hesitate to email me!!

Start with cutting the four fat quarters that you have set aside for Burst Points.  From each of the 4 fat quarters cut according to the following diagrams.  With all of your cutting, the leftover scraps can be set aside for a scrappy binding or can but used for another project.
 Now you are ready to cut your four fat quarters that you have decided will be your Star Surround.  From each of the 4 fat quarters cut according to the following diagrams.

And now you can cut your last four fat quarters that will be your Star Centers.  From each of the 4 fat quarters cut according to the following diagrams.


And now, you have simply to cut your background yardage :)  Once again, you will need to refer to column of your size quilt to know what sizes you need to cut.  Be sure you cut the designated quantity for each line.


Once you have finished cutting your 12 fat quarters and your background yardage, Sort your fabrics into piles of similar descriptions. ie, CS for center star,  FG, for flying geese, HST for half square triangle, GC for goose in the corner,  B for background and S for sashing.  This will make it easier as you begin to put the pieces of the block together.  (This is why you wanted to label your groupings earlier, because you will be mixing them all up now :)

And now you are done!!!   Here's my fabrics all cut up :)  This weeks assignment wasn't to hard, right :)   And now the fun part, you can enter to win the weekly prize :)


The Weekly Prizes are sponsored by the Fat Quarter Shop and a huge thanks goes to them for their support of the Starburst Quilt-A-Long.

This weeks  prize is a Salt Water Charm Pack by Tula Pink for Free Spirit Fabrics


So what do you have to do for a chance to win this beautiful Charm Pack??  Simple . . . Just link up your fabrics all cut up at the end of this post :)  You can link to a blog post or a flickr picture, or whatever.  Just make sure to link up by next Monday morning as I will be announcing a winner at the beginning of next weeks post :)

If you don't get your cutting done by next week you can still link it up :) (just not in time for the prize :)    The linky will remain open until the end of the Quilt-A-Long.  So if your out of town, or just had a busy week, no worries!!!  Just link up when you can :)

And Don't forget to add your beautiful cut up fabric to the Happy Quilting Quilt-A-Long Flickr group!!!  I am so excited to see all of your beautiful groupings ;)

So let's get cutting!!!  And if you have questions, don't hesitate to email me at happyquiltingmelissa@gmail.com.  Have a Happy Quilting Day!!
Pin It!

Thursday, January 10, 2013

Modern Baby - A New Book!!

EEEkkk!!  I am so excited to share, this has been a secret for a long time!!  I have a quilt in a new book that will be released in April called Modern Baby!!!   Double EEEkkk!!!   Martingale has gathered an amazing group of quilters to create this diverse collection of modern baby quilts.  The designers include Amy Smart, Audrie Bidwell, Carolyn Friedlander, Carrie Bloomston, Dana Bolyard, Jake Finch, Jen Eskridge, Lindsey Rhodes, Melissa Corry, Pippa Eccles Armbrester, Sarah Flynn, Shea Henderson, and Victoria Findlay Wolfe.  Ya, can I just say I am so honored to be among this group!


Here's my project,  It's called Daddy's Little Girl. ( I can't believe I finally get to share this, so excited!!!!)   I had a lot of fun designing this quilt.  My design concept was to take a basic chevron (totally modern, right) and then create a sort of moving background for it so that you don't quite know if it is moving up and down, or across. I love the boldness of the black and white prints but yet how the pink tones it down so that it is still soft and girly.  I used prints from Doodle Bug Designs Tuxedo Collection for Riley Blake and the pink is Cotton Candy from Riley Blake's Shades collection.     


I did the quilting myself for this little project and I was so happy with it.  I did a loopy flower and scroll vine design on the pink chevrons and I think it is some of the cutest quilting I have ever done.  Ya, I am just a wee bit proud of it, can you tell??  I did straight line echo quilting in the background to really help give it that modern feel and to really make those pink chevrons pop!!


I think my favorite part of the design are these cute little applique letters.  They are just so dainty and petite, which just makes me thing of cute little snugly babies.  And I really loved the way they finished the quilt.   It is so fun to see the name of the quilt actually on the quilt ;)


So that's Daddy's Little Girl!!   Modern Baby is now listed on Amazon, Barnes and Noble, and Shop Martingale and I have to admit, it still makes me giddy to see my name listed as an author there.  So if you have a minute  pop on over to one of these sites and check out all of the other projects in this adorable book!! Like I said before, I am in some amazing company!!


Oh, and since this is the first time I am able to show this finish, I am linking on up to Amanda's :)
Pin It!

Wednesday, January 9, 2013

Whole Cloth Quilting

I am hoping to get to basting this today.  I am excited to try whole cloth quilting for the first time.  I don't have anything fancy planned, just straight lines, but there is something awfully fun about the idea of quilting on such a clean surface.


Then, once I get it all quilted it will be time to play with these.  So fun!!!


Pin It!