Wednesday, November 10, 2021

Texas Monthly - Month 11!!

Can you believe it!!!  It is the last month of piecing blocks for the  Texas Monthly Block of the Month program!   This BOM is hosted by Stitchin' Heaven  and is so much fun!!!    All we have left after this is Borders, so exciting!!!   

So let's get going!!  There are 2 blocks this month and we get to do regular piecing :)  The blocks are all pretty basic and fast and fun to sew.    So let's get piecing!!!  


Cutting

I like to start out by pressing all of my fabrics.  Then it is time for cutting!!!  I like to cut all of my pieces for all of my blocks at the start.  Just be sure to keep them in piles separate for each block.  

And with all your pieces cut . . . you are ready to move on to the first block.


The Log Cabin Block

Log Cabin Blocks are super fun to make and fairly simple.  Just make sure to pay attention that you always lay your block out in the same direction and continue to add pieces in a clockwise direction.  They can easily get flipped ;)  We will be making 2 Log Cabin blocks so you want to repeat each of these steps twice.

Layout your Fabric 22 Center square and Fabric 11 Short rectangle as shown.  Place the Fabric 11 rectangle onto the left hand side of the Fabric 22 square with right sides together and stitch a 1/4" seam along the edge.  


Press the seam towards the Fabric 11 Rectangle.   Then place the Fabric 11 Long rectangle onto the top of the Fabric 22 square with right sides together and stitch a 1/4" seam along the edge.  


Press the seam towards the Fabric 11 Rectangle.   Now place the Fabric 7 Short rectangle onto the Right Hand Side of the Fabric 22 square with right sides together and stitch a 1/4" seam along the edge.  


Press the seam towards the Fabric 7 Rectangle.   Now place the Fabric 7 Long rectangle onto the Bottom of the Fabric 22 square with right sides together and stitch a 1/4" seam along the edge.  


Press the seam towards the Fabric 7 Rectangle.   At this point, I like to place a Pin at the first seam.  This helps me to remember when adding more pieces where my start is and so I can make sure I lay out all my pieces correctly.  We are going to speed things up a bit now :)   


We will now add the Fabric 12 rectangles.   Place the Fabric 11 Short rectangle onto the Left Hand Side of the Log Cabin Unit with right sides together and stitch a 1/4" seam along the edge.  Press the seam towards the Fabric 12 rectangle.   Now place the Fabric 12 Long rectangle onto the Top of the Log Cabin Unit with right sides together and stitch a 1/4" seam along the edge.  Press the seam towards the Fabric 12 rectangle. 


Now we add the Fabric 21 rectangles.   Place the Fabric 21 Short rectangle onto the Right Hand Side of the Log Cabin Unit with right sides together and stitch a 1/4" seam along the edge.  Press the seam towards the Fabric 21 rectangle.   Now place the Fabric 21 Long rectangle onto the Bottom of the Log Cabin Unit with right sides together and stitch a 1/4" seam along the edge.  Press the seam towards the Fabric 21 rectangle. 

**And remember where I said at the beginning that these pieces can easily get flipped??  Ya, this photo needed a little editing thanks so a little whoops on my part ;)  


Onto the Fabric 9 rectangles.   Place the Fabric 9 Short rectangle onto the Left Hand Side of the Log Cabin Unit with right sides together and stitch a 1/4" seam along the edge.  Press the seam towards the Fabric 9 rectangle.   Now place the Fabric 9 Long rectangle onto the Top of the Log Cabin Unit with right sides together and stitch a 1/4" seam along the edge.  Press the seam towards the Fabric 9 rectangle. 


And finally, we add the Fabric 19 rectangles.   Place the Fabric 19 Short rectangle onto the Right Hand Side of the Log Cabin Unit with right sides together and stitch a 1/4" seam along the edge.  Press the seam towards the Fabric 19 rectangle.   Now place the Fabric 19 Long rectangle onto the Bottom of the Log Cabin Unit with right sides together and stitch a 1/4" seam along the edge.  Press the seam towards the Fabric 19 rectangle. 


And just like that, you have two gorgeous Log Cabin Blocks that should measure 10 1/2" x 10 1/2" unfinished.  


So now you are ready to move onto to making two of the . . . 

Quarter Square Triangle Blocks


We made Quarter Square Triangle Blocks back in Month 5 so this will be a snap ;)  Start by gathering your 16 squares and draw a diagonal line on the wrong side of each of the White squares.  


Match a Marked White square to each of the Blue/Green squares.  Align the two squares with right sides together.   Stitch a 1/4" seam on either side of the drawn line.  


Cut on the drawn line and then press the seam allowances towards the Blue/Green triangles.     Do not Trim at this point, I know that is what you are used to with HST's, but we don't need to trim with Quarter Square Triangles ;0  


Draw a diagonal line in the opposite direction of the seam on the wrong side of each of the Blue HST's.


Align a Marked Blue and a Green HST with right sides together nesting the center seam with the White fabrics on opposite sides.   Pin in place and then stitch a 1/4" seam on either side of the drawn line.  


Cut on the drawn line and then press the seam allowances open.  Trim the tails from the edges of the Quarter Square Triangle Units.  They should not need to be trimmed beyond the tails ;)  


You will have 16 Quarter Square Triangles but 3 can go in your orphan block pile as you will only use 13.    Layout 13 Quarter Square Triangles as shown below, one row of 9 and one row of 4 with the Blue Triangles on top for the long row and the Green Triangles on top for the short row.   


Place the second QST in each row onto the first QST with right sides together.   Align, taking care to match the seams on the corners and pin.  Stitch a 1/4" seam along the pinned edges.  


Then place the third QST in each row onto the second QST with right sides together.   Align, taking care to match the seams on the corners and pin.  Stitch a 1/4" seam along the pinned edges.   Continue in this fashion until you have stitched both rows together. 


You should now have a row of 9 QST Blocks and a row of 4 QST Blocks.   Press the seams open.  


And now you have 2 beautiful  Quarter Square Triangle Block Rows that are just so great!!!  The short row should measure 4 1/2" x 16 1/2" unfinished and the long row should measure 4 1/2" x 36 1/2".  


And now all your blocks are made for the entire quilt!!!!  So now let's take this month's blocks and sew them into the Bottom Section!!  

Bottom Section 


To start, we need to trim the Longhorns and Calves panel.  we will be trimming the panel to 5 1/2" x 16 1/2".  To do this and keep your cattle centered, measure in 1" from the top of the middle Longhorn's horns.   Also, measure in 1" from the rump of the right hand calf.  To double check you are aligned, at this point the left hand Longhorn  rump  should be at 15 1/2" on your ruler and the bottom of the hooves should be at 4 1/2" on your ruler.   Once you are all aligned, Trim along the top and and right hand side of your ruler.   


Now turn your Longhorns and Calves panel upside down.  Align the 16 1/2" Vertical Line and the 5 1/2" Horizontal lines on your ruler with the trimmed edges you just cut.     Once you are all aligned, Trim along the top and and right hand side of your ruler.     Your panel will now measure 5 1/2" x 16 1/2".   Also, from that random green strip in your packet, cut a 1 1/2" x 16 1/2" rectangle.  


Place the Green rectangle onto the bottom of the Panel with right sides together.  Stitch a 1/4" seam along the edge.  Press the seam towards the Green strip. 


Now place the Short Quarter Square Triangle row onto the bottom of the Green Strip with right sides together.  Stitch a 1/4" seam along the edge, taking care to stitch along the bottom of each of the Fabric V's so you get perfect points.    Press the seam towards the Green Strip.  


And now, we can add in the rest of this month's blocks!!  Layout your Panel Section, the Long QST Row, and the 2 Log Cabin blocks as shown below.  Take care your Log Cabin blocks are mirror images of each other in the layout.  


Place the Log Cabin Blocks onto the Panel Section with right sides together.  Sew a 1/4" seam along the edges.  Press the seams towards the Log Cabin blocks.  


Then place the long Quarter Square Triangle row onto the bottom of the section with right sides together.  Sew a 1/4" seam along the edges.  Again, take care to stitch along the bottom of each of the Fabric V's so you get perfect points.    Press the seam open. 


And the Bottom Section is complete!!! 


And now we can turn that Bottom Section into the Bottom Row!!!

Bottom Row

Layout your Paper Pieced Blocks from Month 10 on either side of the Bottom Section as shown. 


Place the Paper Pieced Blocks onto the Bottom Section with right sides together and pin and align them.  Stitch a 1/4" seam along the edges.  Press the seams towards the Paper Pieced Blocks.  


And just like that, your Bottom Row is done.  It should measure appx. 14 1/2" x 64 1/2".


And now, with all of your Quilt Section done, you are ready to assemble the Center of the Quilt!!!

Quilt Center

Layout your 5 Quilt Sections as shown below.  Isn't it so fun to see it all laid out together!!! 


Place the Left Hand Center section onto the Middle Center Section with right sides together.   Align and pin the seams.  Stitch a 1/4" seam along the edge, again, watching for your Fabric V's to stitch along the bottom to ensure those perfect points!!  


Now place the Right Hand Center section onto the Middle Center Section with right sides together.   Align and pin the seams.  Stitch a 1/4" seam along the edge, and once again, watch for your Fabric V's to stitch along the bottom.  


Press the two seams open.   And all that is left is to stitch these 3 rows together!!! 


Place the Top and Bottom Row onto the Center Row with right sides together.   Align and pin the seams.  Stitch a 1/4" seam along the edge, and you know, watch for your Fabric V's to stitch along the bottom.  Press the two seams open.  


And your Quilt Center is complete!!!  Isn't it just gorgeous!!!   It should measure appx. 64 1/2" x 70 1/2"


Great job!!!  So exciting!!!!!  Now we just have to wait for Month 12 to do the borders and finish this all up!!!  

Your Texas Monthly quilt is just about done!!!  Hope you loved this month ;)  

If you have any questions on this tutorial, please don't hesitate to email me at happyquiltingmelissa@gmail.com or leave a comment.  

Hope y'all enjoy making this month's blocks! 

 Looking forward to our last Month!

Pin It!

Tuesday, November 9, 2021

Terrific Tuesday Giveaway Day!!!

 It's Terrific Tuesday Giveaway Day!! Let's have some fun :)

First, we need to announce the winner from last Terrific Tuesday Giveaway!!  
The winner of the Snuggle Up Buttercup Fat Quarter Bundle from Poppie Cotton  is . . .   Number #811 . . . Congrats  crissat28!  I have messaged you :)  


And on to today's

Today's Terrific Tuesday Giveaway is being sponsored by Fat Quarter Shop.   Fat Quarter Shop is amazing and they never cease to amaze me with everything they have going on at their shop!!!     And did you know they have a 24 Hour Flash Sale every day with 2 Flash Sales on Tuesdays!!   And not only do they have a daily deal, they have a Fabric Basic, Pattern, and Notion of the Month!!!!   Laundry Basket Favorites are on sale for the Basic of the Month!!!  Also, all Just Another Button Company Products are on sale for the Notion  , and Elizabeth Hartman Patterns are on sale, So Great!!!   Save 20-30% off of all of them for the whole month of November!!  So Amazing ;) 

24 Hour Flash Sales at the Fat Quarter Shop!


And for today's Terrific Tuesday Giveaway Fat Quarter Shop is giving away a Red Barn Christmas Layer Cake by Sweetwater for Moda!!!!   This would make such a festive Halloween Quilt, it is the same fabric I used for my Starlite Sampler Quilt, and it is just so festive in Christmas Goodness!!!! 
 

You have two entry chances here on the blog, and please leave a separate comment for each.  All Entries are welcome, including International Entries.   Please just be sure to leave an email address if you are a no-reply blogger ;)  


ENTRY 1 - Simply leave a comment that tells me when you start Christmas Shopping??

 ENTRY 2 - Show your Fat Quarter Shop love.   You can follow them on   FacebookTwitterInstagramPinterestYou Tube or at their Blog.  You can Sign up for their Newsletter which will ensure you catch all of their amazing sales, or you can visit The Shop and then share a favorite item ;)   Just be sure to leave a comment of how you showed your Fat Quarter Shop Love!!!

And that's it ;)  The giveaway will be open until next Tuesday, November 16th,  when I will announce a winner at the beginning of next weeks Terrific Tuesday Giveaway Post :)

You can also pop over to my Instagram and/or Facebook to enter there as well :)  

Good Luck and Have a Happy Quilting Day!!!
Pin It!

Thursday, November 4, 2021

Planning for 2022

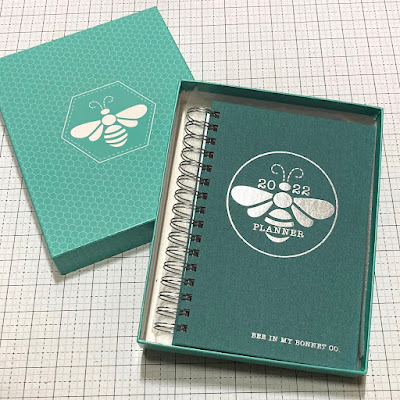
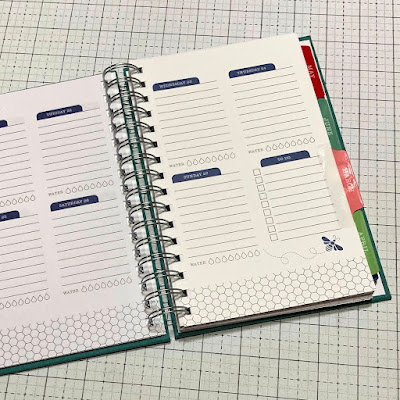
 I know, it's probably to early to be talking about 2022, but you know the next two months are just going to fly by :)    And I am an old school girl at heart, so even though the world continues to move to everything electronic, I still love a paper planner.   And I am super excited for this new Bee in my Bonnet Planner by Lori Holt.   You had me at Spiral Binding!!!   


Can I just say I Love this Planner and wish it was 2022 so I could start writting in it already.   (note, my 2021 planner was a cheapie and it has pretty much fallen apart, so I am ready to move on ;)      I love that along with a monthly calendar, there is also a weekly listing for days, that include plenty of lines to write down everything I need to get done.  Please tell me I am not the only one that writes down Make My Bed, on my To Do List just so I can cross it off a minute later :)  I think that is why I still love a paper planner, the satisfaction of getting to cross it off the list!!!    And including the Water, so brilliant and so helpful :)  So here is to crossing lots and lots of my 2022 list!!  


And something I am super excited to add to my 2022 To Do List . . . I finally ordered an Elizabeth Hartman kit!!!!  I got the Awesome Ocean Kit and it comes with this gorgeous rainbow of Kona Solids!!!  I have been admiring her amazing patterns for years, and have always thought, "One day I am going to make one of those."  Well, it won't be made in one day, but my plan is for 2022 to be the year :)  And I am so excited!!!!   I plan to donate this to the Festival of Trees next year, so I already have a deadline, which ya know, keeps this from joining the Long, Long, Long term projects, tee hee hee.  


So now I am wondering, for those of you that have made Elizabeth Hartman's amazing patterns before, any tips or tricks I should know about before getting started??

Thanks and hope you have a very Happy Quilting Day!!

Pin It!

Tuesday, November 2, 2021

Terrific Tuesday Giveaway Day!!!

 It's Terrific Tuesday Giveaway Day!! Let's have some fun :)

First, we need to announce the winner from last Terrific Tuesday Giveaway!!  
The winner of the $50.00 Gift Certificate from  Kimberly's Fabric Stash is . . .   Number #174 . . . Congrats  alicehho!  I have messaged you :)  


And on to today's

Today's Terrific Tuesday Giveaway is being sponsored by  Poppie Cotton .      Poppie Cotton is a newer fabric company started by my good friends Jina Barney and Lori Woods.  Their fabrics are just beautiful and are wonderful to sew with.   The quality is fantastic and I just love all of their pretty prints!!!   If you haven't sewn with Poppie Cotton yet, I highly recommend you check it out ;)  


And today's Terrific Tuesday Giveaway is an exciting one!!  Poppie Cotton is offering one lucky reader an entire Fat Quarter Bundle of their newest line, Snuggle Up Buttercup!!!  This is the cutest Christmas Line in adorable prints and colors, just so precious.     Someone is going to be super lucky this week!!!!


You have two entry chances here on the blog, and please leave a separate comment for each.  All Entries are welcome, including International Entries.   Please just be sure to leave an email address if you are a no-reply blogger ;)  

ENTRY 1 - Simply leave a comment that tells me when do you start listening to Christmas Music each year??  (I started yesterday :)  

 ENTRY 2 - Lets show Poppie Cotton some Love!!!!   You can follow them on   FacebookYouTube or Instagram.  Or you can sign up for their newsletter or  visit Poppie Cotton and share your favorite fabric collection ;)   Just be sure to leave a comment of how you showed your Poppie Cotton Love!!!

And that's it ;)  The giveaway will be open until next Tuesday, November 9th, when I will announce a winner at the beginning of next weeks Terrific Tuesday Giveaway Post :)

You can also pop over to my Instagram and/or Facebook to enter there as well :)  

Good Luck and Have a Happy Quilting Day!!!


Pin It!

Monday, November 1, 2021

October Sew Sampler Box!!!

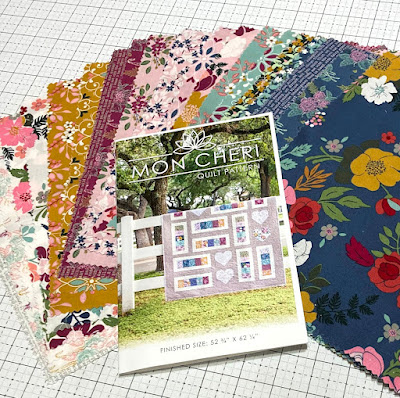
I know, it's November (Seriously, where did October go!!) but I needed to still share my October Sew Sampler Box but got a little busy with the Holiday Weekend.   So here we are . . . and talk about some amazing quilting goodness!!  The theme for October was Dream Big and I am so already dreaming of that Mon Cheri quilt being made up :)  


I am absolutely in love with this Whimsical Romance Fabric Line by Keera Job for Riley Blake Designs!!!  It is the same fabric I used for my Moonstones Quilt that I shared a Free PDF of a few weeks ago (just in case you missed it ;)   And when I saw the exclusive Mon Cheri pattern that came with it. . . Well, let's just say that I have already pulled some grey background from my stash and plan to do some cutting this afternoon.  I am just so excited for this project.  I hope to share a finish soon ;) 


And let's talk about the notions!  I have decided I can never have enough rulers, I just squeal every time I get a new ruler :)  And this 1 1/2" x 6 1/2" Creative Grids Ruler is such a great size for marking and tiny piecing!!!   And The Magic Seam Wand is new to me, but looks like it will be a great tool to have when traveling :)    And finally, the Take-Along Mini Color Wheel, wow, talk about a handy tool for matching fabrics!!  So awesome ;)   


And of course, with a new month means a new block in our QAL;)   Here is  Block 7 of the Bright Side Quilt along!!   I just love seeing all of these blocks come together in all of the Basic Grey goodness!!   Because of the lights and dark placement of my block, it looks more like an X than a star to me, and  I love that it creates a new look.    I just can't wait to see these all come together, especially with some basic grunge blocks that yes, I still need to make :)


And just a note,  Sew Sampler boxes currently have No Waiting List!!!  So you can sign up right away and get a box on your door step next month!!! So fun :)  

And that is October Sew Sampler Box!!  Now to wait clear to the end of November, good thing I will have my Mon Cheri project to keep me busy until the next box arrives ;)  

I hope you all have a very Happy Quilting Day!! 

Pin It!