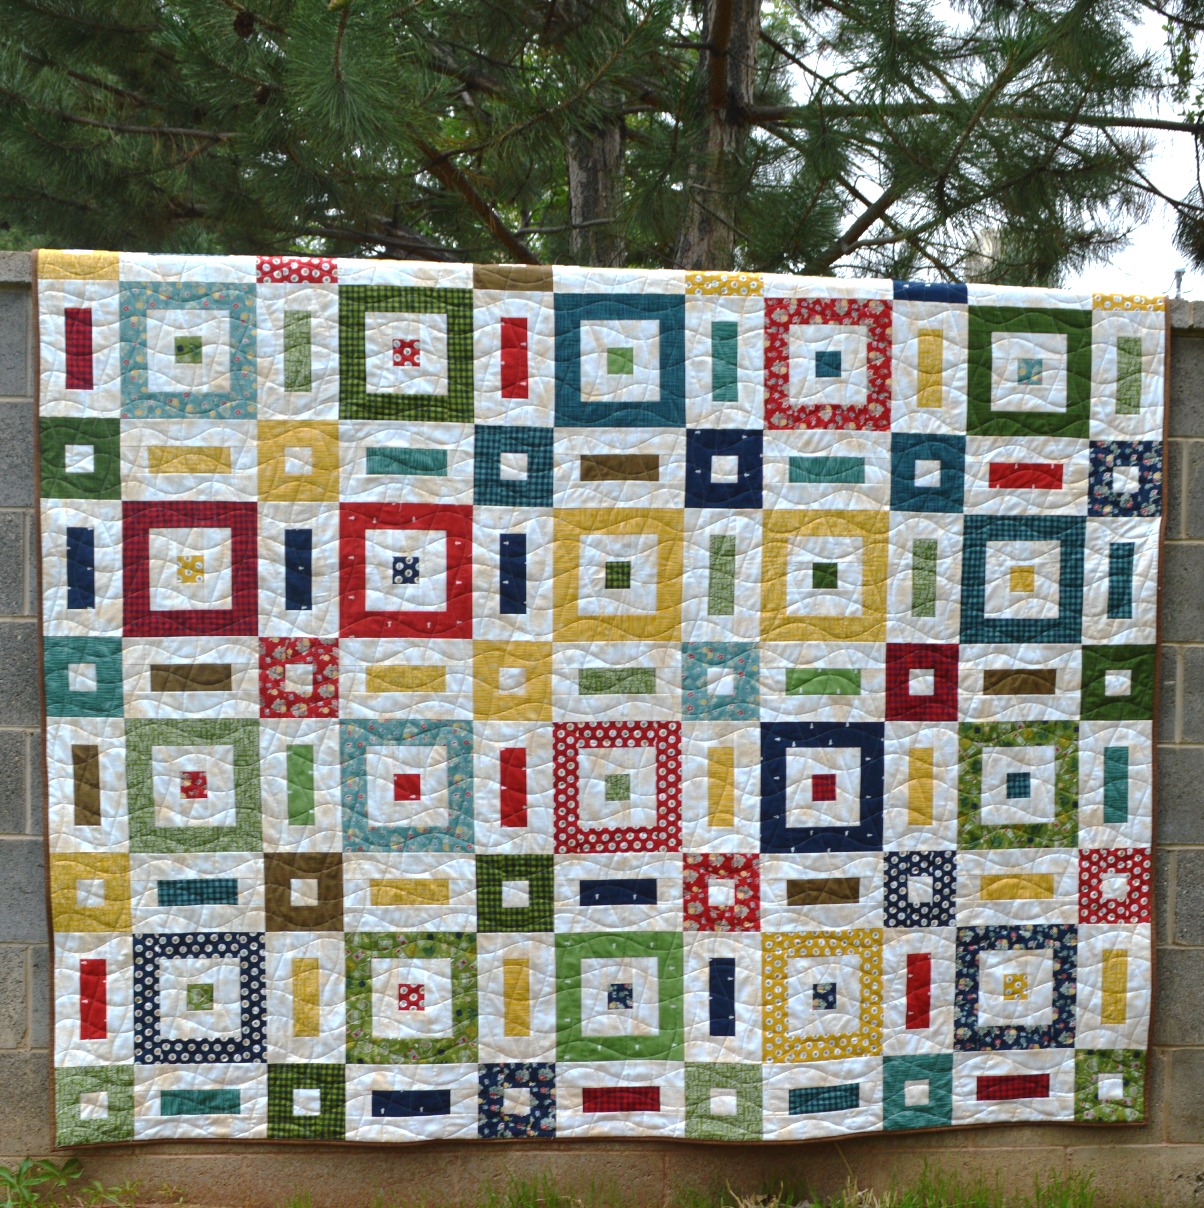
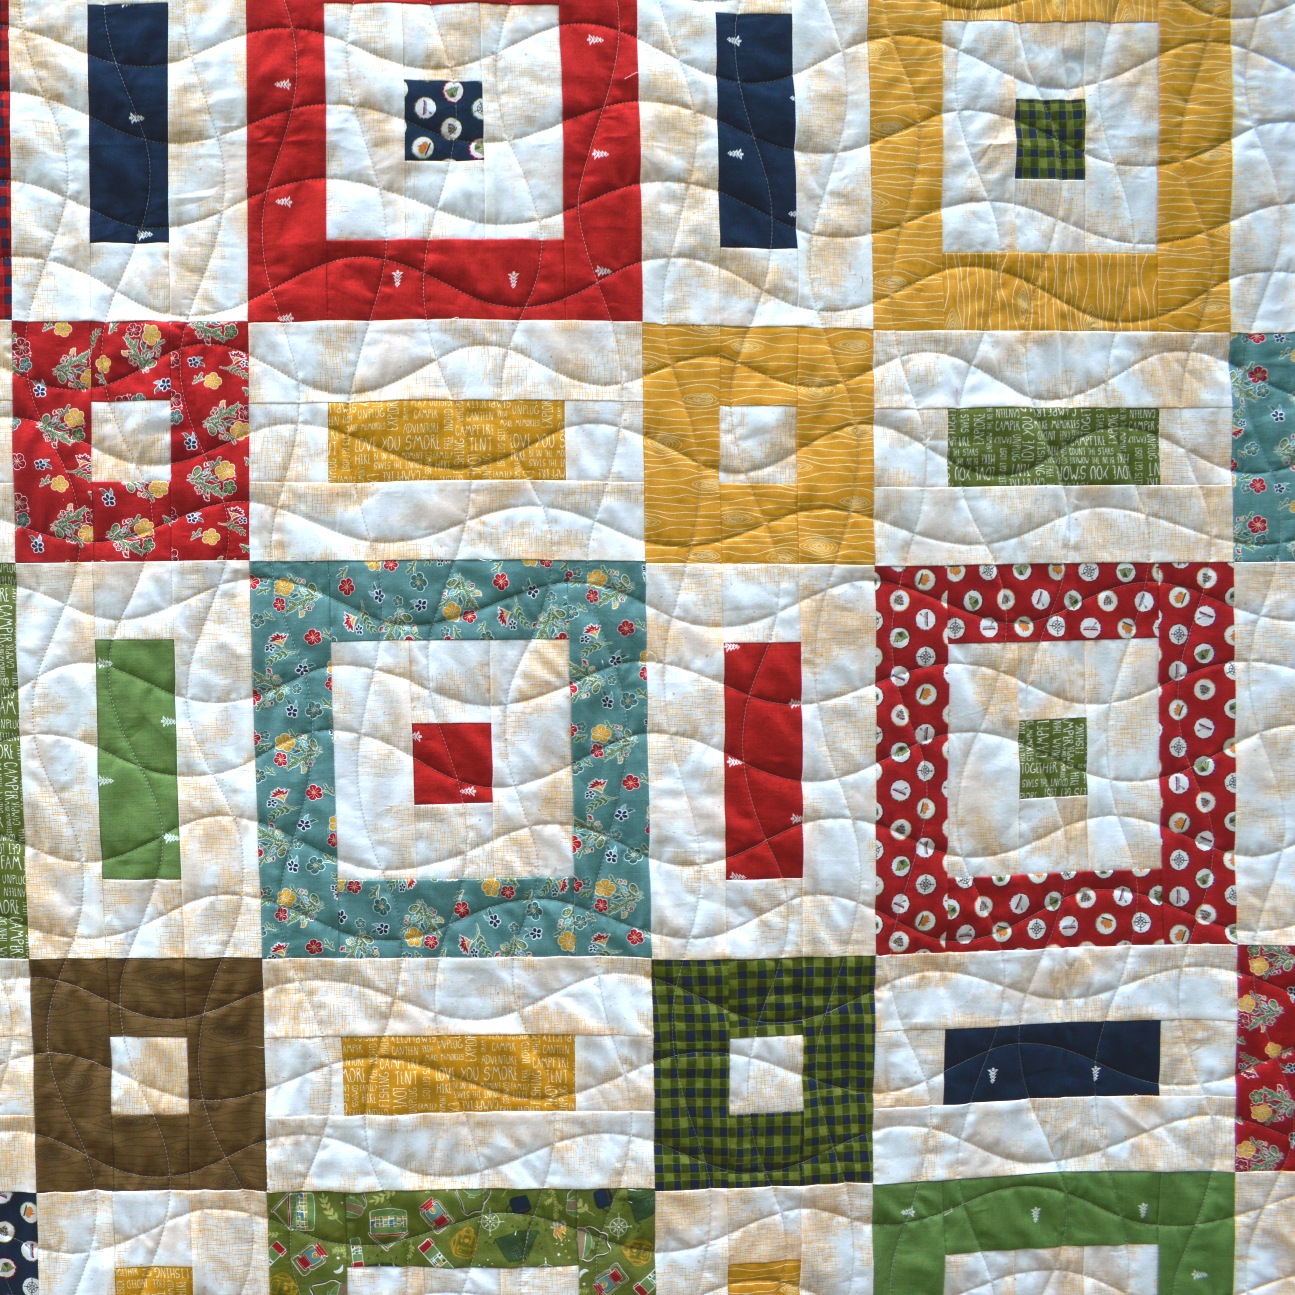
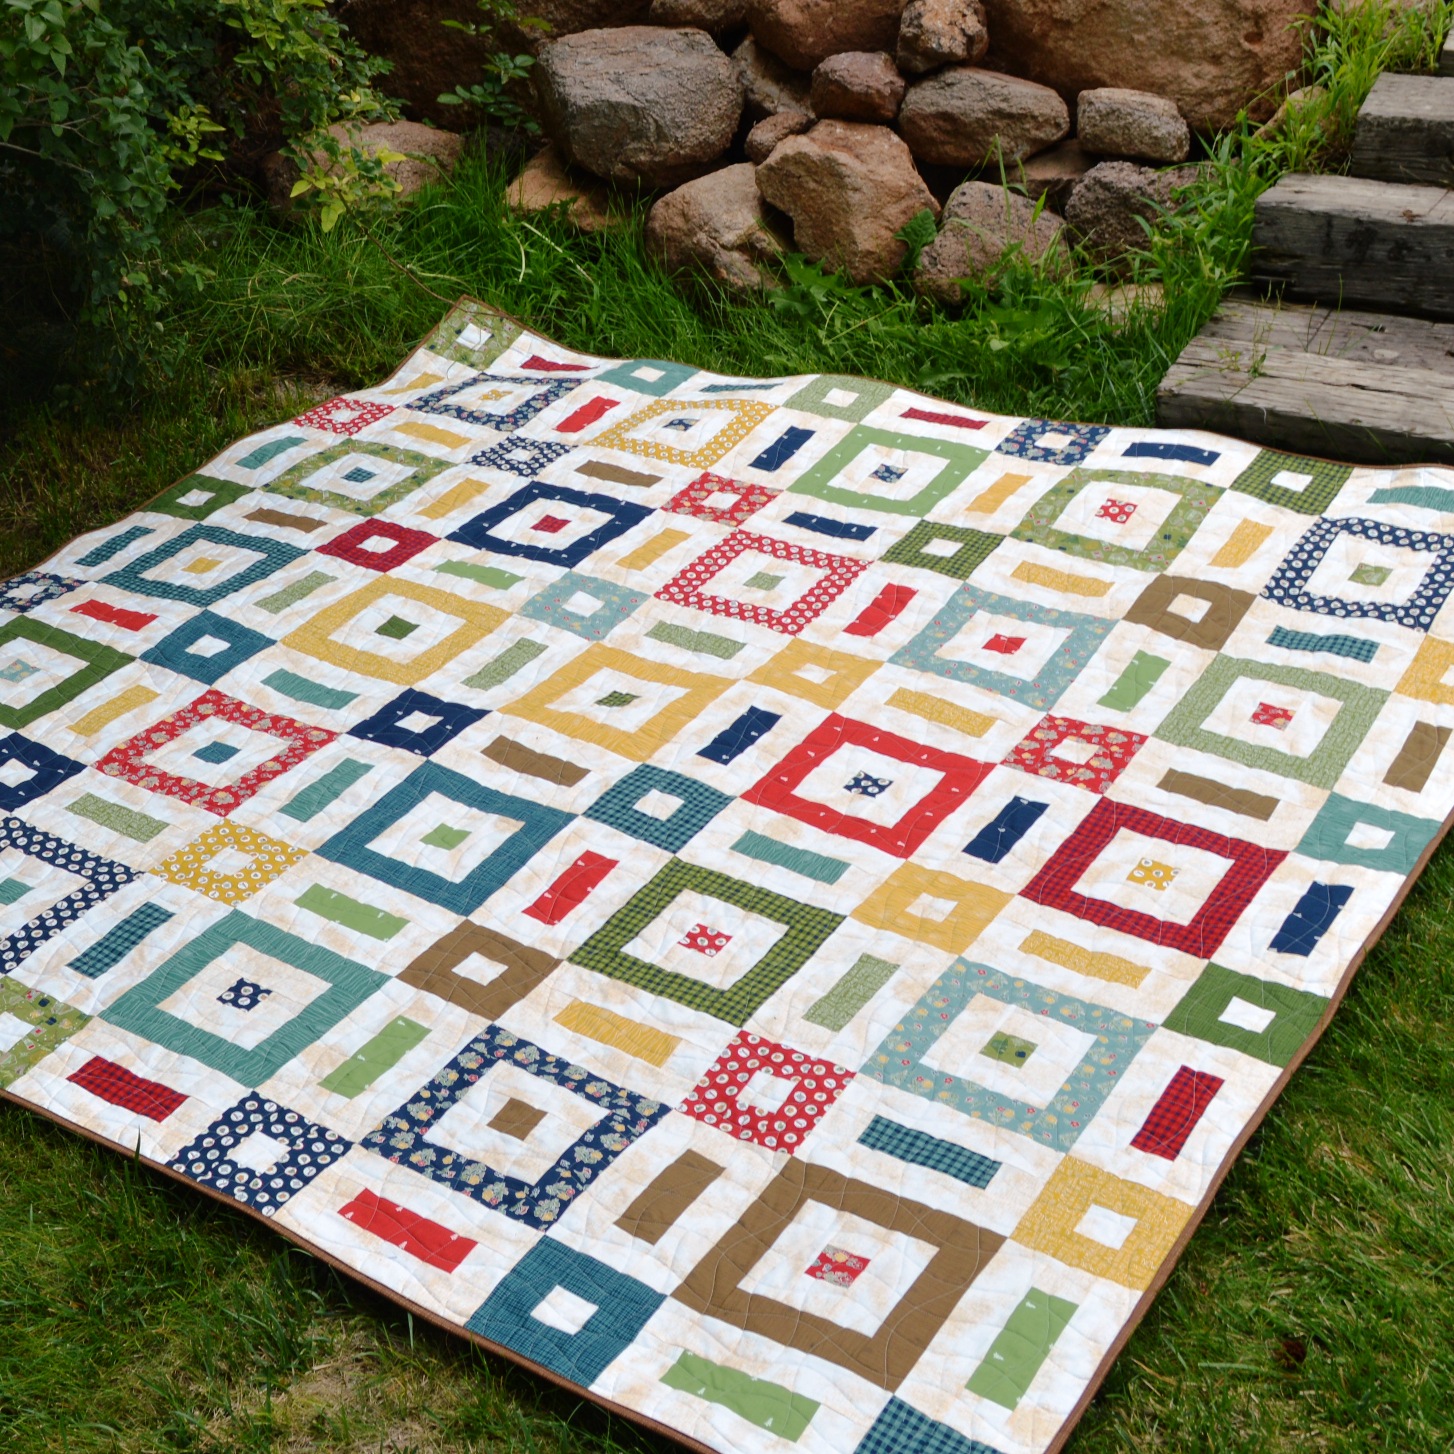
It's Month 4 with my good friends at Stitchin' Heaven doing their BOHO Heart Monthly Block of the Month program and that means another month of fun tutorials!!
Month 1 Month 2 Month 3 Month 4 Month 5 Month 6
Month 7 Month 8 Month 9 Month 10 Month 11 Month 12
And since each month has Lots and Lots of Tutorials in them . . . Here is a list to jump right to the tutorial you need for this month 4:
Square in a Square Blocks Pinwheel Blocks Sawtooth Star Block
Flying Geese Block Spools of Thread Block Simple Framed Square Block
Shoo Fly Block Grandmother's Flower Garden Block
Orange Peel Block Background Strips
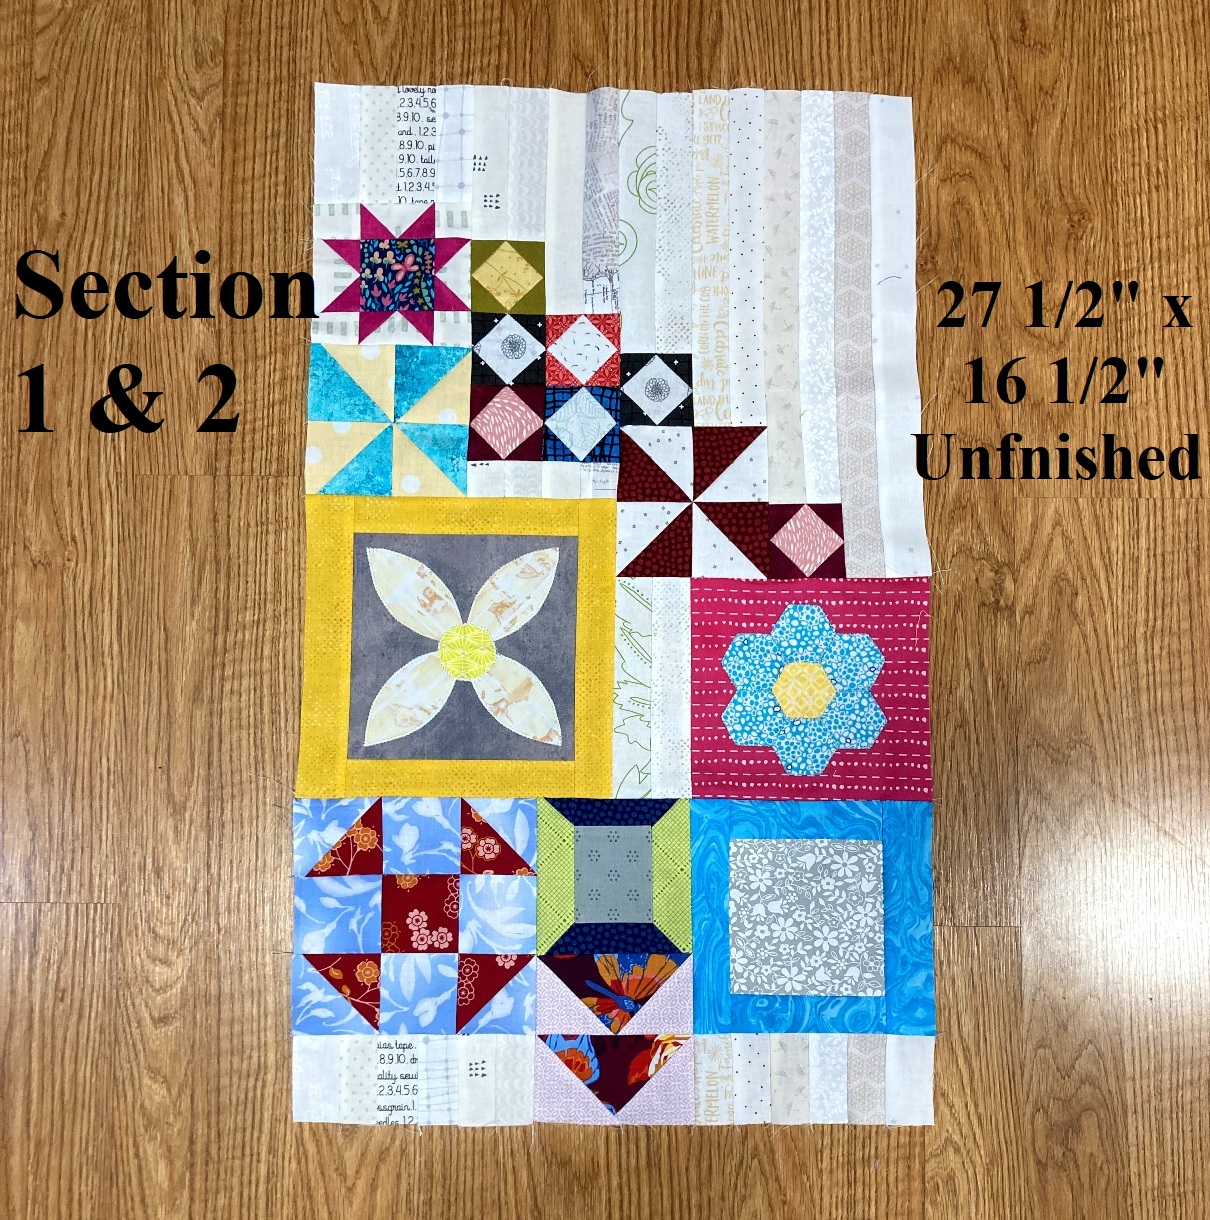
Sewing Section 1 Sewing Section 2 Sewing Together Section 1 & 2
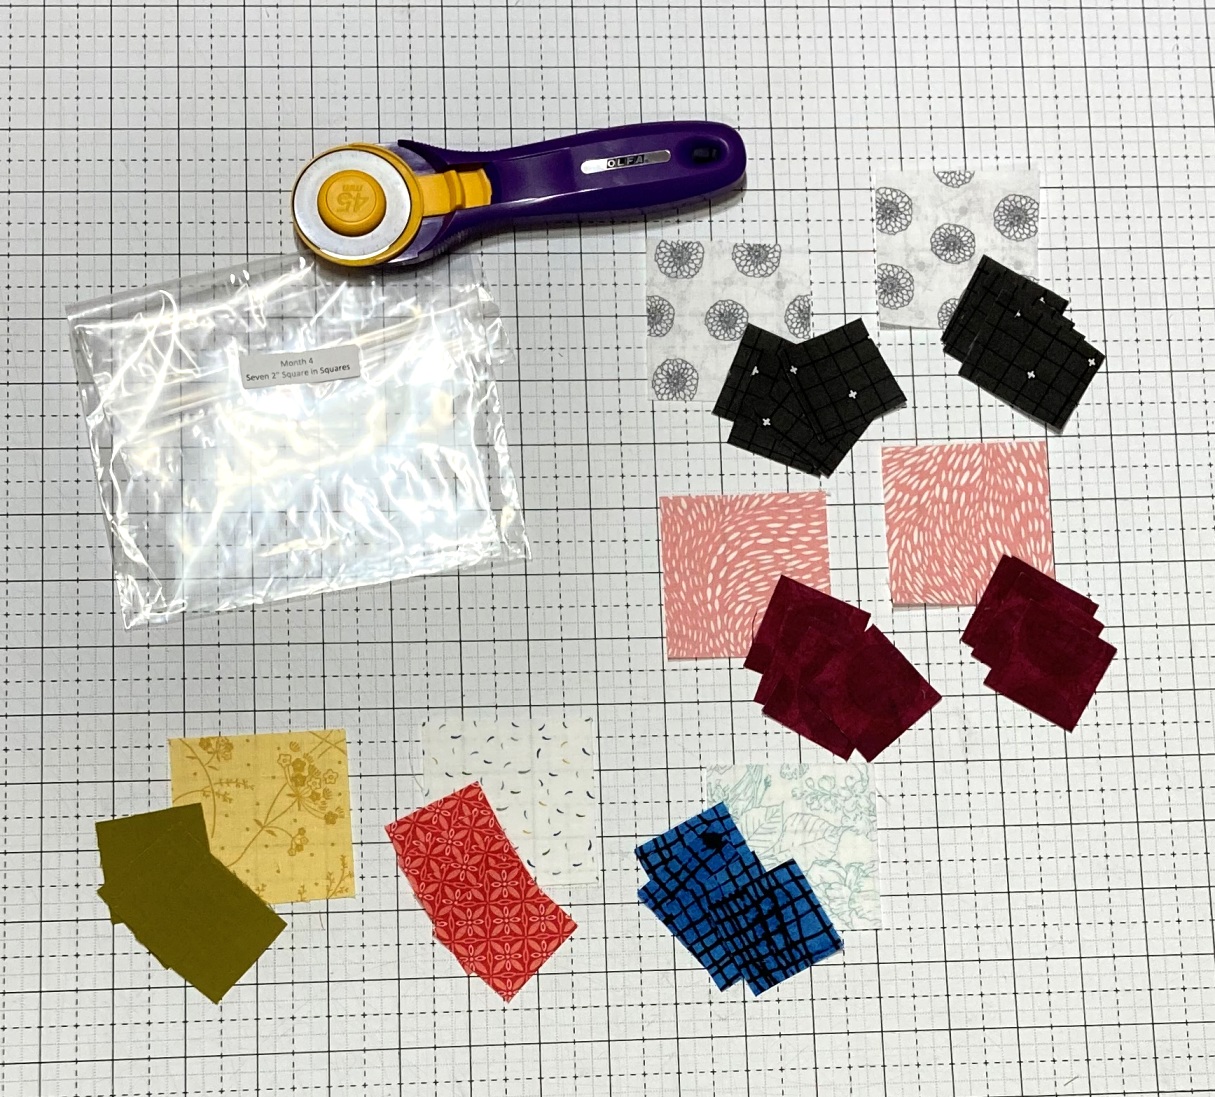
So you have your Month 4 BOHO Heart Packet . . . Lets get started!!!
We'll start with our first block, and this month we are making a whole set of the . . .
Square in a Square Block – 7 Blocks
From your Month #4, Square in a Square bag, cut the fabrics according to page 2 of the supplemental cutting list.


And now we can move onto another set of familiar blocks, the . . .
Pinwheel Block – 2 Blocks
From your Month #4, Pinwheel bag, cut the fabrics according to page 1 of the supplemental cutting list. I cut my squares 3" instead of the 2.875" and will trim. ** NOTE** You will see there was a small error in the cutting for the Pinwheel blocks as the yellow and white fabrics are 4" x 4" and should be 8" x 4". Just replace them with a similar piece of fabric from your stash of scraps ;)


And now we can move onto another familiar block with a slight variation, the . . .
Small Sawtooth Star Block
From your Month #4, Small Sawtooth Star bag, cut the fabrics according to page 1 of the supplemental cutting list.
Using the cut squares and the
Sawtooth Star Block Directions from Month 1 make your block. Obviously, there are just a few alterations in the directions, they are made the same way, just smaller and you don't have to do a patchwork star center just use the center square you cut. The Small Sawtooth Star Block should be measuring 4 1/2" x 4 1/2" unfinished.
And now we can move onto a new block made with a familiar unit, the . . .
Flying Geese Block
From your Month #4, Flying Geese bag, cut the fabrics according to page 2 of the supplemental cutting list.
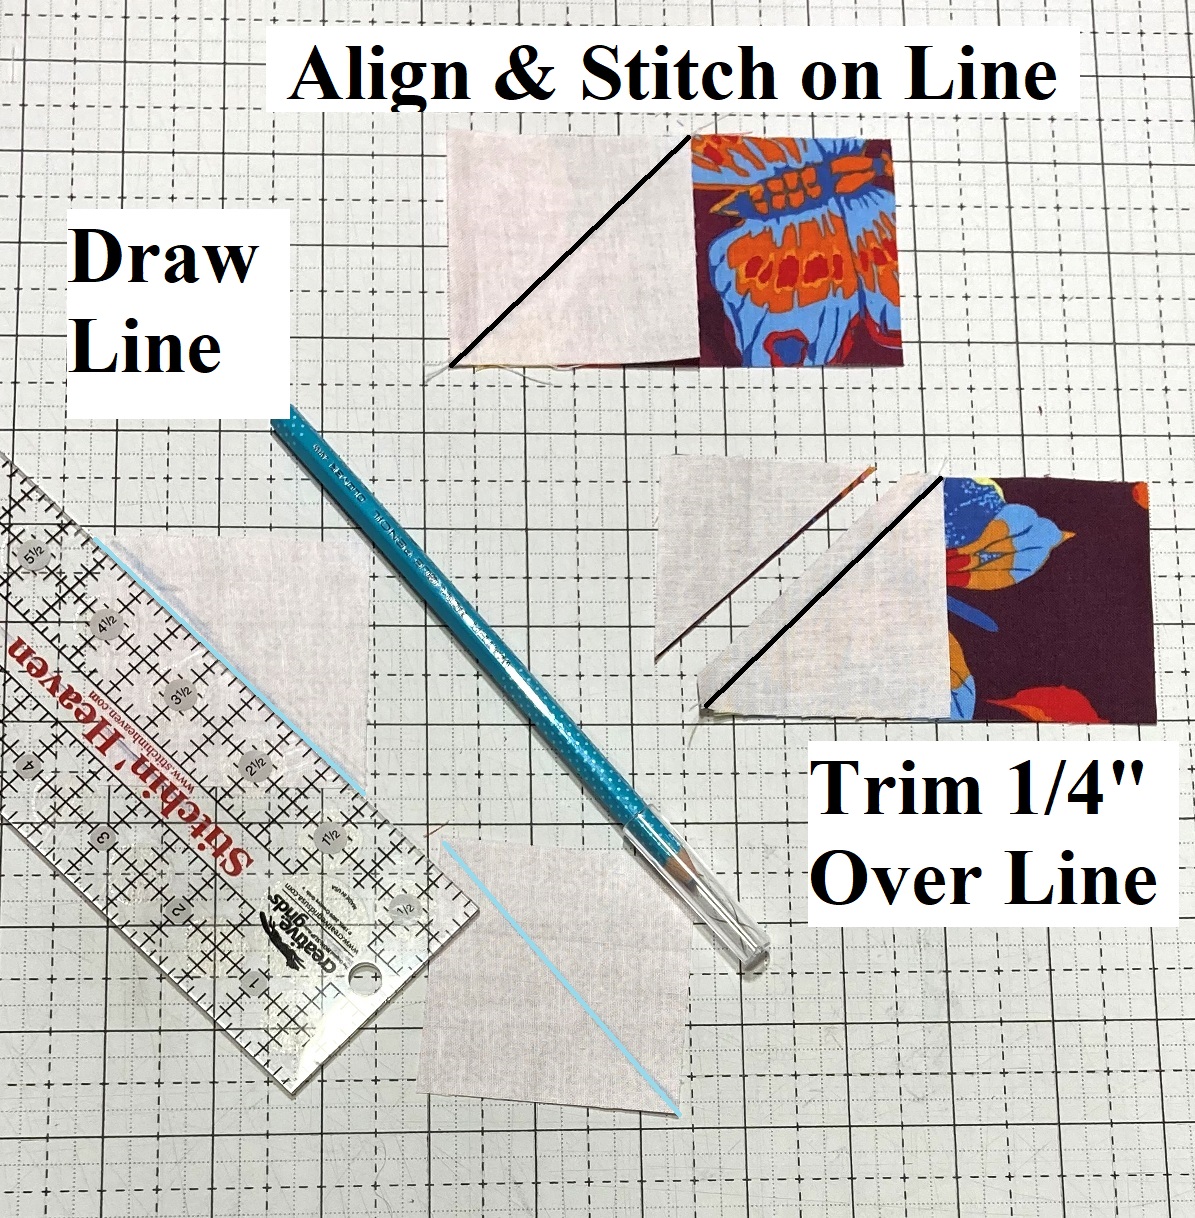
Draw a diagonal line on the wrong side of all 4 Pink squares. Place a Marked Square onto each of the 2 Burgundy Fabric rectangles with right sides together as shown and pin them in place. Sew a seam directly on the drawn line. Trim 1/4" over the stitched line and scrap the excess.
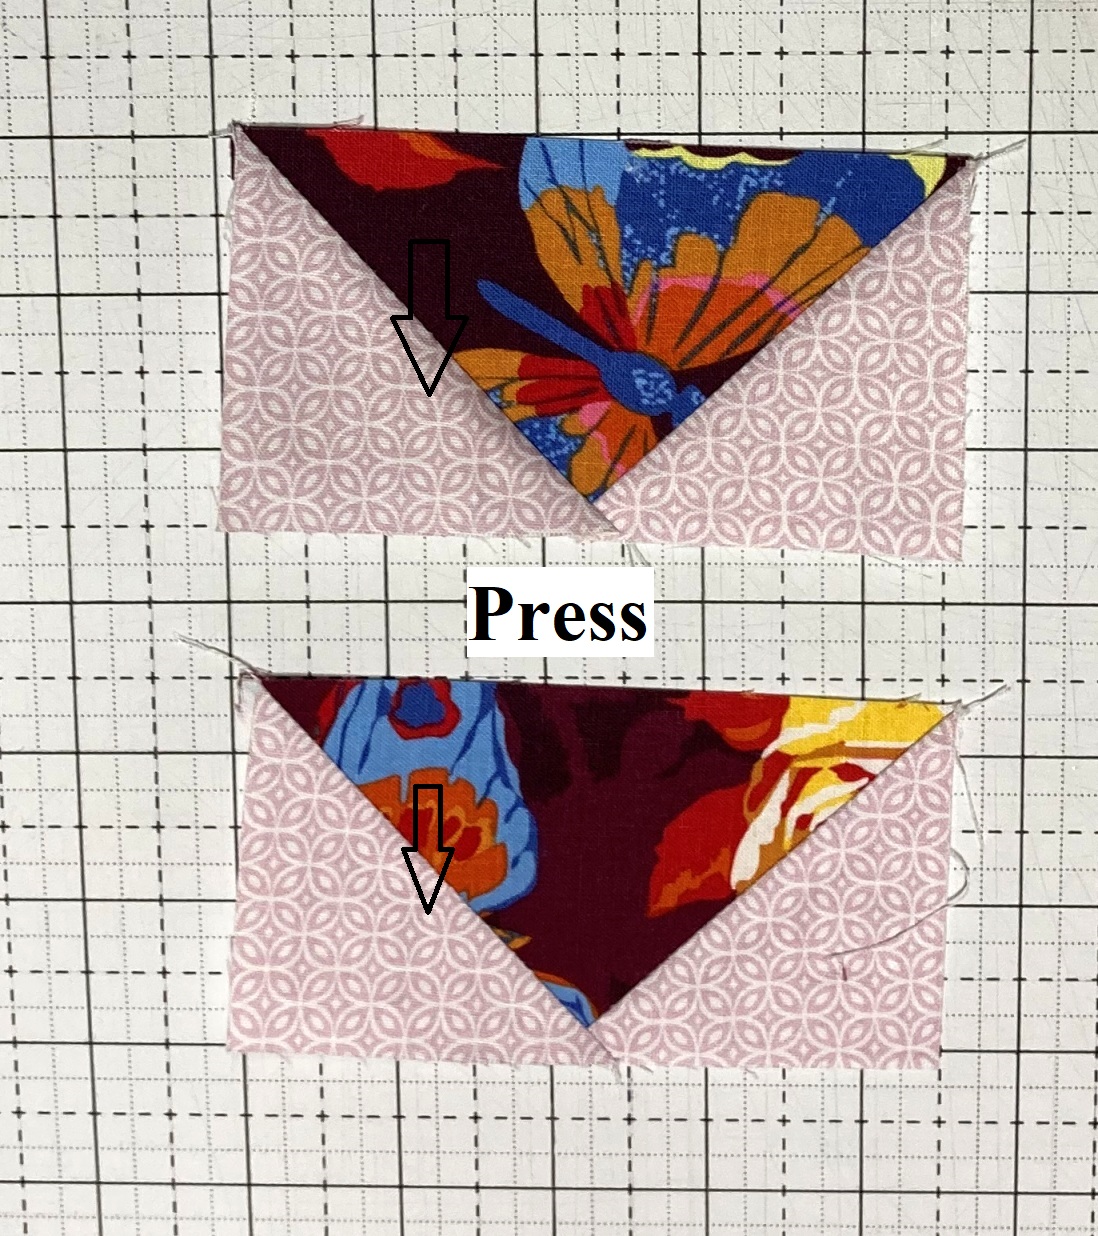
Press the seam allowance upwards towards the Pink Triangles. And now you can repeat for the second side of the 2 Units. Place a remaining Marked Square on the other side of each of the 2 units with right sides together. Stitch a seam directly on the drawn line, trim 1/4" over the seam line, and then press towards the Pink Triangles.
Press the seam allowance towards the Pink Triangles. And you have 4 perfect Flying Geese Units measuring 2 1/2" x 4 1/2" and again, these are one of those things you need to be very careful with if you decide to square them up. Leave 1/4" seam allowance at the top point and ensure the two sides come to a point at the bottom. Layout your 2 Flying Geese Units as shown.
Place the top unit on to the bottom unit with right sides together. Align and stitch a 1/4" seam along the edge, and when stitching, be sure to center through the center of the thread X so you get a nice crisp point. Press the seam open.
And just like that, you have a Flying Geese Block that should measure 4 1/2" x 4 1/2" unfinished.
And now we are moving on to another fun block that's perfect for quilters, the . . .
Spools of Thread Block
From your Month #4, Small Sawtooth Star bag, cut the fabrics according to page 1 of the supplemental cutting list.
Draw a diagonal line on the wrong side of all 4 Blue squares. Place a Marked Square onto the top and bottom of each of the 2 Green Fabric rectangles with right sides together as shown, and take care to notice the direction of the lines. Sew a seam directly on the drawn line. Trim 1/4" over the stitched line and scrap the excess.
Press the seam allowance outwards towards the Blue Triangles. And now layout your remaining 3 rectangles as shown.
Place the top and bottom rectangles onto the center rectangle with right sides together, aligning the raw edges. Stich a 1/4" seam long both sides.
Press the seam allowances outwards towards the Blue Rectangles.
Place the left an right units onto the center unit with right sides together. Align and stitch a 1/4" seam along the edge, and when stitching, be sure to keep the angles seams aligned. You can use the pin trick to help with this :) Press the seams open.
And all that is left is to square up the block. Trim a 1/4" from the top and bottom of the block so that it measures 4 1/2" x 4 1/2". (oh, and side note - I didn't realize this had to be trimmed until I was putting it in the quilt, after I had already taken the finished pictures of the block, so that is why they are a little long in those pics :)
And just like that, you have a Spool of Thread Block that should measure 4 1/2" x 4 1/2" unfinished.
And now we can move onto another familiar block with another size variation, the . . .
Simple Framed Square Block
From your Month #4, Simple Framed Square bag, cut the fabrics according to page 2 of the supplemental cutting list.
And now we can move onto another new block that is a classic, the . . .
Shoo Fly Block
From your Month #4, Shoo Fly Bag, cut the fabrics according to page 2 of the supplemental cutting list. I cut my squares 3" instead of the 2.875" and will trim. ** NOTE** One more small error in the cutting for this shoo fly block as your red floral piece is to small. You can either pick a new fabric piece from your scrap stash or you can cut your two 3" squares from the sent piece, and add a new fabric piece for the 2 1/2" center square ;)

Layout the 4 Half Square Triangle Units, 4 Side Blue squares, and 1 Red Center square as shown.
Place the center column pieces onto the left hand pieces with right sides together. Align and pin if desired. Stitch a 1/4" seam along the edge of all the units.
Then, place the left hand column pieces onto the center pieces with right sides together. Align and pin if desired. Stitch a 1/4" seam along the edge of all the units.
Press the top and bottom row Inward towards the Blue squares. Press the center row outwards towards the Blue squares.
Place the Top Row onto the Center row with right sides together. Align and pin/nest the seams. Stitch a 1/4" seam along the pinned edge.
And now, place the bottom row onto the center row with right sides together. Align and pin/nest the seams. Stitch a 1/4" seam along the pinned edge. Press the last two seams open.
And your Block is done and you have a Shoo Fly Block that should measure 6 1/2" x 6 1/2" unfinished.
So now it is time to move on to a whole new skill of English Paper Piecing with the. . .

Okay, so here we go . . .
From your Month #4, Grandmother's Flower Garden Bag, cut the fabrics according to page 1 of the supplemental cutting list. Also, cut at least 7 stiff paper templates of the Hexagon shape. And be sure when cutting out your Hexagon shapes from the fabric, that you add a 1/4" seam allowance to the template. You can either make the template larger, or simply use your ruler to add a 1/4" when cutting like I show below.
We will start by glue basting the fabric hexagon to the paper template. Put a dab of applique glue, or just a regular glue stick, on the paper template. Fold over the raw edge of the fabric and tack down. Continue doing this all around the template. And yes, my fingers got a little glue messy, but it got easier with each one.
Take care to really keep the corners tight, and I found it helpful to use a little extra glue to tack down the excess fabric around the corners just to keep it out of the way.
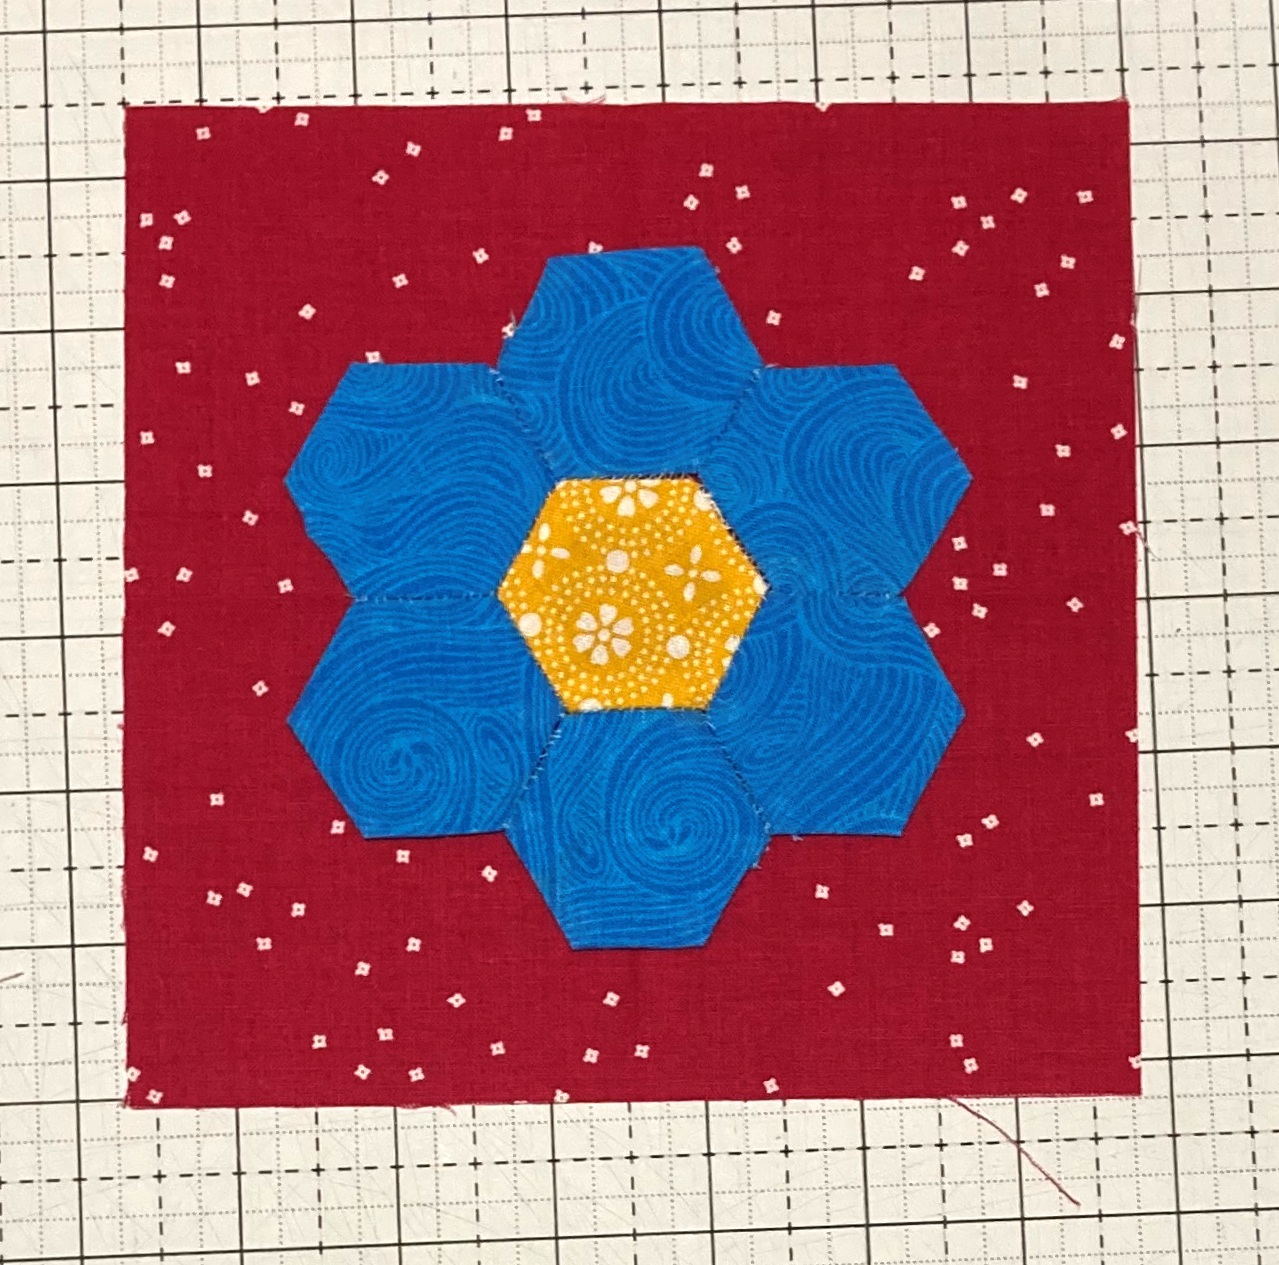
Continue this process for all 7 of your hexagons, 6 blue outside hexagons, and 1 yellow center hexagon. Then at this point, it is time to grab your thread for some hand stitching fun. And I used white, but after, I wished I would have used a blue that matched so you couldn't see me stitches as much, because again, I am a horrible hand stitcher ;)
We will start by sewing each of the Outside hexagons to the Center hexagon. Place an Outside Hexagon and the Center Hexagon right sides together and align the raw edges. And I found out from trial and error, it is really helpful to try and make sure the corners are lined up perfectly. With the hexagons aligned, you want to do a simple whip stitch along the edge. I tied a knot in my thread to start (don't know if that is right but it worked :) Then loop through the 2 edges of the fabric, taking care to only catch the edge of the fabric and not the papers.
Continue in this fashion across the entire edge. Then, you can add a second hexagon. Just place the second hexagon right side together with the center hexagon and let the first stitched on one just hang out. Continue whipstitching until you have added all 6 side Hexagons to the center Hexagon.
And now you should have a unit that looks something like this. You can see where a few of my corners weren't quite as aligned making a little pucker. Also, I wish I would have made my stitches a little tighter, so note that when stitching ;) Now, it is time to sew the sides together. This is done in the same fashion, only you have to start and stop after each section.
Place two side heaxgons right sides together. you will have to slightly bend the center paper to do this. Again, Align the two sides and then whipstitch across the side, taking care to just catch the fabric edge and not the papers.
When you need to tie off at the end, I found it easiest to simply make a whipstitch, and then feed my needle through the thread center before pulling it tight. Again, not sure if that is correct, but it worked ;) Continue whipstitching all 6 sides together.
And again, you can see from the back, that some of my sides are not quite as tight as I would have liked, that was because my corners were not perfectly aligned. But as long as it lays mostly flat, you will be okay ;) Now, gently remove the papers from your hexagons. I found the easiest way to do this was to run my needle between the fabric and paper along the edge to loosen the glue, and then pull gently.

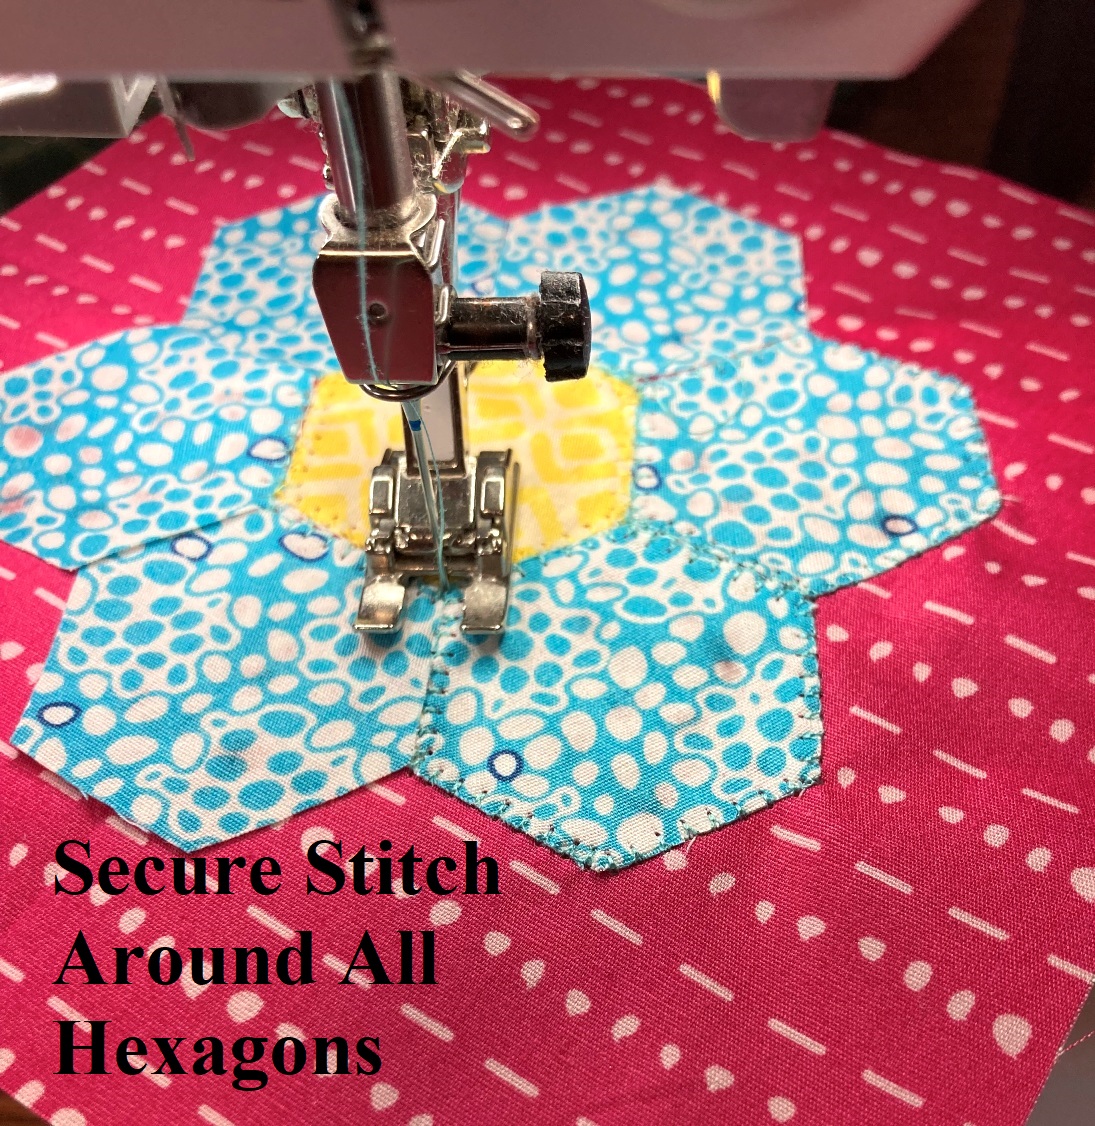
And now, you are ready to applique your English Paper Pieced Flower onto your background pink square. Center the flower by folding the Pink flower in half twice and then aligning the flower in the center. At this point, you want to secure stitch around the outside of your EPP Flower to the square. You can choose to do this by machine, like with applique, or you can do it by hand with the same whipstitch. Either way is great!! (And please don't judge, but I didn't secure stitch mine as I planned on making an alternate block and was just making this for the tutorial and to try EPP. I like everything matchy-matchy and if some of my blocks are raw edge applique, I want them all that way :)
And just like that . . . you have a beautiful Grandmother's Flower Garden Block that should measure 6 1/2" x 6 1/2" Unfinished. And who knows, maybe it's your first time English Paper Piecing too!! If so, way to give it a try!!!
And I mentioned an alternate block . . . I really like the look of my machine applique in the other blocks, so I decided to make this Grandmother's Flower Garden Block as a raw edge applique so it will match the rest of the applique blocks. So if you have tried the EPP and didn't love it, (But truly, give it a try first, that's how we learn new things!!) and want to do this block applique, here is what to do :)
Trim your 7 hexagons to measure the exact same size as the paper template.
Find the center of the Pink square by folding it in half twice. Then use applique glue to glue the center hexagon to the center of the square. Then glue a side hexagon to one side of the center hexagon.
Continue in this fashion until you have glued all 6 of the side hexagons around the center hexagon. And no worries, the applique glue dries clear.
Now, simply secure stitch around all 7 hexagons with your favorite applique stitch. I always love the blanket stitch, and be sure to stitch around both the inside and outside of the center. I changed thread, using yellow and blue both. But again, do this as a second option, give EPP a try first ;)

And now, just one last block the . . .
From your Month #4, Orange Peel bag, cut the fabrics according to the page 1 supplemental cutting list. Also, cut out your Mini Circle 1.5" Template and your Orange Peel Leaf Template. Trace your circle template on to the wrong side of your bright yellow square and trace 4 leaf templates onto the wrong side of the light yellow fabric. Then cut out your appliques.
Fold your Grey Square in half twice and diagonally twice and finger press the creases. Align the Petals on the diagonal creases so they meet at the center. Dab some applique glue or just use a little glue stick to secure the Petal Appliques in place. And don't stress to much about the center.
Because now we are going to Glue Baste the Circle Applique over the Petal Appliques to the Center of the block.
And all that is left is to secure stitch your applique to your block. Again, you can use your machine, hand stitching, or needle turn and pick the color thread and stitch you like. I found it easiest to stitch around the 4 petals and then around the center, overlapping a bit between each petal ;)
Now, layout the appliqued center square and 4 Gold rectangles as shown below.
Place the small rectangles onto the top and bottom of the center square with right sides together. Align and stitch a 1/4" seam along the edges.
Press the seams outwards towards the Gold rectangles. Place the longer rectangles onto the sides of the center square with right sides together. Align and stitch a 1/4" seam along the edges. Press the seams outwards towards the Gold rectangles.
And your final block is done!! The Orange Peel Block should measure 8 1/2" x 8 1/2" unfinished.

And that means it is time to start putting all the blocks together, but first, we are going to need some more of those Low Volume Background strips!!
Start by pressing all of your Low Volume Background pieces. I like to stack up 3 strips on top of one another, trim the selvages, and then cut as many 1 1/2" strips as I can. If you cut super straight, you can get 2 strips from each fabric pieces.
From the Low Volume Strips sent with your Month #4 package, cut the fabrics according to pages 4 of the supplemental cutting list.
Just like Month 1, There is no right or wrong order to number your strips, you can do your low volume strips in any order you like.
Also, most importantly, once you have cut all the pieces from one fabric, take care to keep them together and marked with the Number of that vertical row/fabric. You are cutting the strips for Month 4, 5 and 6 so you will be keeping these grouped and marked for some time.
Background Strips for Grey Holes - Here is what you need to cut and group with the fabrics above to continue "piecing" the Grey Holes from the low volume strips like we did in Month 1-3.
Fabric 19 - (1) 1 1/2" x 2 1/2" and (1) 1 1/2" x 4 1/2"
Fabric 20 - (1) 1 1/2" x 2 1/2" and (1) 1 1/2" x 4 1/2"
Fabric 21 - (2) 1 1/2" x 2 1/2"
Fabric 22 - (2) 1 1/2" x 2 1/2"
Fabric 23 - (1) 1 1/2" x 1 1/2" and (2) 1 1/2" x 2 1/2"
Fabric 24 - (1) 1 1/2" x 1 1/2" and (2) 1 1/2" x 2 1/2"
Fabric 25 - (1) 1 1/2" x 1 1/2"
Fabric 26 - (1) 1 1/2" x 1 1/2"
Fabric 27 - (1) 1 1/2" x 6 1/2"
Fabric 28 - (1) 1 1/2" x 6 1/2"
Grey Holes VS Gold Fillers - And Finally, some of the Grey Holes you will be sent the Gold filler fabrics for. By now, you have most likely chosen if you want to use the Gold Fabrics, or continue piecing the fillers. If you want to continue piecing the fillers, you will need to add the following to your first group of background strips.
Fabric 25 - (1) 1 1/2" x 2 1/2"
Fabric 26 - (1) 1 1/2" x 2 1/2"
Fabric 27 - (1) 1 1/2" x 2 1/2"
Fabric 28 - (1) 1 1/2" x 2 1/2"
Fabric 31 - (1) 1 1/2" x 2 1/2"
Fabric 32 - (1) 1 1/2" x 2 1/2"
Fabric 33 - (1) 1 1/2" x 2 1/2" and (1) 1 1/2" x 8 1/2"
Fabric 34 - (1) 1 1/2" x 2 1/2" and (1) 1 1/2"x 8 1/2"
And now with all your Background Pieces cut, you can start sewing together your . . .
Sewing Section 1
We will start by sewing some Strip Sets together. For all of these strip sets, press the seam allowance to the Larger Number fabric. Also, I found it very helpful to leave my extra pieces of marked background fabric to the side of my piecing so it can be used as a guide.
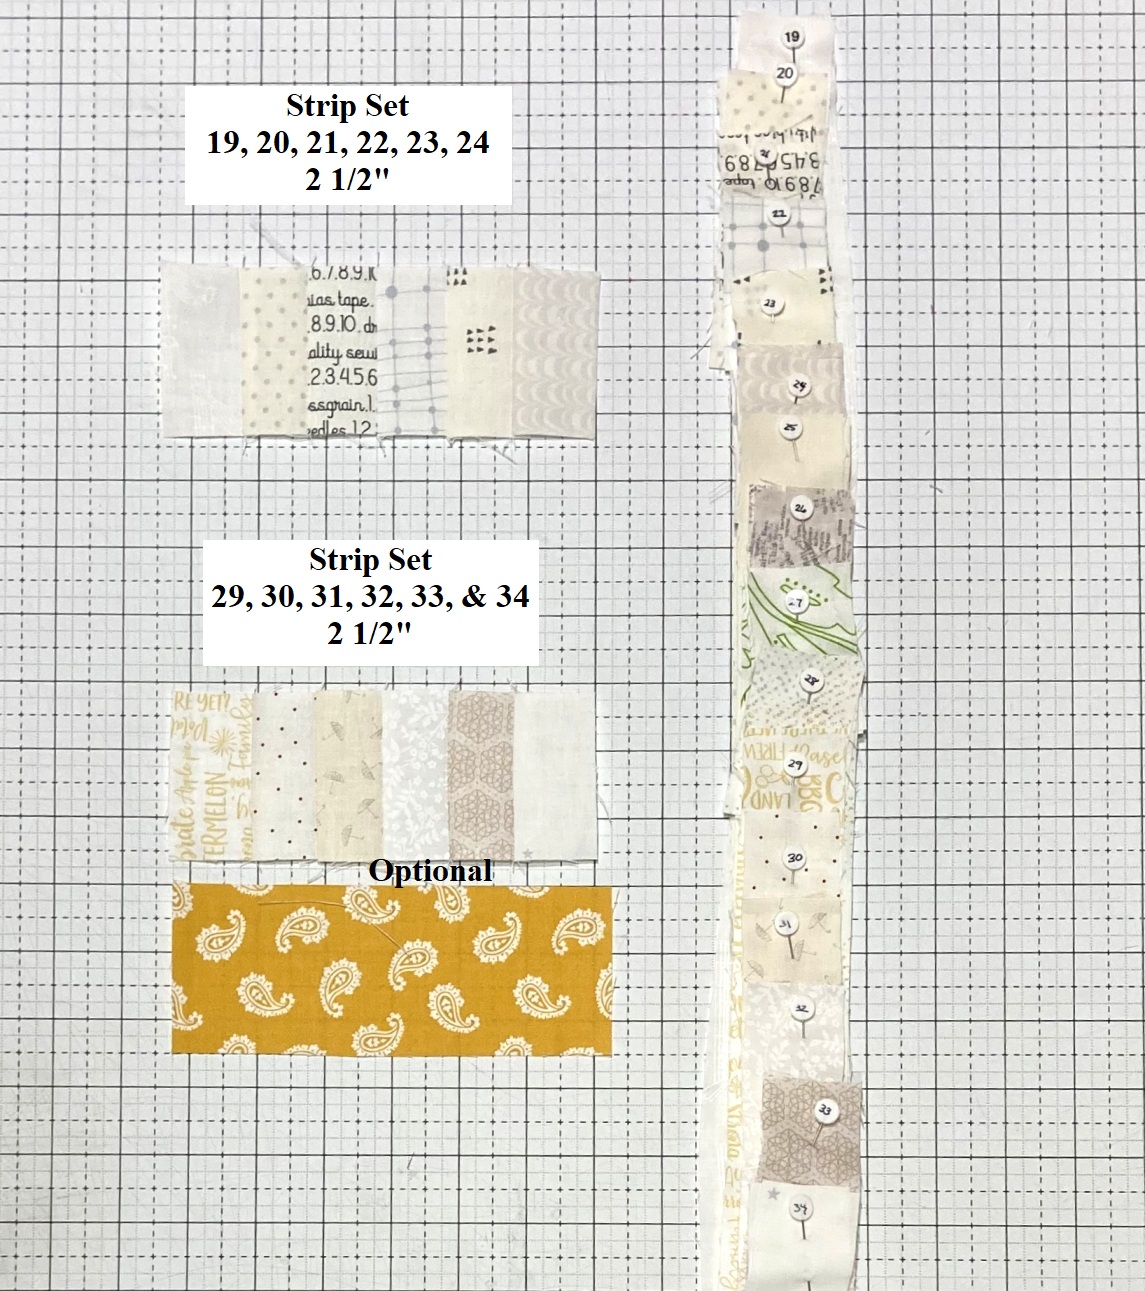
From Fabric 19, 20, 21, and 22 sew a 3 1/2" Strip Set together as shown.
From Fabric 23, 24, 25, and 26 sew a 1 1/2" Strip Set together as shown.
From Fabric 23 and 24 sew a 4 1/2" Strip Set together as shown.
From Fabric 25 and 26 sew a 6 1/2" Strip Set together as shown.
From Fabric 27 and 28 sew a 7 1/2" Strip Set together as shown.
From Fabric 27 and 28 sew a 6 1/2" Strip Set together as shown.
From Fabric 29 and 30 sew a 9 1/2" Strip Set together as shown.
From Fabric 31 and 32 sew a 11 1/2" Strip Set together as shown.
From Fabric 33 and 34 sew a 13 1/2" Strip Set together as shown.
Now we will sew Blocks and Strip Sets. For all of these, press the Seams Open. And still, the guide is very helpful to keep handy and make sure you are always putting the Blocks at the bottom of the Strip Sets.
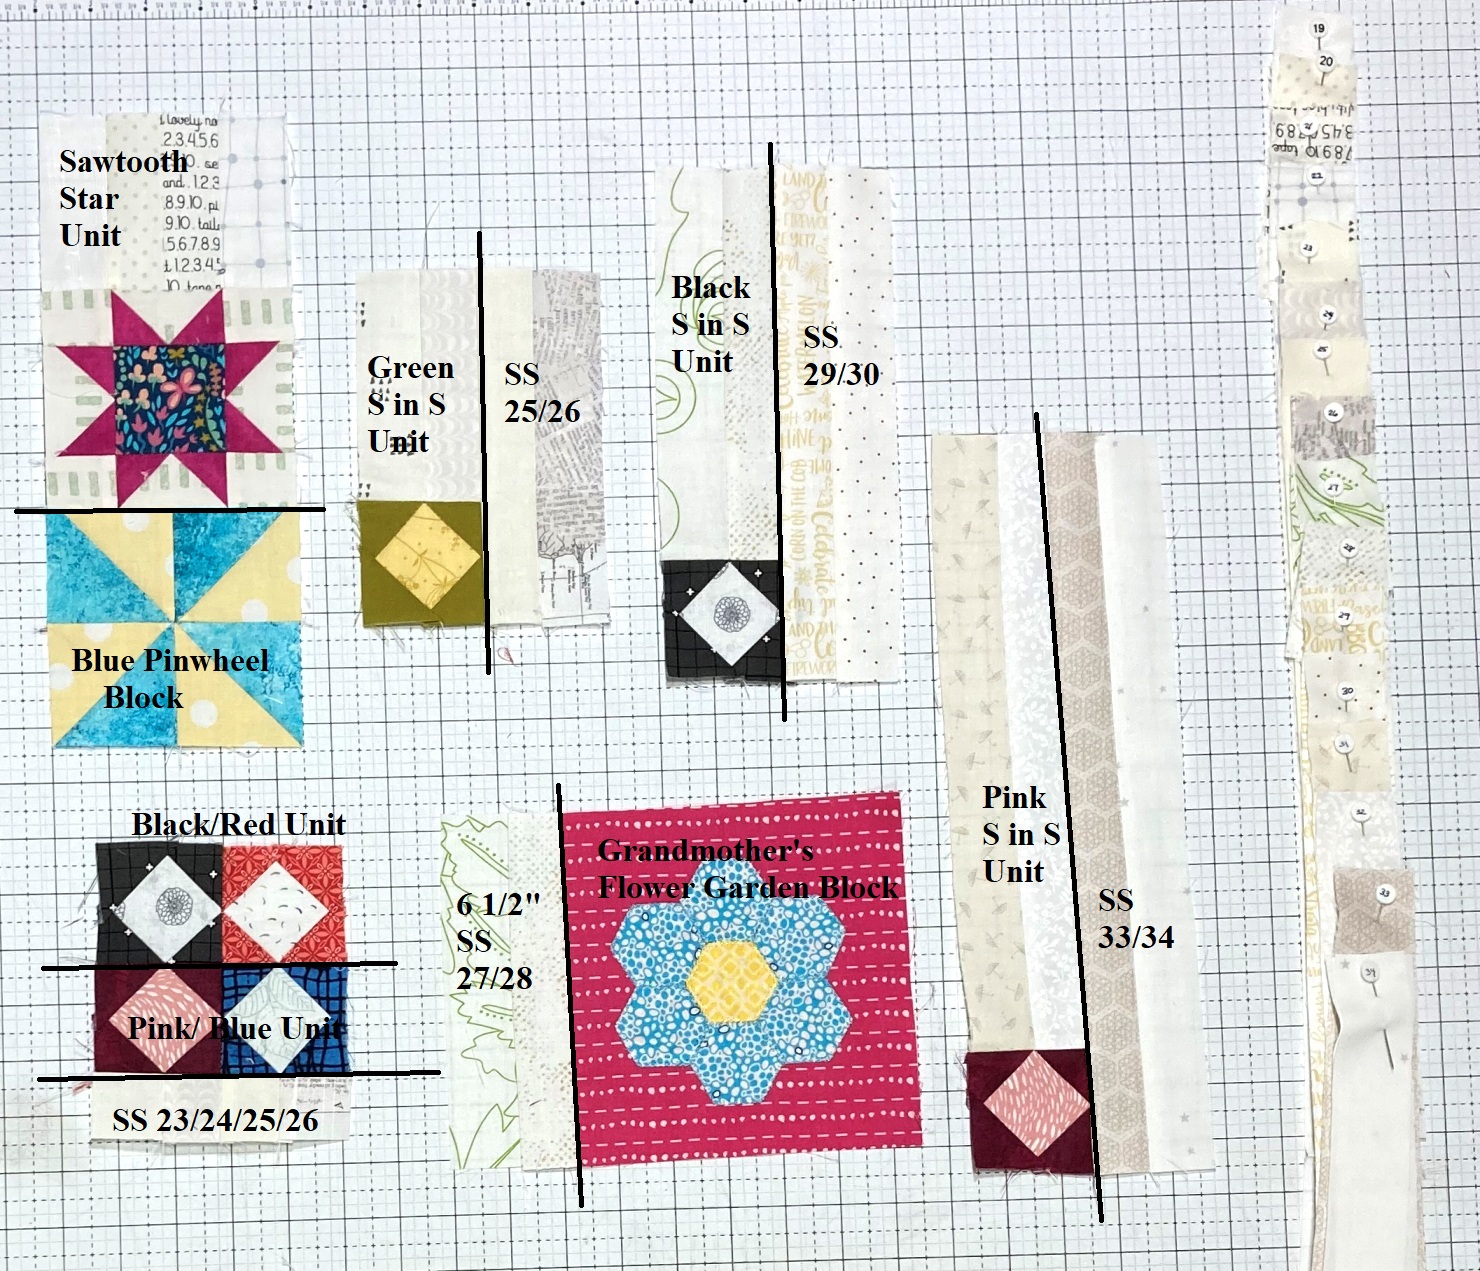
Sew the 19/20/21/22 Strip Set and the Sawtooth Star Block together as shown.
Sew the 23/24 Strip Set and the Green Square in a Square Block together as shown.
Sew the 7 1/2" 27/28 Strip Set and the Black Square in a Square Block together as shown.
Sew the 31/32 Strip Set and the Pink Square in a Square Block together as shown.
Sew the Black Square in a Square Block and the Red Square in a Square Block together as shown.
Sew the Pink Square in a Square Block and the Blue Square in a Square Block together as shown.

Sew the Sawtooth Star Unit and the Blue Pinwheel Block together as shown.
Sew the Green Square in a Square Unit and the 25/26 Strip set together as shown.
Sew the Black Square in a Square Unit and the 29/30 Strip set together as shown.
Sew the Pink Square in a Square Unit and the 33/34 Strip set together as shown.
Sew the Black/Red Square in a Square Unit and the Pink/Blue Square in a Square Unit and the 23/24/25/26 Strip Set together as shown.
Sew the 6 1/2" 27/28 Strip Set and the Grandmother's Flower Garden Block together as shown.
Press the Seams Open.
Sew the Green Sashed Square in a Square Unit and the Squares in a Squares Unit together as shown.
Sew the Black Sashed Square in a Square Unit and the Red Pinwheel Block together as shown.
Press the Seams Open.
Sew the Pinwheel Star Unit and the Squares in Squares Unit together as shown.
Sew the Black Pinwheel Unit and the Pink Sashed Square in a Square Unit together as shown.
Press the Seams Open.
Sew the Squared Pinwheel Star Unit and the Orange Peel Block together as shown.
Sew the Squared Pinwheel Unit and the Sashed Grandmother's Unit together as shown.
Press the Seams Open.
Sew the Peeled Squared Pinwheel Star Unit and the Grandmother's Squared Pinwheel Unit together as shown.
Press the Seams Open.
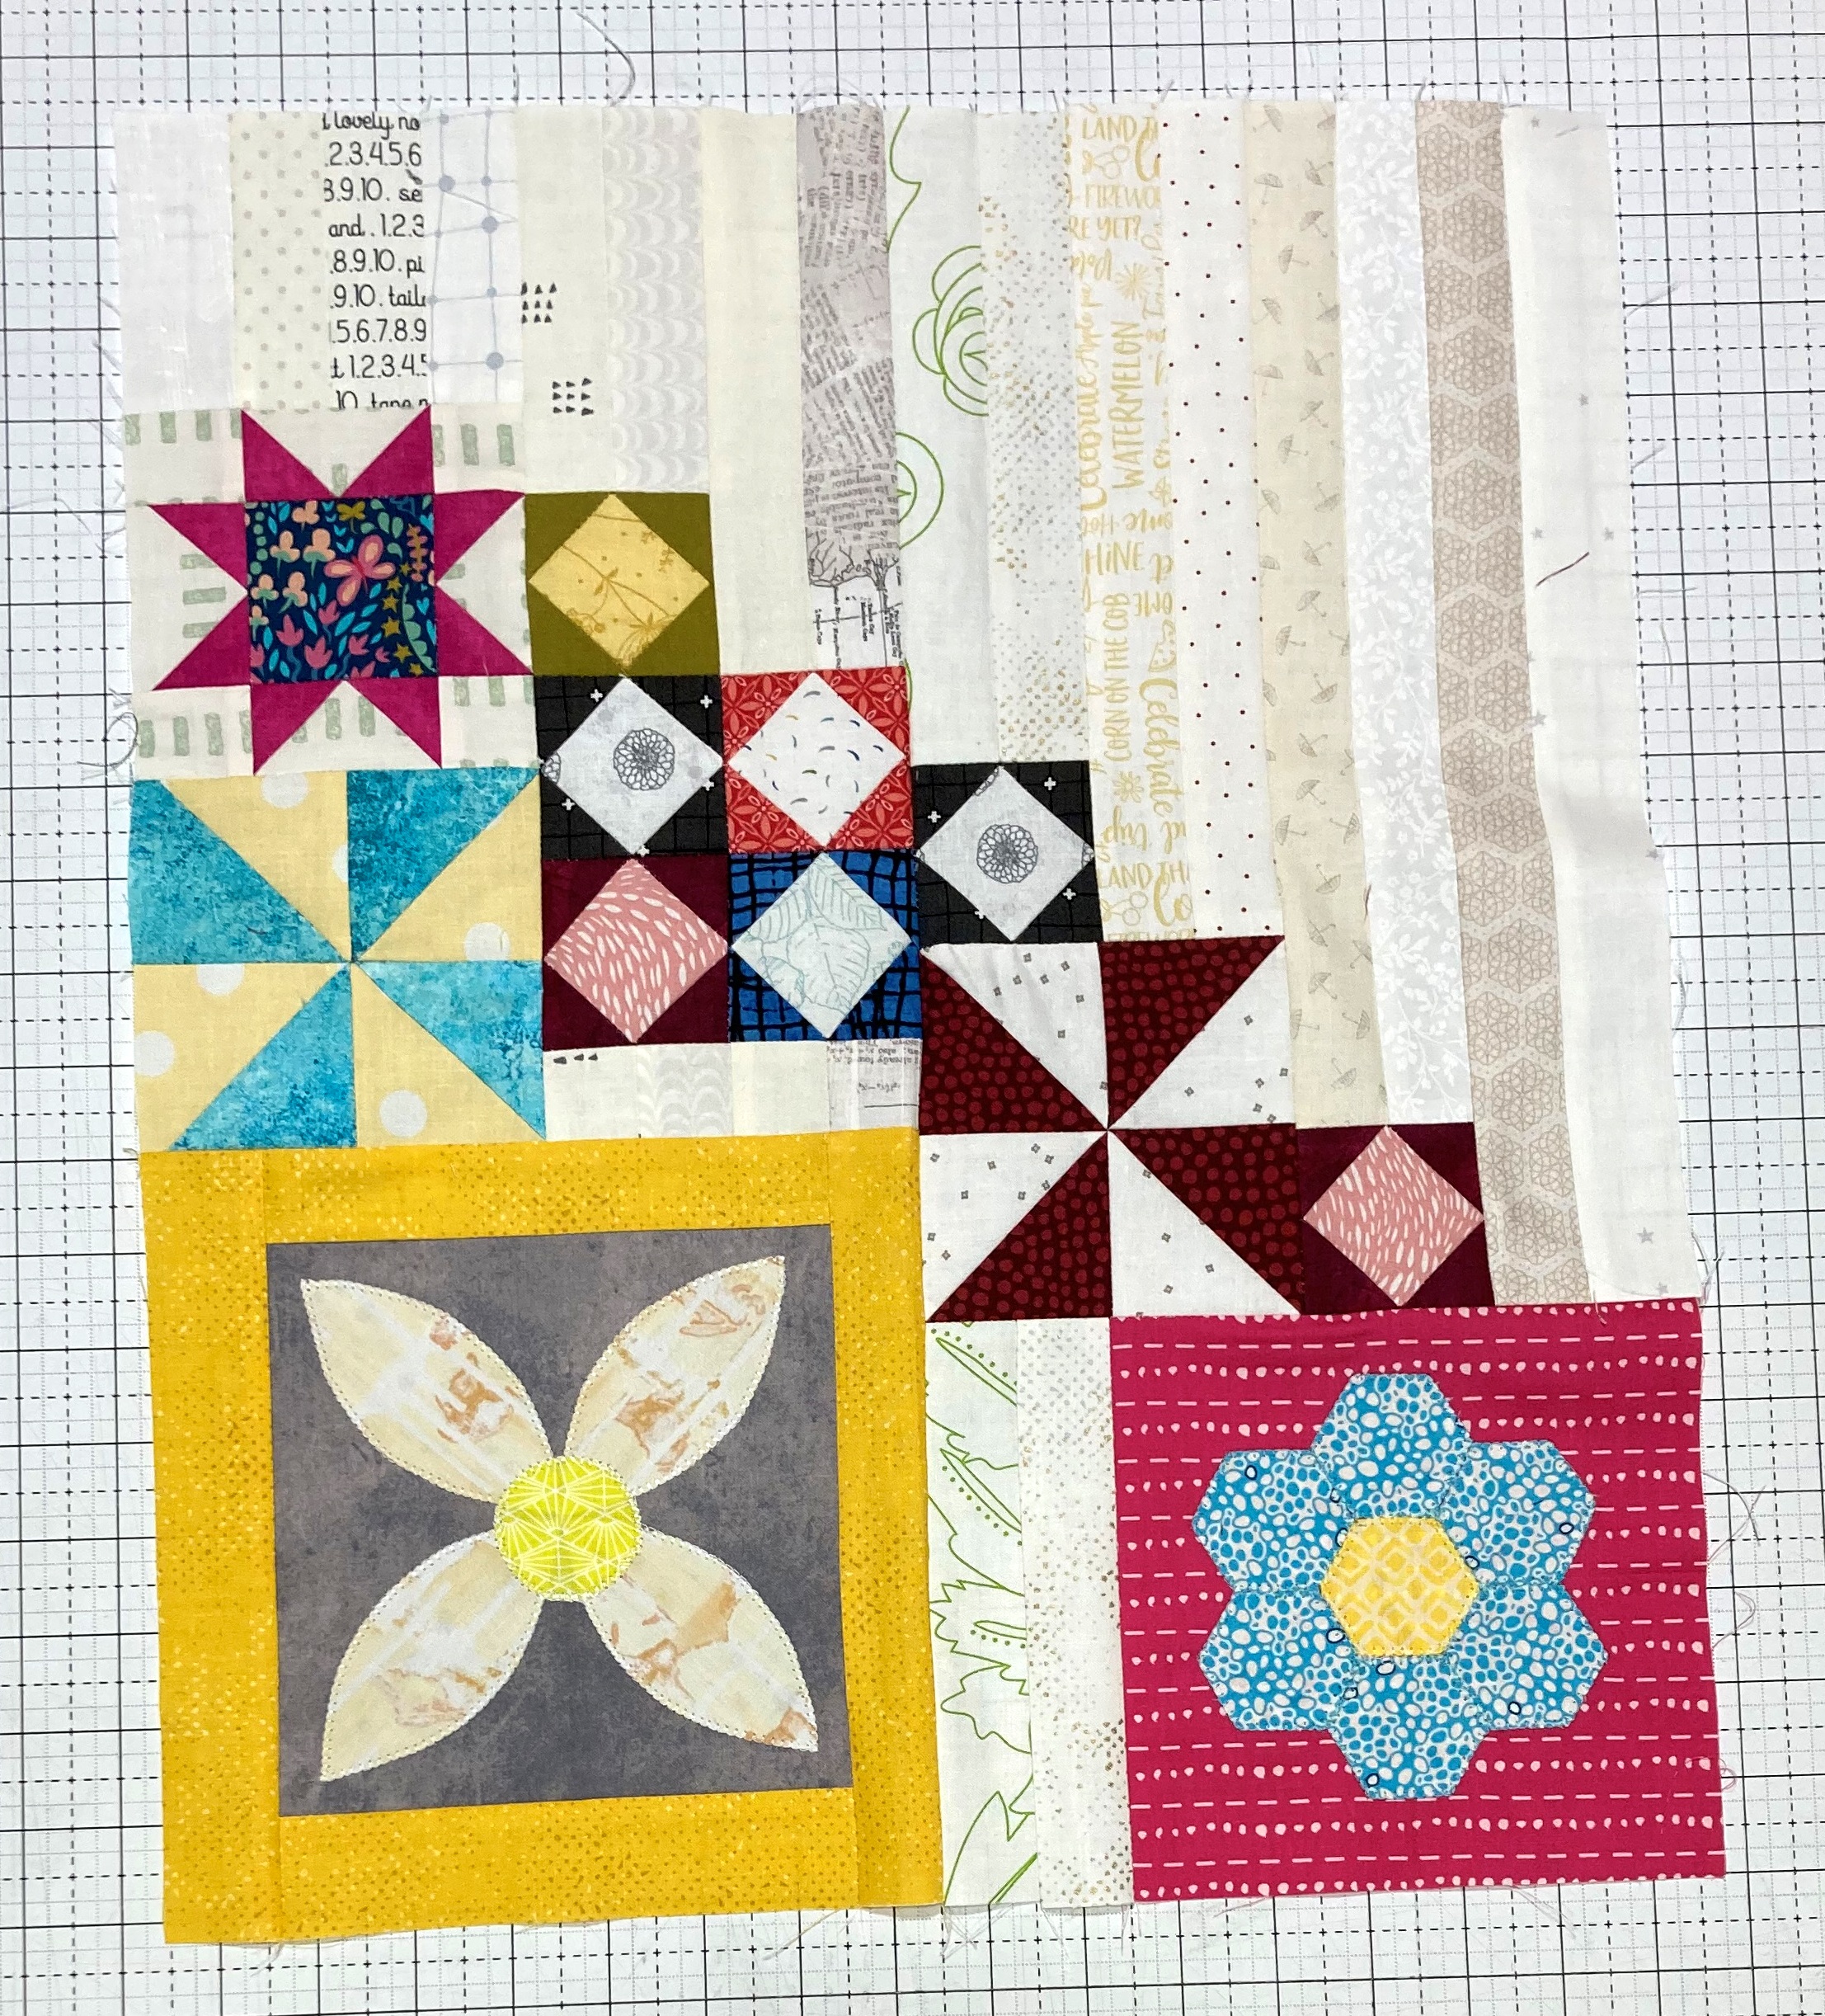
And your Group 2 - Section 1 is complete. It should measure 16 1/2" wide by 19 1/2" high.
And now we can sew together . . .

Once again, We will start by sewing the Strip Sets together. Press the seam allowances to the Larger Number fabric.
From Fabric 19, 20, 21, 22, 23, and 24 sew a 2 1/2" Strip Set together as shown.
(or cut out a 2 1/2" x 6 1/2" Background Fabric Filler)
From Fabric 29, 30, 31, 32, 33, and 34, sew a 2 1/2" Strip Set together as shown. And note - if you are following along with piecing from the book, 29 and 30 replace a 2" block for our version.
(or cut out a 2 1/2 'x 6 1/2" Gold Fabric Filler)
Now we will sew the Block to the Strip Set. Press the Seams Open. And still, the guide is very helpful to keep handy and make sure you are always putting the Blocks at the bottom of the Strip Sets.
Sew the Shoo Fly Block and the 19/20/21/22/23/24 Strip Set together as shown.
Sew the Spool of Thread Block and the Flying Geese Block together as shown.
Sew the Simple Framed Block and the 29/30/31/32/33/34 Strip Set together as shown.
And now to finish Section 2. (much quicker than section 1, tee hee hee)
Sew the Sashed Shoo Fly Unit, and the Thread Geese Unit, and the Sashed Framed Unit together as shown.
Press the Seams Open.
And your Group 2 - Section 1 is complete. It should measure 16 1/2" wide by 8 1/2" high.

And all that is left is . . .
And it's super easy. Just layout Section 1 and Section 2 as shown.
Place Section 2 onto Section 1 with right sides together. Align and pin the edges. Stitch a 1/4" seam along the edge. Press the seam open.
And your Month 4 BOHO Group 2 - Section 1 & 2 is complete. It should measure 16 1/2" wide by 27 1/2" high.
And that is it for BOHO Heart Block of the Month, Month 4 :)
If you have any questions on this tutorial, please don't hesitate to email me at happyquiltingmelissa@gmail.com or leave a comment.
Hope you have so much fun making all of this months blocks and then sewing them all together:)
Looking forward to Next Month!!


