Note - If you are looking for the Cotton Bliss Giveaway you will
find it here ;)
So ever since I showed this picture at the last
Blogger's Quilt Festival, I have had lots of wonderful people writing me asking how I did the applique. The first time I tried to explain it in an email and quickly realized that the process was a little complex for an email and that a tutorial would be needed and promised one would be coming soon. Well, it's not quite soon, but today is the day I finally make good on that promise :)
And since I just finished a second quilt for the SUU Alumni that matches the first SUU quilt, that will be the example for our tutorial :) Go T-Birds!!!
So let's get to it!!!
First, pick an image for your applique. It can be as complex as you like. Now, I am not drawing artist, so I go to the internet and search for an image. Save the image, just make sure it isn't a tiny little thumbnail image as you will have to make it larger and it will print all pixilated if the image size is to small.
Now open Microsoft Excel. Click on Insert and then select Picture and then From File. Select the image from wherever you saved it. (If you have another program that prints images without shrinking size please use that, this is just the program I know.)
Now, right click the image and select Format Picture. Click on the Size tab and type in the height of the applique you want. I made mine 19" high. Let the Width auto correct it's size based on the aspect ratio. This will keep your image from getting stretched ;) Click Ok
Now print your image out on card stock. The card stock is important so that your templates won't be super flimsy when you are trying to trace them. Depending on the size will determine how many pages it prints out on.
Now, to trim off the margins. Use the image as a guide to where the margins are and trim them away. I just use my quilting ruler and rotary cutter. But note - I have a blade that I specifically use for paper, don't use a blade that you want to use to cut fabric :) You don't need to worry about trimming margins from the sides where the image ends, like the top here ;)
Once all of the margins are trimmed lay your pieces out to create the image. You will notice there is some overlap in the image. This is what allows you to put it together and not have the pieces fold over when tracing. It just makes them more sturdy :)
Overlap the first 2 pieces of your image until all of the lines in the image match up. The top and bottom of the paper should match up as well. Tape the 2 pieces together, front and back.
Continue overlapping and lining up the pieces until all of the pieces are taped together and you have a large version of your image to use as a template for applique.
Now, this is the part that takes a minute. At this juncture, you want to stop and make the decisions on how you want to layer your applique. The goal is to try and make it so your pieces can continue to lay on top of one another allowing background fabrics to show through. So to make that a little more clear, let me explain how I make the decisions on this particular applique. And if you are a bit confused, just keep reading on and seeing how the pieces are cut will help to clear things up :)
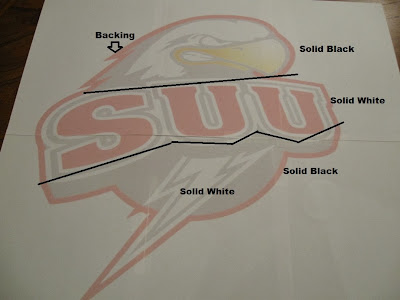
First, I always like to start with a Backing. This is the outermost part of the applique. This needs to be a solid piece that you can stack all other pieces on. In this example, it will be a larger red piece that will create the outline. If there is no outline, I recommend just making an outline in white or muslin to stack all of your pieces on.
From there, I divided the image into three parts, the top, middle, and bottom. On the top, I planned a piece of black that will go onto the red and cover the entire top. From there I can add the white and yellow pieces and still have the black show through to make all of the outlines. For the middle, I choose to a solid white piece and then I will cut out the black outline and red letters to layer on top of the white. And finally, the bottom has 2 solid pieces, A black for the background and a white lightning bolt. The only other piece that needs to be cut is the black streak in the lightening bolt.
So, once you have a plan, cut your applique pattern template into all of the seperate pieces. This will take a little bit as you don't want to cut through any pieces. Each piece you cut around the images. To get into those tiny spaces of the outline without wrecking the pieces around it, I use my rotary cutter to make a slit that my scissors can then fit into. As you cut out each piece, LABEL IT!! I can not make that more clear. Label the right side of the piece as well as the wrong side. Write what color fabric you will cut it out of, and write whether the piece is to be filled in or cut as an outline. This only takes a second but will keep you from making errors down the line ;)
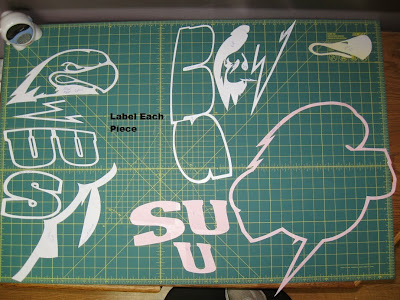
Now, divide your pieces into the color you want them cut from and cut a piece of fabric from each color large enough for all of the applique template pieces. (There are notes on some of these outlined pieces, like the red background, white letters, white lightning bolt, and black cloud, to cut the pieces out as wholes and not around the inside of the template :)
Cut a piece of fusible web (Heat and Bond, Wonder Under, Ect.) the size each fabric piece. Using the manufactures directions, adhere the fusible web to the wrong side of the fabric. (Seriously, use those directions, if it says dry iron, be sure to use a dry iron, it will make removing the paper backing later on so much easier ;)
Now, place the WRONG side of your applique template onto the fusible web. Trace around the applique template. (Now, sometimes, if the applique is not complex, I will just cut around it, but all of these were way to tricky to try to hold the template in place, it saves time to just trace it :)
And when you are cutting some of those pieces that are just a flimsy little outline, it can really help to tape around the image to keep it in place. This will help keep your pieces from getting distorted so they all fit back together nicely ;)
Cut the applique piece from your fabric. This is where a really good pair of scissors come in handy, and if the blades are a little smaller that helps too. Cut out all of your applique pieces.
Once all of the pieces are cut, remove the paper backing from each piece, except for the backing piece. There should be a thin layer of the webbing on the backside of each applique piece.
Now, lay your backing piece, that still has the paper backing on it, onto your ironing board. (And please forgive the state of my ironing board cover, it has had some rough times ;)
Star layering the applique pieces onto your backing. I like to do one section at a time. Start with the whole pieces that will show through and then add each layer on top of it. A lot of this can be eyeballed as far as placement.
But when you get to some of the trickier parts, use your paper template as a guide to help you line up where everything goes.
Once each piece of applique is in place, follow the manufactures directions and press the entire applique securing it in place. Note - do not move your iron back and forth when doing this, it will shift your pieces. Simply place your iron in one spot, hold, and then lift it completely away. Repeat until all pieces are secure.
Now remove the paper backing from the backing piece of fabric. This can be a bit of a pain as you just pressed it like crazy but be patient, it will come off ;)
And now, my favorite part. Secure stitching. You want to make sure that each piece of applique stays in place so you need to move to your machine and secure stitch each raw edge of fabric, except once again, the background fabric. You can use a straight stitch and do raw edge applique, or a zig-zag stitch, or a satin stitch or whatever. I prefer a blanket stitch. I find it easiest to secure all of one color at a time ;) And remember, you need to do all of the raw edges, meaning sometimes there will be back to back stitches where pieces line up.
Just keep stitching away until all of the raw edges are secured. Trim away all of the loose edges and then stand back and admire your beautiful layered applique.
When you are ready to add it to a project, simply place it on the project as desired and be sure to make sure it is straight. It would be sad to put that much time into an applique and then put it on the project crooked. Once it is place, press it and adhere the backing fabric to the project.
Lastly, secure stitch around the background fabric to secure the applique to the project. Normally, you would do this before the project is quilted, but I didn't want to quilt the applique as I really wanted it to pop out so I needed to have the quilt space underneath the applique quilted before hand. It can be a bit of a challenge to attach it to a quilted quilt, but it is possible. Just stick with it ;)
And there you have it. Once complex layered applique that will add so much personality to any of your projects!!!
I hope you have enjoyed this tutorial and find it helpful. I know this is a little more complex so please, if you have any questions, or just have an image that you need help breaking down, please don't hesitate to email me ;) I am happy to help in any way I can ;) And if you make some of your own complex layered appliques I would love to see them. You can add them to my
Flickr Group Here ;)
Oh, and one last thing before signing off, for those wondering, I am finishing up the pattern for this particular quilt design. Here is hoping it will be ready for release soon, maybe even tomorrow ;)
Have a Happy Quilting Day!!!


