Wednesday, February 2, 2022

Simple Lattice Quilt and Tutorial

Today I am thrilled to be bringing you a new quilt and a tutorial to go along with it! I just love simple patchwork and so I wanted to share my favorite way to make Simple Lattice Blocks. No stitch and flip with lots of drawing lines today. These are made with very little waste and go together so quick and come out perfect every time with a quick trim!! And the best thing is, once you learn the technique for making the Simple Lattice Block, you can use it for any size block you like.

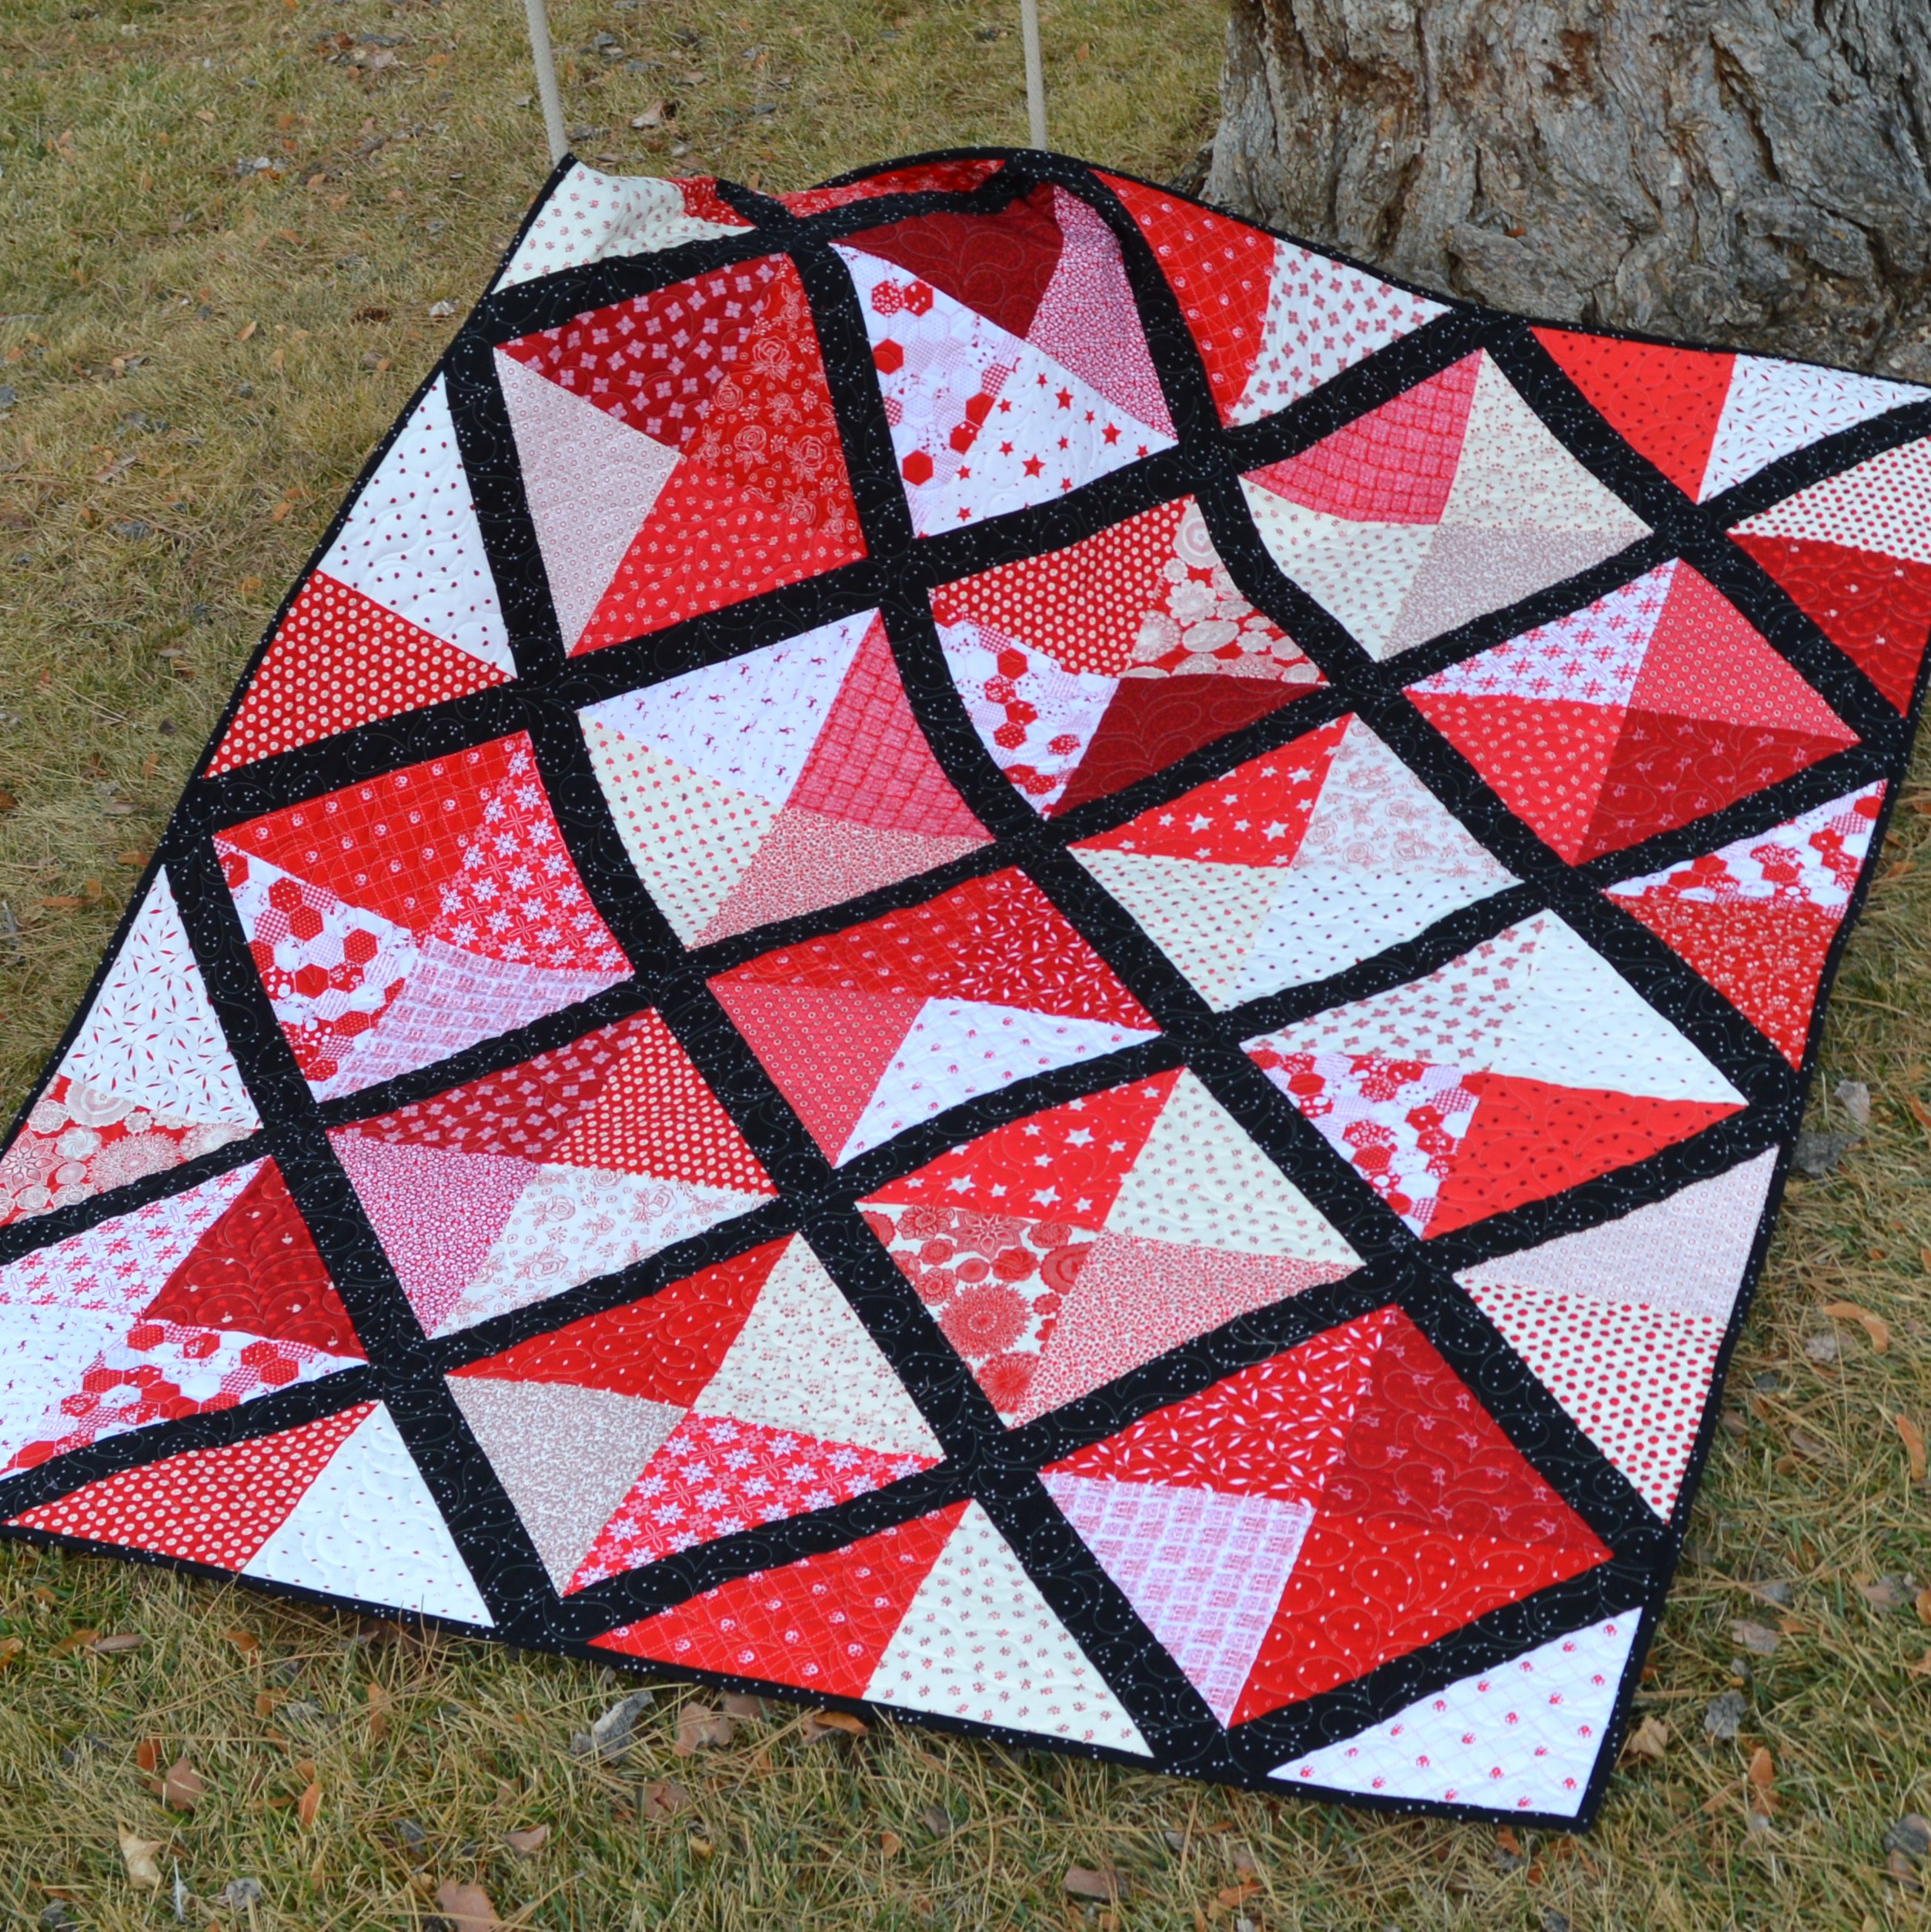
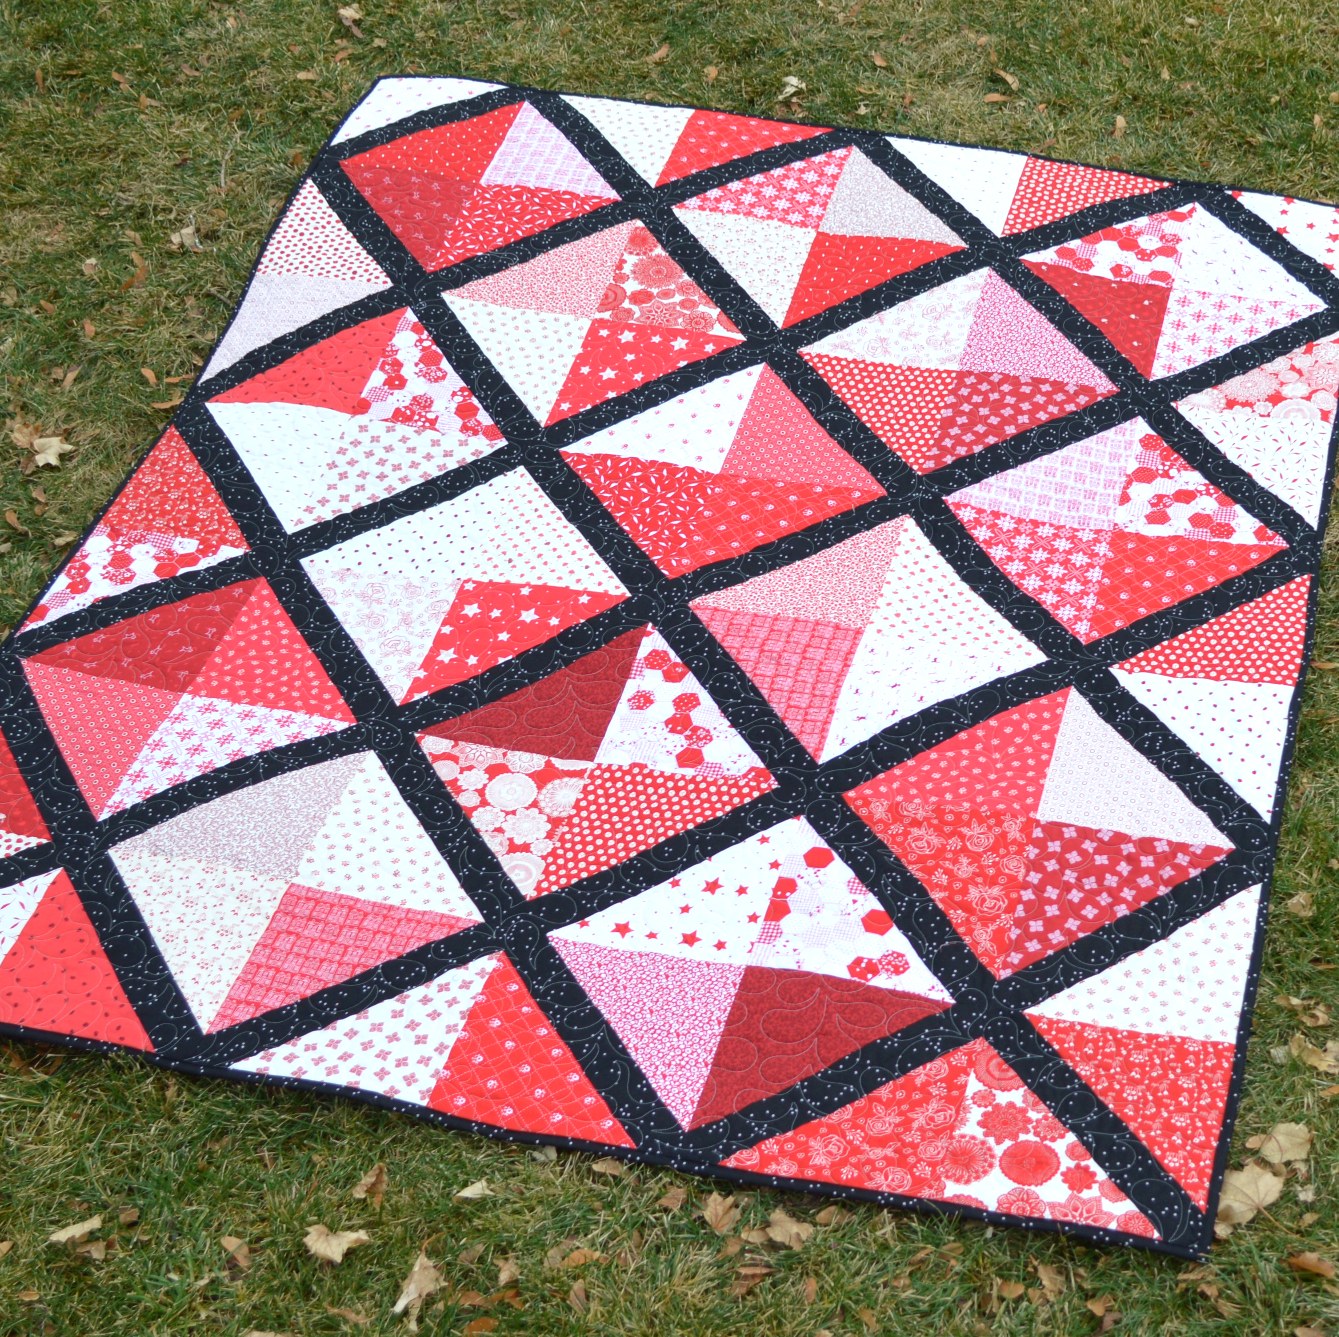
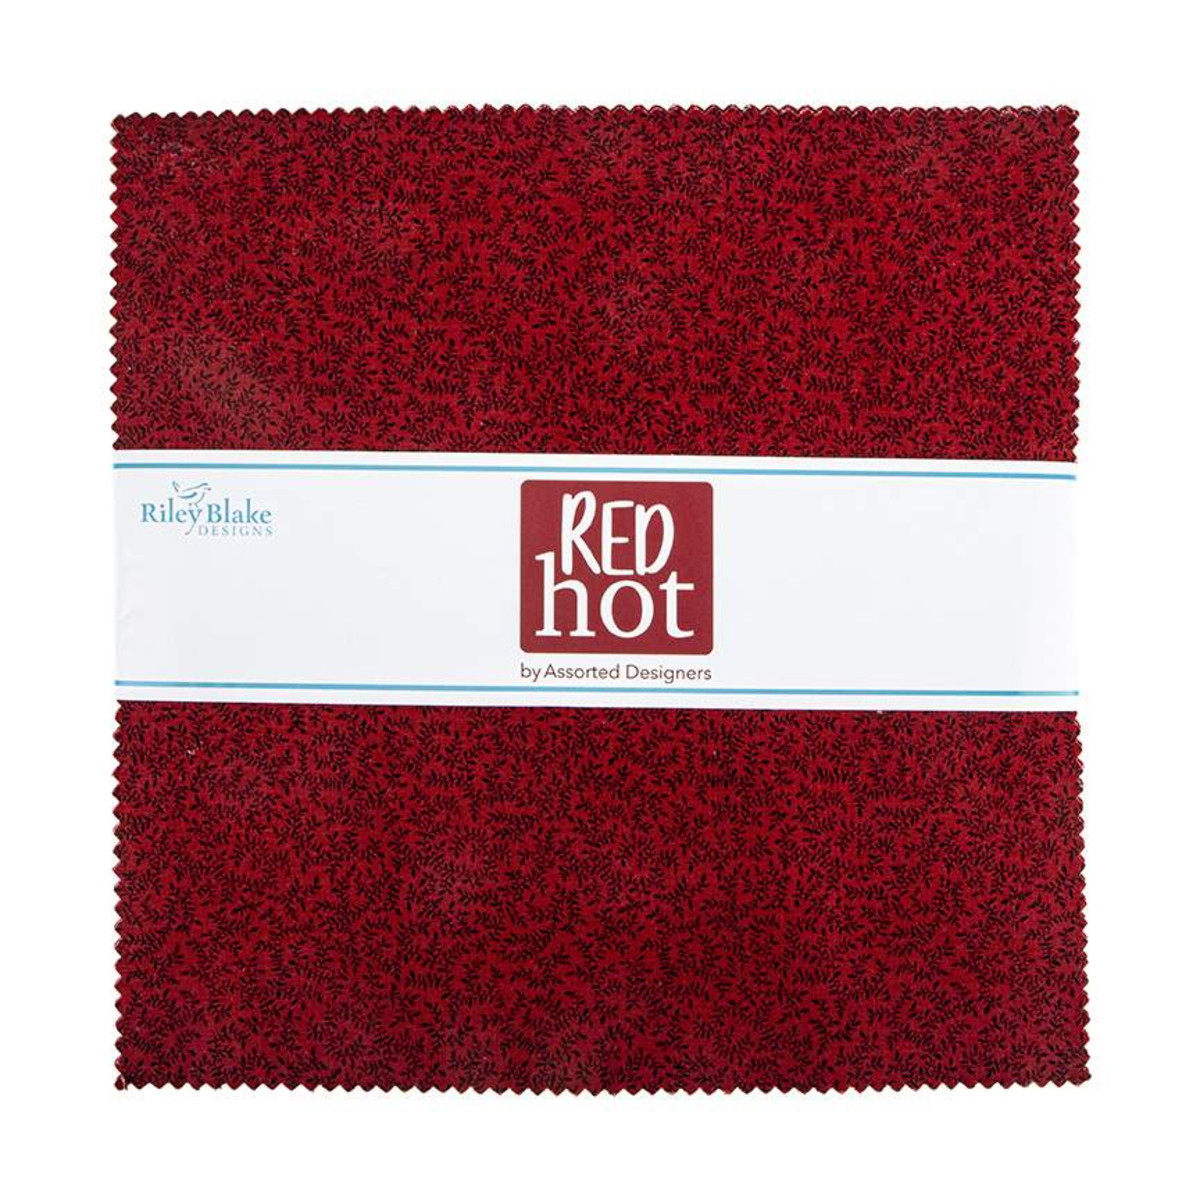
For our tutorial today, we are using a 10"Stacker of Red Hot! I make a lot of red, white, and black quilts to be donated to my Alma Mater, Southern Utah University, and this collection was just the perfect fit for another fun Alumni quilt. And I love that this fabric line has a print from 21 different Riley Blake Designers making it super scrappy and happy in all it's designed goodness. This quilt is pre-cut friendly, so just grab a Stacker and some Sashing fabric (I used Blossom Black) and you are ready to make up your quilt!

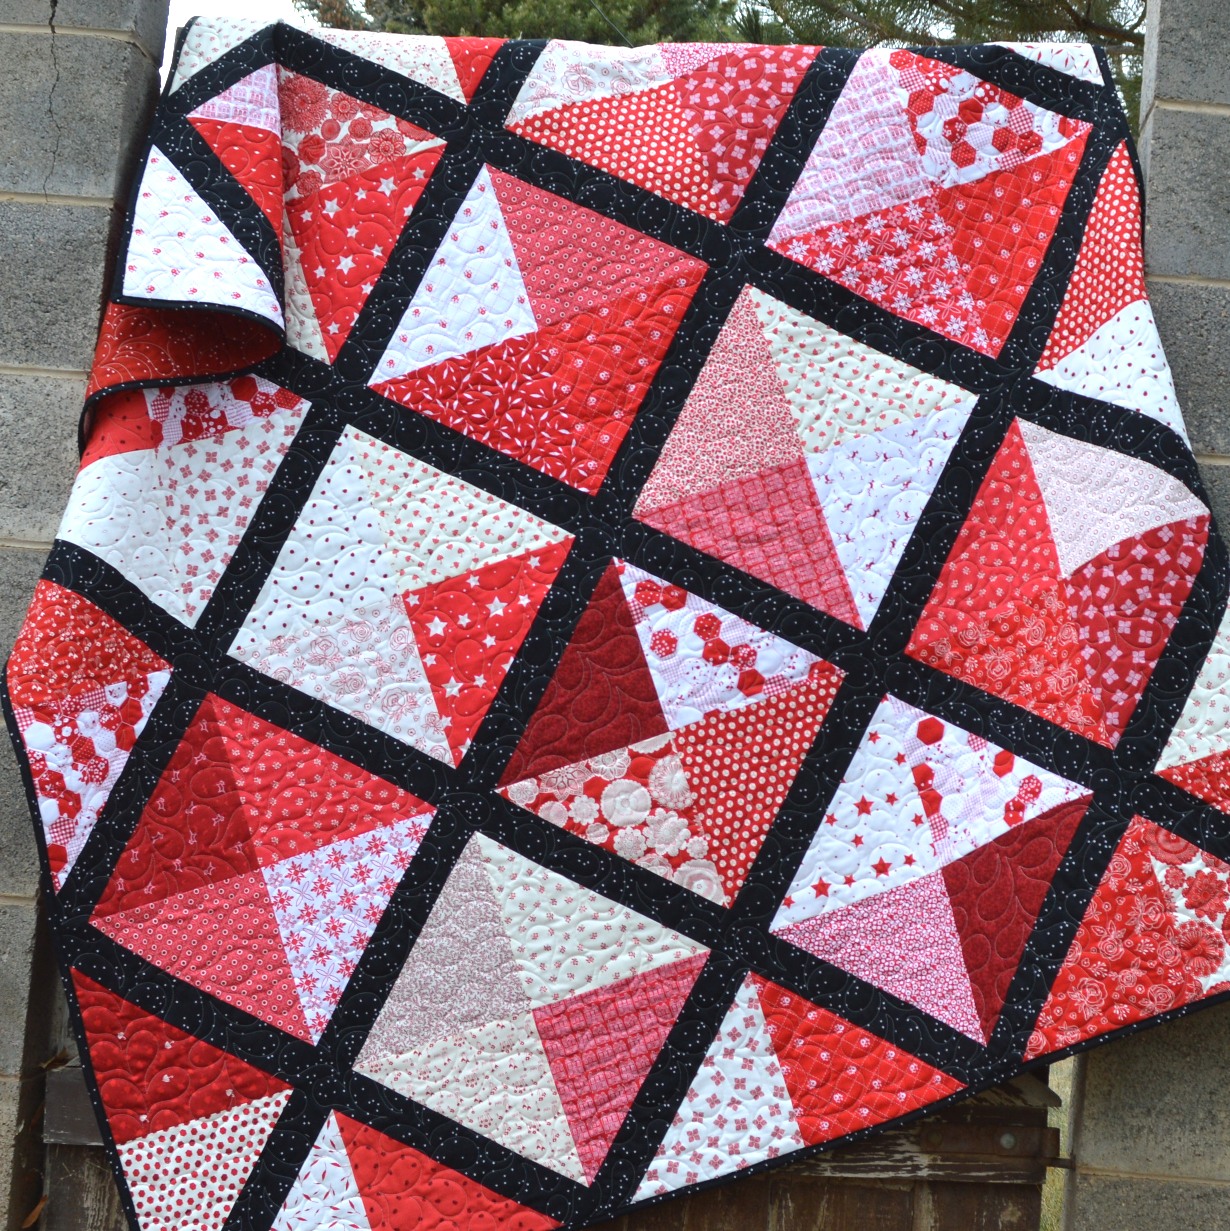
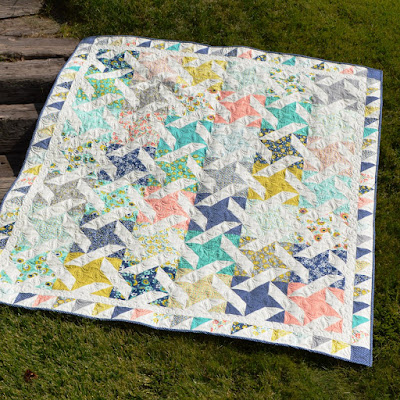
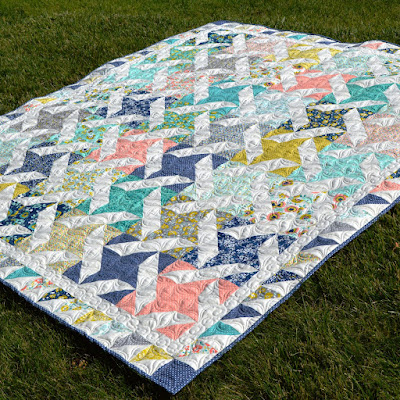
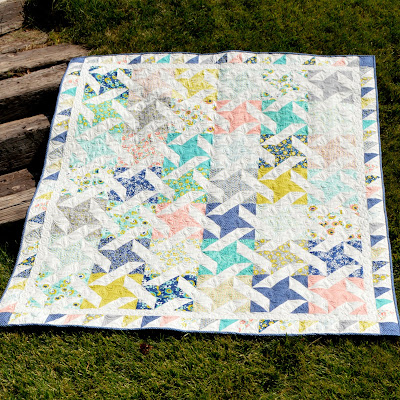
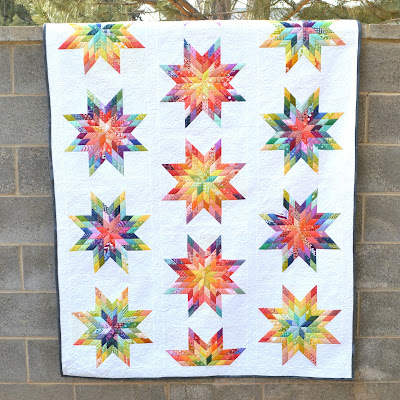
The quilt finishes at 60" x 70" so it makes for a perfect lap size quilt. It is a wonderful go-to gift when you need to whip up something quick and looks amazing in any prints!! So, let's get to making your own!!!

MATERIALS NEEDED:

To make your own Simple Lattice Quilt you will need

One 10" Stacker or Layer Cake

2 Yards of Sashing/Binding Fabric

4 Yards of Backing Fabric

STEP 1 - CUTTING

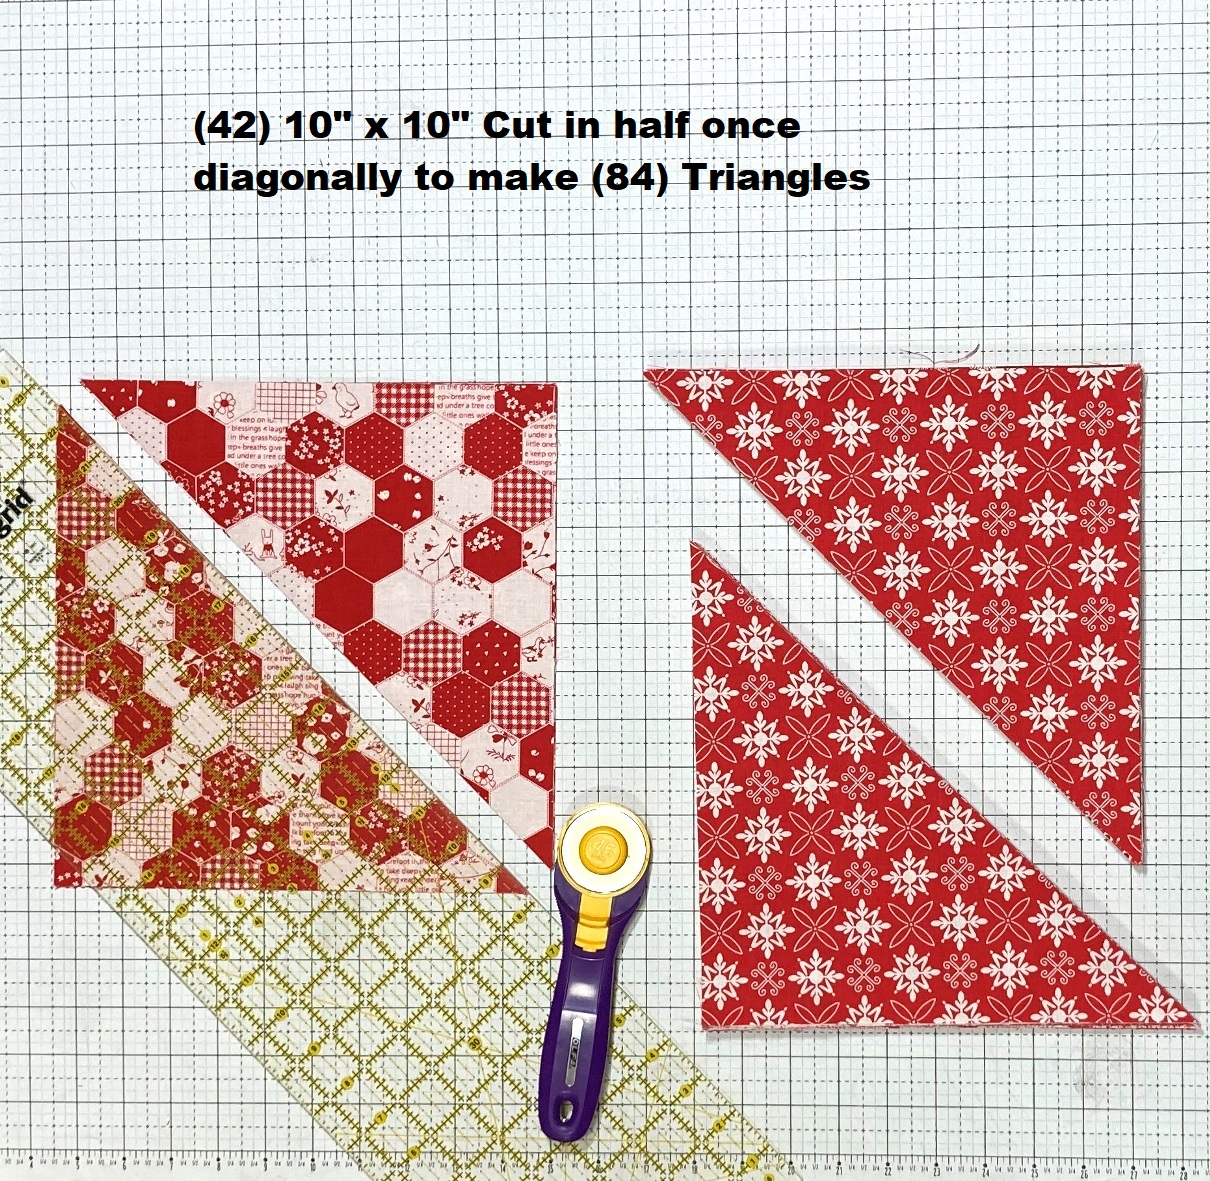
Cut each of the (42) 10" x 10" squares in your 10" Stacker in half once diagonally to make 84 triangles. Set these aside.

From your Sashing/Binding Fabric cut the following:

(7) 2 1/2" x WOF Strips for Binding

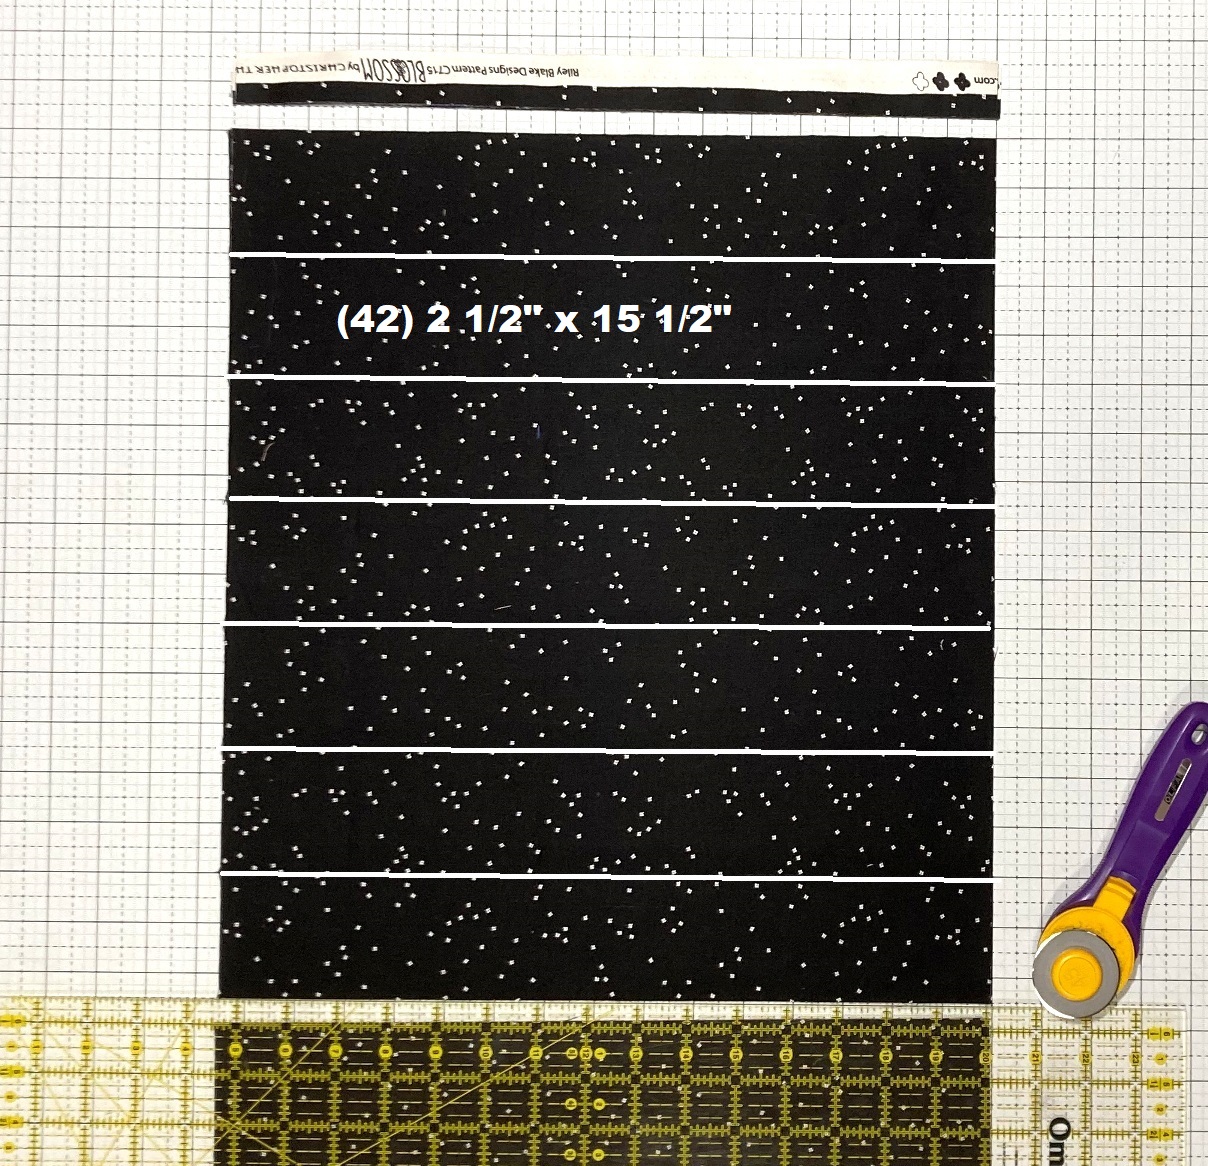
(3) 15 1/2" x WOF Strips and from each strip sub-cut

(14) 2 1/2" x 15 1/2" sashing strips for a total of (42) 2 1/2" x 15 1/2" sashing strips

STEP 2 - MAKING THE LATTICE BLOCK

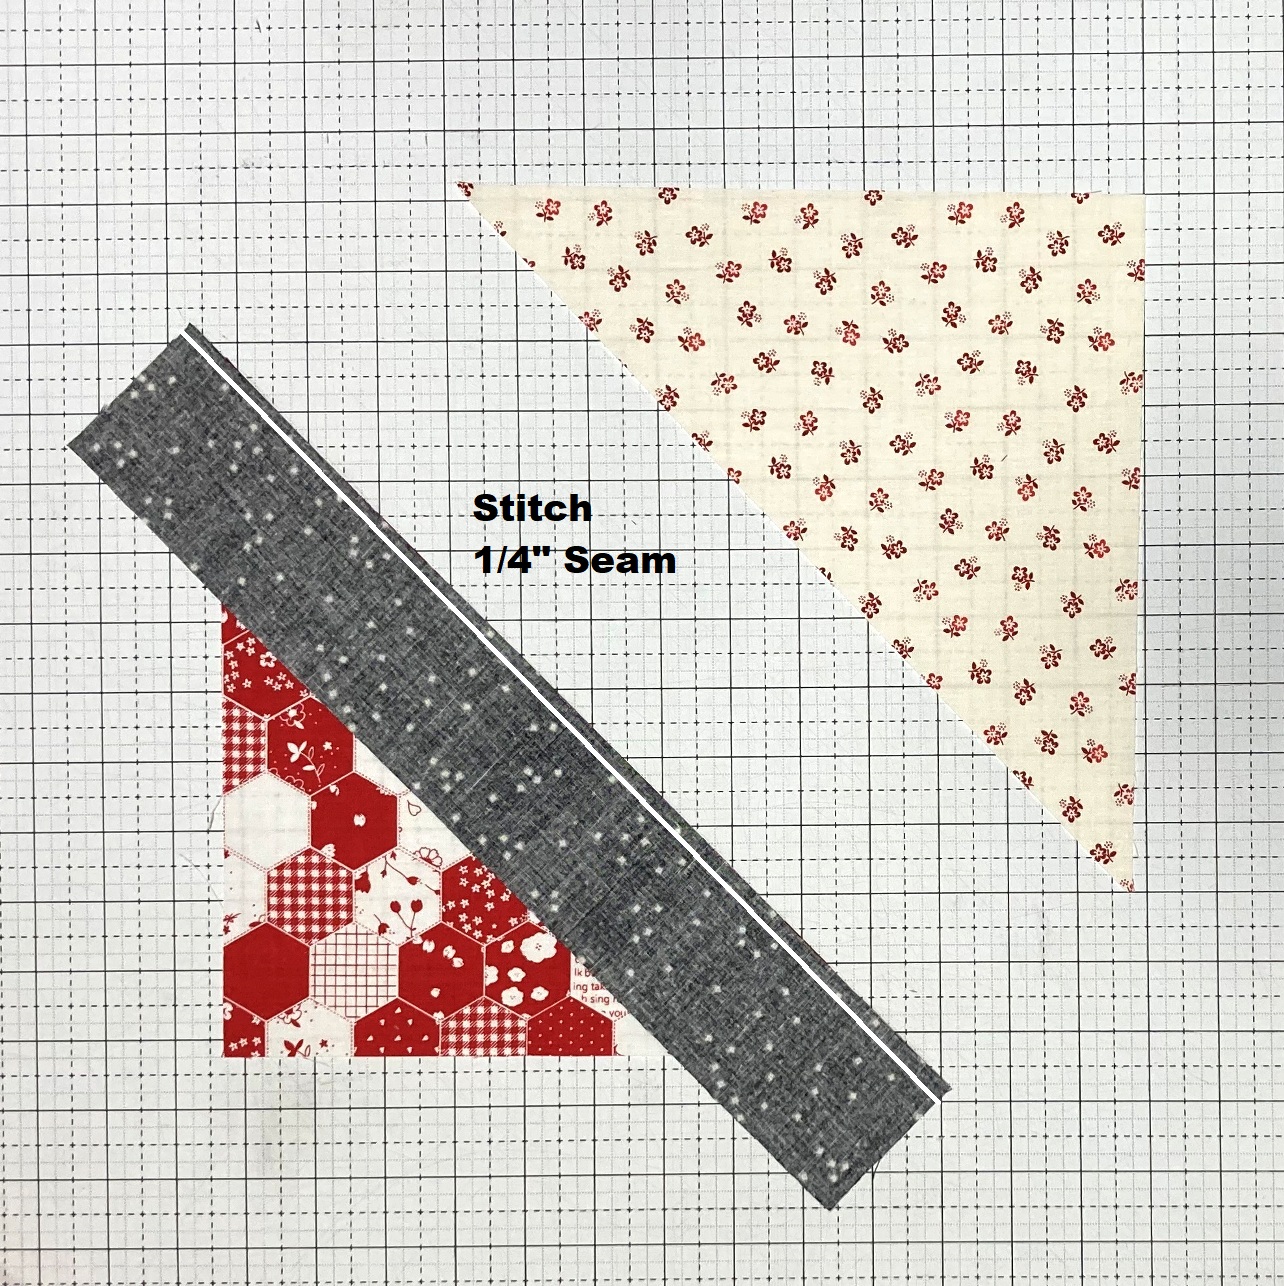
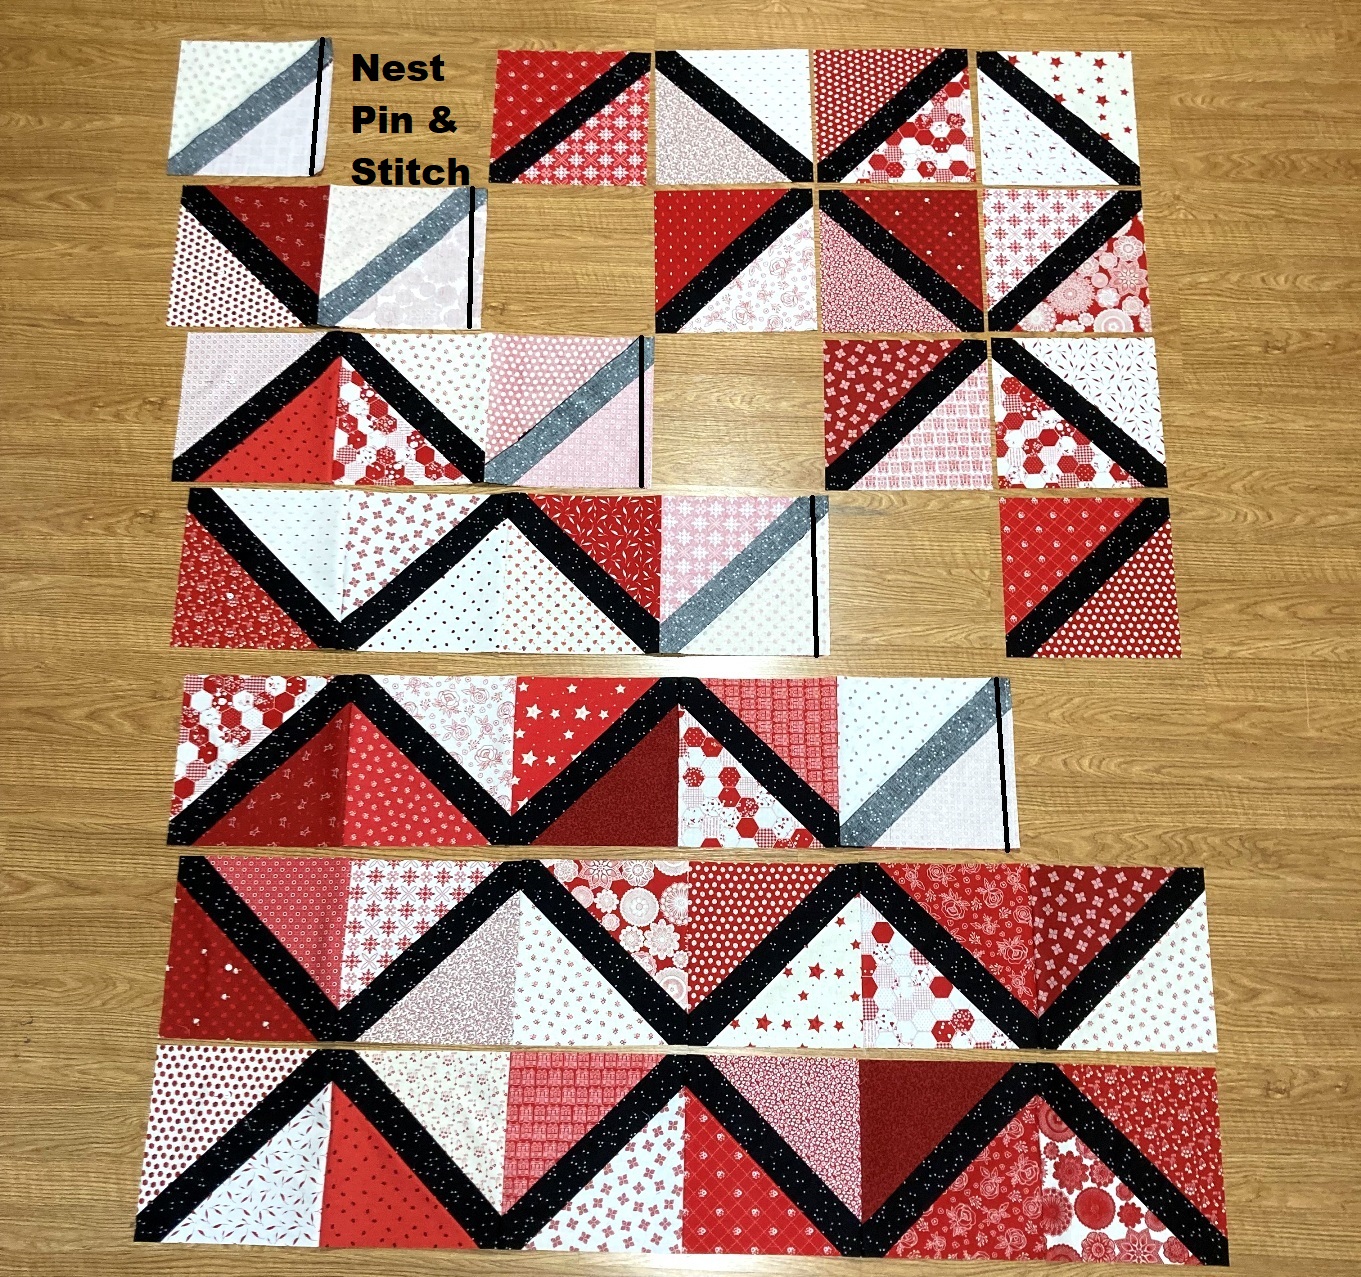
And with the cutting done, we are ready to do some stitching. To make a block you will need 2 triangles of different fabrics, and 1 2 1/2" x 15 1/2" sashing strip. Lay them out as as shown below.

Place the sashing strip onto the left hand side triangle with right sides together. Align the edge, and center the sashing strip on the triangle. You don't have to measure that perfectly, just eyeball it.  Stitch a 1/4" seam along the side.

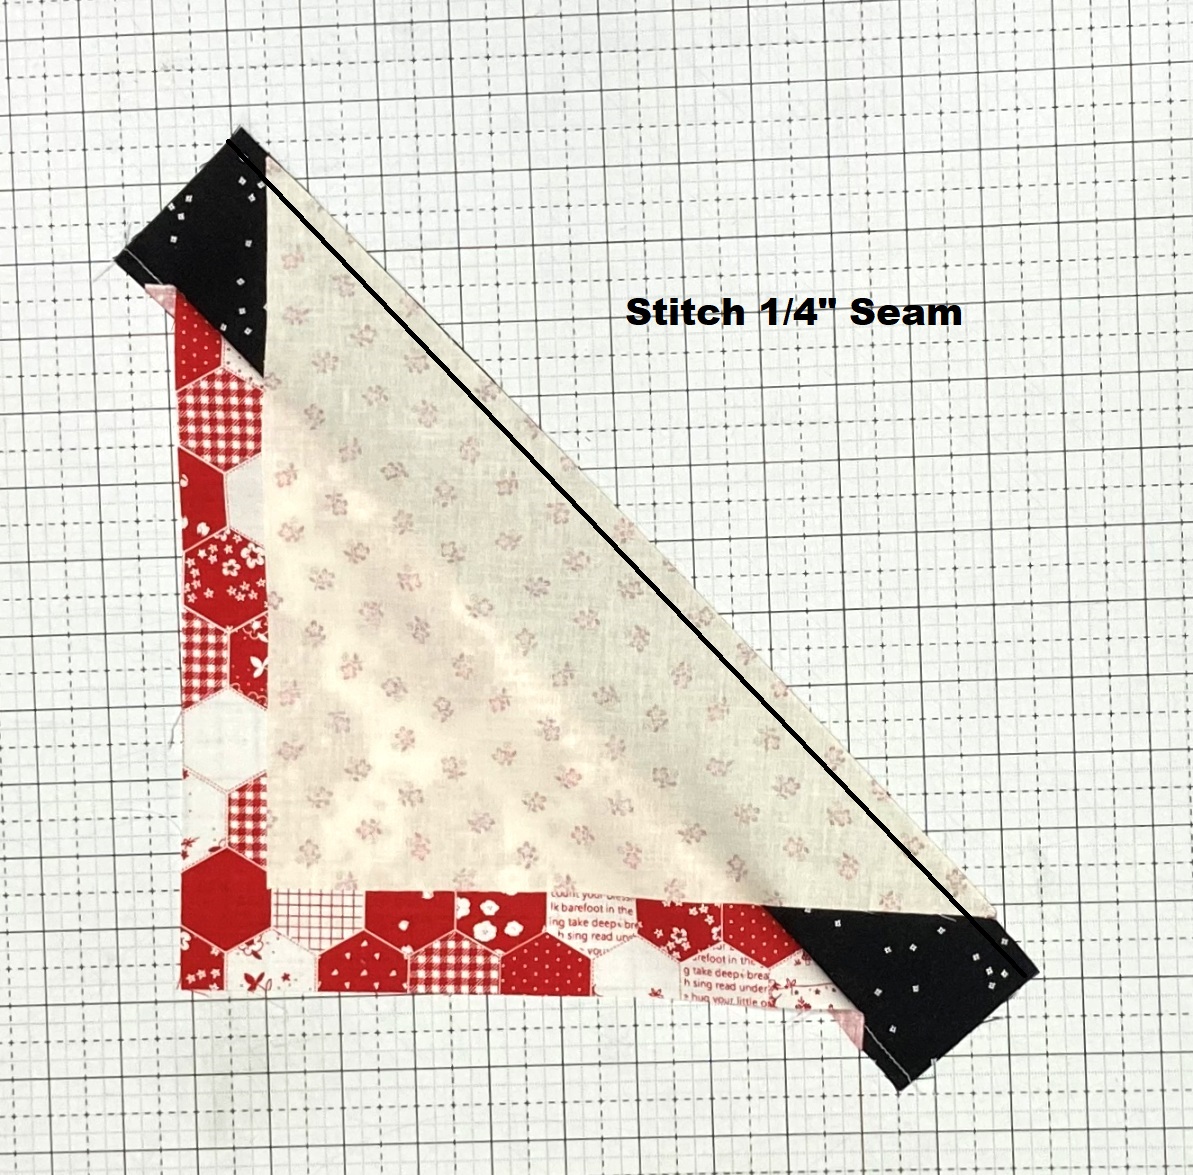
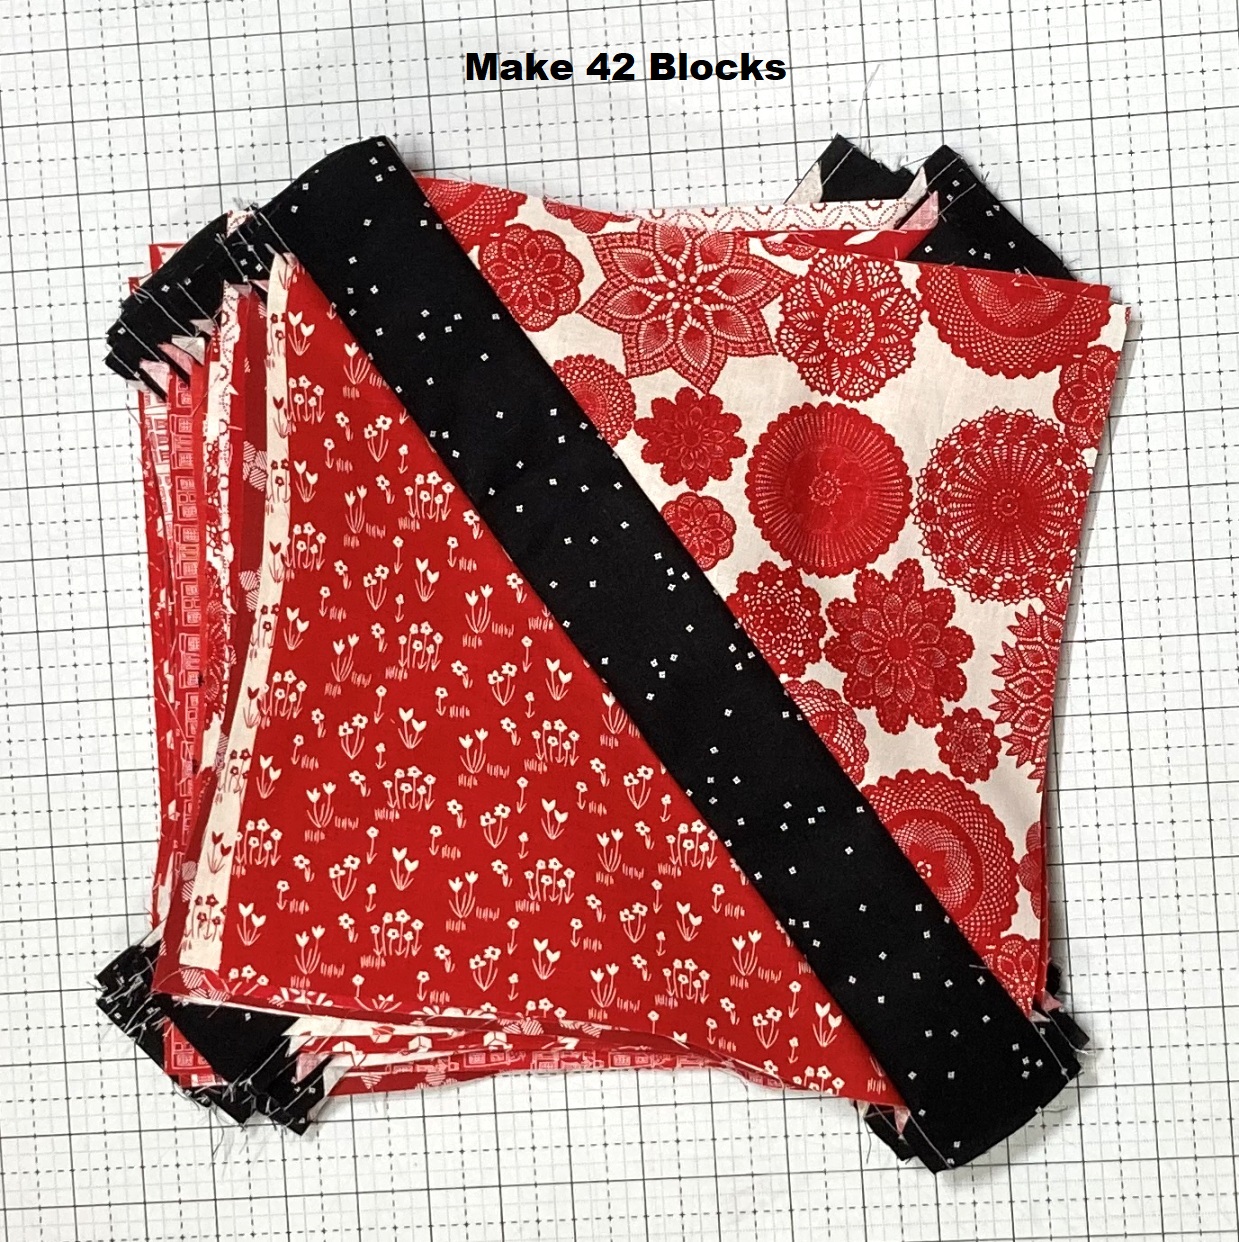
Lay the stitched pieces back out again, and place the right hand side triangle onto the sashing strip with right sides together. Align the edge, and again, eyeball to center the sashing strip on the triangle. Stitch a 1/4" seam along the side. Making the block is as simple as that. You need to make 42 Simple Lattice Blocks for this quilt.

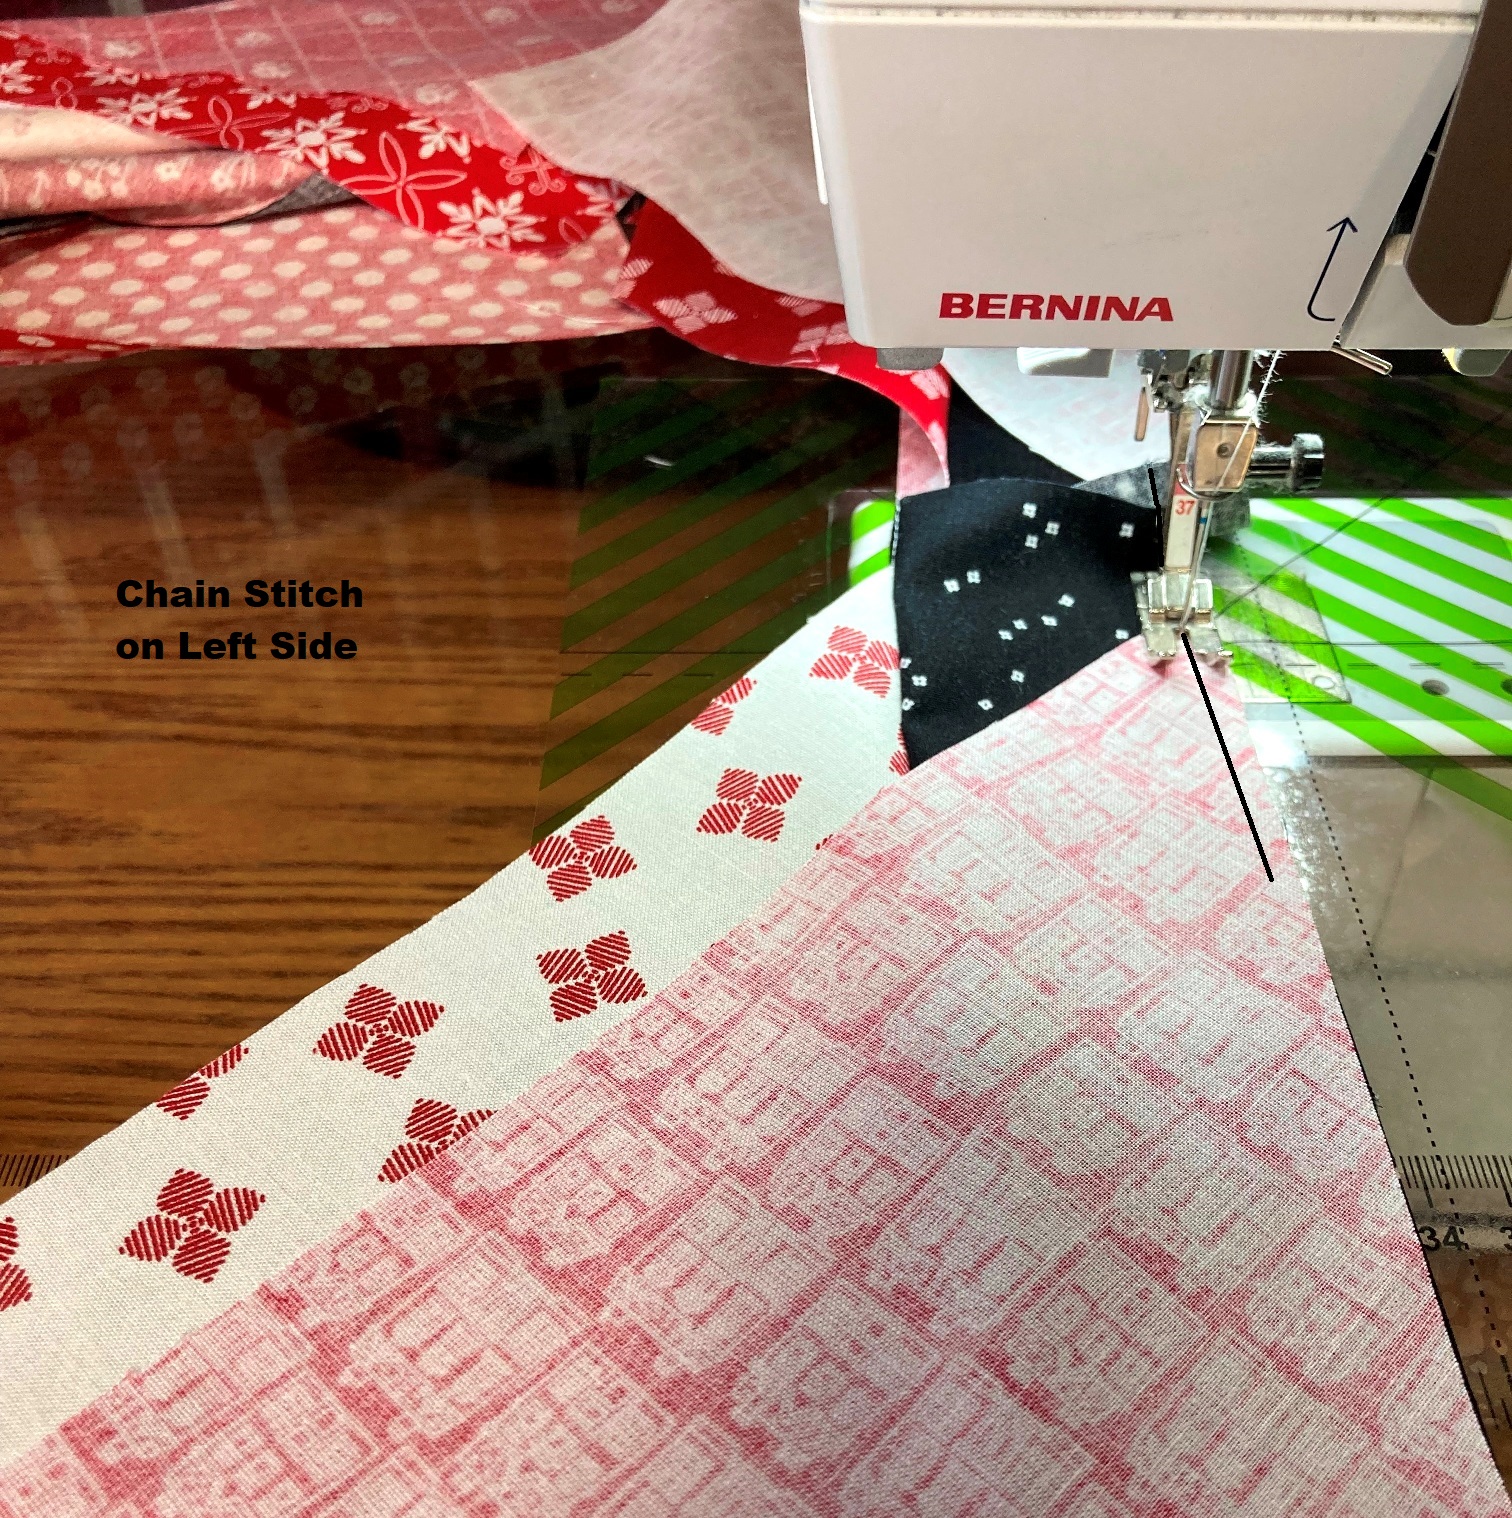
So, to save time and thread, we will chain stitch! If you have never chain stitched before, it is just simply not cutting threads between each unit, but sewing a long string of each unit one after the other. So, even though that means you will be stitching along the edge of your strip set where there is no triangle on the top and bottom of each unit, it is still faster than stopping and starting each unit, and uses about the same amount of thread.  

Stitch a 1/4" seam on the right hand side of each sashing strip . When you are finished, clip the threads between each Strip Set Unit.

Then, Stitch a 1/4" seam on the left hand side of each sashing strip . When you are finished, clip the threads between each Strip Set Unit.

And just like that, you have 42 Simple Lattice blocks all ready for pressing and trimming!

STEP 3 - TRIMMING THE LATTICE BLOCK

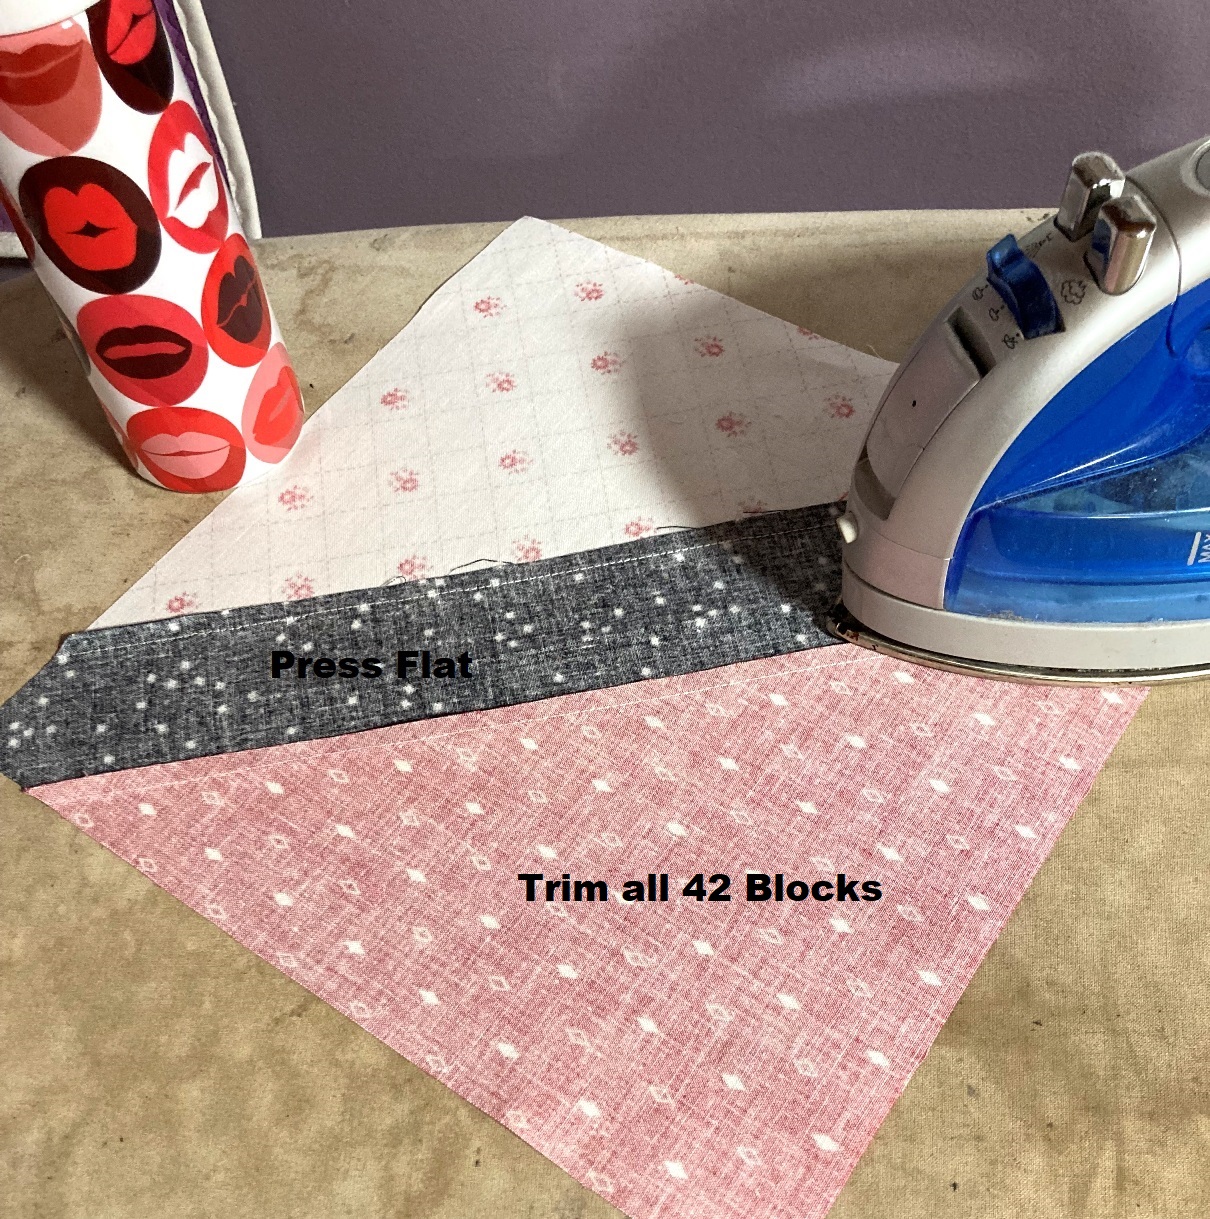
So let's get to pressing. You want to press both of your seams in the same direction so as to allow you to nest your blocks when sewing the quilt top together. I find the easiest way to do that is to place a triangle on my ironing board face up, and then press the first seam towards the sashing strip from the front. I use my finger in front of the iron to flatten the seam and ensure it is pressing upwards.

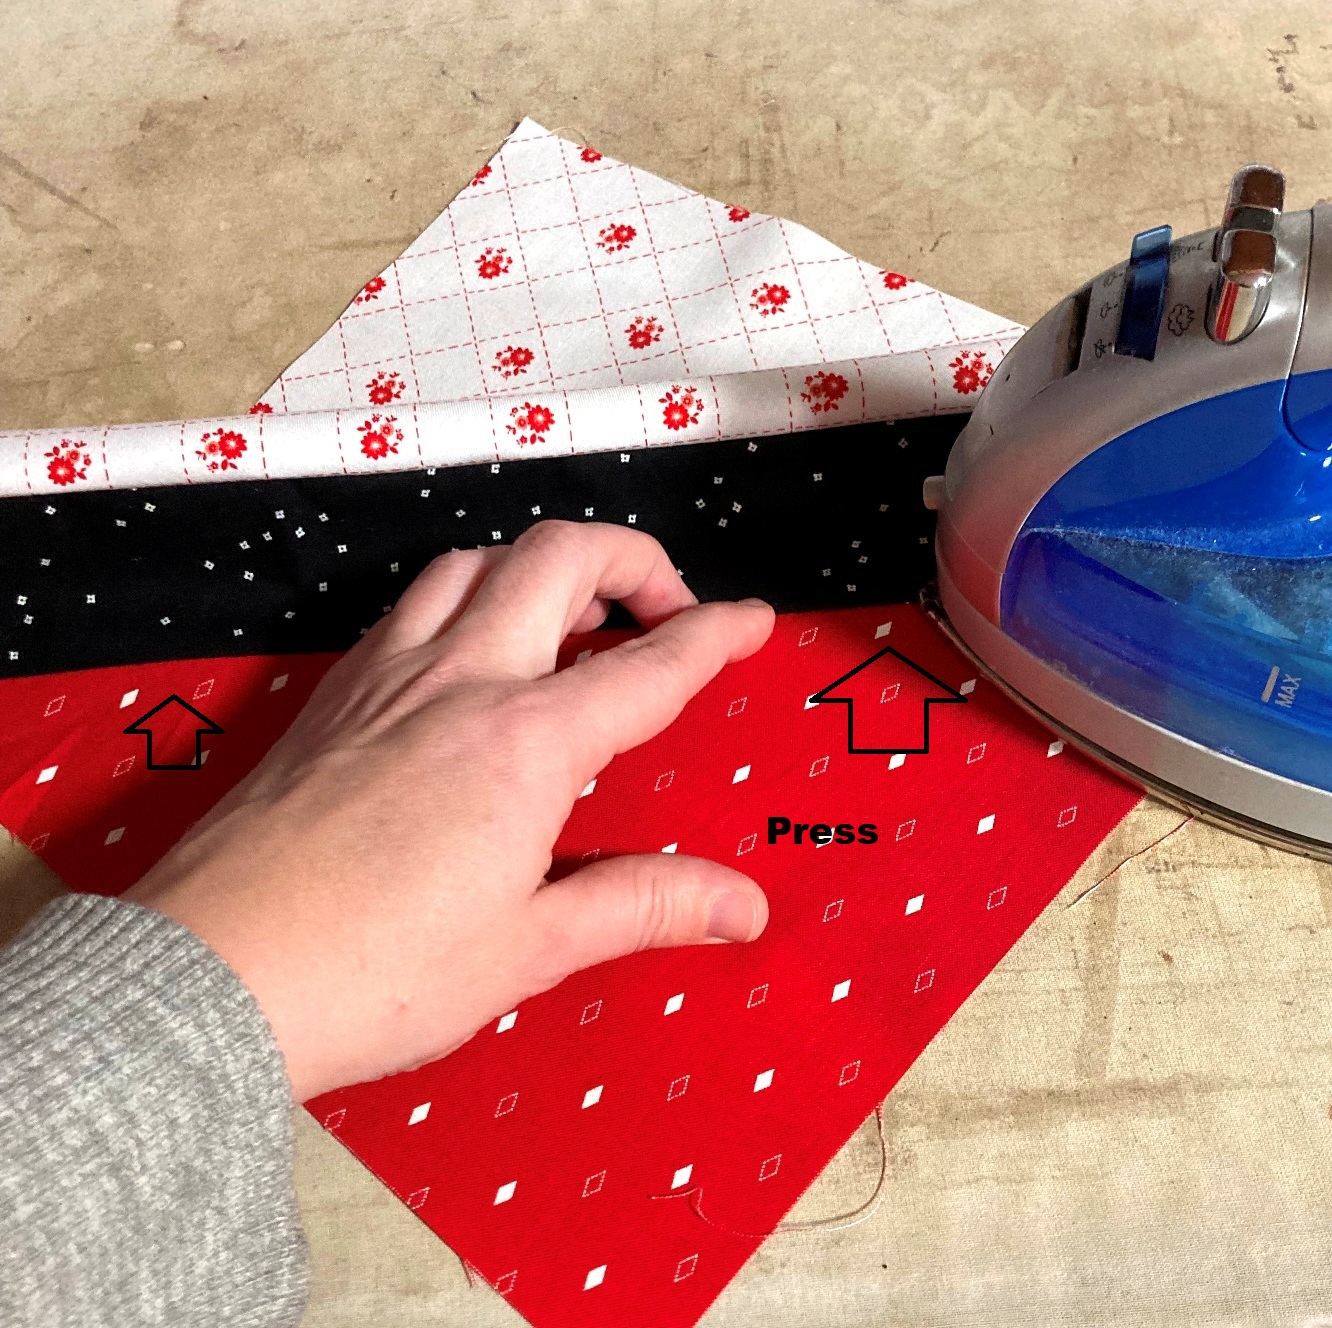
Then, I continue pressing upwards, pressing the second seam towards the triangle. Now both seams are pressed in the same direction.

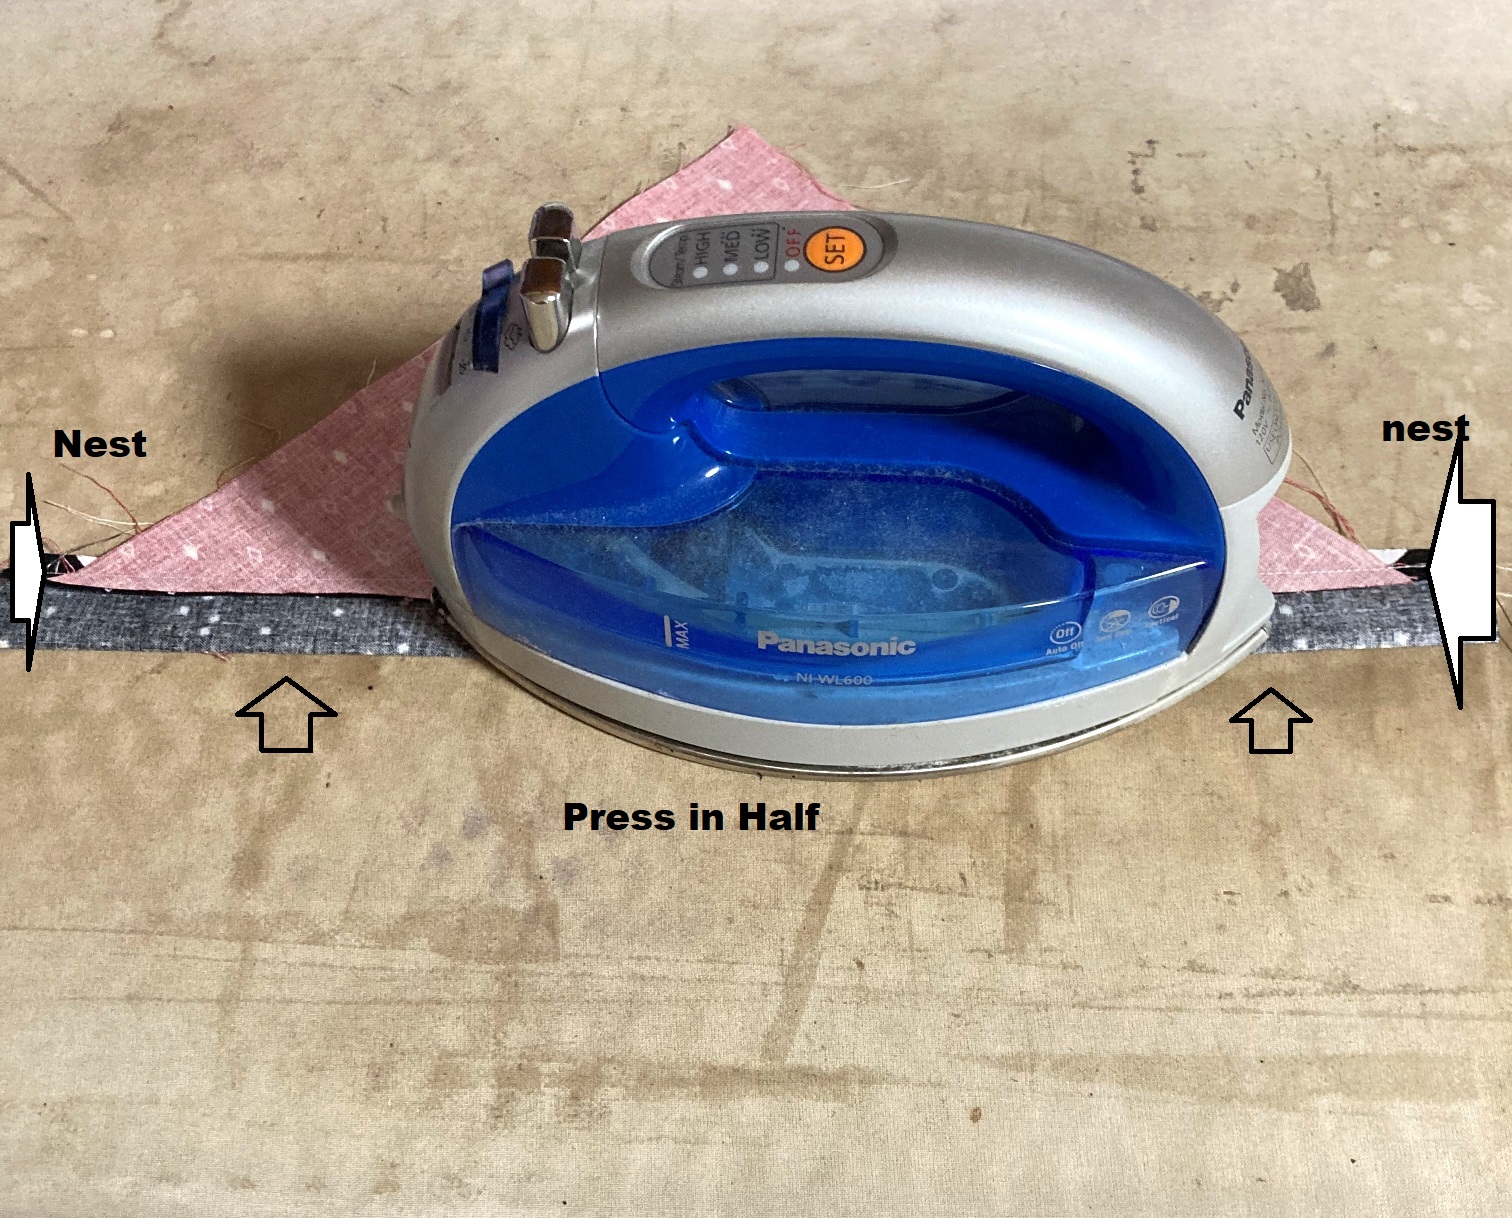
And now we need to add one more press for a trimming reference. Fold the Simple Lattice Block in half exactly, you know it will be exact if the seams of the sashing nest together. Press a fold into the exact middle of the sashing strip.

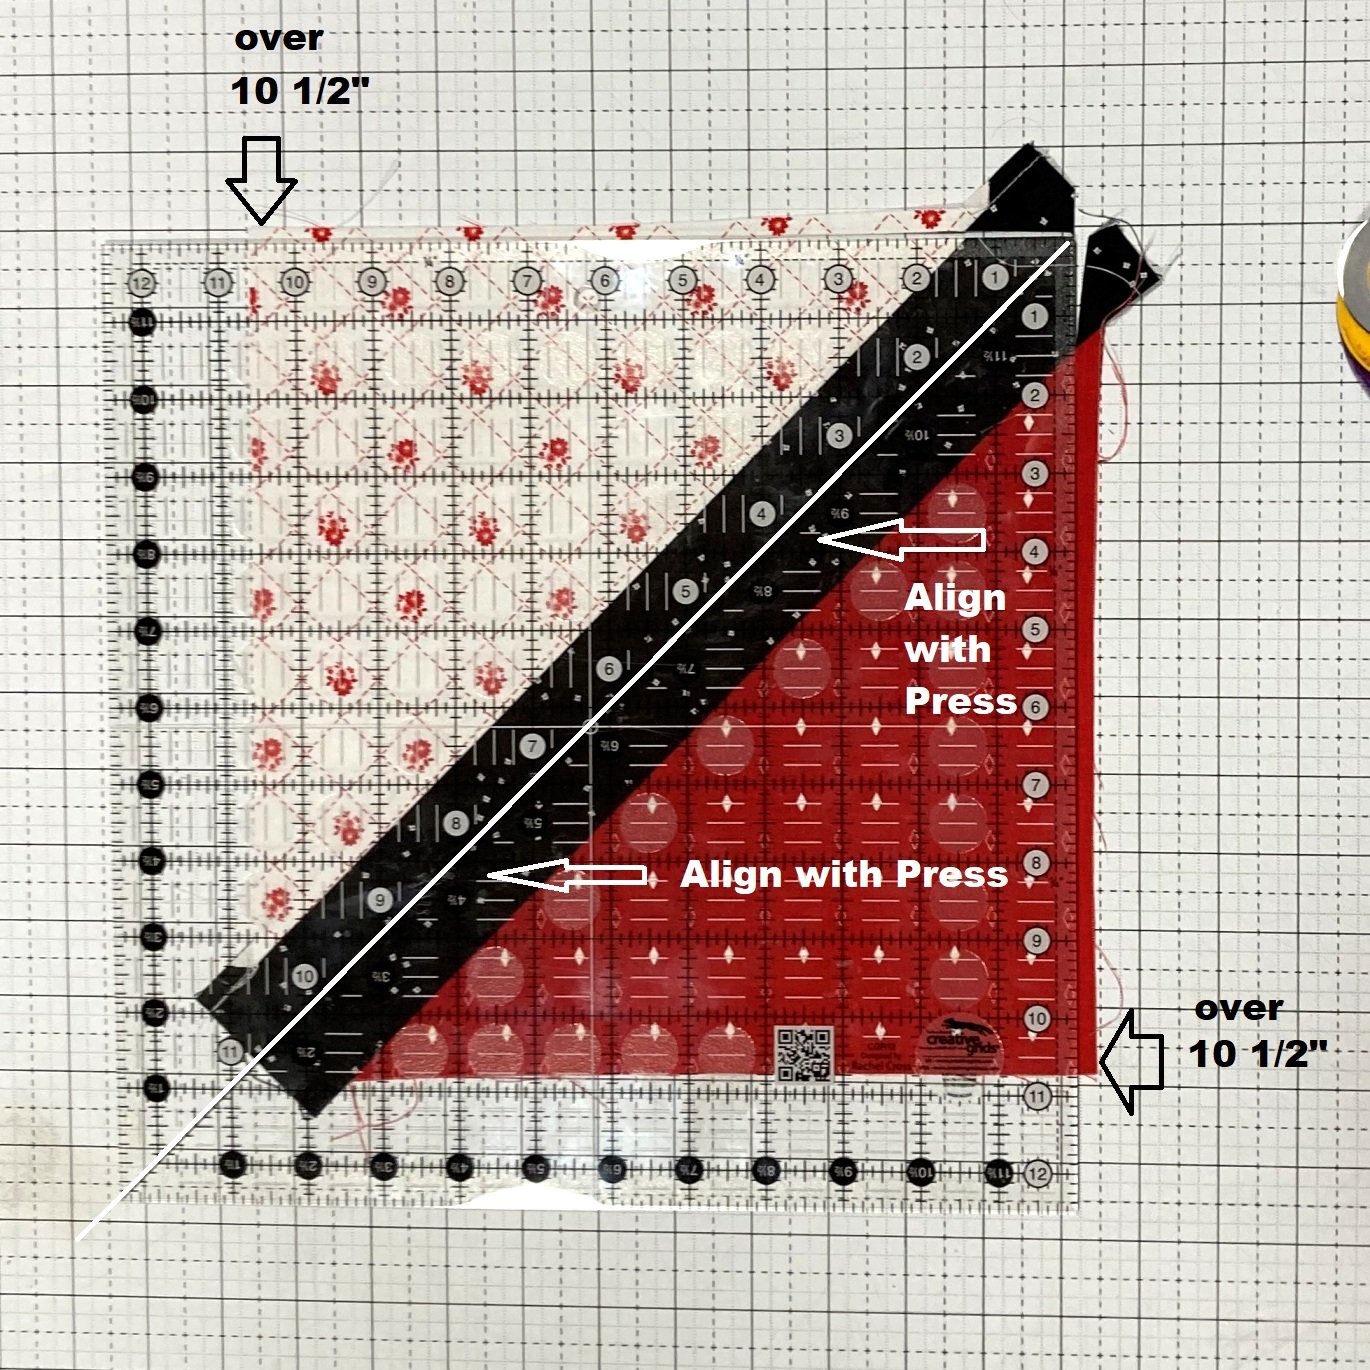
And now you are ready to trim. We will be trimming our Simple Lattice Blocks to 10 1/2" square. So to do this, place a large square ruler over your block. Ensure that the fabric on the left hand side and bottom is over the 10 1/2" markings on your ruler and that the diagonal center line on your square ruler is matched up with the pressed line in the center of the sashing strip. That is the most important! Once you are lined up, trim the left hand side and top along the edge of the ruler.

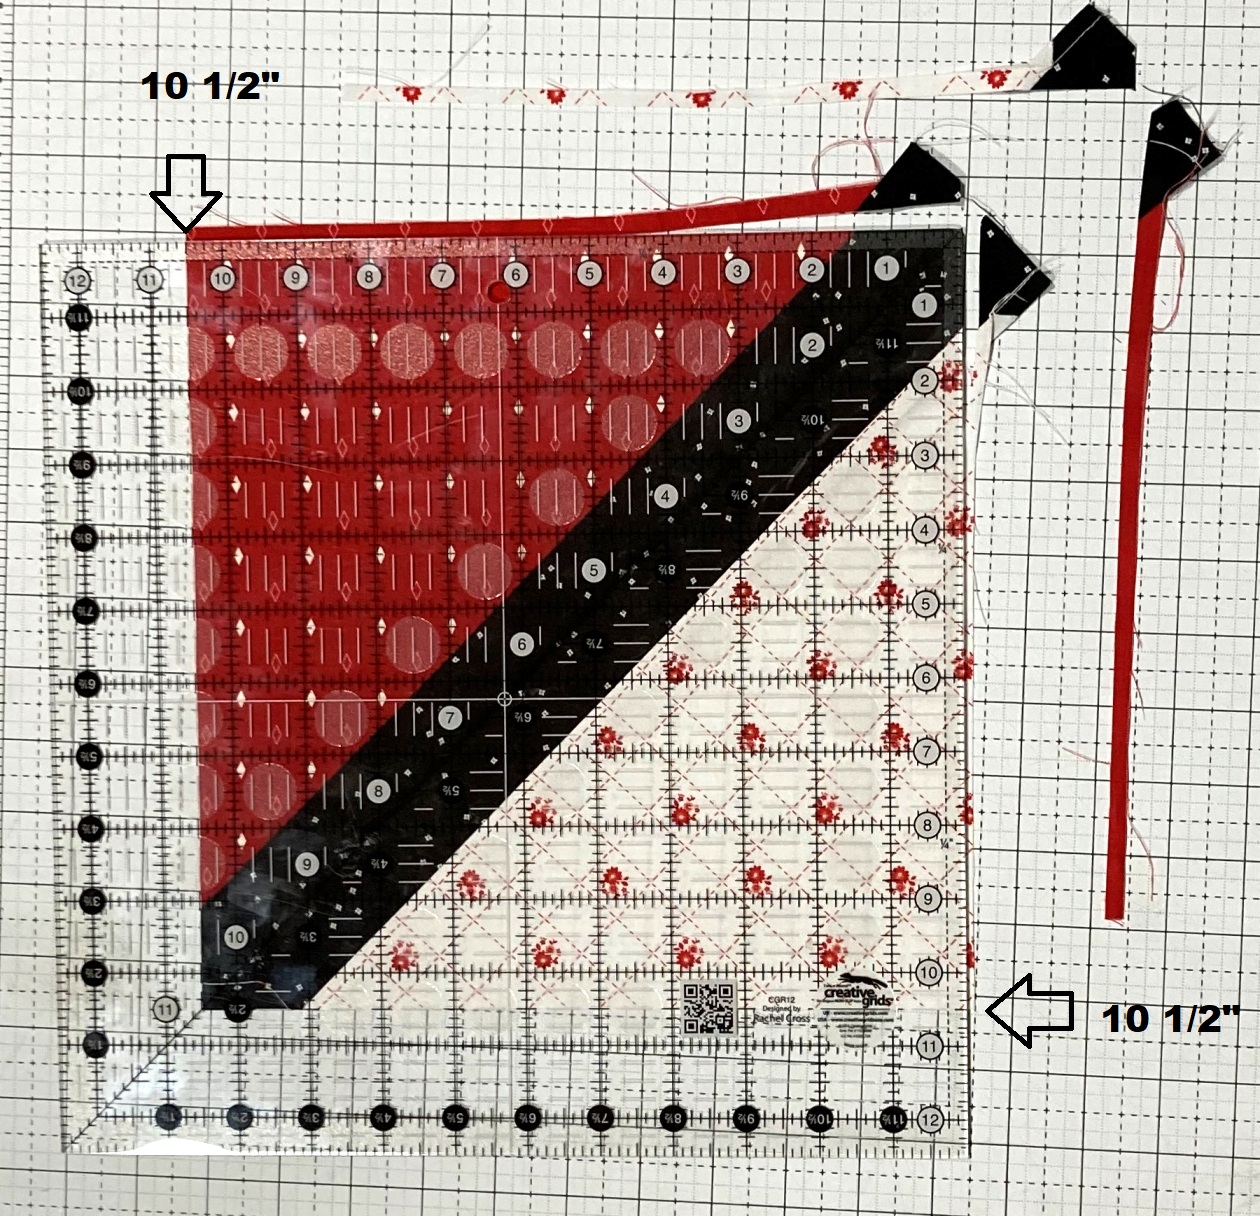
Now, simply rotate the block 180 degrees and line up the trimmed edges with the 10 1/2" marks on your ruler. The diagonal center line on your ruler will once again align with the pressed center line. Once you are lined up, trim the side and top along the edge of the ruler.

And last but not least, you no longer need that pressed line in your sashing for reference, so I like to spray it with a little water and steam it out.    Trim all 42 of your Simple Lattice Blocks.


STEP 4 - SEWING THE QUILT TOP

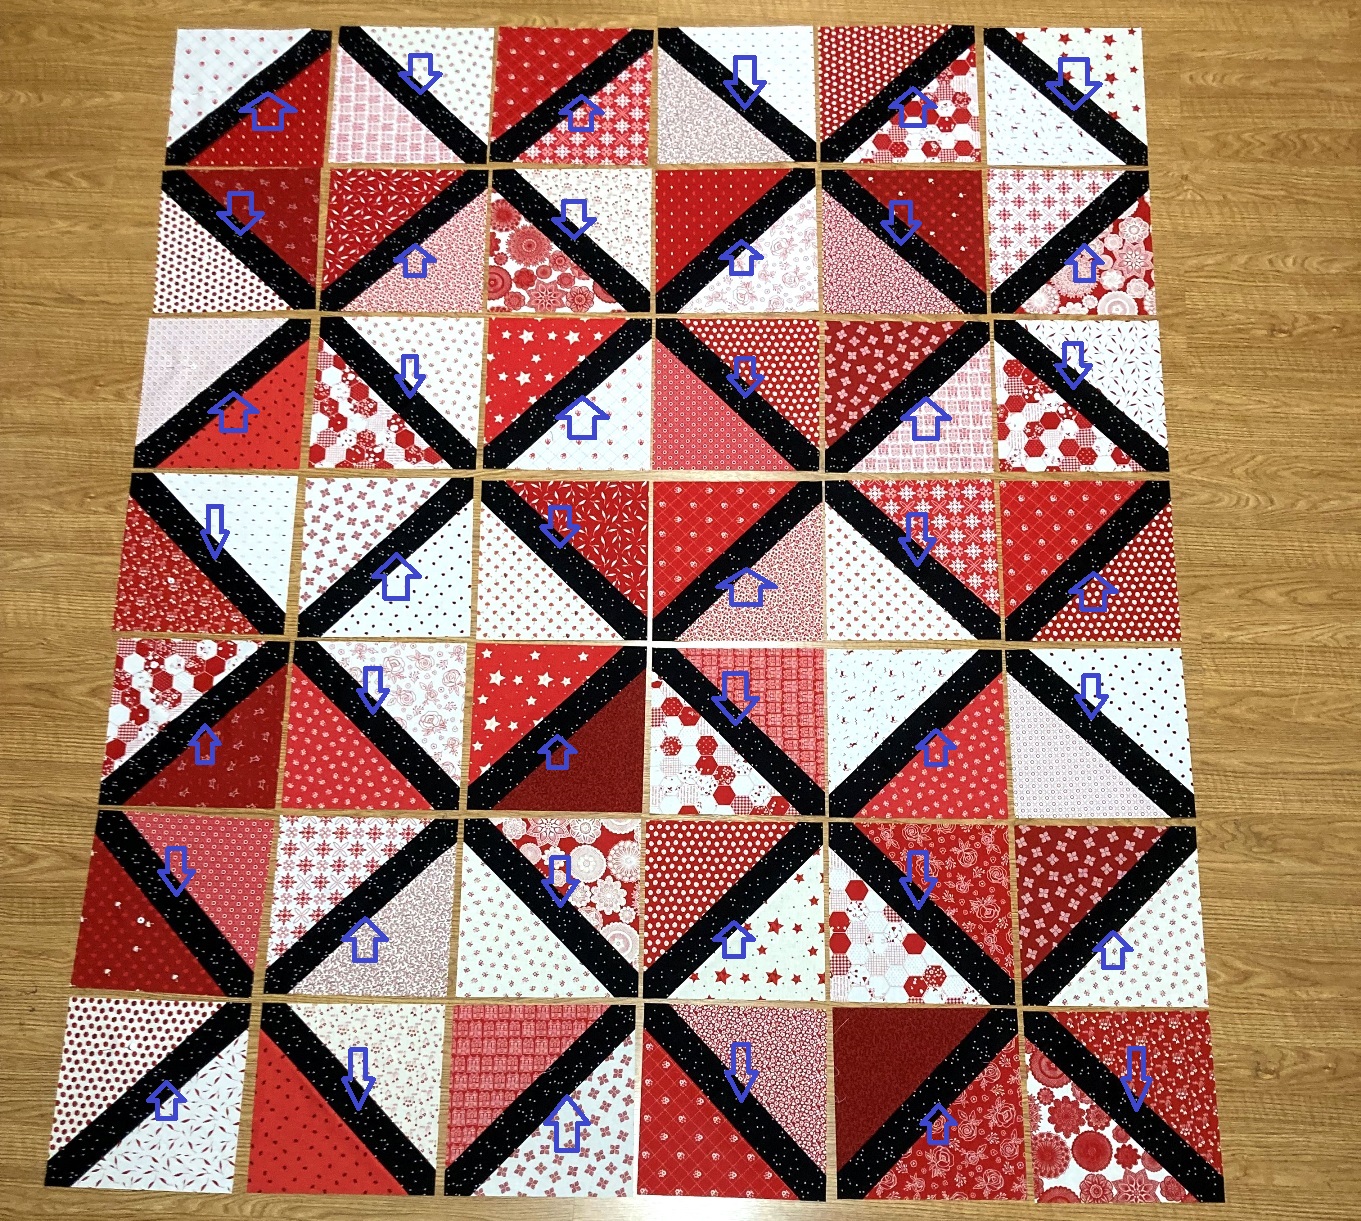
And with your trimmed Simple Lattice Blocks, you are ready to sew your quilt top. There are endless layout options with a Simple Lattice Block, and you are welcome to try them all out, or just follow this simple layout I used. The most important thing though, when laying out your blocks is to ensure that your pressed seams go in opposite directions as shown. That will allow you to nest them when sewing the blocks together and ensure nice perfect points. Once you get a layout you like, I find it helpful to mark my rows or take a picture of the layout so you can refer back to it once you have sewn and pressed.

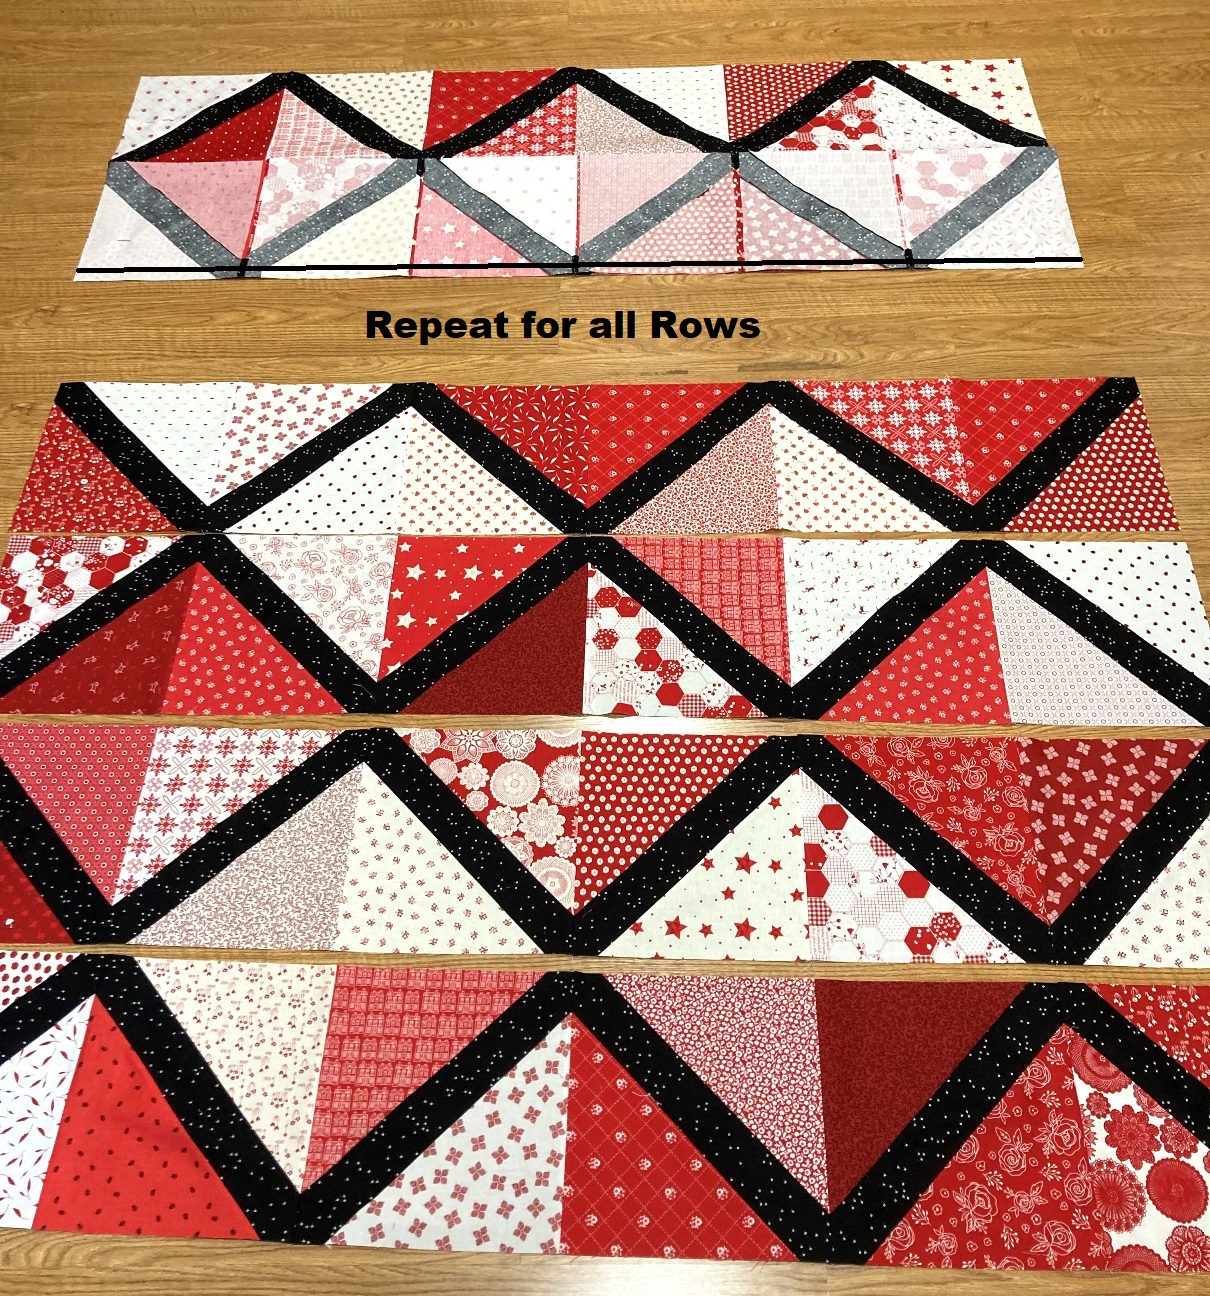
Now, it's time to sew the rows together. Place the second block onto the first block in each row with right sides together. Align and pin the seams and then stitch a 1/4" seam along the edge. (shown in the first row, chain stitch all 5 rows). Then, place the third block onto the now sewn together first and second blocks with right sides together. (shown in the second row). Align and pin the seams and then stitch a 1/4" seam along the edge. Continue in this fashion until all 6 blocks have been stitched together in a row in all 7 rows.  

Once all of the blocks are sewn into rows press the seams in each row open. Then layout your rows again.

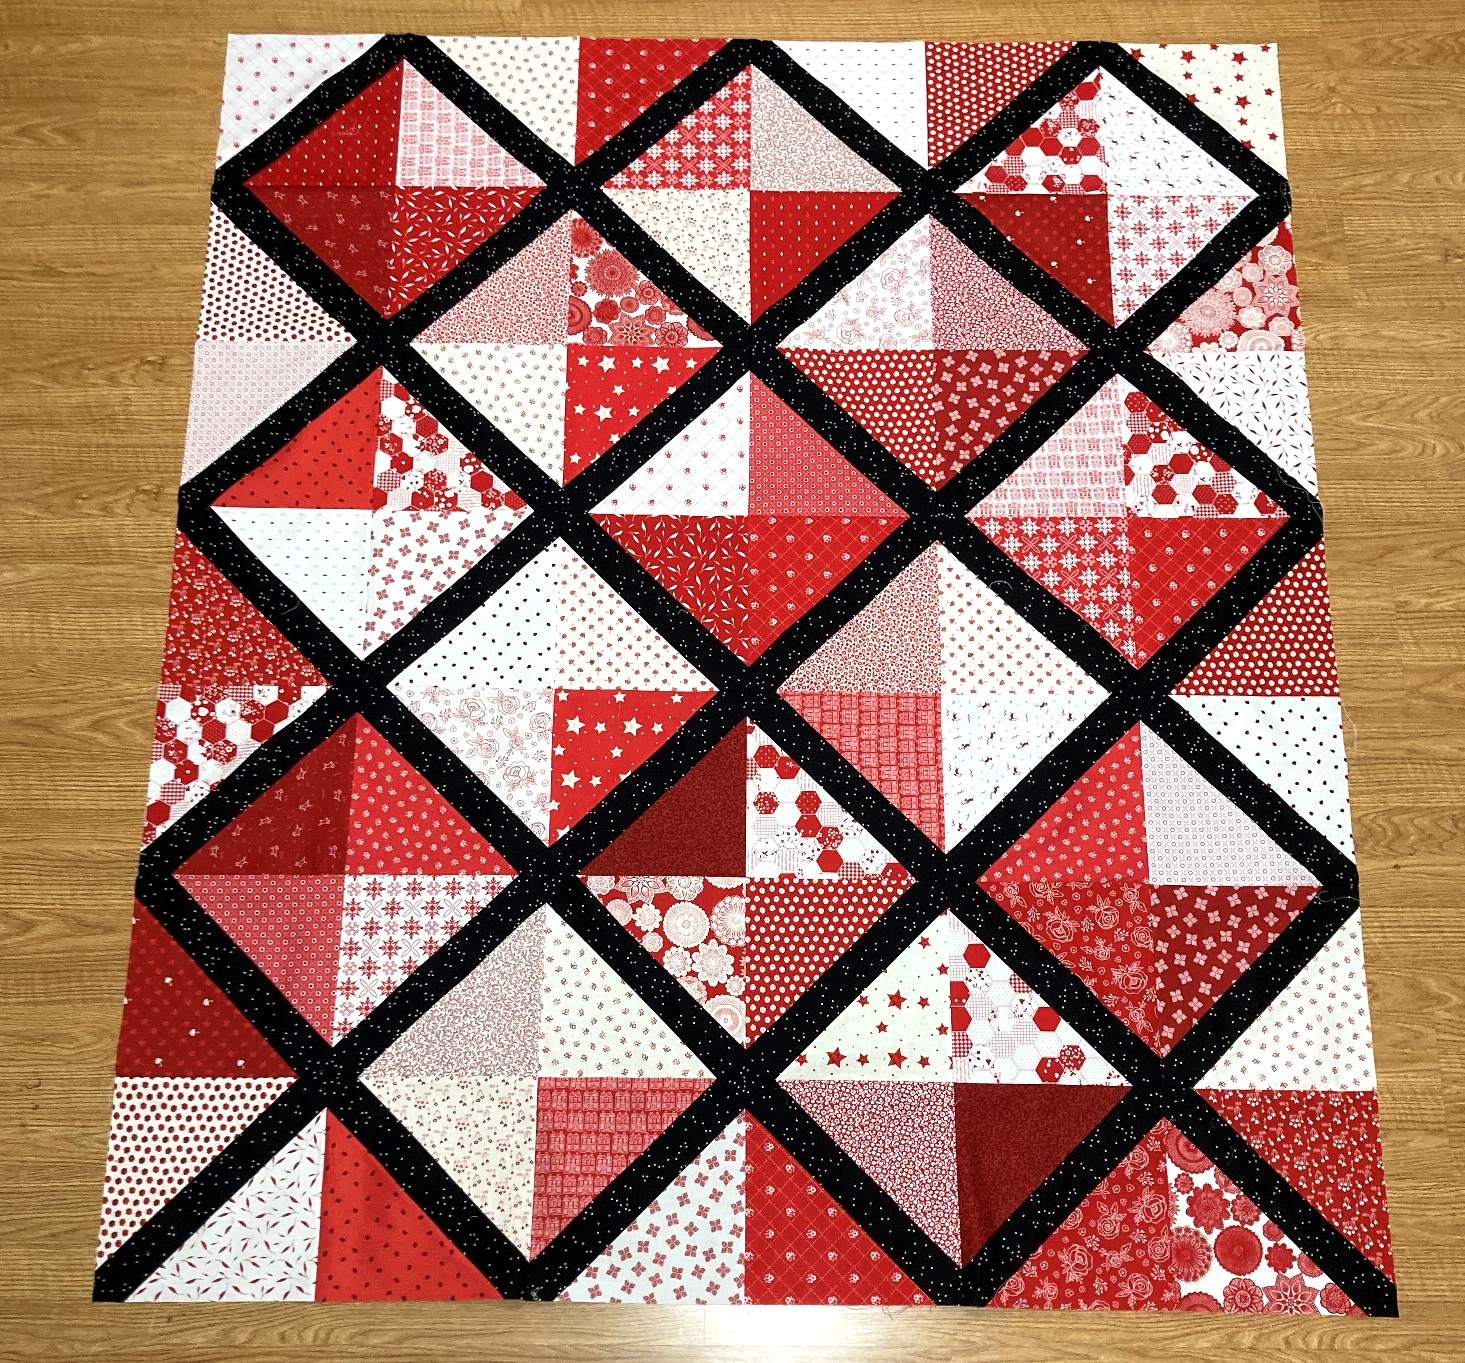
Now, stitching the rows together is the same, just in a longer fashion. Place the second row onto the first row with right sides together. Align and Pin all of your seams. Sew a 1/4" seam along the edge.  

Then, place the third row onto the now sewn together first and second row, with right sides together. Align and pin all of the seams. Sew a 1/4" seam along the edge. Continue in this fashion until all of your rows are sewn together. Press the seams open.

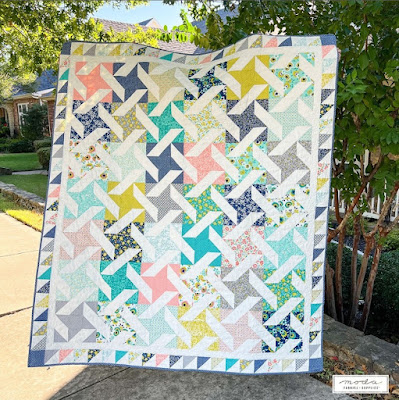
And just like that, you have a beautiful 60 1/2" x 80 1/2" finished Simple Lattice Quilt Top!!!!  So fun!!!!

And again, the great thing is the technique is the same regardless of what size square you start with or what width of sashing you add. Just ensure your sashing is longer than the long triangle length and when you trim up your block, just trim it to a slightly smaller size than the untrimmed block. And the sky is the limit!!!


STEP 5 - FINISHING THE QUILT

Before you start making all of the size Simple Lattice Blocks, let's finish up this 10" Stacker Simple Lattice Quilt first!! All that is left is to just Baste It, Quilt It, and Bind it!!!! Yup, three big things in one little sentence. If you are new to quilting and need some tips on how to Baste It, Quilt It, and Bind It, you can check out my Finishing Your Quilt Video Series. It will walk you through it all in step by step detail.  

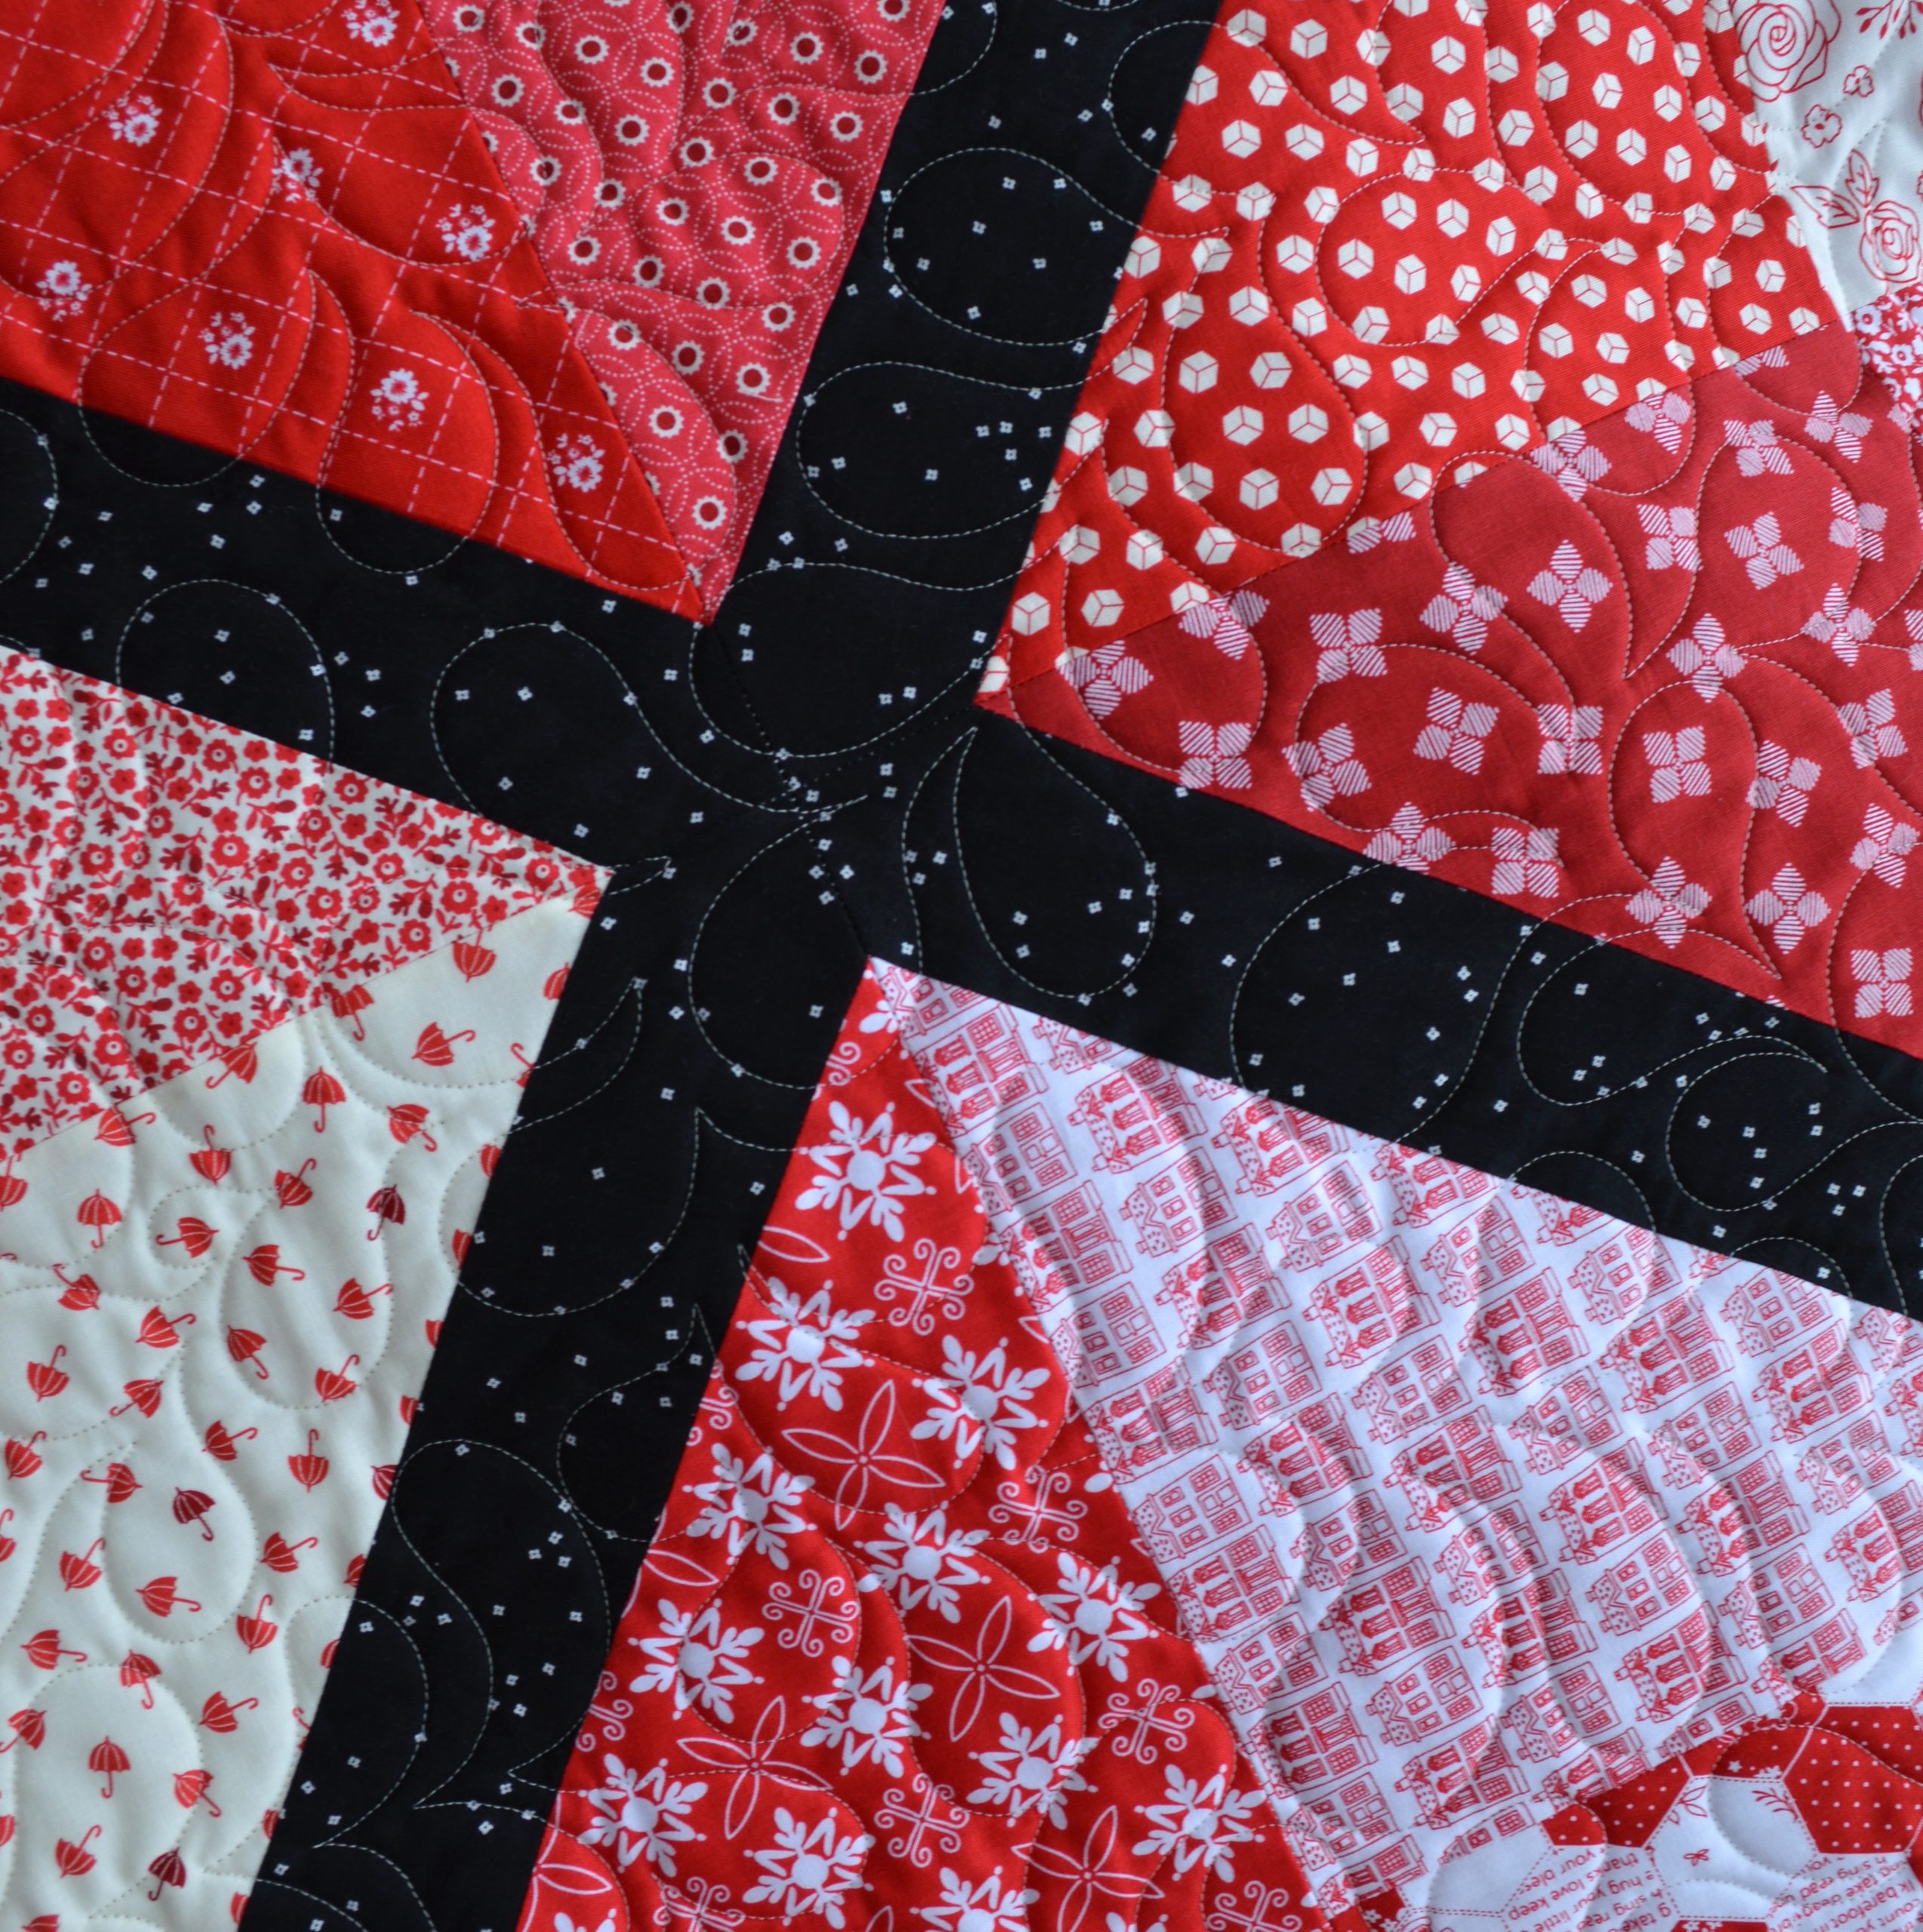
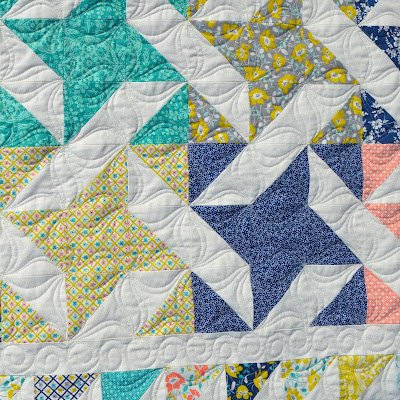
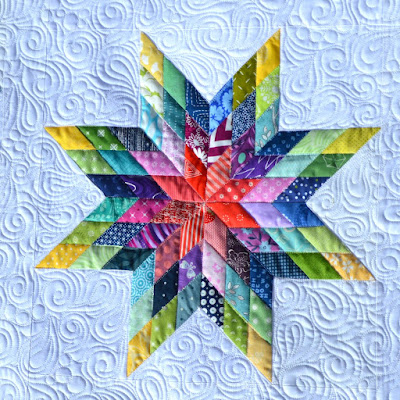
I quilted mine with an all over loose feather design that I just love to stitch. It is so relaxing and fun, and also very fast, perfect for this fast, go-to, quilt!!!

I hope you have enjoyed this tutorial and if you make your own Simple Lattice Quilt I would love to see it!! You can email me a picture at happyquiltingmelissa@gmail.com, or post it to social media with #happyquiltingwithmc :)  I can't wait to see your Simple Lattice Quilts!!!

Thanks so much for sharing this new quilt finish and tutorial with me.

I hope you have a very Happy Quilting Day!!!

Pin It!

Tuesday, February 1, 2022

Terrific Tuesday Giveaway Day!!

 It's Terrific Tuesday Giveaway Day!! Let's have some fun :)

First, we need to announce the winner from last Terrific Tuesday Giveaway!!  
The winner of the Dream Green Twin Size batting from Kimberly's Fabric Stash . . .   Number #30  . . . Congrats scottylover!  I have messaged you :)  


And on to today's

Today's Terrific Tuesday Giveaway is being sponsored by Fat Quarter Shop.   Fat Quarter Shop is amazing and they never cease to amaze me with everything they have going on at their shop!!!     And did you know they have a 24 Hour Flash Sale every day with 2 Flash Sales on Tuesdays!!   And not only do they have a daily deal, they have a Fabric Basic, Pattern, and Notion of the Month!!!!     All Bee Cross Stitch Basics  by Lori Holt for Riley Blake Designs are on sale!!!  Also, All Oh . . .Sew Organized Stash and Store  unitsare on sale for the Notion  , and all It's Sew Emma Patterns are on sale for the Pattern.   Save 20-30% off of all of them for the whole month of January!!  So great ;) 

24 Hour Flash Sales at the Fat Quarter Shop!


And for today's Terrific Tuesday Giveaway Fat Quarter Shop is giving away this gorgeous Sweet Moda Mix Fat Quarter Bundle!!!  How perfect is this bundle for all of your Valentines projects!!!  


You have two entry chances here on the blog, and please leave a separate comment for each.  All Entries are welcome, including International Entries.   Please just be sure to leave an email address if you are a no-reply blogger ;)  


ENTRY 1 - Simply leave a comment that tells me something Sweet :)  

 ENTRY 2 - Show your Fat Quarter Shop love.   You can follow them on   FacebookTwitterInstagramPinterestYou Tube or at their Blog.  You can Sign up for their Newsletter which will ensure you catch all of their amazing sales, or you can visit The Shop and then share a favorite item ;)   Just be sure to leave a comment of how you showed your Fat Quarter Shop Love!!!

And that's it ;)  The giveaway will be open until next Tuesday, February 8th, when I will announce a winner at the beginning of next weeks Terrific Tuesday Giveaway Post :)

You can also pop over to my Instagram and/or Facebook to enter there as well :)  

Good Luck and Have a Happy Quilting Day!!!
Pin It!

Friday, January 28, 2022

Spring Migration Quilt!!!

 It is always a fun day when I get to share a little secret sewing for my good friends at Moda Fabrics ;)     And how happy and bright is this quilt, just perfect for getting through the rest of winter and looking forward to Spring!!!    And speaking of spring, the name of this quilt is Spring Migration and it is by Clark Street Quilts!!! 

Like I said, these fabrics are just so happy!!!  I remember opening the box and just smiling at these wonderful prints and colors of the Morning Light  Fabric Line by Linzee McCray   My favorite is the pop of coral, just gorgeous!!!  And there is a tone on tone damask print that I absolutely love, along with all the other beautiful florals.  


The piecing in this quilt is oh so much fun :)   Yup, a whole lot of Half Square Triangles, so your Bloc Loc ruler really comes in handy for this one.   But I love the stars they create, and how much movement is in the design.   And of course, I always love a HST border!!    And because it is mostly basic piecing, it went together super fast.   It finishes at 63 x 72 so it is a great size to snuggle up in.  

And when it came time to quilt it, I just had to take advantage of the perfect nine patches of each block.    So I quilted my all over Wavy Orange Peel, and I just love all of the extra movement it adds, just so fun!!!  I added a curly Q in the border, just to break it up and it turned out so cute.   And  good ol' 402 Pearl blended perfectly in all of these light and dark colors, it truly is my favorite!! 

And this quilt is now making its way to quilt shops around the US.   Moda posted this adorable picture of it and I couldn't help but share it as well.  Doesn't it just look perfect in that quaint little neighborhood.    So pretty!!!  

So the snuggling for me will have to wait until it makes it's way home.   But you don't have to wait!!!  Morning Light Fabrics are shipping now and Fat Quarter Shop has a Spring Migration Quilt Kit already available.  And don't you just love the boxes the kits come in, so cute!!! 

I am so happy that I got to make this beautiful Spring Migration quilt, it really was oh so much fun to make!!      I already have it on my list to make again because I just love all the amazing secondary designs created in this wonderful Spring Migration pattern  :)  And how cute would it be to shrink the block size down and make a baby quilt, so adorable!!  


And that is it for today and the weekend!!

Thanks for popping in and sharing this finish with me !!

I hope you all have a very Happy Quilting Day!!

Pin It!

Wednesday, January 26, 2022

Starlite Rainbow Quilt and Tutorial!!!

 I am so thrilled to be sharing my newest finish today and to sharing a new AccuQuilt Tutorial for it as well.    It's called Starlite Rainbow, and it is just so happy making!!!   I have been sharing sneak peeks of this for the last little bit, so here it is, the full reveal of my Starlite Rainbow quilt!!!


Okay, I know I have said it before, but I just love quilting the rainbow!!!   Each star has 5 of the basic primary colors in it and they "explode" from the center of the star in color order so you get the graduated rainbow effect in each star.   


And this quilt is entirely made of scraps!!!  Don't you just love a good scrap buster :)   I used the Prairie Star BOB die for cutting all of the pieces for the quilt.  I cut all of my red scraps, and then all of my yellow, and so forth.  You need 144 diamonds from each color, so ya, lots and lots of scrap busting!!!   


The Starlite Rainbow quilt is made up of just under 1000 pieces, which sounds like a whole lot right!!   But truly, the cutting is super fast with the Prairie Star BOB die and the piecing is so easy because all of the diamonds have the little dog ears, making it easy to line everything up just right.    It measures 50" x 62" when it is finished so it is a great size to be used as a lap quilt to snuggle up with.  


When it came time to quilt I decided I really wanted to make those stars pop!!   So I stitched in the ditch around the piecing of the stars, and then quilted small swirls, paisleys, pebbles, and curls in the background. I just love the texture it added to the quilt and it really made the stars the focal point, they just shine :)  
  

Oh, and side note . . . if you are wondering where the name of this quilt came from??   Total child of the 80's here, and one of my favorites was Rainbow Brite.   Any of you remember the name of her horse??   Better yet, did any of you sing along to Starlite Rainbow Brite on your cassette tape??  Ya, that song kept running through my head while I was sewing the stars together, so it just had to be the namesake for this quilt :)


And that is my Starlite Rainbow Quilt!!!  And I hope you love it as much as I do ;)   If you want to make your own Starlite Rainbow Quilt just pop on over for the free step by step tutorial!!!     And when you are done, I would love to see it!!!  You can email me a picture at happyquiltingmelissa@gmail.com or post it to social media with #happyquiltingwithmc and #AccuQuilt ;)  I can't wait to see your Starlite Rainbow Quilts!!!


Thanks for joining me today and sharing this new quilt and tutorial with me ;)  I am so glad to have made this quilt.  I have had a prairie star quilt on my bucket list for a long time, and now I can cross it off and enjoy the finish!!  


Oh, and fun little side note . . . if you want to watch me share this Starlite Rainbow Quilt on the Live AccuQuilt Show, you can see it here on YouTube, I come and visit at about 13 minutes in ;)  

I hope you all have a very Happy Quilting Day!!!  
Pin It!

Tuesday, January 25, 2022

Terrific Tuesday Giveaway Day!!

 It's Terrific Tuesday Giveaway Day!! Let's have some fun :)

First, we need to announce the winner from last Terrific Tuesday Giveaway!!  
The winner of the $25.00 Gift Certificate from Lou Lou's Fabric Shop . . .   Number #363  . . . Congrats ladydifulmer!  I have messaged you :)  


And on to today's

Today's Terrific Tuesday Giveaway is being sponsored by Kimberly's Fabric Stash.    You will find so many amazing fabrics over at Kimberly's and everyday low prices!!! Kimberly has an  App so you can shop even easier.  It is available for both android and apple.    And be sure and Sign Up for Kimberly's Fabric Stash Brand New Newsletter so you know all the sales and going's on!!! 


Today's Terrific Tuesday Giveaway is for some amazing quilting goodness!!!  Kimberly's Fabric Stash is giving one lucky reader a Dream Green Twin Size batting!!!   And if it is one thing we all need more of, it's batting!!!  


You have two entry chances here on the blog, and please leave a separate comment for each.  All Entries are welcome, including International Entries.   Please just be sure to leave an email address if you are a no-reply blogger ;)  


ENTRY 1 - Simply leave a comment that tells me if you have any apps on your phone that you have never used??

 ENTRY 2 - Show your Kimberly's Fabric Stash  Love!!!!   You can  You can follow them on   Facebook(where Kimberly Hosts her Facebook Live every Friday at 7 EST) TwitterPinterest, or You Tube.  Or you can visit The Shop  and then share a favorite item ;)   Just be sure to leave a comment of how you showed your Kimberly Fabric Stash Love!!!

And that's it ;)  The giveaway will be open until next Tuesday, February 1st,  when I will announce a winner at the beginning of next weeks Terrific Tuesday Giveaway Post :)

You can also pop over to my Instagram and/or Facebook to enter there as well :)  

Good Luck and Have a Happy Quilting Day!!!
Pin It!