Wednesday, January 11, 2023

BOHO Heart Block of the Month - Month 8

 It's Month 8 with my good friends at Stitchin' Heaven  doing their BOHO Heart Monthly Block of the Month program and that means another month of fun tutorials!!

Month 1                Month 2               Month 3             Month 4            Month 5               Month 6

Month 7                Month 8               Month 9            Month 10           Month 11              Month 12

And since each month has Lots and Lots of Tutorials in them . . . Here is a list to jump right to the tutorial you need for this month 8:  

Mini Framed Square Block                 Square in a Square Block                 Pinwheel Block           

Small Sawtooth Star Block                 Churn Dash Block                           Simple Framed Square  Block

Dresden Fan Block                              Owl Block                                       Courthouse Steps Block

Flying Geese Block                             Half Square Triangles Block           Intersection Block    

Sewing Background Strips                  Sewing Section 2                            Sewing Section 3

                                Sewing Section 4                  Sewing Section 1-4 Together                          


So you have your Month 8 BOHO Heart Packet . . .  Lets get started!!! 


We'll start with our first block of Month 8, the . . .


From your Month #8, Mini Framed Square bag, cut the fabrics according to page 2 of the supplemental cutting list. 
  

Using the cut pieces and the Mini Framed Square Directions from Month 2 make your first block,  the Mini Framed Square Block  measuring 2 1/2" x 2 1/2" unfinished. 


And now we can move onto another familiar block,  the . . .

Square in a Square Block

From your Month #8, Mini Framed Square bag, cut the fabrics according to page 2 of the supplemental cutting list. 
  

Using the cut squares and the Square in a Square Block Directions from Month 1 make your block, The Square in a Square Block  measuring 2 1/2" x 2 1/2" unfinished. 


And now we can move onto a fun new block, the . . .

Pinwheel Block

From your Month #8, Pinwheel bag, cut the fabrics according to page 1 of the supplemental cutting list.    I cut my squares 3" instead of the 2.875" and will trim.   


Using the cut squares and the Pinwheel Block Directions from Month 1 make your 2 blocks.   The Pinwheel Blocks measuring 4 1/2" x 4 1/2" unfinished.  


And now we can move onto another familiar block , the . . .

Small Sawtooth Star Block


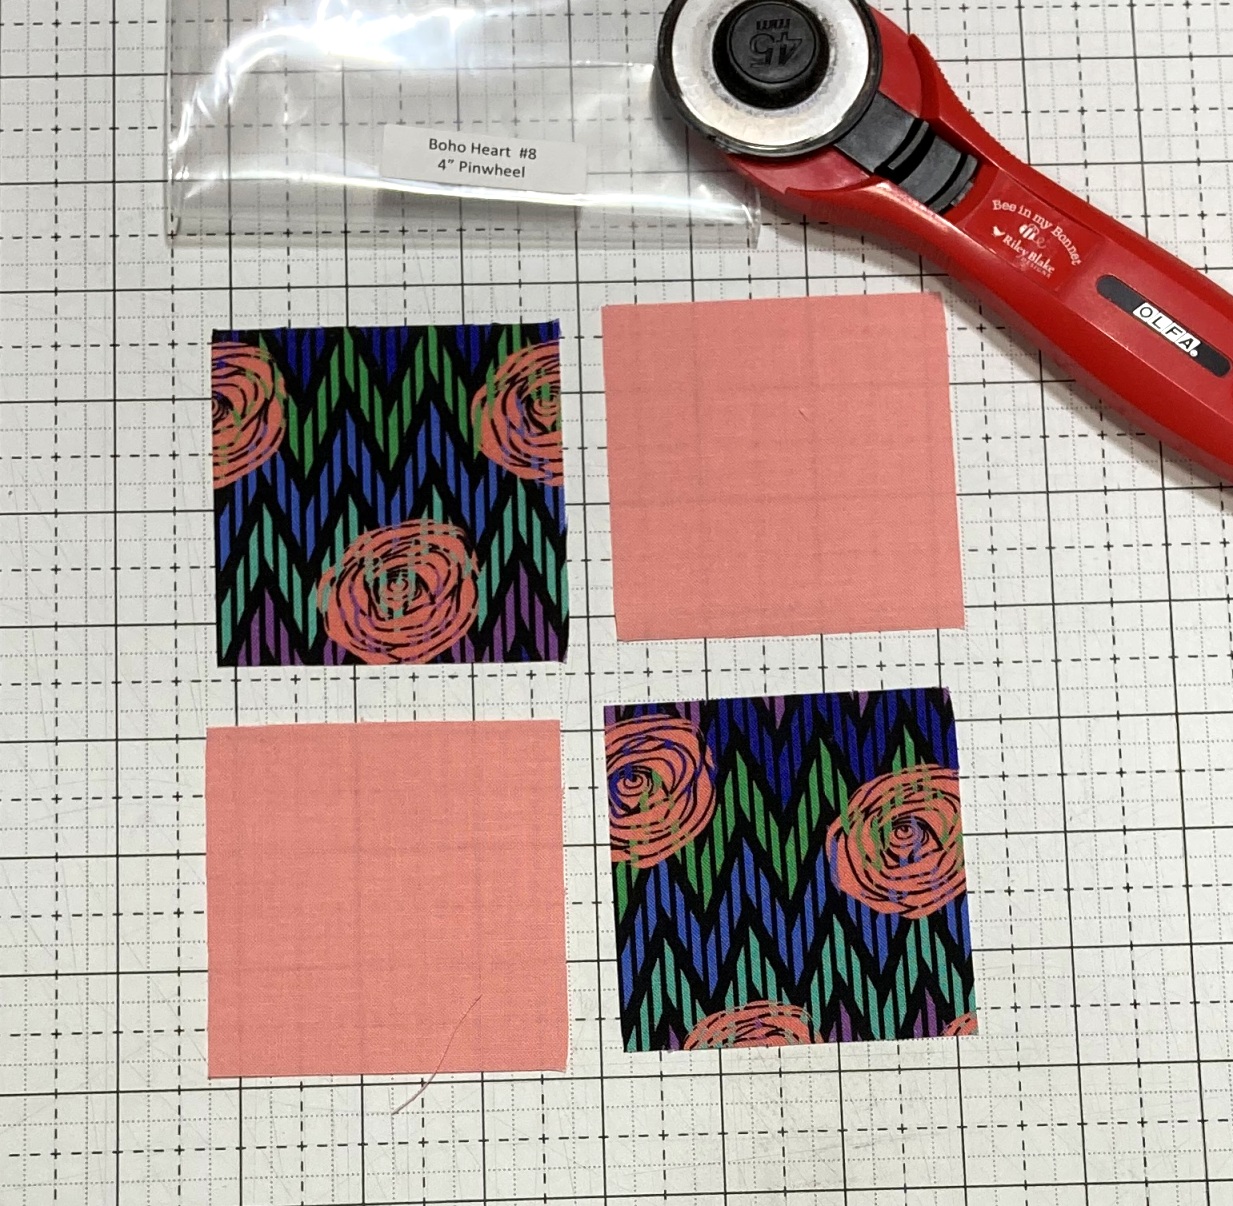
From your Month #8, Small Sawtooth Star bag, cut the fabrics according to page 1 of the supplemental cutting list. 
   

Using the cut squares and the Sawtooth Star Block Directions from Month 1 make your block.  Obviously, there are just a few alterations in the directions, they are made the same way, just smaller and you don't have to do a patchwork star center just use the center square you cut.   The Small Sawtooth Star Block should be measuring 4 1/2" x 4 1/2" unfinished. 


And now we can move onto another familiar block , the . . .

Churn Dash Block


From your Month #8, Churn Dash bag, cut the fabrics according to page 1 of the supplemental cutting list.   I cut my squares 3" instead of the 2.875" and will trim. 


Using the cut pieces and the Churn Dash Block Directions from Month 1 make your block.   The Churn Dash Block measuring 6 1/2" x 6 1/2" unfinished.  


And now we can move onto yet another familiar unit, the . . .

Simple Framed Square Block


From your Month #8, Simple Framed Square bag, cut the fabrics according to page 2 of the supplemental cutting list.   


Using the cut pieces and the Mini Framed Square Block Directions from Month 2 make your block.  And again, it is made the same way, just on a larger scale.  The Simple Framed Square Block should be measuring 6 1/2" x 6 1/2" unfinished.   


And now we can move onto a new block made with a familiar unit,  the . . .

Dresden Fan Block


From your Month #8, Dresden Fan bag, cut the fabrics according to page 1 of the supplemental cutting list.   


Using the Dresden pieces and the Dresden Plate Directions from Month 5 make 6 Dresden Plates, 3 of each of your 2 green fabrics.    Layout your plates as shown below.  


Lay the second plate onto the first plate with right sides together.  Be sure to line up your folded edges along the top.  Sew a 1/4" seam along the side edge.   Then continue in this fashion until you have sewn all 6 plates together in a row.  


Now you want to press the seams.  I like to press the seams open, but you can also press them to one side, just make sure to press them all in the same direction.  


And now, we are going to add our Fan Dresden Plate into a block.  Align the Fan in the Corner of the Block, with the two fan edges overhanging.  Double check that the Quarter Circle Applique will overlap the edges of the Dresden Fan when placed in the Corner of the block.  Trim the 2 edges of the Dresden Fan so it is aligned with the Purple Square.   


 Place the Quarter Circle on the corner of the block.  Pin the Dresden Fan Plate and Quarter Circle Applique in place, I like to pin around the center of the plate so the pins won't get in the way when I secure stitch.   


And all that is left is to secure stitch your applique to your block.   I start with the quarter circle applique.  I used a white thread so it would match with all of the white prints.   And as always, you can hand stitch or machine stitch using your favorite stitch.


Then secure stitch around the Dresden Fan.  When secure stitching around the Dresden Fan, you only need to stitch around the outside of the plate.  you do not need to secure stitch down the side seams. 


And now you have a beautiful Dresden Fan Block that should be measuring 6 1/2" x 6 1/2" unfinished.  


And now we will continue with some more applique fun making the,

Owl Block


From your Month #8, Owl bag, cut the fabrics according to the page 2 supplemental cutting list.  Also, cut out your Owl Body, Wings, Eye, Tummy, and Beak Templates.  Because this is a layered applique block, I like to prepare the fabrics with Lite Heat N Bond before tracing the templates.  This just makes them a little easier to work with, but if you don't like the bulk of Heat N Bond, just keep using the glue ;)  Trace your templates on to the wrong side of your fabrics and then cut out all your applique pieces.   And be sure when tracing the Owl Wing template, to trace one on the right side of the template and one on the wrong side of the template so you have two wings facing opposite directions.   


If using Heat N Bond, remove the paper backing on your Appliques.  Fold your Green Square in half twice and diagonally twice to give you a good center alignment.  


Place your appliques on top of one another and the Lime Green Square as shown below.  It doesn't have to be perfectly aligned, just so long as it gives the shape of an owl.  If Layered Applique projects are new to you, you can see this Complex Layered Applique Tutorial to give you a few more hints ;)   


And once again, you need to secure stitch your applique to your block, and be sure to secure stitch all the different applique pieces backstitching at the beginning and end of each.    You will need to start and stop several times to stitch round all the pieces.    I just used a white neutral thread, but you can totally use any color you like, or change threads for each applique piece.  


And you have your eighth block finished and also are finished with Applique for this month.   I just love this cute Owl Block measuring 6 1/2" x 6 1/2" unfinished. 


And now one last Familiar block, the  . . . 


From your Month #8, Courthouse Steps bag, cut the fabrics according to page 2 of the supplemental cutting list.   Note - The Pink fabric for my block was missing from my bag, so I pulled something from my pink scrap bin.  If yours is missing as well, you can use scraps or contact Stitchin' Heaven customer service and they will send you out the pink fabric.  


Using the cut pieces and the Courthouse Steps Block Directions from Month 5, and taking care to watch the color placement, make your block.    The Courthouse Steps Block should be measuring 8 1/2" x 8 1/2" unfinished.   


And now another new block with a familiar unit, the  . . . 

Flying Geese Block


From your Month #8, Flying Geese bag, cut the fabrics according to page 3 of the supplemental cutting list. 


Using the cut pieces and the Flying Geese Block Directions from Month 4, make 4 Flying Geese Blocks that will now be Flying Geese Units. Layout the 4 Flying Geese Units as shown.


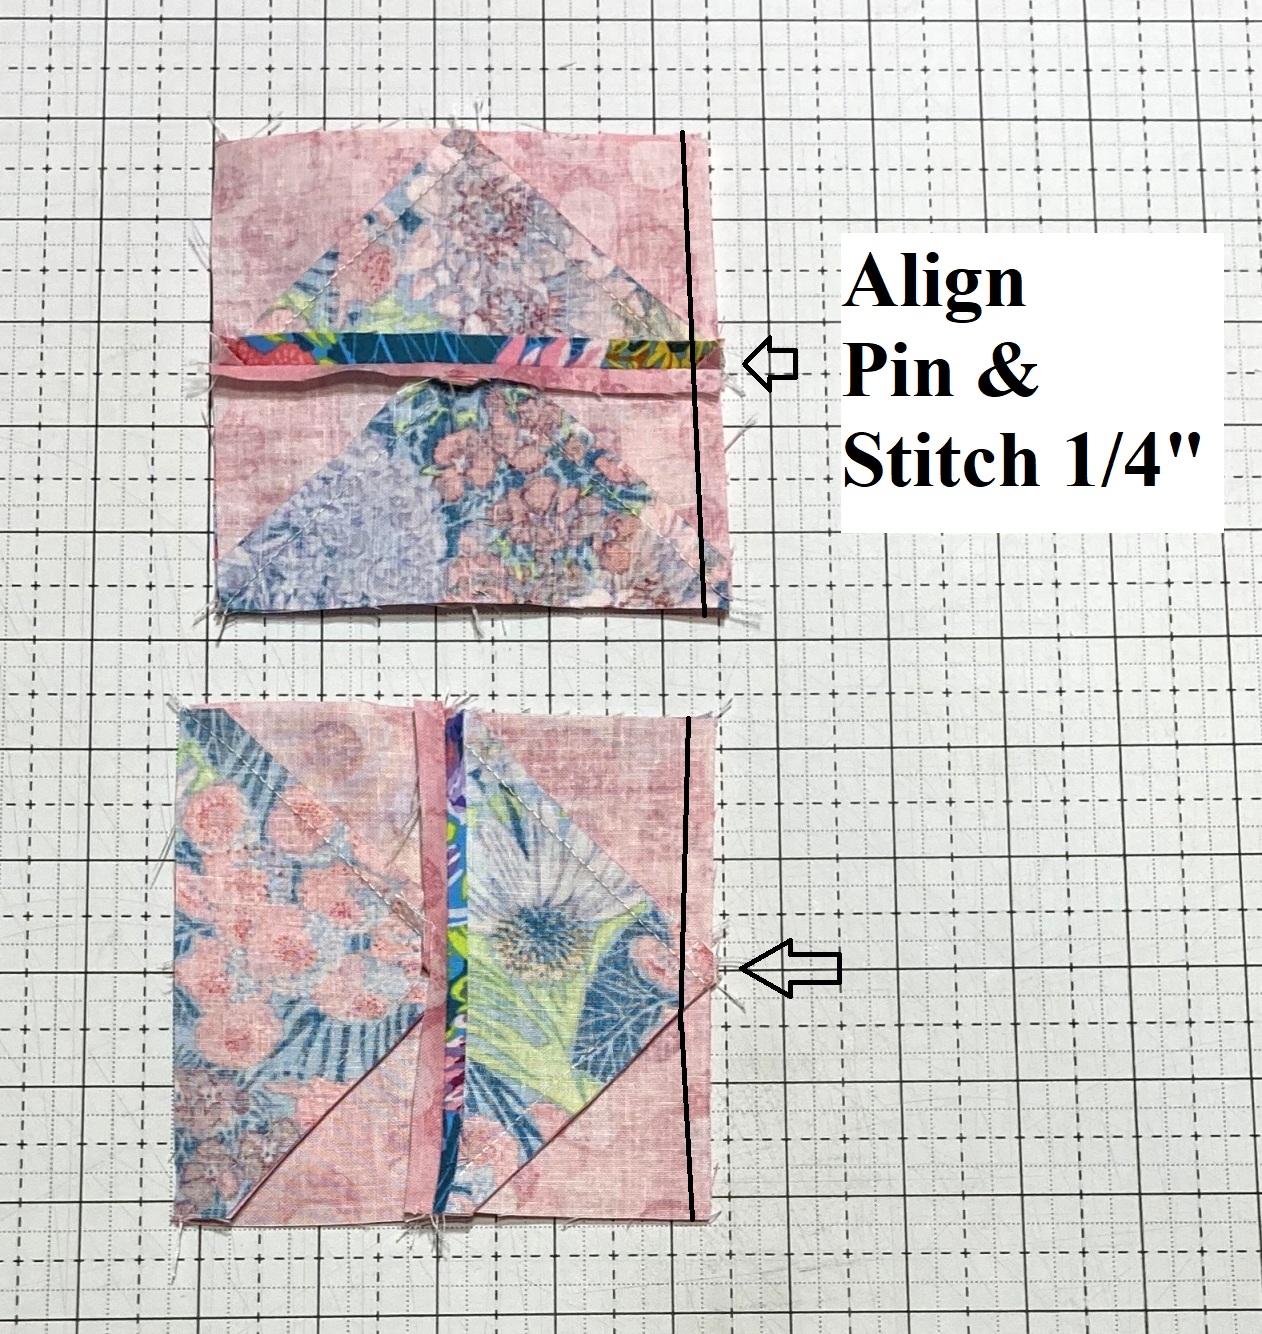
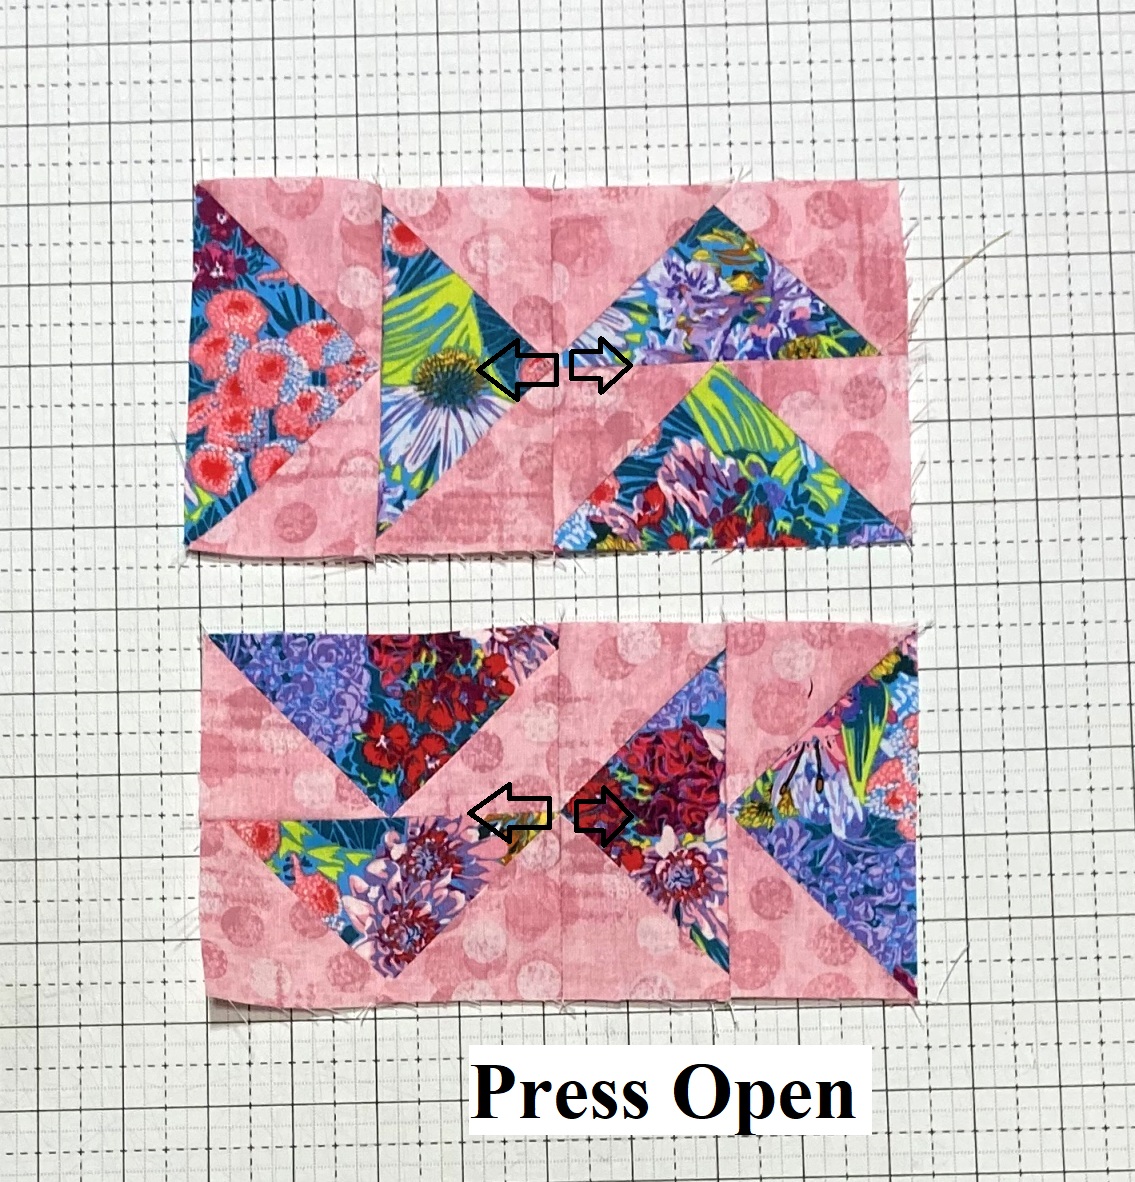
Place the right hand units onto the left hand units with right sides together.   Align and pin if desired.   Stitch a 1/4" seam along the edge of all the units, taking care to stitch directly along the bottom of the fabric V and through the center of the Thread X.  


Press the seams open.   


Place the Top Row onto the Bottom row with right sides together.   Align and pin/nest the seams.   Stitch a 1/4" seam along the pinned edge, watching the Fabric V and Thread X again.   Press the seam open.


And your Block is done and you have a Flying Geese Block that should measure 8 1/2" x 8 1/2" unfinished.  


And now another new block with a familiar unit, the  . . . 


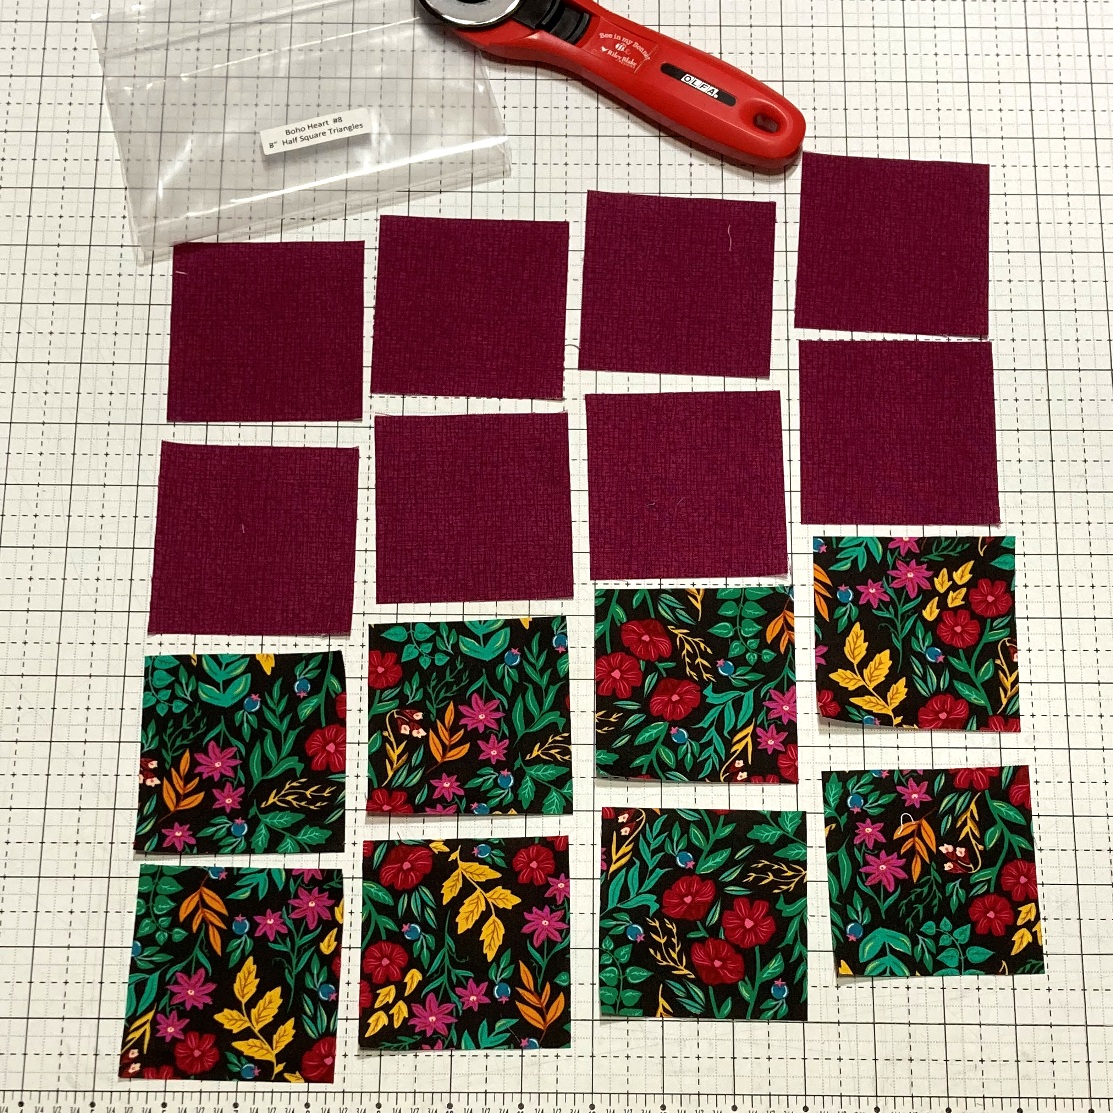
From your Month #8, Half Square Triangles bag, cut the fabrics according to page 3 of the supplemental cutting list.  I cut my squares 3" instead of the 2.875" and will trim. 


Using the cut squares and the Half Square Triangle Block Directions from Month 1make 16 Half Square Triangle Units.   Layout 4 Half Square Triangle Units in 4 Rows as shown.


Using the Half Square Triangles and the Half Square Triangle Block Directions from Month 2make the block.    This block is made in the same way, only instead of a 3 x 3 layout, it is a 4 x 4 layout.   


And your Half Square Triangles Block should be measuring 8 1/2" x 8 1/2" unfinished.  


And that leaves us with one final new block, the . . . .
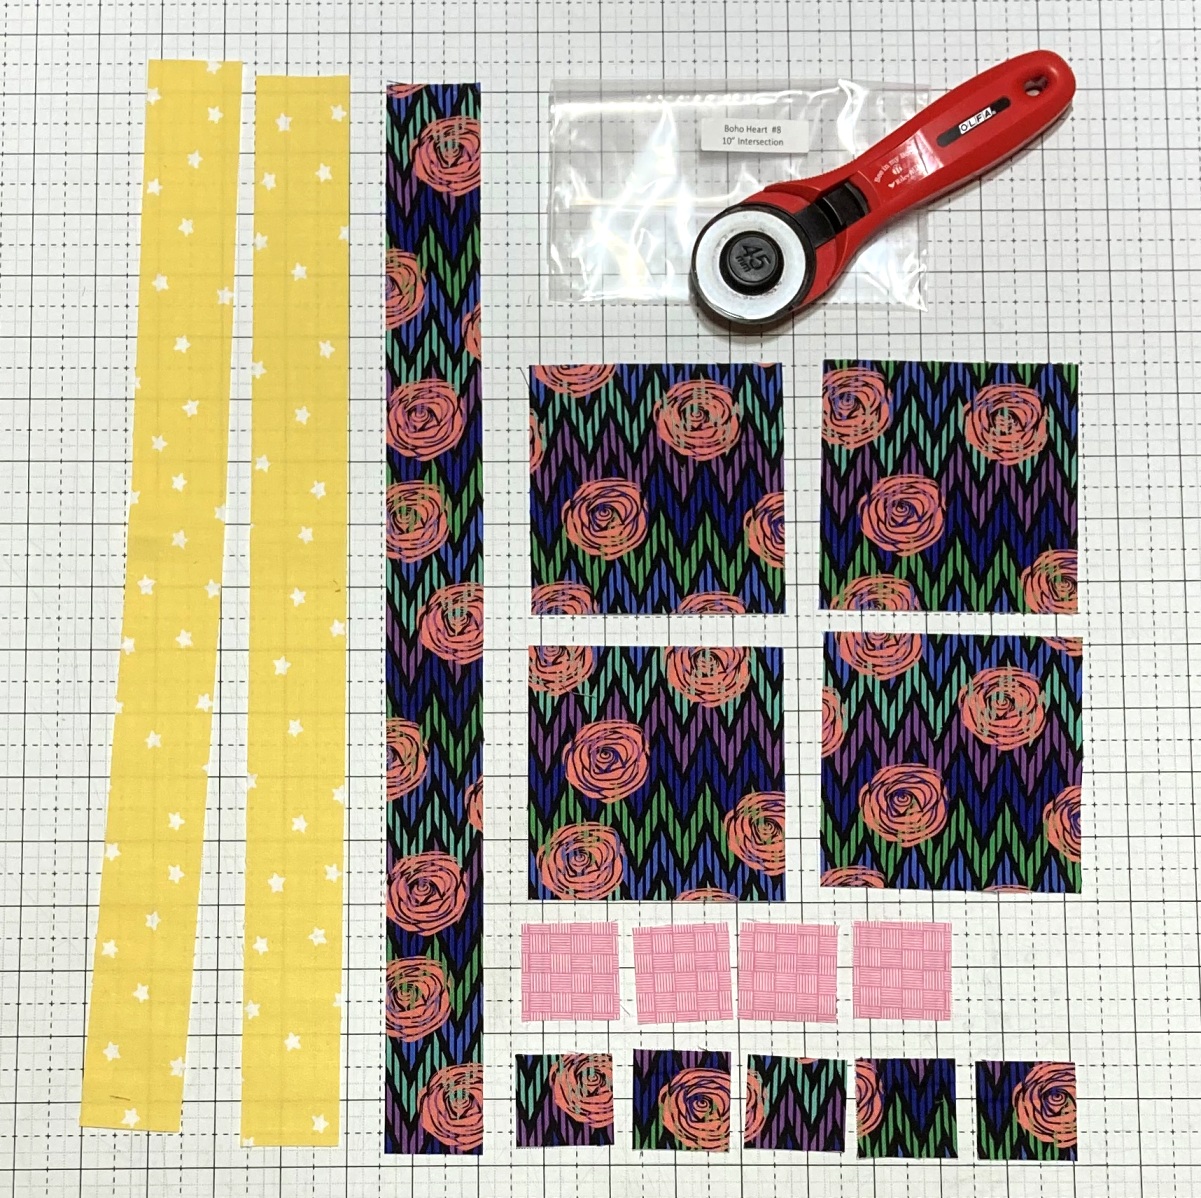
Intersection Block


From your Month #8, Intersection bag, cut the fabrics according to page 1 of the supplemental cutting list.  


Layout the 9 small squares as shown below.  


Sew the squares into a 9 patch.  If you need a little extra help with this, you can use the 9 patch part of the  Shoo Fly Block Directions from Month 4make the block.     Set the 9 patch aside.  


Now we are going to Strip Piece.  Gather your long rectangle pieces.   Lay them out as shown.  


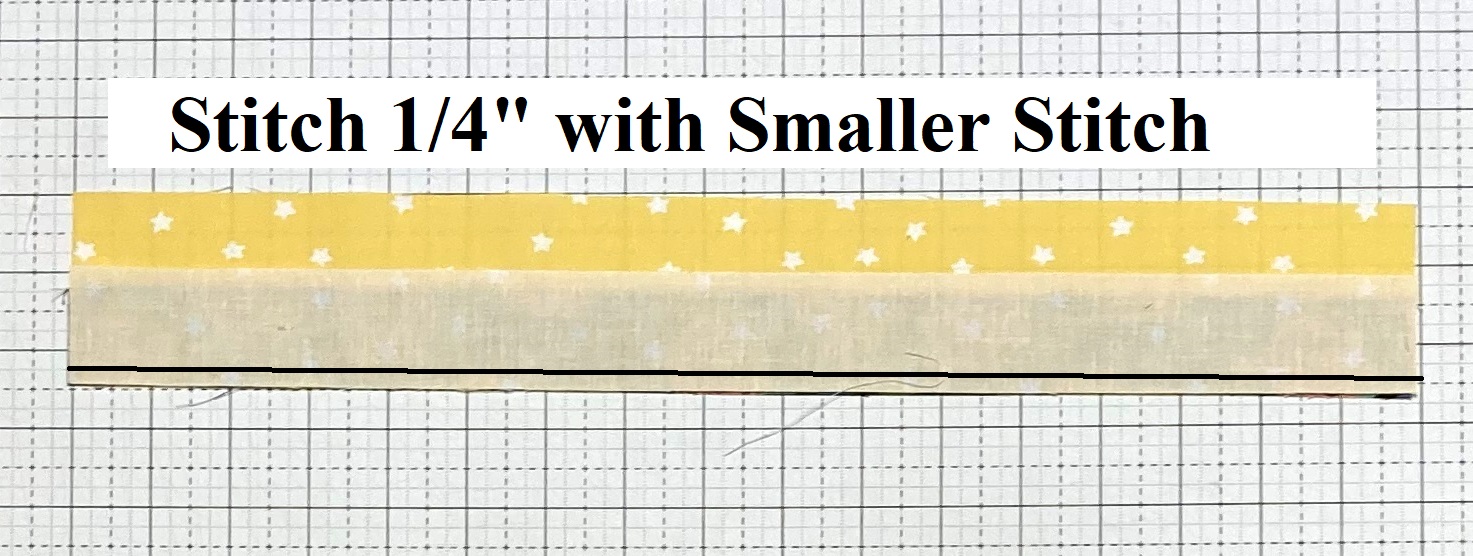
Place them middle row onto the top row with right sides together.  Stitch a 1/4" seam along the long edge.   When strip piecing, I like to use a smaller stitch length so my stitches don't unravel when the pieces are subcut.   It's totally okay if your strips do not match perfectly at the ends.    Then, place the bottom row onto the center row and stitch a 1/4" seam along the long edge.  


Press your strip set inwards towards the darker center strip.   Take care when pressing a strip set that you don't stretch the material.  I like to press from the front and run my finger along the edge of the seam just in front of my iron.  This keeps bubbles out of the seam and ensures no stretching.    
Once you have pressed the strip set, lay it on your cutting mat so the top is aligned with a horizontal line on your mat.   Using a vertical line on the mat as a guide, cut a straight edge.  Measure in 4" from your straight edge and cut a Side Unit.  Continue measuring in 4" and cutting sub-cutting side units until you have a total of 4 Side Units measuring 4 1/2" x 3 1/2".   The remainder of the strip can be scrapped.  


Now layout the 4 Side Units, 4 Multi-colored squares, and 1 9 Patch Units as shown.  


Place the center column pieces onto the left hand pieces with right sides together.   Align and pin if desired.   Stitch a 1/4" seam along the edge of all the units. 


Then, place the left hand column pieces onto the center pieces with right sides together.   Align and pin if desired.   Stitch a 1/4" seam along the edge of all the units.


Press the top and bottom row Inward towards the Blue squares.   Press the center row open.  


Place the Top Row onto the Center row with right sides together.   Align and pin/nest the seams.   Stitch a 1/4" seam along the pinned edge. 


And now, place the bottom row onto the center row with right sides together.   Align and pin/nest the seams.   Stitch a 1/4" seam along the pinned edge.   Press the last two seams open.  


And your last Block is done and you have a Intersection Block that should measure 10 1/2" x 10 1/2" unfinished.  


And now with all your blocks done, we can move onto sewing them all together.  To start through, we need to move to  . . . 

Sewing Background Strips

This month there are only a few set of Strip Sets to make, and for each one, you can choose to use the Strip Set or to cut a Gold Filler block from your Gold Filler Bag. 

So here are the Strip Sets we need to sew together for all 3 sections we will be making.

From Fabric 35, 36, 37, and 38 sew a 2 1/2" Strip Set together as shown.
    (or cut out a 2 1/2" x 4 1/2" Gold Fabric Filler)

From Fabric 43, 44, 45, 46, 47, and 48 sew a 2 1/2" Strip Set together as shown.
    (or cut out a 2 1/2" x 6 1/2" Gold Fabric Filler)

From Fabric 49 and 50 sew a 4 1/2" Strip Set together as shown.
    (or cut out a 2 1/2" x 4 1/2" Gold Fabric Filler)

From Fabric 45 and 46 sew a 4 1/2" Strip Set together as shown.
    (or cut out a 2 1/2" x 4 1/2" Gold Fabric Filler)


And with that done, we can start putting all the blocks together.   let's get going on  . . .

Sewing Section 2


We will start sewing Blocks and Strip Sets together to make the Section.   

Sew the Small Sawtooth Star Block and the 35/36/37/38 Strip Set together as shown.
Sew the 45/46 Strip Set and the Pinwheel Block together as shown.
Sew the Churn Dash Block and the Owl Block together as shown.

Press the Seams Open.  

 
Sew the Sashed Sawtooth Unit and the Dresden Fan Block together as shown.
Sew the Sashed Pinwheel Unit and the Churn Owl Unit together as shown.

Press the Seams Open. 


Sew the Sawtooth Fan Unit and the Intersection Block together as shown.

Press the Seam Open


Sawtooth Fan Intersection Unit and the Pinwheel Churn Owl Unit together as shown.

Press the Seam Open


And your Group 3 - Section 2 is complete.  It should measure 16 1/2" wide by 16 1/2" high.


And now we can move on to . . . 


Again, we will start sewing Blocks and Strip Sets together to make the Section.   

Sew the 43/44/45/46/47/48 Strip Set and the Mini Framed Square Block together as shown.
Sew the 49/50 Strip Set and the Square in a Square Block together as shown.

Press the Seams Open.  

 
Sew the Simple Framed Square Block and the Sashed Square Unit together as shown.

Press the Seams towards the Block. 


Sew the Intersection Block and the Simple Framed Square Unit together as shown.

Press the Seam towards the Block. 


And your Group 3 - Section 3 is complete.  It should measure 16 1/2" wide by 8 1/2" high.


And now we can move on to . . . 


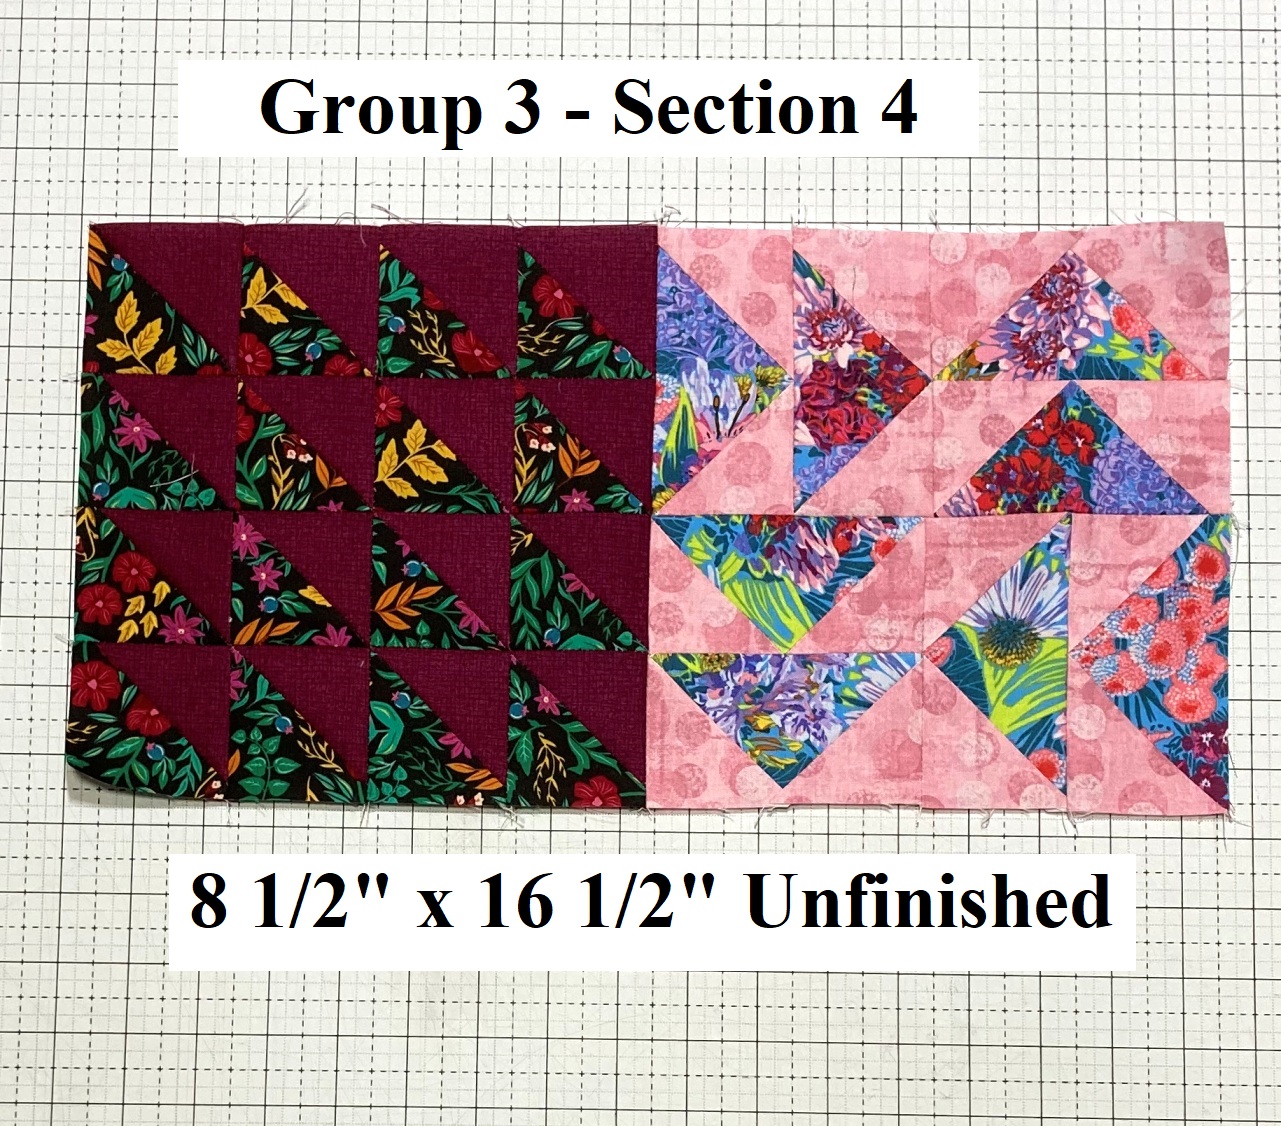
Sew the Half Square Triangles Block and the Flying Geese Block together as shown.  

Press the Seam Open


And your Group 3 - Section 4 is complete.  It should measure 16 1/2" wide by 8 1/2" high.


And that means, all that is left is to do the . . . 


And it's super easy.  Just layout Section 1 from Month 7 and Sections 2, 3, and 4 from this month this month as shown below.


Place Section 2 onto Section 1 with right sides together.   Place Section 4 onto Section 3 with right sides together. Align and pin the edges.  Stitch a 1/4" seam along the edge.  Press the seam open.  


Finally, place Section 3/4 onto Section 1/2 with right sides together.  Align and pin the edges.  Stitch a 1/4" seam along the edge.  Press the seam open.  


And your Group 3 BOHO Section 1-4 is complete.  It should measure 16 1/2" wide by 51 1/2" high.     How exciting is that ;)  


And that is it for BOHO Heart Block of the Month, Month 8 :) 

If you have any questions on this tutorial, please don't hesitate to email me at happyquiltingmelissa@gmail.com or leave a comment.  

Hope you have so much fun making all of this months blocks, there are so many and they are all great to put together.  

 Looking forward to Next Month!!


Pin It!

Tuesday, January 10, 2023

Terrific Tuesday Giveaway Day!!!

  It's Terrific Tuesday Giveaway Day!! Let's have some fun :)

First, we are going to announce the winners of last week's Terrific Tuesday Giveaway!!  

The winner of the Whimsical Romance Fat Quarter Bundle from Fat Quarter Shop  is . . . #648  . . . Congrats to Janet Leckington!!!  I have messaged you :)


And on to today's

Today's Terrific Tuesday Giveaway is being sponsored by Green Fairy Quilts.  Green Fairy Quilts is your home for pre-cut goodness and they always have amazing sales going on every weekend on a selected pre-cut or notion!!!   And did you know that Green Fairy Quilts has a Deal of The Day, I just love these!!!    And Green Fairy Quilts is currently having an  Amazing New Year Clearance Sale with Precuts  50-70% off!!   You won't want to miss this!!! 

And for today's Terrific Tuesday Giveaway, Green Fairy Quilts will be giving one lucky reader a brand new, Red and White Gatherings by Primitive Gatherings for Moda!!!    This is such a gorgeous line and it would make a beautiful Valentine's Day quilt!!! 

You have two entry chances here on the blog, and please leave a separate comment for each.  All Entries are welcome, including International Entries.   Please just be sure to leave an email address if you are a no-reply blogger ;)  

ENTRY 1 - Simply leave a comment that tells me what is your favorite meal of the day?? 

 ENTRY 2 - Show your Green Fairy Quilts love.   You can Sign up for their Newsletter which I highly recommend as it will ensure you catch all of their amazing sales!!  You can follow them on Instagram or Facebook,  or you can visit the Shop and then share a favorite item ;)   Just be sure to leave a comment of how you showed your Green Fairy Quilt Love!!!

And that's it ;)  The giveaway will be open until next Tuesday, January 17th, when I will announce a winner at the beginning of next weeks Terrific Tuesday Giveaway Post :)

You can also pop over to my Instagram and/or Facebook to enter there as well :)  

Good Luck and Have a Happy Quilting Day!!!
Pin It!

Saturday, January 7, 2023

December Sew Sampler Box!!

 So it's only 7 day's into the new year, it's not to late to share my December Sew Sampler box, right :)   Besides, the days between Christmas and New Years really don't count, as I consider those complete recoup days ;)  The theme of the December month's box is Joy in the Journey, and it seemed fitting as 2022 was quite a quilty journey :)    So let's check out the Sew Sampler Goodness for December shall we ;)  

First up, the fabric!!!  2 Charm Packs of Fisherman's Bend by Violet Craft.  And I will be honest, when I saw those fish, I was like what???  But as I went through the Charm Pack, I found I love the colors especially of the butterfly and bird prints.  So my plan is to separate the two charm packs and make a cool 80's vibe fisherman project for the cabin, maybe little hand warmers for when they boys go fishing in the winter ;)   And then a soft, birds and butterfly project.   It's making me super excited to see how they come together.  


And next, the notions that  Fat Quarter Shop sent along this month.  How cool is that Magnetic Pin Caddy!!  It even has a built in storage container for pins when you are traveling :)   And the Sassy Sayings Iron-On Labels are so adorable.   I want to iron them onto muslin and then color them and make a quilt just of the labels.  A sassy patchwork quilt, so cute!!!   And you know I love everything Olfa, the Magnetic Touch Knife now has a happy spot on my lamp, ready to cut open my quilty packages ;)   And finally, I just love this adorable Enamel Zipper Pull.   And guess what, I am making a bag (more on that to come)  and it will be just a perfect little embellishment!!! 


And yes, I have given up on the Quilt Along this year.    Luckily, there are still  Bliss Quilt Along kit featuring Stitched Fabrics by Joanna Figueroa to add to my long term project pile, tee hee hee :)  


And just fyi, the Sew Sampler box Subscription now has openings!!!  So there is no wait list, and you can sign up and get a new box next month.  So fun!!!   It's a great after Christmas gift to give yourself :)   

Hope you all have a very Happy Quilting Day!!!
Pin It!

Thursday, January 5, 2023

Island Lagoon Quilt and Quilting Cruise!!!

So the end of 2022 was pretty much a blur, and when I was writting my end of year post, I realized I never posted about my Island Lagoon quilt and the amazing Quilting Cruise I got to teach on last year!!!  So, it's time to get caught up :)  This is my Island Lagoon quilt, isn't it just so fun, and perfect for a class that was making it's way to Hawaii!!!  


The quilt design is by Deb Luttrell, the owner of Stitchin' Heaven, and I was so excited that she asked me to come and teach her quilt on the cruise.   This is a super fun log cabin quilt to make.  I love the added variation of putting the quarter log cabin blocks on point.  It just really bordered that large Log Cabin center so perfectly!!!  


This is the quilt that I made from Stitchin Heaven's wonderful cruise kit.  I have to say, it is pretty nice to have all of the pieces cut and labeled ahead of time.  You just open the bag and start stitching :) And it goes together really fast, especially when you chain piece.  The quilt finishes at 77" x 77", so it is a great size to have for a picnic, or even on the beach :)  

 I quilted mine with an all over free motion quilting of echoed paisleys, pebbles,, and swirls.  I decided to do the quilting in a slightly larger scale than I usually do as the pattern is done in a larger scale.  I just love how it turned out, and all of the texture it added to the quilt!!!  


And this Island Lagoon quilt hung in class for the cruise, and at the end of the cruise, it was given to our "cruise manager".   This amazing gal had done 3 back to back cruises with Dana and Dawn and kept everything running smoothly for all of us stitching.  So amazing and she was so very excited to be given the quilt from class :)  I wish I would have gotten a picture of her smile ;)    But no worries, I also had a second Island Lagoon quilt in process that I used to show the process of making the quilt on sample boards.  I finished putting it together during the end of the cruise and now it just needs to be quilted, so I will share it soon ;)  It is done in a completely different fabric, and it blows me away how much it changes up the design.  


And speaking of changing up the design . . . not everyone in the class used the Island Lagoon cruise kit.  Here are just a few samplings of changing up the fabrics.  Aren't they just so fun!!!   It always amazes me how much it changes up the design by changing the fabrics.  


And if your wondering what a quilt cruise is like, let me tell you, it is so much fun!!!!  First off, you should know the entire boat is not quilters ;)   Its normally an amazing group of around 50-75 quilters, who fast become friends while cruising and quilting.   I loved getting to know all of these wonderful people!!!  


One of the main reasons you get to be fast friends is because you are all stitching together in one big room.   The room is open all the time, so you can eat and play on the ship, and then still come back and sew to your hearts content.   And as you can see from the finished projects above, there was a lot of late night sewing going on ;)  


I love that Stitchin Heaven provides all of the sewing machines so you don't have to worry about lugging them all on board.   In fact, that is one of my jobs as a teacher ;)   Before the cruise leaves port, Dana, Dawn, Deb, Sandra and I were all in the conference room setting up tables, chairs, and machines so everything was ready to go the first day of class.  And of course, I got some help from my traveling companions, Barbara, Charlotte, and Jacob.   Yes, this is proof that my husband was in the conference room at one point, and even helped set up the machines!! 


But of course, his preference is to be at the ports.  And the great thing about quilt cruises, none of the classes are taught during the port days. (although the sewing room is open if you prefer to stay and sew)   So you can still get out and enjoy all of the amazing destinations you are sailing too.   We had so much fun in Maui and Oahu.   What an amazing cruise filled with lots of friends, fun, and probably to much food ;)  


And now I get to look forward to doing it all again, only this time in Alaska!!!   This September I will be teaching on a Scrappy and Happy Alaska Quilting Cruise and I can't wait!!!   I just love quilting scrappy, and I am super excited to teach this scrappy Stacked Squares quilt with it's awesome low volume scrappy background.  It is going to be so much fun!!!   My husband can't wait either, he is already planning excursions of dog sledding, and snorkeling, ya, that is going to be cold :)  So, take a look, and maybe I will see you on board in September ;)   


I hope you all have a very Happy Quilting Day!   

Pin It!

Tuesday, January 3, 2023

Terrific Tuesday Giveaway Day!!!

   It's Terrific Tuesday Giveaway Day!! Let's have some fun :)

First, we are going to announce the winners of last week's Terrific Tuesday Giveaway!!  

The winner of the $25.00 Gift Certificate from Thousands of Bolts  is . . . #93  . . . Congrats to  maryprine!!!  I have messaged you :)


And on to today's

Today's Terrific Tuesday Giveaway is being sponsored by Fat Quarter Shop.   Fat Quarter Shop is amazing and they never cease to amaze me with everything they have going on at their shop!!!     And did you know they have a 24 Hour Flash Sale  and Precuts of the Week!!   You can also save big on the Basics of the Month!!!!     This month Laundry Basket Favorites   for Andover Fabrics are on sale!!    Also, Mettler Threads are on sale for the Notion, and all  Lella Boutique Patterns are on sale for the Pattern.   Save 20% off of all of them for the whole month of January!!  So great ;)  


And for today's Terrific Tuesday Giveaway  Fat Quarter Shop is giving away this gorgeous Whimsical Romance Fat Quarter Bundle by Keera Job for Riley Blake Designs!!!  I used this fabric in my Moonstones quilt and I just love it!!!  (and Moonstones has a free PDF pattern, just sayin :)  Wouldn't this bundle just be amazing to create with in the new year!!!! 
 

You have two entry chances here on the blog, and please leave a separate comment for each.  All Entries are welcome, including International Entries.   Please just be sure to leave an email address if you are a no-reply blogger ;)  


ENTRY 1 - Simply leave a comment that tells me if you were still awake when the clock struck midnight at the New year :)   ( I was in and out of sleep but the fireworks woke me up long enough to celebrate, tee hee hee :)  

 ENTRY 2 - Show your Fat Quarter Shop love.   You can follow them on   FacebookTwitterInstagramPinterestYou Tube or at their Blog.  You can Sign up for their Newsletter which will ensure you catch all of their amazing sales, or you can visit The Shop and then share a favorite item ;)   Just be sure to leave a comment of how you showed your Fat Quarter Shop Love!!!

And that's it ;)  The giveaway will be open until next Tuesday, January 10th, when I will announce a winner at the beginning of next weeks Terrific Tuesday Giveaway Post :)

You can also pop over to my Instagram and/or Facebook to enter there as well :)  

Good Luck and Have a Happy Quilting Day!!!
Pin It!