It's always a fun day when I get to share some secret sewing!! I was thrilled when my good friends at Moda Fabrics asked if I would make the Summer Weekend Quilt by Corey Yoder featuring her new Sunwashed Fabrics!!! And of course, I said yes, I mean, how can you not whip up those adorable sunshine blocks set on point, so cute!!!!
I am such a fan of making Coriander Quilts Patterns!! They are always so well written, easy to follow, and she and I have a similar style in piecing that always makes it fun and fast to whip up one of her quilts! And I was thrilled to do this design on-point. I don't often do quilts on-point, but they are so fun, and they create a great negative space to have fun quilting in :)
And I know it looks like a lot of piecing with some complicated shapes, but really, it is just basic piecing that is harder than it looks. These blocks whipped together in no time, and I just love the different backgrounds on the blocks to really add that extra wow factor. It finishes at 64" x 76" so it is a great size to snuggle up in or have as a throw on a couch.
And I had so much fun custom quilting this one!!! Remember how I mentioned that awesome negative space, I quilted feathers in it!!! I just love getting to quilt a vine of feathers moving up the quilt, so fun!!! (which is kind of funny I say that now, when I few years ago that would have scared me to even attempt :) Then in the blocks, I really wanted to make the "sunshine points" pop, so I left those un-quilted and then did tiny pebbling and figure 8's in the block background. I just love how it makes those points stand out. So fun!! !!!
And now this quilt is off visiting lots of quilt shops hopefully bringing some Summer Weekend goodness wherever it travels :) So I will have to wait to snuggle up in it, But you don't have to wait!!! Sunwashed Fabrics are shipping now and Fat Quarter Shop has a Hometown Quilt Kit already available !! (and guess who's quilt that is in the picture, I know I'm silly, but it just makes me smile ;) Now you can whip up your own Summer Weekend Quilt before Summer arrives, so great!!!
I know you are just going to have so much fun making your own ;) And if you are like me, I need this splash of summer in my life right now (so done with snow right now :) I am excited for this one to come back because I think it is just going to make such a lovely gift :) You just can't help but smile at all of those happy prints and colors in adorable sunshine blocks!!!
And that is it for today !!
I hope you all have a very Happy Quilting Weekend!!
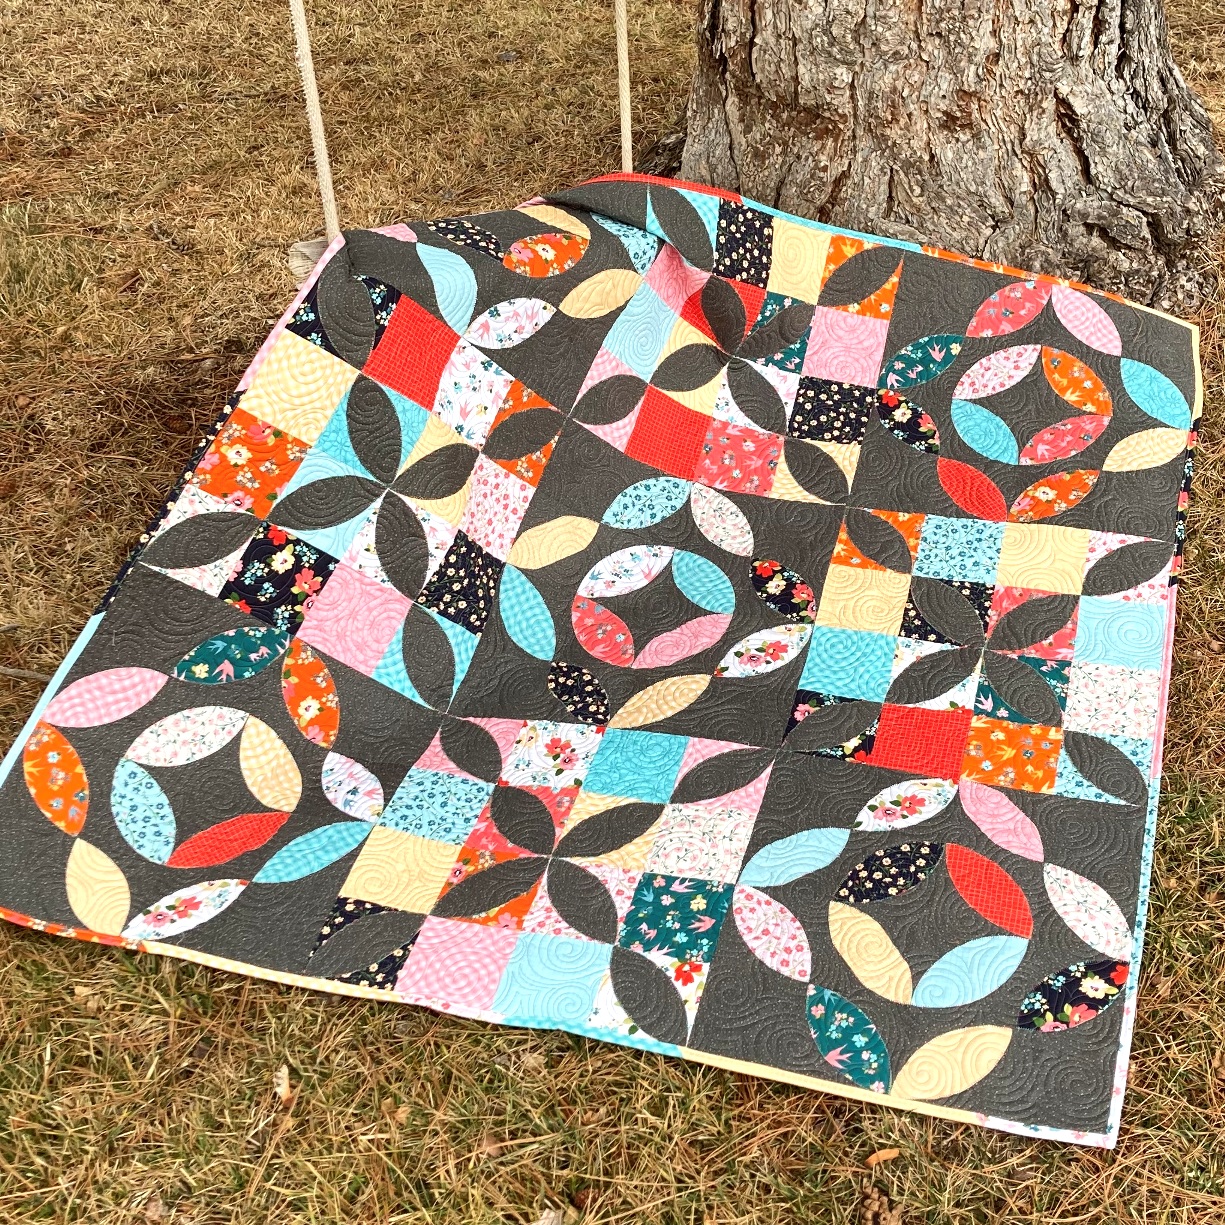
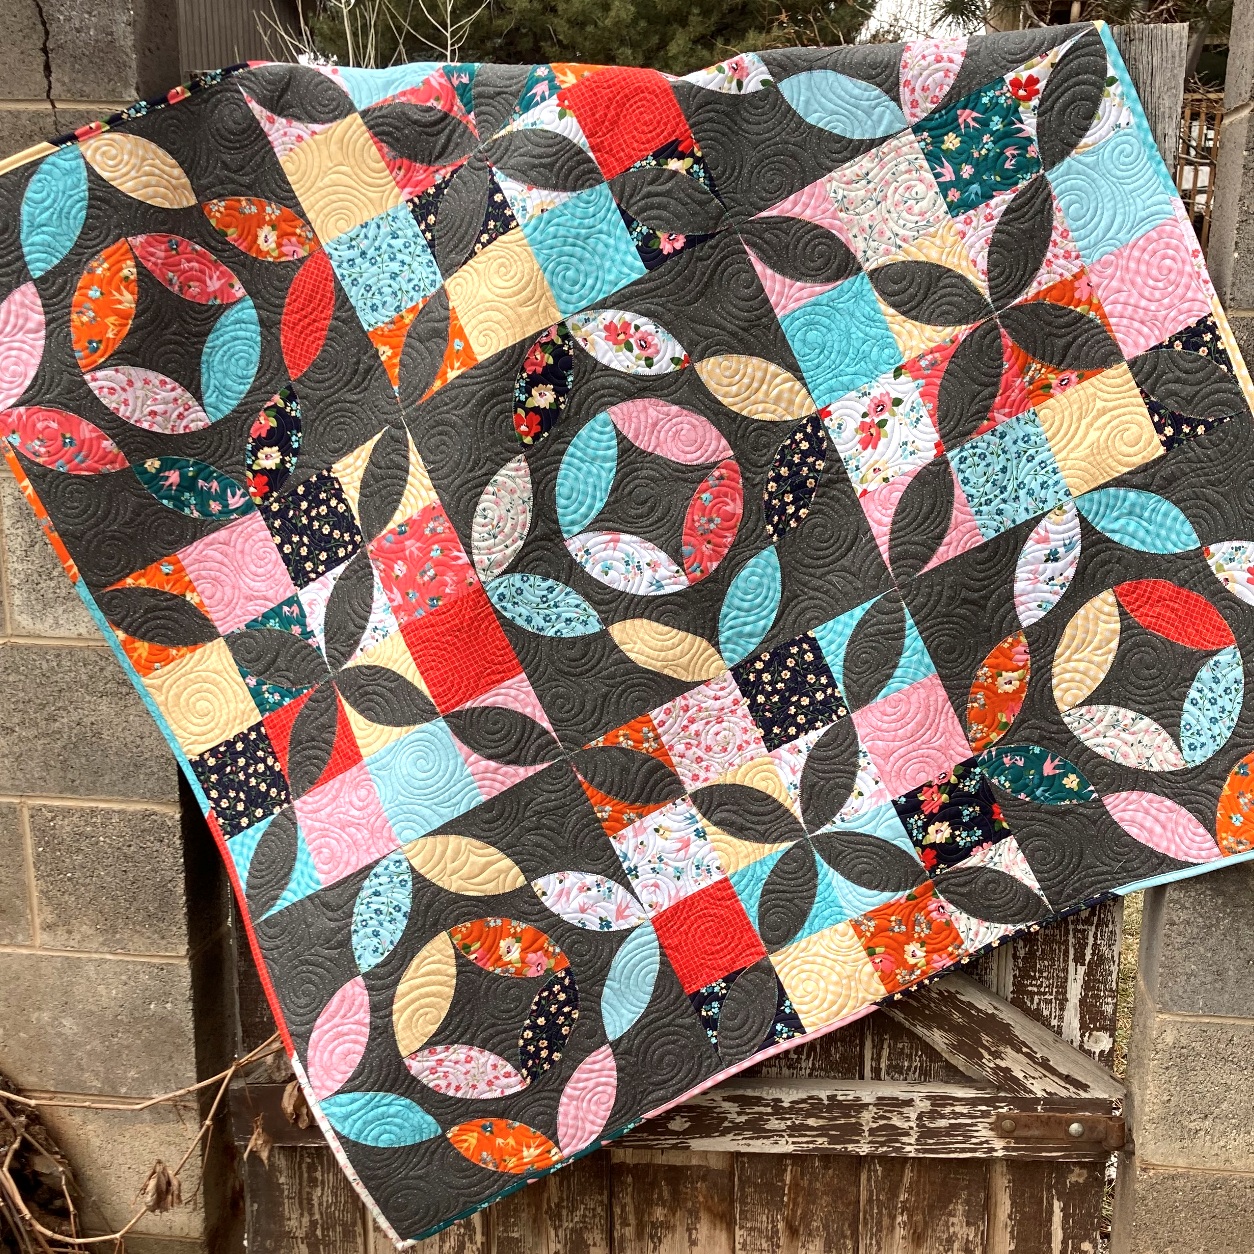
Today I am thrilled to be bringing you a new quilt and a tutorial to go along with it! I just love simple applique, and simple applique added to simple patchwork . . . well that is just the best!!! And so, without further ado . . . here is the Petal Patch Quilt!!!
Petal Patch is Charm Pack Friendly, making it really easy to grab some packs and get going. The quilt finishes at 54" x 54" so it makes for a great lap size quilt. It is a wonderful way to practice simple applique, and makes a gorgeous finish. So, let's get to making your own!!!
3 Background Charm Packsor2 Yards of Background Fabric cut into (14) 5" x WOF Strips and sub cut into (112) 5" Squares
1/2 Yard of Binding Fabric cut into (6) 2 1/2" x WOF Strips
3 1/4 Yards of Background Fabric cut into (2) 58 1/2" x WOF Pieces
STEP 1 - CUTTING THE APPLIQUES
To cut out my "Petal" (also known as Orange Peel) Appliques, I used the AccuQuilt GO! Orange Peel 4 1/2" die. It makes quick work of cutting out applique, and because this die is so small, it even works in my GO! Me Cutter.
If you don't have an AccuQuilt System, there are lots of Orange Peel Templates you can purchase, just make sure to get a 4 1/2" template. Or, if you are using a different size template, be sure your squares are all 1/2" larger than your template.)
And of course, you can always make your own Template!! Here is a 4 1/2" Orange Peel Template, that you can print and use to make your own template from cardboard or template plastic.
Any way you choose to cut your Petals is great! You will need to cut:
60 Petals from the Assorted Print 5" squares &
32 Petals from the Background 5" squares.
When you are finished cutting all your applique Petals you will now have:
32 Background Petals and 80 remaining Background 5" Squares
STEP 2 - SEWING THE APPLIQUE BLOCKS
Because this applique shape is so basic, you don't need to really bother with Heat N Bond for adhering. You can simple Glue or Pin baste your appliques. To Glue Baste, simply place small dots of Applique Glue on the wrong side of your Petal Template. Then center it diagonally on a 5" square. Print Fabric Petals are placed on Background 5" squares and Background Fabric Petals are placed on Print 5" squares. You should have 1/4" extra along the 2 corner edges.
If you are Pin Basting, take care to keep the pins in the center of your Petal Applique and away from the edges. That way when you are secure stitching your applique you don't have to remove the pins.
With your Petal Applique basted to your 5" square, you can now secure stitch around your applique. You can do machine, hand, or needle turn applique and choose any color thread. Stitch around the entire Applique using your desired secure stitch. I like to backstitch 1-2 stitches at the end of my stitching just to hold it. I used a fun variegatedthread with a machine Blanket stitch :)
If you are new to applique, you can see my Applique Basics video's that will help walk you through the previous steps in more detail :)
Continue stitching the Petal Appliques until you have secure stitched them all to a 5" square. You should now have:
60 Print Petal Units and 32 remaining Assorted Print 5" Squares &
32 Background Petal Units and 20 remaining Background 5" Squares
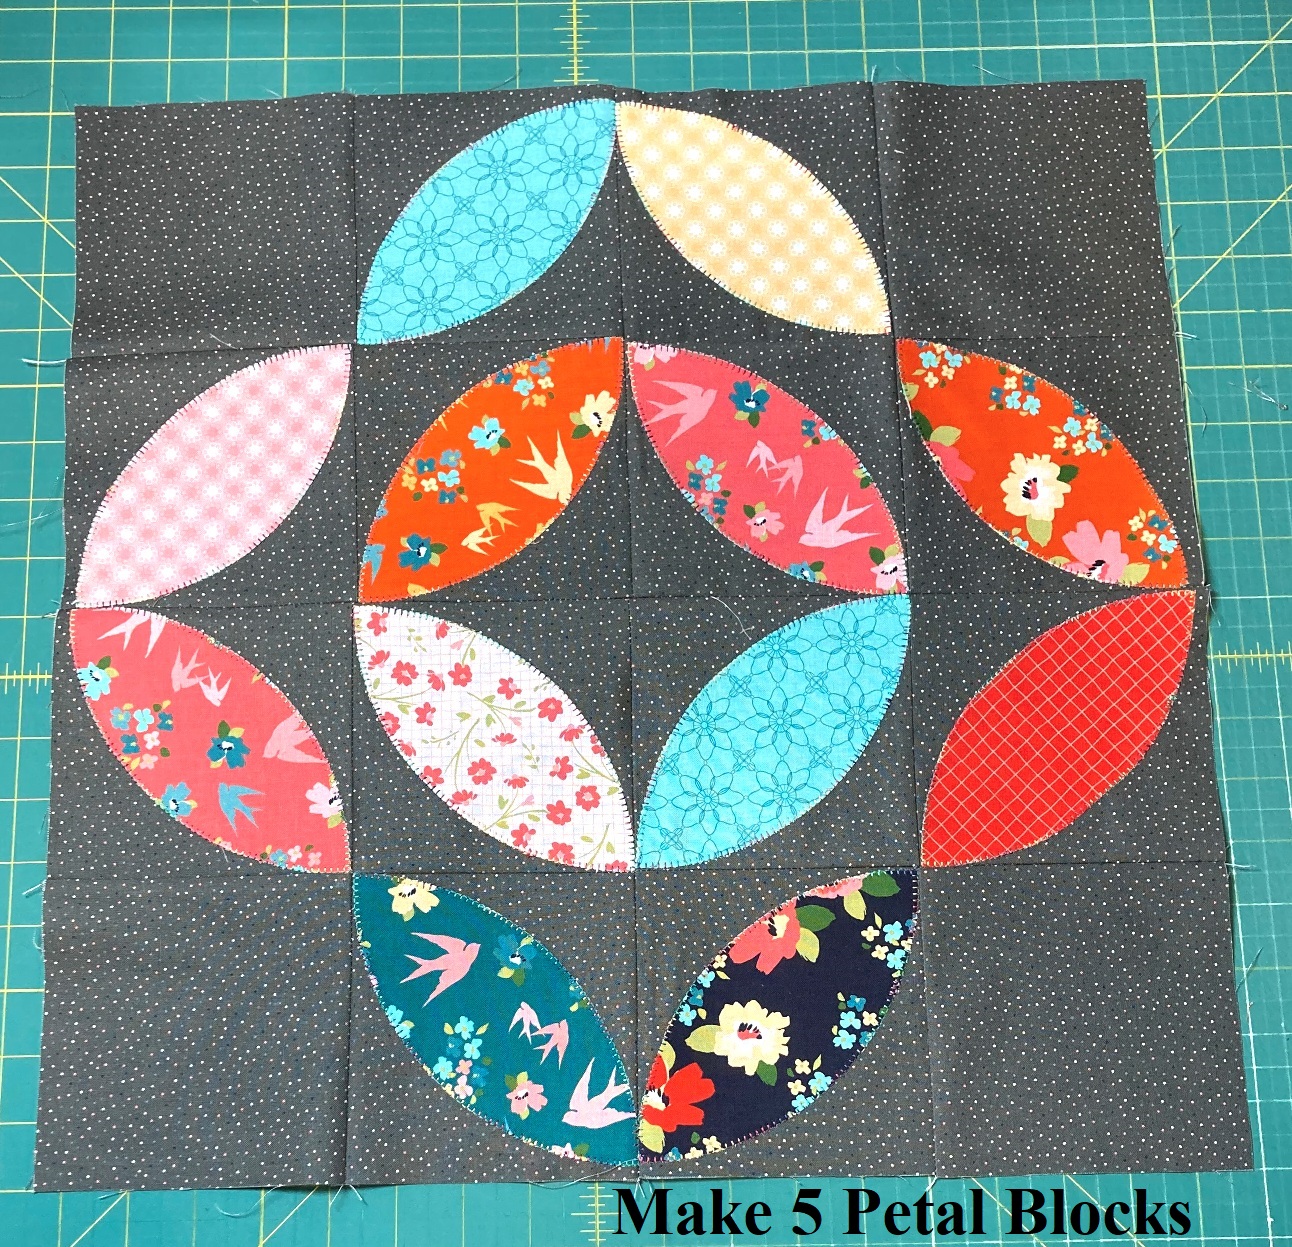
STEP 3 - SEWING THE PETAL BLOCKS
Layout 3 Print Petal Units and 1 Background 5" Square as shown, taking note of the fabric placement. Place the right hand squares in each row onto the left hand squares with right sides together and align the raw edges. Stitch a 1/4" seam along both edges. Press the seams Open.
Now, place the Top Row onto the Bottom Row with right sides together and align and pin the center seam and raw edges. Stitch a 1/4" seam along the pinned edge. Press the seam open. Repeat this process to make a total of 20 Petal Block Corner Units.
And now, with the units made, we can make the block! Layout 4 Petal Block Corner Units as shown, taking note of the fabric placement.
Place the right hand Units in each row onto the left hand Units with right sides together and pin and align the center seams and raw edges. Stitch a 1/4" seam along both edges.
Press the seams Open.
Now, place the Top Row onto the Bottom Row with right sides together and align and pin the seams and raw edges. Stitch a 1/4" seam along the pinned edge. Press the seam open.
And you have a beautiful 18" unfinished Petal Block. Repeat this process to make a total of 5 Petal Blocks.
STEP 4 - SEWING THE CRISS CROSS BLOCKS
Layout 2 Background Petal Units and 2 Assorted Print 5" Square as shown, taking note of the fabric placement. Place the right hand squares in each row onto the left hand squares with right sides together and align the raw edges. Stitch a 1/4" seam along both edges. Press the seams to opposite sides towards the 5" Print Square.
Now, place the Top Row onto the Bottom Row with right sides together and align and pin/nest the center seam and raw edges. Stitch a 1/4" seam along the pinned edge. Press the seam open. Repeat this process to make a total of 16 Criss Cross Block Corner Units.
And once again, with the units made, we can make the block! Layout 4 Criss Cross Block Corner Units as shown, taking note of the fabric placement.
Place the right hand Units in each row onto the left hand Units with right sides together and pin and align the center seams and raw edges. Stitch a 1/4" seam along both edges.
Press the seams Open.
Now, place the Top Row onto the Bottom Row with right sides together and align and pin the seams and raw edges. Stitch a 1/4" seam along the pinned edge. Press the seam open.
And you have a beautiful 18" unfinished Criss Cross Block. Repeat this process to make a total of 4 Criss Cross Blocks.
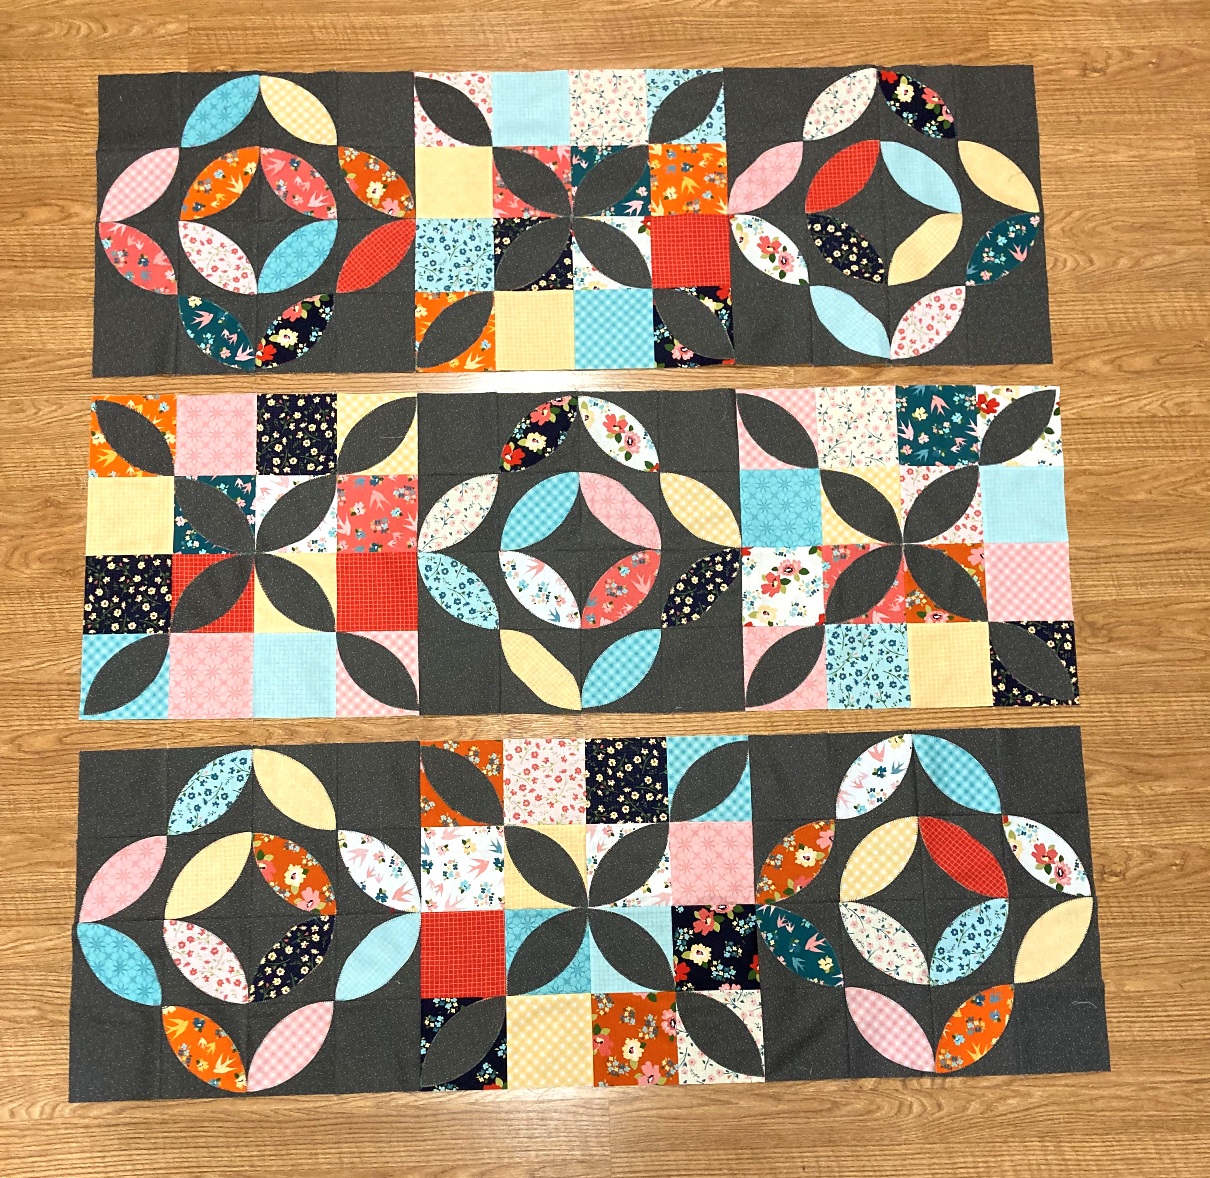
STEP 5 - MAKING THE QUILT TOP
And with your Blocks complete, you are ready to sew your quilt top. Layout your 5 Petal Blocks and 4 Criss Cross blocks as shown below. You can rotate them as much as you like until you get a color layout that is pleasing to the eye.
Now, it's time to sew the blocks into rows. Place the second block onto the first block in each row with right sides together. Align and pin the seams and then stitch a 1/4" seam along the edge. (shown in the first row, chain stitch all 3 rows). Then, place the third block onto the now sewn together first and second blocks with right sides together. (shown in the second row). Align and pin the seams and then stitch a 1/4" seam along the edge, chain stitch all 3 rows.
Once all of the blocks are sewn into rows press the seams in each row open. Then layout your rows again.
Now, stitching the rows together is the same, just in a longer fashion. Place the second row onto the first row with right sides together. Align and Pin all of your seams. Sew a 1/4" seam along the edge.
Then, place the third row onto the now sewn together first and second row, with right sides together. Align and pin all of the seams. Sew a 1/4" seam along the edge. Press the seams open.
And just like that, you have a beautiful 54 1/2" x 54 1/2" finished Petal Patch Quilt Top!!!! So fun!!!!
STEP 6 - FINISHING THE QUILT
And now let's get this quilt top!! All that is left is to just Baste It, Quilt It, and Bind it!!!! Yup, three big things in one little sentence. If you are new to quilting and need some tips on how to Baste It, Quilt It, and Bind It, you can check out myFinishing Your Quilt Video Series. It will walk you through it all in step by step detail.
I quilted mine with an all over swirl design that I just love to stitch. It is so relaxing and fun, and also it adds lots and lots of texture to the quilt!!! It also will help keep all of that applique super secure stitched ;)
And that is my Petal Patch Quilt!!! I hope you have enjoyed this tutorial and if you make your own Petal Patch Quilt I would love to see it!! You can email me a picture at happyquiltingmelissa@gmail.com, or post it to social media with #happyquiltingwithmc :) I can't wait to see your Petal Patch Quilts!!!
Thanks so much for sharing this new quilt finish and tutorial with me.
Today's Terrific Tuesday Giveaway is being sponsored by Lou Lou's Fabric Shop . Did you know that Jamie makes a new Lou Lou Bundle every Tuesday . . . there are so many to choose from and they are all just stunning!!! Isn't this new Love You bundle just so perfect!!! Along with hosting the giveaway, Jamie is having a Amazing Christmas Fabric Sale with 25% off and more!!! And be sure to shop their gorgeous Valentine's Day picks as well!!! So pretty :)
You have two entry chances, the second being optional, and please leave a separate comment for each. All Entries are welcome, including International Entries. Please just be sure to leave an email address if you are a no-reply blogger ;)
ENTRY 1 - Simply leave a comment that tells me Who inspires you to be better??? ENTRY 2 - Lets show Lou Lou's Fabric Shop some Love!!!! You can follow them on Facebook, Twitter, Pinterest, or Instagram. Or you can follow their blog or visit The Shop and then share a favorite item ;) Just be sure to leave a comment of how you showed your Lou Lou's Fabric Shop Love!!!
And that's it ;) The giveaway will be open until next Tuesday, January 24th when I will announce a winner at the beginning of next weeks Terrific Tuesday Giveaway Post :)
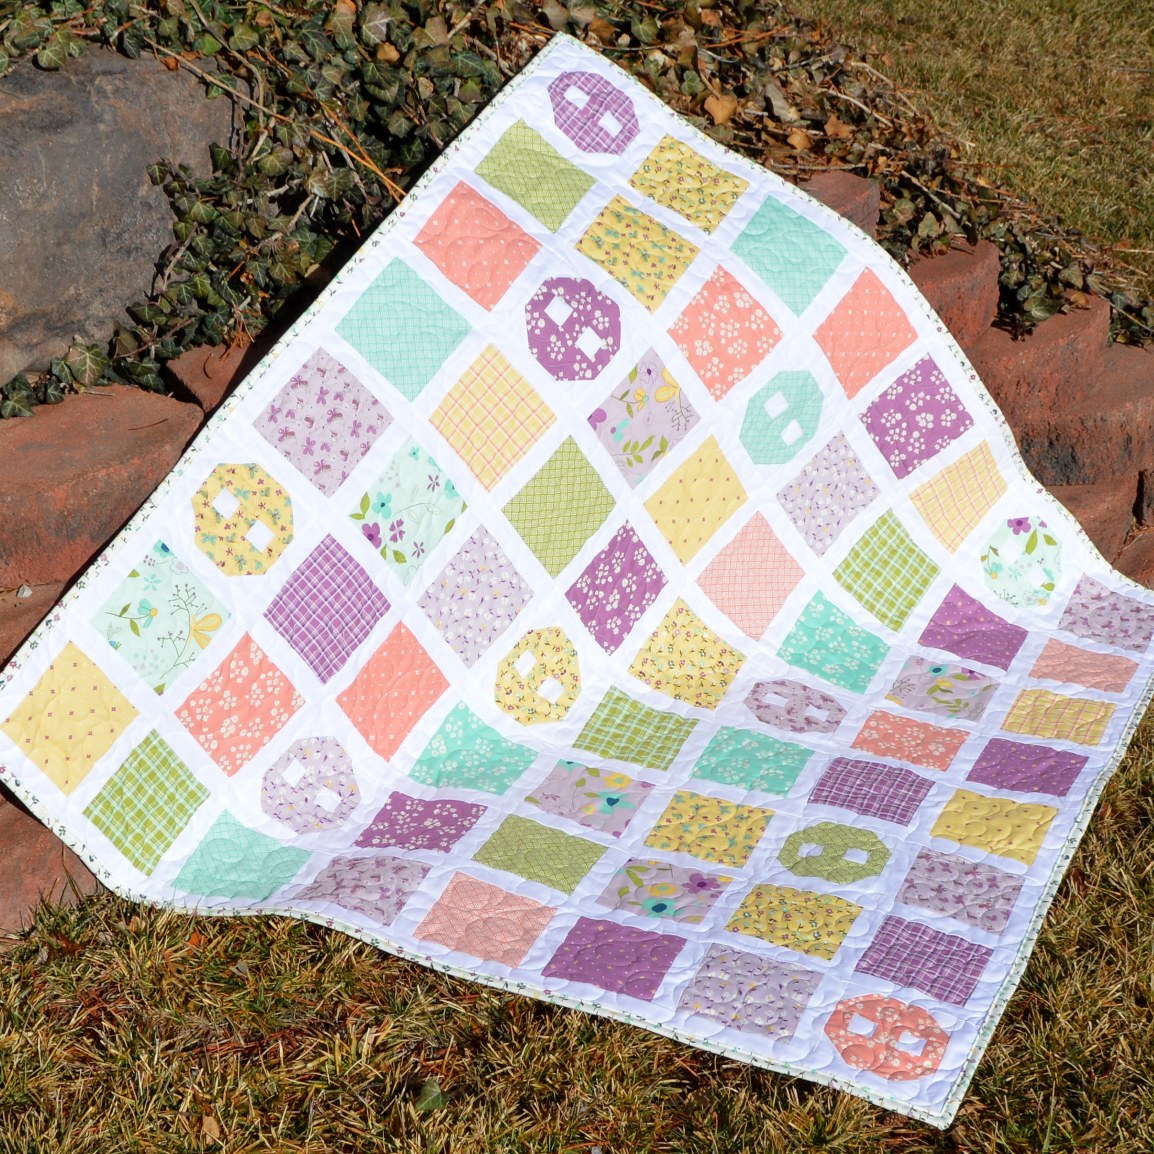
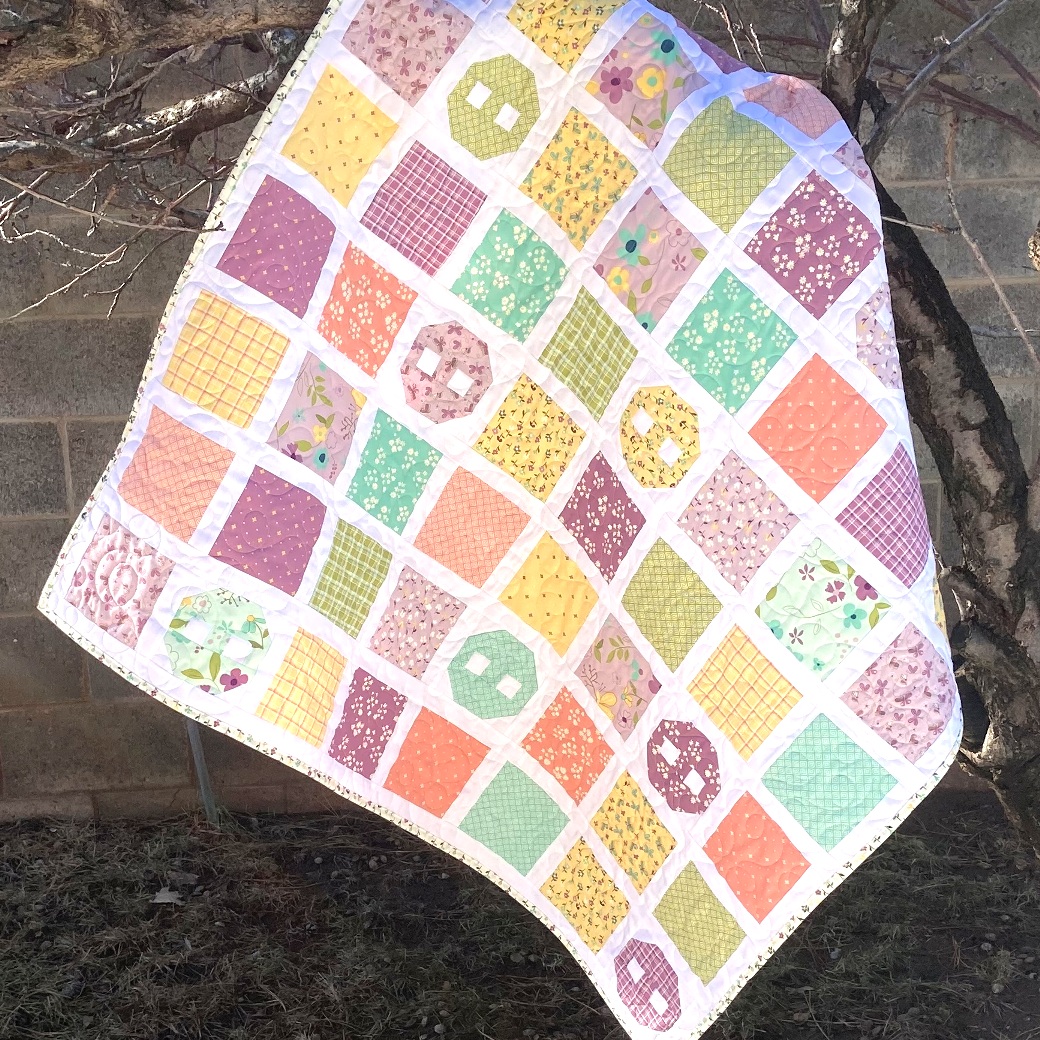
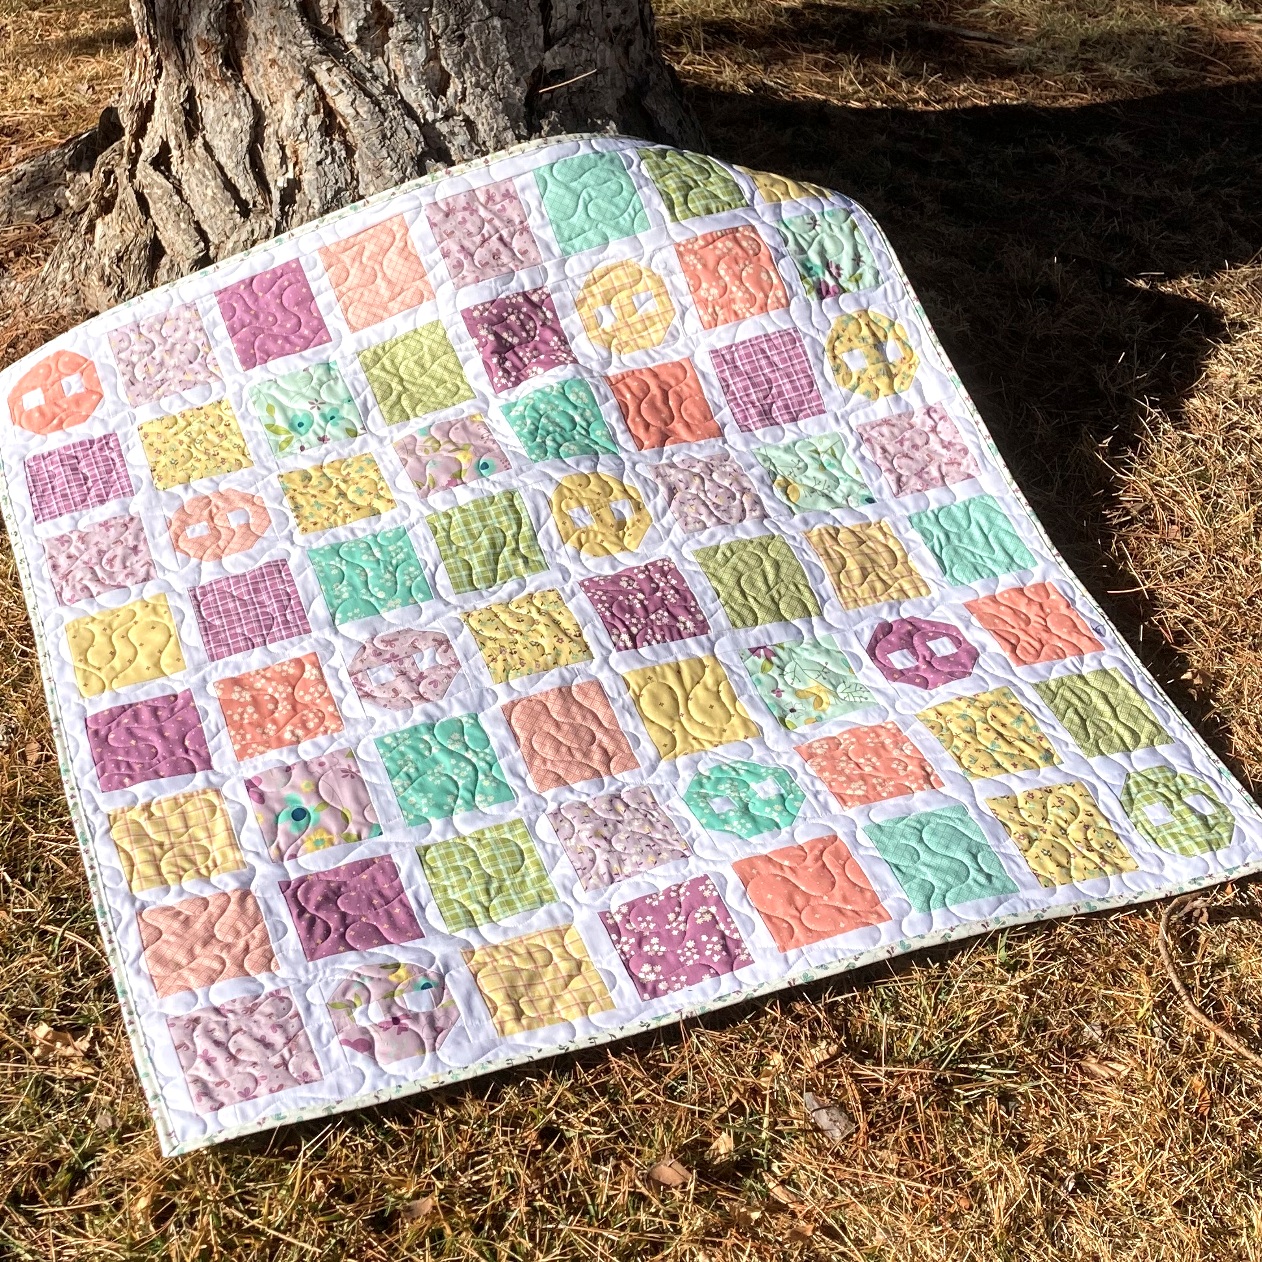
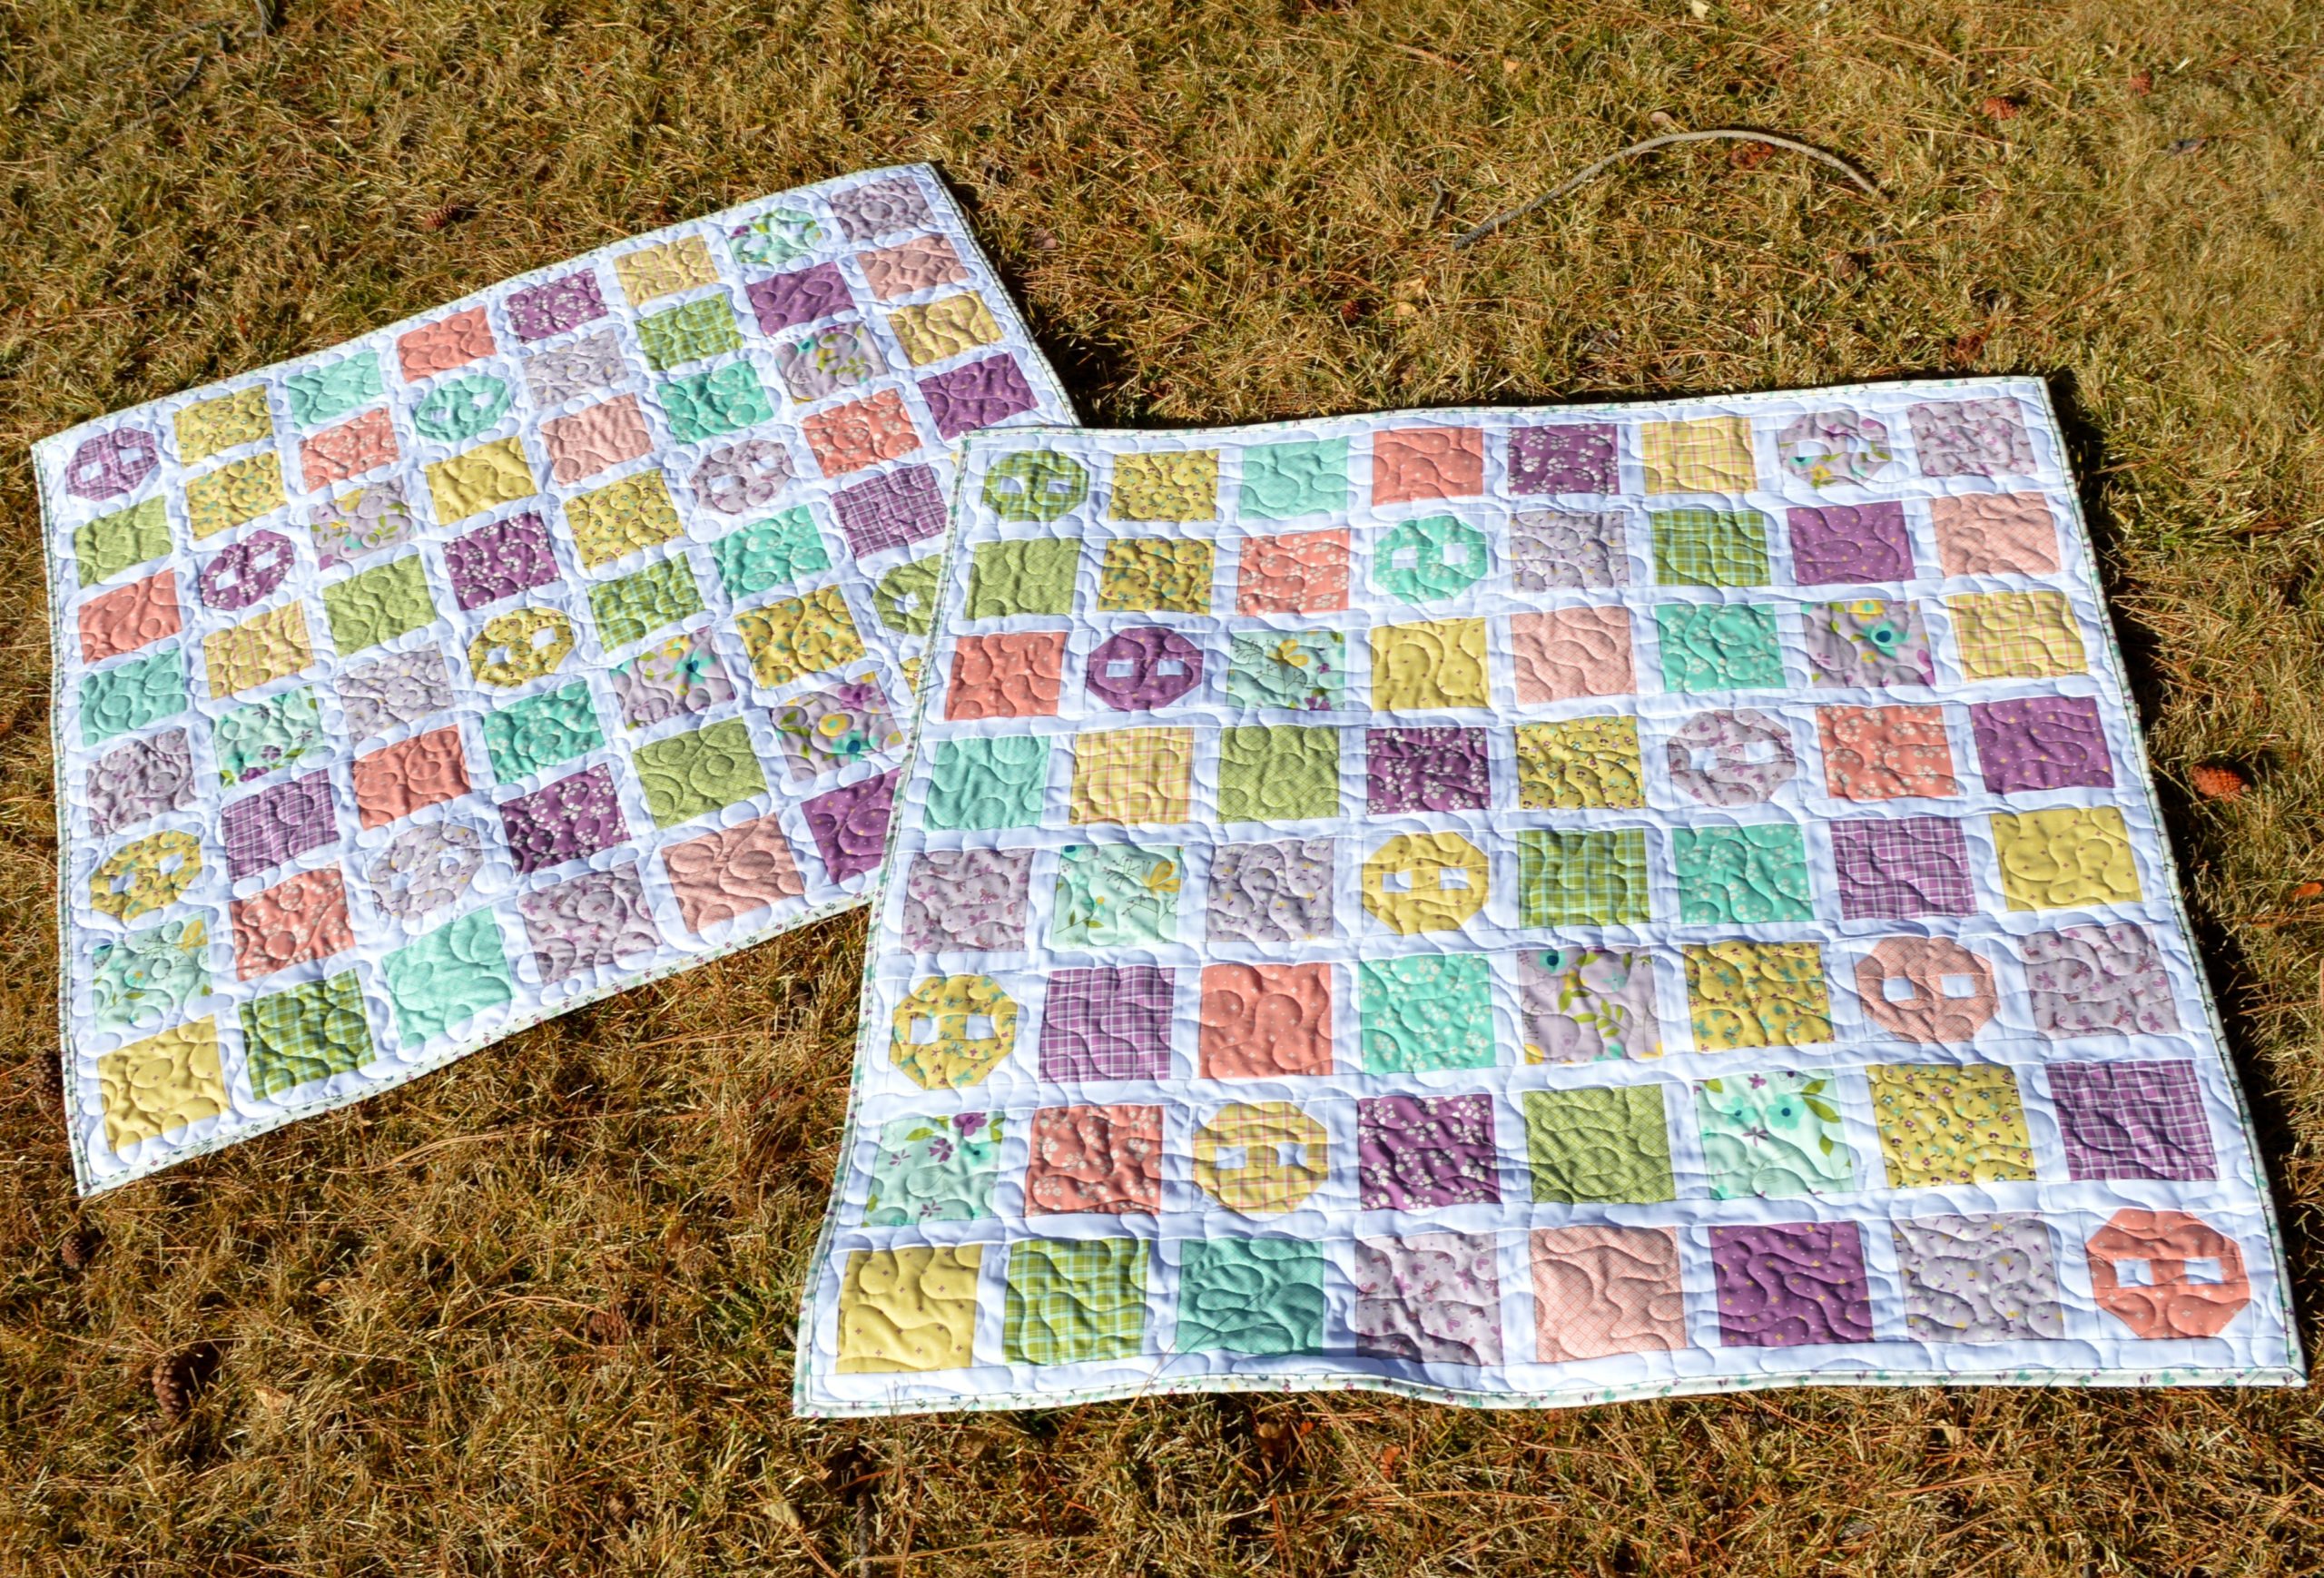
Hello Quilting Friends! Today, I am thrilled to be sharing this brand new Cute as a Button quilt as well as a Free PDF Pattern for it!!! This design adds simple piecing to basic patchwork for an absolutely adorable baby quilt!!! And they are so simple and fun to make, you can't stop at making just one ;)
Cute as a Button is made entirely of 5" squares plus a few sashing strips!!! So just grab your favorite Charm Pack / 5" Stacker and with very minimal cutting, you are ready to sew!!! I used 2 Hello Spring 5" Stackers by Sandy Gervais, and I just love the beautiful colors and happy prints in this line!!! All of the flowers, butterflies, and geo prints in happy spring colors just makes me smile. Just perfect for a new little wee one ;)
I originally designed Cute as a Button for my Charming Baby Quilts book. But ya know, design 30 quilts and a third of them go into the book. I just loved this design so much I didn't want to see it fall by the wayside. So I have just been waiting for the right fabric to come along to make it up. You just need two 5" Stackers and a Background fabric and with such little piecing, this whips up in no time.
You will use 74 squares from your Charm Pack / 5" Stacker to make this quilt, which is great, as it makes it easy to pull out the few squares that blend into the background. The Cute as a Button quilt is Baby Size and finishes at 45" x 45". And as I mentioned, there is a free PDF Download of this pattern, so you can make your own!!! just click here . . . FREE PDF Cute as a Button Pattern Download, and download it ;)
When it came time to quilt mine I knew I wanted to keep both quilts I made really soft. So I opted for a very loose design in a large scale. And from the cover photo, you can see I made 2 quilts. So for one, I quilted a simple meander and on the second a simple loop de loop. And you know, my favorite 402 So Fine blended perfectly with all of these spring shades.
As you can see, it gives lots of texture while still being super soft. I can't wait for these to be gifted. So fun!!! This is such a great size to decorate a nursery with or for a wee one to have lots of play time. Either way, they are certainly Cute as a Button!!!
And those are my Cute as a Button quilts!!! I hope you have enjoyed this post. Oh, and if you make your own Cute as a Button quilts, I would love to see them! You can share your quilts with me on social media using hashtags #happyquiltingwithmc and tagging @happyquiltingmc or email me a picture at happyquiltingmelissa@gmail.com. I can't wait to see your Cute as a Button quilts and I can't wait to see, if like me, you can't make just 1 :)
Thanks for popping in and sharing these adorable finishes with me ;)


