Wednesday, July 6, 2022

BOHO Heart Block of the Month - Month 2

 It's Month 2 with my good friends at Stitchin' Heaven  doing their BOHO Heart Monthly Block of the Month program and that means another month of fun tutorials!!

Month 1                Month 2               Month 3             Month 4            Month 5               Month 6

Month 7                Month 8               Month 9            Month 10           Month 11              Month 12

And since each month has Lots and Lots of Tutorials in them . . . Here is a list to jump right to the tutorial you need for this month 2:  


Square in a Square Block                                              Mini Circle Block                                

Four Patch Block                                                          Mini Framed Square Block      

Sashed Half Square Triangle Block                                 Half Square Triangles Block

Pinwheel in a Courthouse Steps Block                            Sewing Section 3

Sewing Section 4 Part 1                                                Sewing Section 5


So you have your Month 2 BOHO Heart Packet . . .  Lets get started!!!  


We'll start with our first block of Month 2, the . . .

Square In A Square Block


From your Month #2, Square in a Square bag, cut the fabrics according to the supplemental cutting list. 
  

Using the cut squares and the Square in a Square Block Directions from Month 1 make your first block, The Square in a Square Block  measuring 2 1/2" x 2 1/2" unfinished. 


And now we can move onto another familiar block, the . . .

Mini Circle Block


From your Month #2, Mini Circle bag, cut the fabrics according to the supplemental cutting list.    Remember, when cutting the Mini Circle applique, to fussy cut your circle.  And my fabrics were mixed up, as in, the green was the larger square and the light was the smaller square, but it is still big enough to cut the pieces you need.  


Using the cut pieces and the Mini Circle Block Directions from Month 1 make your second block, The Mini Circle Block  measuring 2 1/2" x 2 1/2" unfinished. 


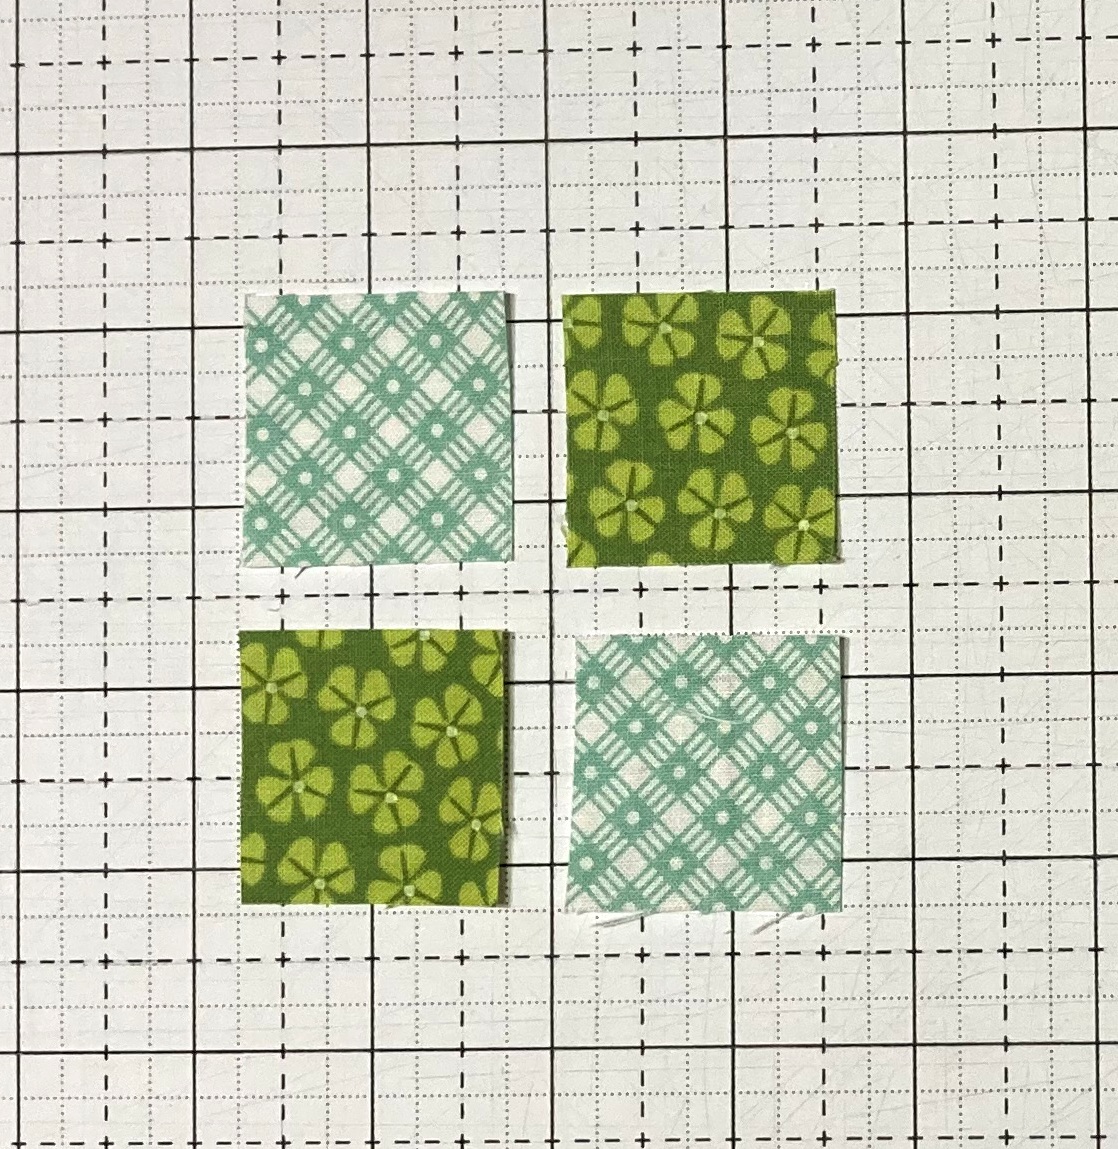
And now we can move onto Block 3, the . . . 

Four Patch Block


From your Month #2, Four Patch bag, cut the fabrics according to the supplemental cutting list. 


 Layout the 4 squares as shown below, taking note of the fabric placement.  


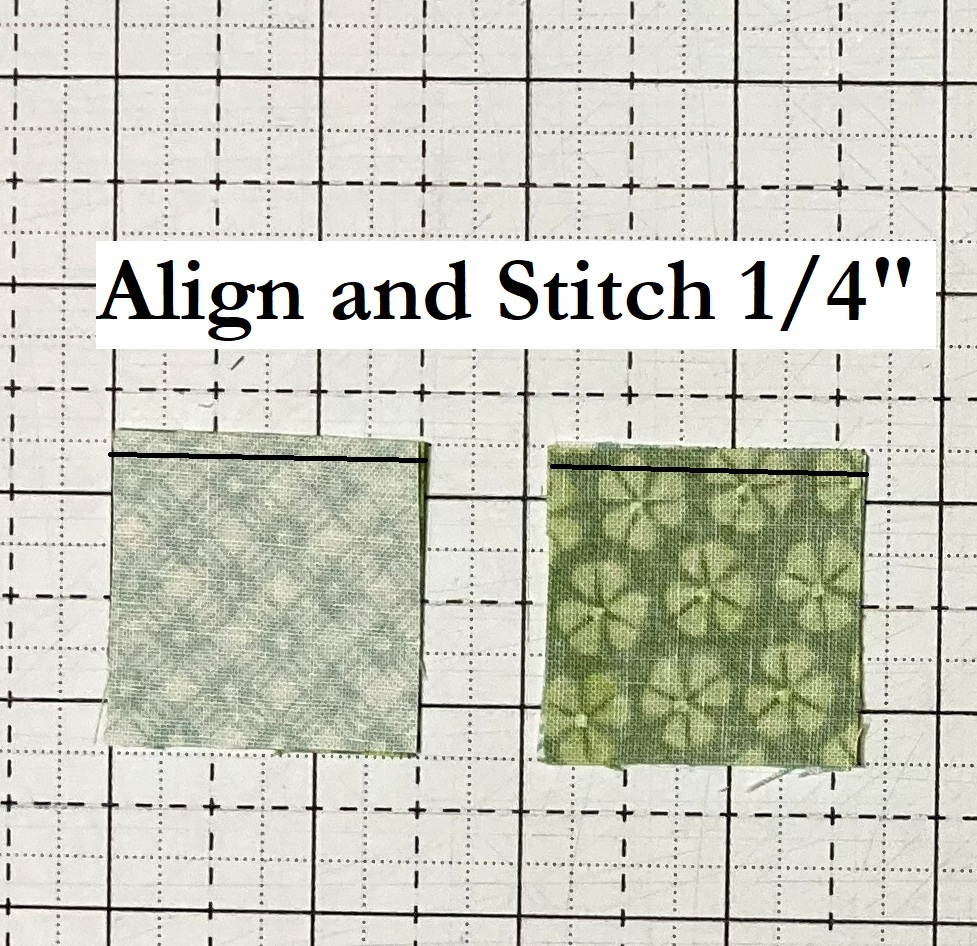
Place the top squares in each column onto the bottom squares with right sides together and align the raw edges.    Stitch a 1/4" seam along both edges.  


Press the Seams towards the Dark Green print.  


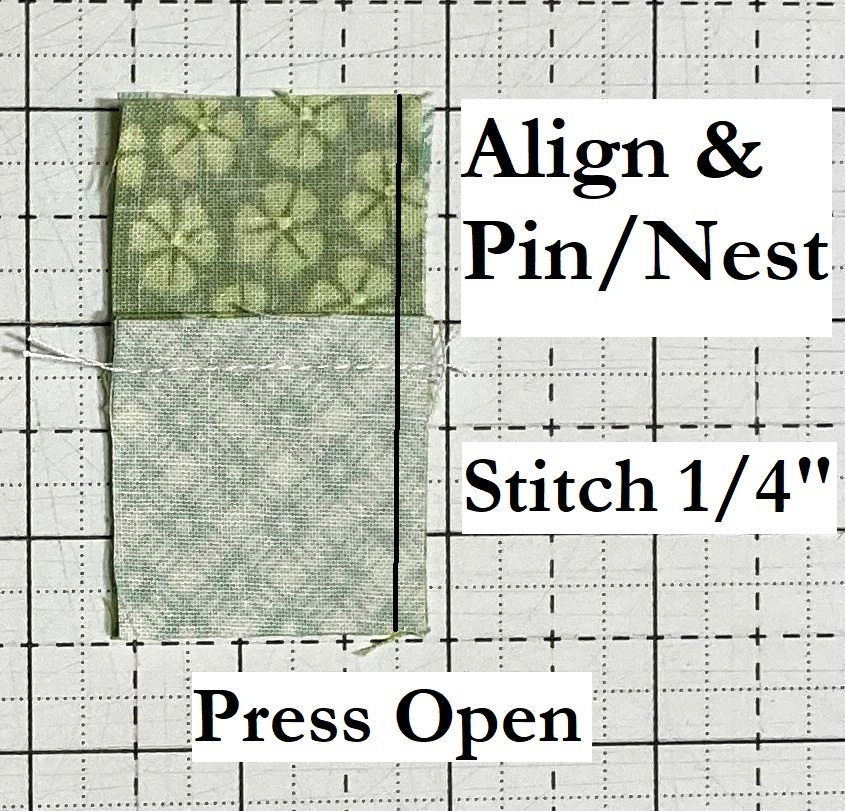
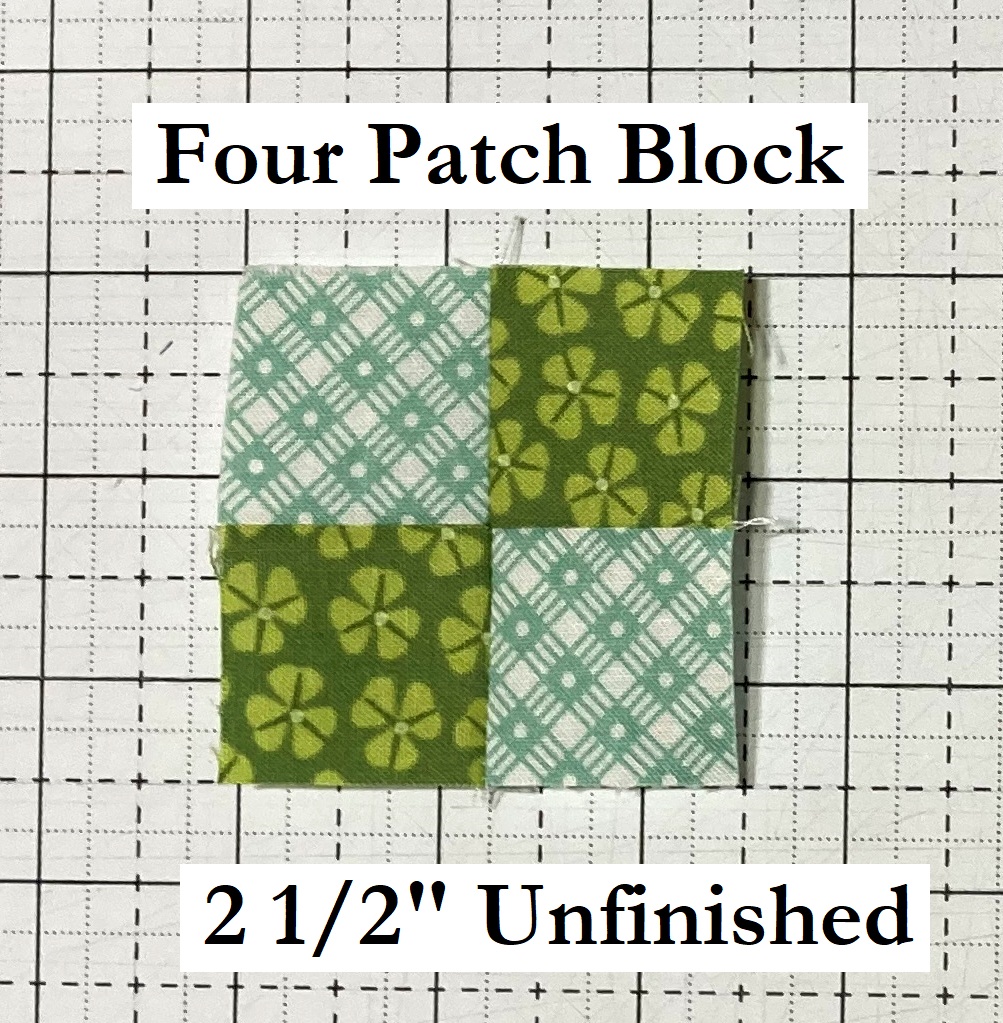
Place the Right Hand Column onto the Left Hand Column with right sides together and align and pin/nest the raw edges.      Stitch a 1/4" seam along the pinned edge.   Press the seam open.  


And just like that, block 3 is done!!  The Four Patch Block should measure 2 1/2" x 2 1/2" unfinished.  


And now we can move onto the last mini block this month, the. . . 

Mini Framed Square Block


From your Month #2, Mini Framed Square bag, cut the fabrics according to the supplemental cutting list. 


Layout the center square and 4 rectangles as shown below.   


Place the small rectangles onto the sides of the center square with right sides together.   Align and stitch a 1/4" seam along the edges.   


 Press the seams outwards towards the black rectangles.   


Place the longer rectangles onto the top and bottom of the center square with right sides together.   Align and stitch a 1/4" seam along the edges.    Press the seams outwards towards the black rectangles.   


And Block 4 is done!!  The Mini Framed Square should measure 2 1/2" x 2 1/2" unfinished.  


And now we can move onto slightly larger blocks, starting with the. . . 


From your Month #2, Sashed Half Square bag, cut the fabrics according to the supplemental cutting list.   I cut my squares 3" instead of the 2.875" and will plan to trim the HST's.  

Using the 3" Pink and White Squares and the Half Square Triangle Directions from Month 1 make 4 Half Square Triangles and trim them to 2 1/2" x 2 1/2".  


Layout the 4 Half Square Triangle Units, 4 Side Blue rectangles, and 1 Purple Center square as shown.  


Place the center column pieces onto the left hand pieces with right sides together.   Align and pin if desired.   Stitch a 1/4" seam along the edge of all the units. 


Then, place the left hand column pieces onto the center pieces with right sides together.   Align and pin if desired.   Stitch a 1/4" seam along the edge of all the units. 


Press the top and bottom row Inward towards the Blue rectangles.   Press the center row outwards towards the Blue rectangles. 


Place the Center Row onto the Top row with right sides together.   Align and pin/nest the seams.   Stitch a 1/4" seam along the pinned edge. 


And now, place the bottom row onto the center row with right sides together.   Align and pin/nest the seams.   Stitch a 1/4" seam along the pinned edge.   Press the last two seams open.  


And your Block 5 is done and the Sashed Half Square Triangle Block that should measure 5 1/2" x 5 1/2" unfinished.  


So now it is time to move on to the. . . 


From your Month #2, Half Square Triangles bag, cut the fabrics according to the supplemental cutting list.   I cut my squares 3" instead of the 2.875" and will plan to trim the HST's.    Also, in this bag is the Gold Large Floral Fabric that can be used to do the "grey holes" in your section piecing.  Last Month we did Strip piecing of the background for the "holes" and you cut out the pieces you would need this month to do the same.  So you an choose if you want to do the Strip Piecing or just use the Gold Floral.  It is completely up to you, and I will continue to give both options going forward in the tutorials ;) 


Using the Squares and the Half Square Triangle Directions from Month 1 make 10 Half Square Triangles and trim them to 2 1/2" x 2 1/2".   You will only use 9 of the 10 HST's so one of them can be put in your scrap bin.  


Layout the 9 Half Square Triangle Units as shown.  


Place the center column pieces onto the left hand pieces with right sides together.   Align and pin if desired.   Stitch a 1/4" seam along the edge of all the units. 


Then, place the left hand column pieces onto the center pieces with right sides together.   Align and pin if desired.   Stitch a 1/4" seam along the edge of all the units. 


Press the seams open.  


Place the Top Row onto the Center row with right sides together.   Align and pin the seams.     You can use this little pin trick to align the points of your HST's perfectly.    Stitch a 1/4" seam along  the pinned edge, and be sure when stitching that you stitch directly along the bottom of the Fabric V made in the seam allowance to ensure a perfect points. 


And now, place the Bottom row onto the Center row with right sides together.   Align and pin/ with the seams with the pin trick.   Stitch a 1/4" seam along the pinned edge, again stitching directly along the point of the Fabric V.   Press the last two seams open.  


And your Block 6 is done and perfectly pointed!!  The  Half Square Triangles Block that should measure 6 1/2" x 6 1/2" unfinished.  


And now we only have one block left for this month, the. . . 


From your Month #2, Pinwheel in a Courthouse bag, cut the fabrics according to the supplemental cutting list.   Again, I cut my squares 3" instead of the 2.875" and will plan to trim the HST's. 

 
Using the Squares and the Pinwheel Block Directions from Month 1 make a Pinwheel Center Unit and your HST's are still trimmed to 2 1/2" x 2 1/2".


Layout the Pinwheel Center Unit and 4 rectangles Cream rectangles as shown below.   


Place the small rectangles onto the top and bottom of the Pinwheel Center unit with right sides together.   Align and stitch a 1/4" seam along the edges. 


 Press the seams outwards towards the rectangles.     Place the longer rectangles onto the sides of the Pinwheel Center unit with right sides together.   Align and stitch a 1/4" seam along the edges.   


Press the seams outwards towards the rectangles.    And now we repeat for the Dark Blue Rectangles.    Place the small rectangles onto the top and bottom of the Sashed Pinwheel Center unit with right sides together.   Align and stitch a 1/4" seam along the edges. 


Press the seams outwards towards the rectangles.     Place the longer rectangles onto the sides of the Sashed Pinwheel Center unit with right sides together.   Align and stitch a 1/4" seam along the edges.   Press the seams outwards towards the rectangles. 


And your Block 7 is done and the Pinwheel in a Courthouse Step Block should measure 8 1/2" x 8 1/2" unfinished.  


And that means it is time to start putting all the blocks together.  So grab all of your   Low Volume Background strips that we cut last month, as well as your blocks and let's get going on  . . .

Sewing Section 3


We will start by sewing some "optional" Strip Sets together.   For all of these strip sets, press the seam allowance to the Larger Number fabric.  These Strip Sets are optional as you can choose to use the Large Gold Floral Pieces or make the "Grey Hole" strip sets.  I will be using the Strips Sets in the tutorial, but you use what you like.  

From Fabric 11, 12, 13, 14, 15, and 16, sew a 2 1/2" Strip Set together as shown.
From Fabric 17 & 18, sew a 6 1/2" Strip Set together as shown.


Now we will sew Blocks to the Strip Sets.   Press the Seams towards the Strip Sets.  

Sew the 3/4 Strip Set and the HST Block together as shown.
Sew the 11/12/13/14/15/16 Strip Set and the Square in a Square Block together as shown.
Sew the 17/18 Strip Set and the Half Square Triangles Block together as shown.


 Now we start sewing it together into the Section 3.   

Sew the Square in a Square Unit and the Half Square Triangles Unit together as shown.

Press the Seams Open. 


Sew the Square in a Square/HST Unit and the Pinwheel in a Courthouse Steps Block together as shown, taking note that the longer sashing rectangles on the block are on the sides.  

Press the Seams towards the Pinwheel Block. 


And your Group 1 - Section 3 is complete.  It should measure 16 1/2" wide by 8 1/2" high.


And now we can move on to . . . 


Once again, We will start by sewing the Strip Sets together.   Press the seam allowances to the Larger Number fabric.   

From Fabric 4, 5,  & 6, sew a 41 1/2" Strip Set together as shown.
From Fabric 7 & 8, sew a 24 1/2" Long Strip Set together as shown.
From Fabric 7 & 8, sew a 13 1/2" Short Strip Set together as shown.


Now we will sew Blocks to the Strip Sets.   Press the Seams Open.  

Sew the 7/8 Long Strip Set and the Four Patch Block together as shown.
Sew the 7/8 Short Strip Set and the Mini Framed Square Block together as shown.


 Now we start sewing it together into the Section 4 Part 1.   

Sew the Mini Framed Square Unit and the Four Patch Unit together as shown.

Press the Seams Open. 


Sew the 4/5/6 Strip Set and Framed/4 Patch Unit together as shown.

Press the Seam towards the Strip Set. 


Sew the Sashed Framed/4 Patch Unit and Sashed Half Square Triangle Block together as shown.  

Press the Seam Open. 


And your Group 1 - Section 4 Part 1 is complete.  It should measure 5 1/2" wide by 46 1/2" high.


And all that is left for this month is . . . 


Once again, We will start by sewing the Strip Sets together.   Press the seam allowances to the Larger Number fabric.   

From Fabric 1 & 2, sew a 44 1/2" Long Strip Set together as shown.
From Fabric 1 & 2, sew a 8 1/2" Short Strip Set together as shown.


Now we will sew Blocks to the Strip Sets.   Press the Seam Open.  

Sew the 1/2 Short Strip Set and the Mini Circle Block together as shown.


 Now we start sewing it together into the Section 5.   

Sew the Mini Circle Unit and the 1/2 Long Strip Set together as shown.

Press the Seam Open. 


And your Group 1 - Section 5 is complete.  It should measure 2 1/2" wide by 54 1/2" high.


And you are done for this Month!!! 
We will sew these Sections all together next month, 
so for now, just leave them in the 3 separate sections.  


And that is it for BOHO Heart Block of the Month, Month 2 :) 

If you have any questions on this tutorial, please don't hesitate to email me at happyquiltingmelissa@gmail.com or leave a comment.  

Hope you have so much fun making all of this months blocks and then sewing them all together:)  You can actually see the heart starting to form by the end of this month, so fun!!!  

 Looking forward to Next Month!!

Pin It!

Tuesday, July 5, 2022

Terrific Tuesday Giveaway Day!!!

 It's Terrific Tuesday Giveaway Day!! Let's have some fun :)

First, we need to announce the winner from last Terrific Tuesday Giveaway!!  
The winner of the $50.00 Gift Certificate from Lou Lou's Fabric Shop is. .   Number #311. . . . Congrats debfwms!  I have messaged you :)  


And on to today's

Today's Terrific Tuesday Giveaway is being sponsored by Green Fairy Quilts.  Green Fairy Quilts is your home for pre-cut goodness and they always have amazing sales going on every weekend on a selected pre-cut or notion!!!   And did you know that Green Fairy Quilts has a Deal of The Day, I just love these!!!    And right now you can shop Green Fairy Quilts with the discount code JULY4 for additional savings on top of their awesome sale prices and free shipping over $75!!!   The code expires Wednesday, so pop over today and have fun shopping!!! 

And for today's Terrific Tuesday Giveaway, Green Fairy Quilts will be giving one lucky reader a Holly Jolly Layer Cake by Urban Chicks for Moda Fabrics!!!  So excited, let the Christmas in July fun begin!!!!  

You have two entry chances here on the blog, and please leave a separate comment for each.  All Entries are welcome, including International Entries.   Please just be sure to leave an email address if you are a no-reply blogger ;)  

ENTRY 1 - Simply leave a comment that tells me if you have any Christmas in July projects planned??  (I will be sharing some finishes this week to give you some ideas if you don't :)  

 ENTRY 2 - Show your Green Fairy Quilts love.   You can Sign up for their Newsletter which I highly recommend as it will ensure you catch all of their amazing sales!!  You can follow them on Instagram or Facebook,  or you can visit the Shop and then share a favorite item ;)   Just be sure to leave a comment of how you showed your Green Fairy Quilt Love!!!

And that's it ;)  The giveaway will be open until next Tuesday, July 12th, when I will announce a winner at the beginning of next weeks Terrific Tuesday Giveaway Post :)

You can also pop over to my Instagram and/or Facebook to enter there as well :)  

Good Luck and Have a Happy Quilting Day!!!
Pin It!

Monday, July 4, 2022

Low Volume Moroccan Lullaby - HQM Quilt 14

 It is Week 14 of the Happy Quilting Marathon and can you believe I am posting on a Monday!!!   I know, right, but it is going to be a busy week with lots of fun shares, so I had to get this in early :)   And early was the only option, as we have some fun BBQ and Family and Games planned for this evening ;)  So let's get to it.   Here is my Low Volume Moroccan Lullaby!!! 

So these were actually Bee Blocks that my Bee Mates made for me clear back in 2018.  After making up my original Moroccan Lullaby pattern, I started to wonder what it would be like in a low volume version.   Kind of funny that it was actually the beginnings of my Moroccan Lullaby 2 pattern ;)    So I grabbed all of my Corey Yoder Low Volumes from 3 different lines and sent the fabrics out.    And I have to say, when I sewed the blocks together, I really worried that I might have gone a little "too scrappy and bright" in my low Volume Crosshatching backgrounds ;)  


Ya know, we all have that moment when we just want to go back and change a fabric choice, right!!   And so the quilt top sat, and sat.   Until today!!! Because finishing it up is better then having a quilt top just sit in a pile.   And you know the funny thing, Now that it is all quilted, I like it all the more ;)  Sure, it is still a little busy than my "usual" style, but I just love how the quilting made those rainbows in the corners just pop.   It really let the secondary design shine.  

I quilted it with an all over loose feather design.  The main reason I choose this, is because it is not super dense.   And you might have also found this, but when putting quilt blocks together that have been made from lots of different people, they aren't always the same size.   So there was a bit of  "easing in" in the quilting and something really loose works best for that ;) 


And now, I just can't help but smile at this Low Volume Moroccan Lullaby.   I have set it aside because I have a sweet Senior friend of my daughters that this quilt will just fit perfectly.  She is all rainbows and sunshine and it will be an perfect Graduation gift for her to take to college.   So fun!!!! 


And that is Quilt #14 - Low Volume Moroccan Lullaby ;)  14 Down and only 12 more quilts to go in the Happy Quilting Marathon :)  I'm on the downward slope!!!!  


And that is it for today, thanks for popping in to share this finish with me!!! 

I hope you all have a very Happy Quilting Day and for my quilting friends in the USA, I hope you have a very Happy 4th of July!!

Pin It!

Saturday, July 2, 2022

Bella Skill Builder - HQM Quilt 13

 It is Week 13 of the Happy Quilting Marathon and I am so excited about this finish because I am pretty sure it is my oldest WIP at the moment.  So happy to have it done!!!! It's my Bella Skill Sampler from 2017!!! 

We all know I just love a good rainbow quilt!!!  I used lots of shades of Bella Solids to make this solid sampler.  It blew me away how many shades of solids I had in my stash.  So fun!!! 


And I had so much fun learning lots of new skills while making each of the blocks!!!!   I made a small version and a large version of each block so I could make this twin size ;)   You can search Bella Skill Builder on my blog to see each of the block posts and the different colors and size alterations I use in each block ;)

I decided to stick with the rainbow vibe, and use a rainbow variegated thread.  Simple loop de loops for the win, especially with such a bold thread choice.  I love how it just ties all of the blocks together in this fun sampler. 


I actually didn't have a binding made for this quilt, so I went to my scrap bin, and found a bunch of grey-brownish prints.   I figured might as well bring in the last of the neutrals in the binding.  I think it was a perfect way to finish it up!!!  And now I am just thrilled because I can say my longest WIP is no longer 5 years old.  Yippee!!!! 


And that is Quilt #13 - Bella Skill Builder ;)  13 Down and only 13 more quilts to go in the Happy Quilting Marathon :)   I have reached the half way point and I am just so happy!!!!  


And that is it for today, thanks for popping in to share this finish with me!!! 

I hope you all have a very Happy Quilting Weekend!!

Pin It!

Friday, July 1, 2022

Heartfelt Quilt Along - Precious Blocks

 It's Month 6 of the Heartfelt Quilt Along and I am just so excited because today is the last day of block releases, meaning it's almost time to put it all together!!!  This is Fat Quarter Shop's 9th Annual Charity Quilt Along and they are always my favorite :)  Today's release are the Precious Blocks  and how cute are those small hearts inside the heart!!!


I am using Graphite Cross Weave for the background and Flirt fabrics by Sweetwater for all the hearts.   And I am super excited that next month we get to add all the sashing because I can't wait to see all of these hearts framed in the Graphite Cross Weave!!  It's going to be so pretty!!!      


So are you joining in with the Heart Felt fun???   You can download the block pattern right here and it is requested for each pattern you download to donate $5.00  to the Make a Wish Foundation :)  And I am super excited to say that even though it has just started,  Fat Quarter Shop's annual charity QAL has already raised over $88,000!!!  The goal is $1000,000 which will allow for 16 wishes to be granted.  How awesome is that!!!  And Moda Fabrics and Fat Quarter Shop have joined to match up to $30,000 :)  So many amazing wishes :)  


Be sure to share all of your Heartfelt progress on social media with #heartfeltqal and check out Fat Quarter Shops post for the Precious Blocks for lots more Heart Felt Inspiration!!! 

And that's it for the Sixth Release in the Heart Felt Quilt Along!!!!      

Thanks for popping in today ;)  Have a Happy Quilting Day!!

Pin It!