

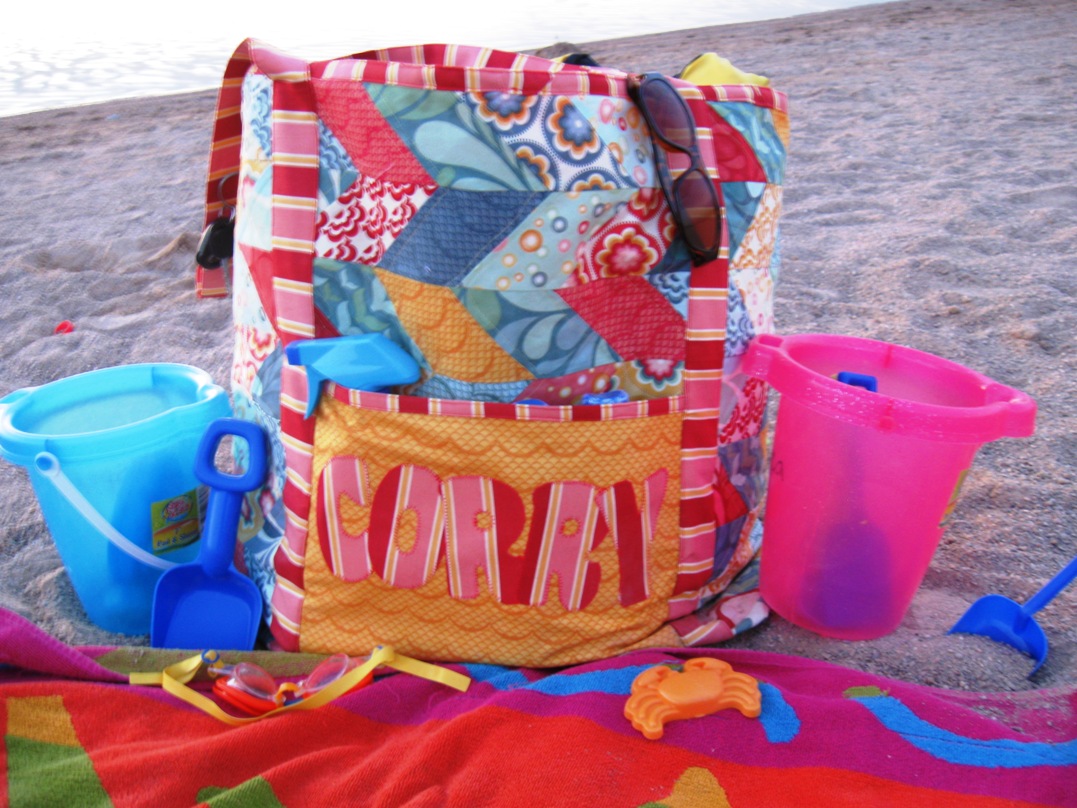
So basically I was getting tired of having to carry around several bags every time our family tried to go on an outing. And I wasn't finding any tote's large enough to purchase. So . . . Take a couple deep breaths, think positive thoughts, and go for it . . . make something that is not a quilt. A customized tote just for my family :) And I have to say, this looks way better than anything I could have bought.

This bag is 25" wide, 17" deep, and an 8" base. You can really "Take It All" with this tote.

And now that this
Moda Bake Shop Tutorial has been published for a while, I can now post it here
on my blog for your convenience ;) So just follow along
below for the full step-by-step tutorial. And if you love it, you can get
the printer friendly version here :)

I used Salt Air by Cosmo Cricket for my tote because I just loved the beach themed fabrics and they fit perfect for all our summer outings!!!
You will need:
1 Salt Air Jelly Roll – You will use 22 strips
1 Yard for the handles, binding, and applique – I used 37027 12
3/4 Yard for the lining – I used 37023 12
1/3 Yard for the pockets – I used 37025 14
1 Yard for the handles, binding, and applique – I used 37027 12
3/4 Yard for the lining – I used 37023 12
1/3 Yard for the pockets – I used 37025 14

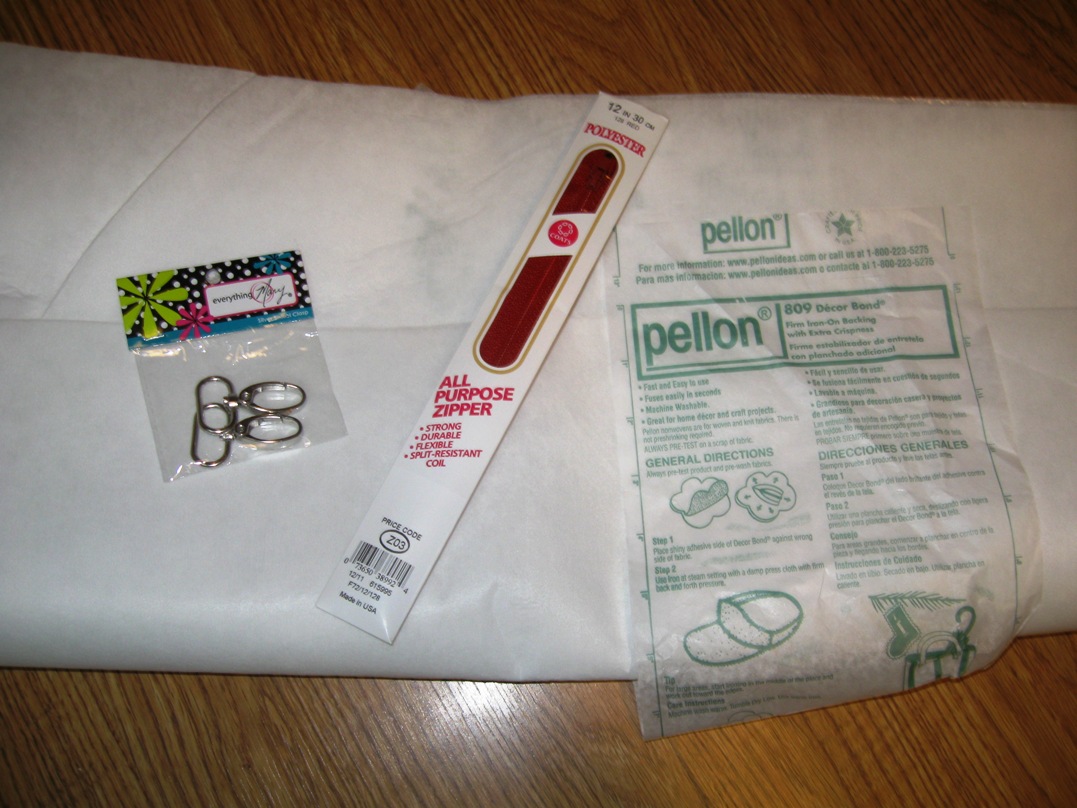
Additionally – You will need some Non-Fabric Supplies. They include :
2 Yards of Interfacing – I used 809 Decor Bond (It is iron-able and a good weight)
1 Key Ring Hook
1 12″ Zipper
1 Key Ring Hook
1 12″ Zipper

STEP 1 – CUTTING
So . . . Let’s get started with cutting up our yardage so it is ready when we need it  First well cut the 1 yard piece. Begin by cutting the selvage from your yardage. Then cut (2) 2 1/2″ x WOF strips for the binding, (4) 6″ x WOF strips for the handles, and set the remaining piece aside to be used for the applique.
First well cut the 1 yard piece. Begin by cutting the selvage from your yardage. Then cut (2) 2 1/2″ x WOF strips for the binding, (4) 6″ x WOF strips for the handles, and set the remaining piece aside to be used for the applique.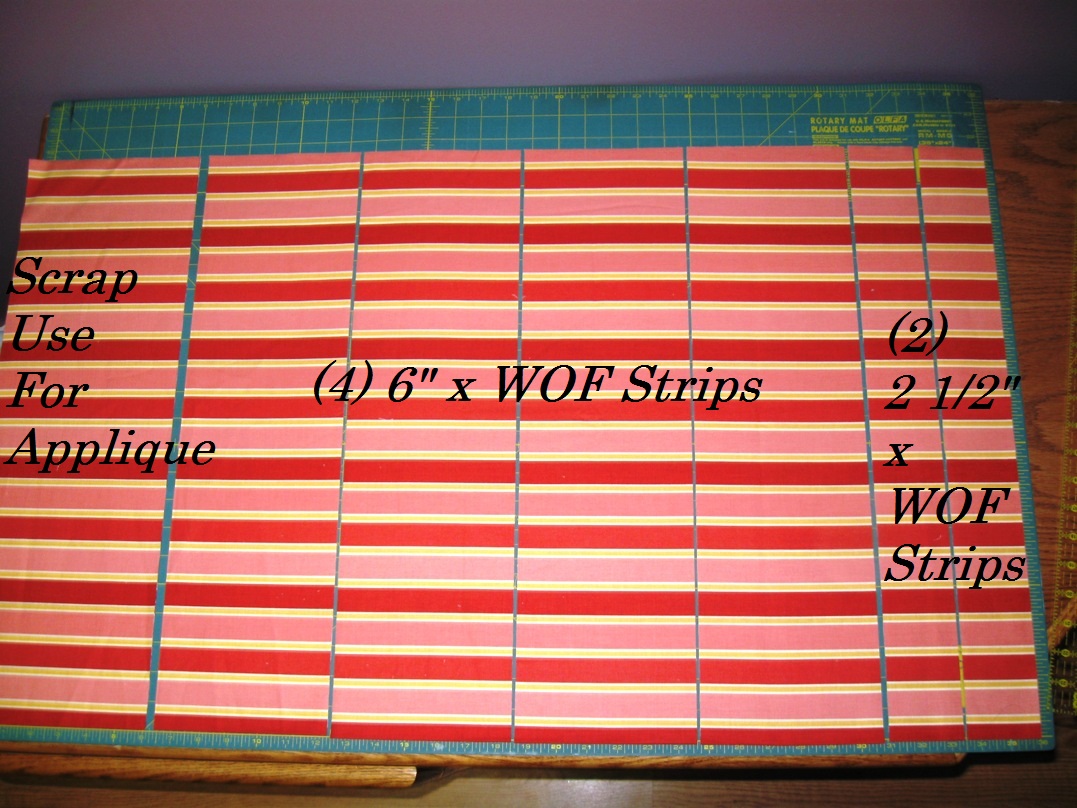
Onto the 1/3 yard piece. From this piece cut (1) 12″ x 18″ rectangle that is cut on the fold. So you will be cutting 9″ up from the folded line. Then cut (2) 11″ x 12″ rectangles. This will leave you with the selvage that you can scrap.

And lastly, take your 2/3 yard piece and cut it into a 26″ x WOF fabric piece. This should just be squaring it up and cutting an inch off the back. Go ahead and cut off the selvage at 21″ when your fabric is folded.

And that is all the cutting. Set these cut pieces aside for later.
STEP 2 – PIECING THE CHEVRON OUTER BAG
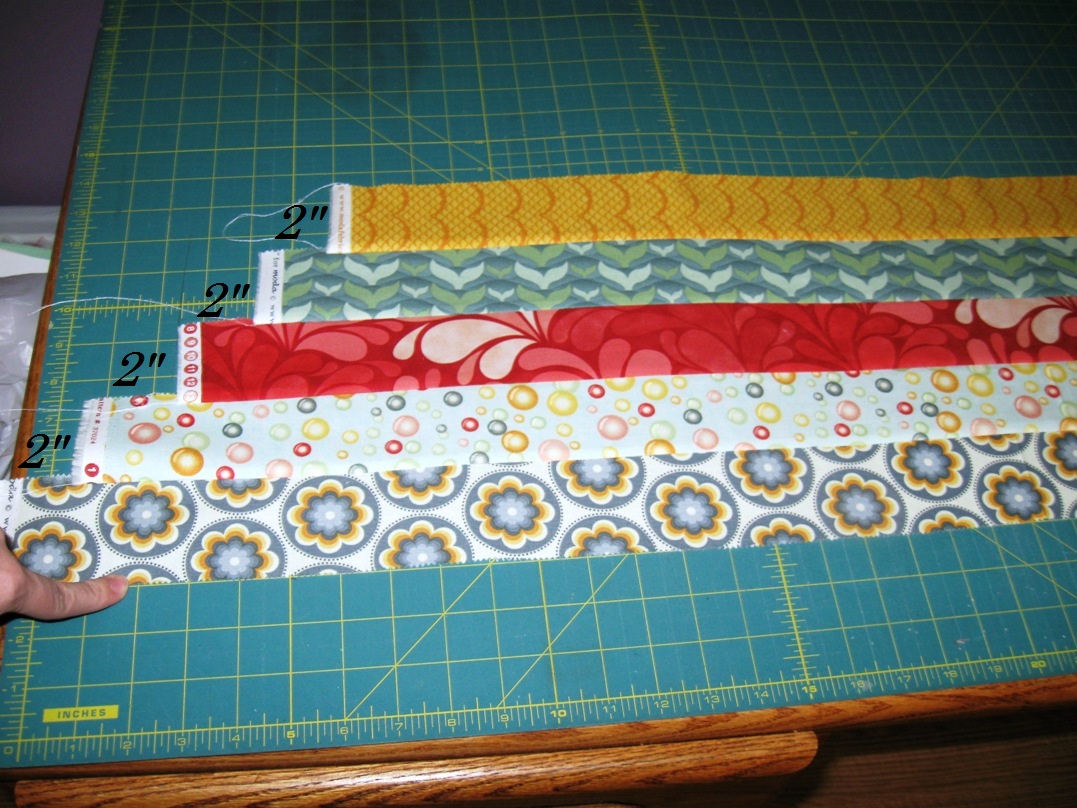
To start . . . Grab 5 strips from your jelly roll. Strip piece the entire strips together into a set of 5 but staggering the strips by appx. 2″ to form upward steps. Clip your threads and press.
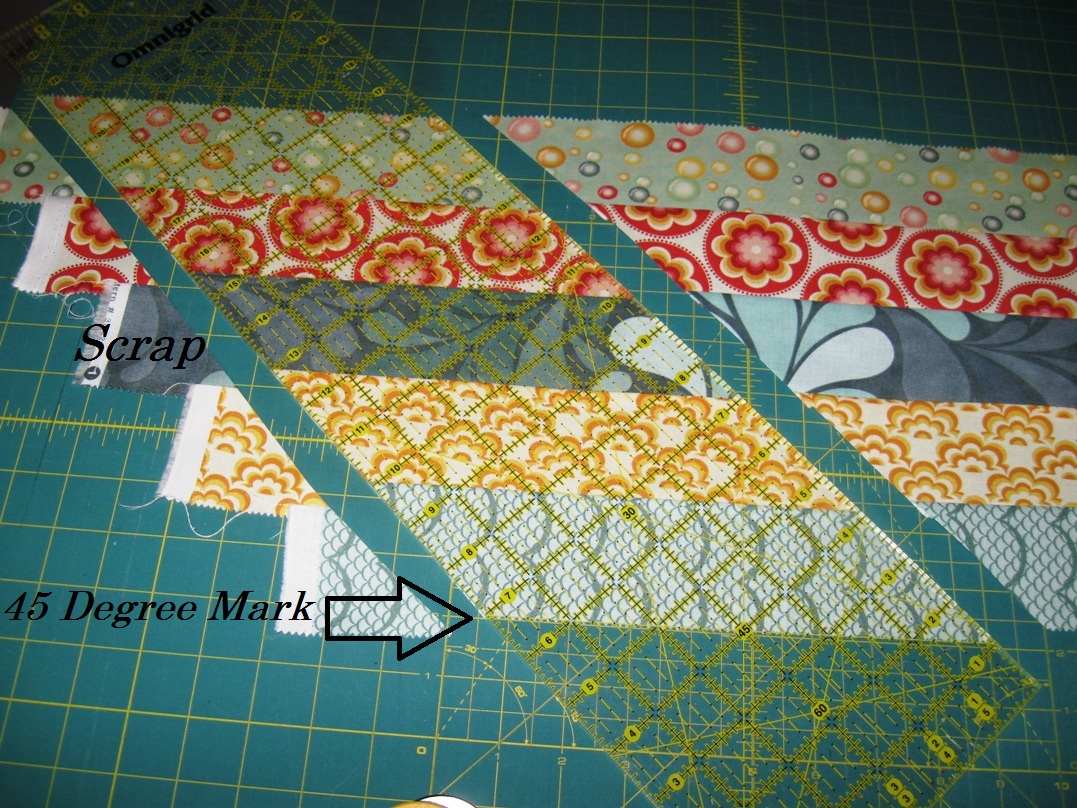
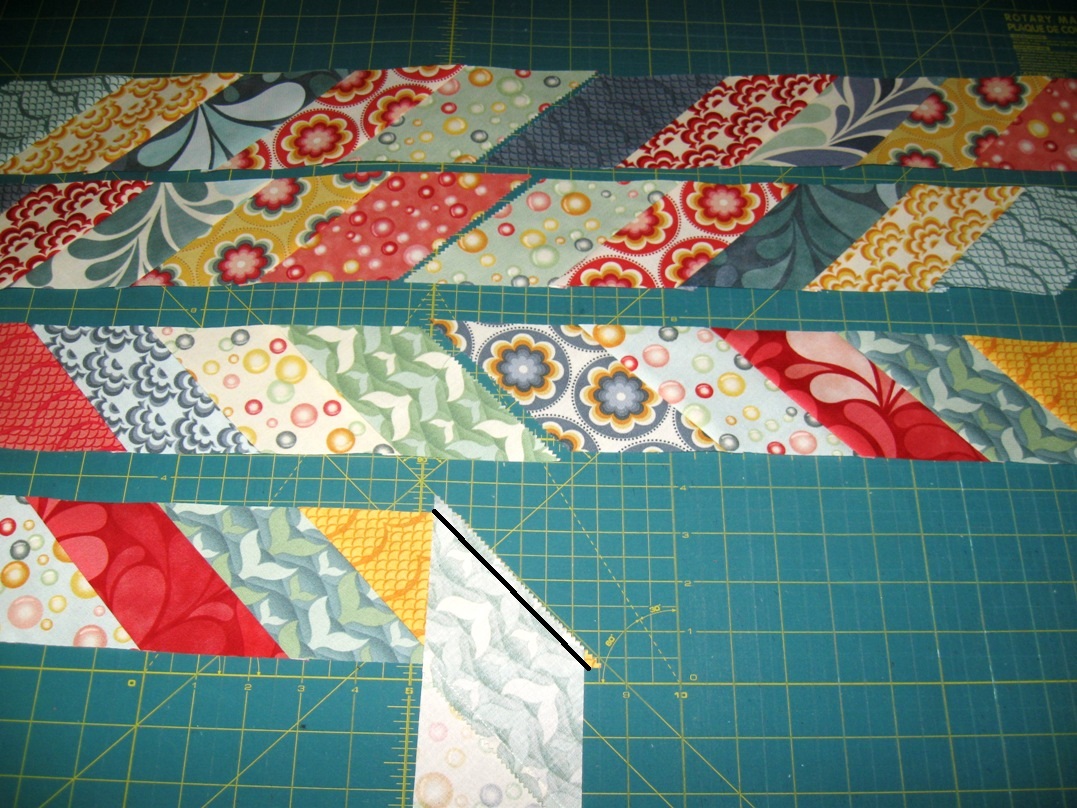
Lay your strip set out onto your mat with the bottom strip aligned with a horizontal strip on your mat. Place a long 6″ wide ruler so that the 45 degree mark is aligned with the bottom of your first strip and the edge of the ruler is as close to the edge of your “steps without including selvage. Cut along either side of the ruler.

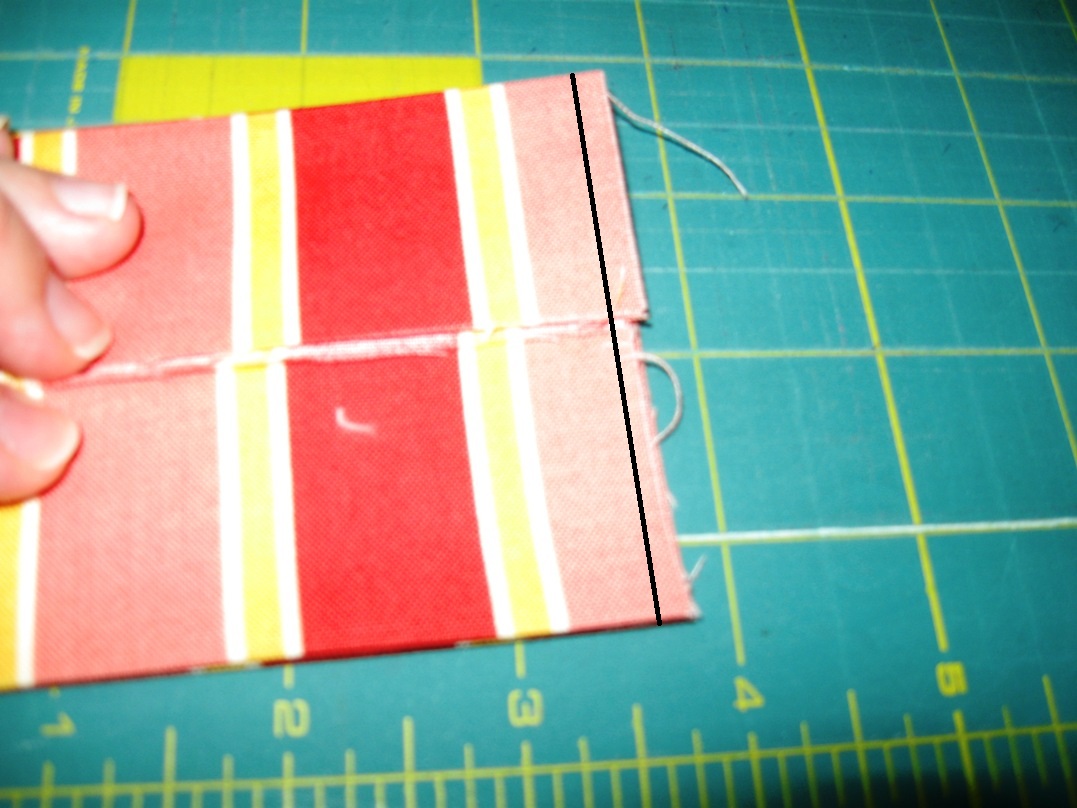
Now, go back and align the 45 degree mark again with the bottom of the piece you just cut. Align the 3″ line of your ruler with the cut line of the fabric. Sub-cut your pieced unit into 2 units.

Now line up your 45 degree mark with the bottom of your pieced strips and the 3″ line of your ruler with the cut edge of your fabric. Cut. Continue to cut this way across the striped piece of fabric until you have sub-cut 9 total pieces. There will be a little scrap at the end.

Now, grab an additional 5 jelly roll strips and repeat this process to make a total of 18 sets of 5 in 2 different print patterns.

And now we will repeat the process but make downward steps instead of upward steps. So grab 5 additional jelly roll strips and strip piece the entire strips together into a set of 5 but this time staggering the strips by appx. 2″ to form downward steps. Clip your threads and press.

Once again, lay your strip set out onto your mat with the bottom strip aligned with a horizontal strip on your mat. Place a long 6″ wide ruler so that the opposite 45 degree mark is aligned with the bottom of your first strip and the edge of the ruler is as close to the edge of your “steps without including selvage. Cut along either side of the ruler.
And again, go ahead and using your 45 degree mark aligned with the bottom of your pieced strips and the 3″ line of your ruler with the cut edge of your fabric, Sub-cut your first piece and then continue to cut 3″ pieces across the striped piece of fabric until you have sub-cut 9 total pieces. Put the scrap in your scrap bin.

Repeat the downward step process with an additional 5 jelly roll strips. You will now have 18 sets of 5 of Upward angled pieces and 18 sets of 5 of downward angle pieces. Perfect for making 9 Chevron rows.

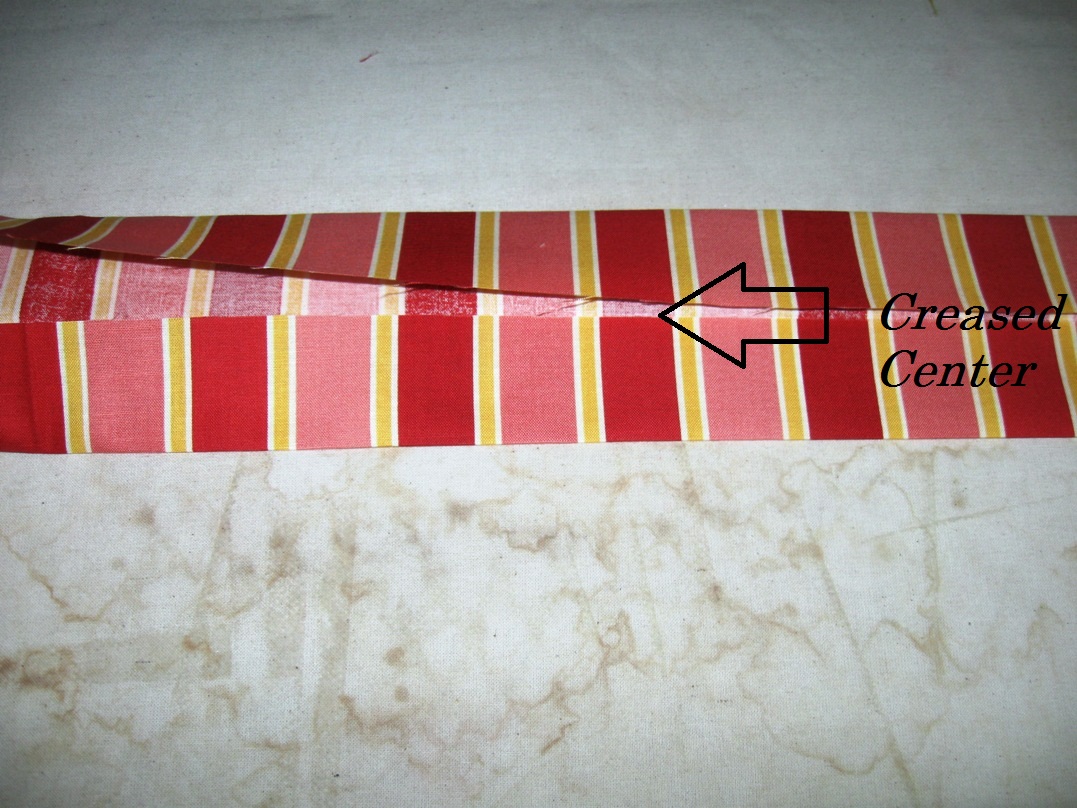
So, Lets get to making the rows. Taking 2 upward angle rows (one from each set) make one long row. You can mix and match the patterns as much as you like to get some variance. Lay the second piece onto the first piece with right sides together and the pieces at a 90 degree angle. The corners will overlap 1/4″. Sew a 1/4 seam along the edge. Press. Repeat to make 9 Upward Angled long rows and 9 Downward Angled Long Rows.
Now that you have your long rows you can make your chevron points. Take 1 Upward angle row and place it on top of a Downward angle row with right sides together. To get really nice points take care to nest your seams and pin at each seam intersection. Go ahead and stretch a little or ease fabric in to get your points lined nice and perfect.

Stitch a 1/4″ seam along your pinned edge removing pins as you go. (Where they are angled they will really want to throw your 1/4″ off.) Press your seam and admire your beautiful chevron points!! Repeat to make 9 sets total.

Stitch your 9 sets together. Lay out the rows as follows making all the points on on side and the arrow tails on the other. Stitch the rows together the same way you stitched the sets together taking care to line up and pin each seam. When all 9 rows are sewn together it should look like this.

Now fold the entire pieced work in half and lay it on your cutting mat aligning the folded edge with the 0 horizontal line of your mat. Cut along each edge so that you have a 26″ wide piece remaining. Discard cut pieces.
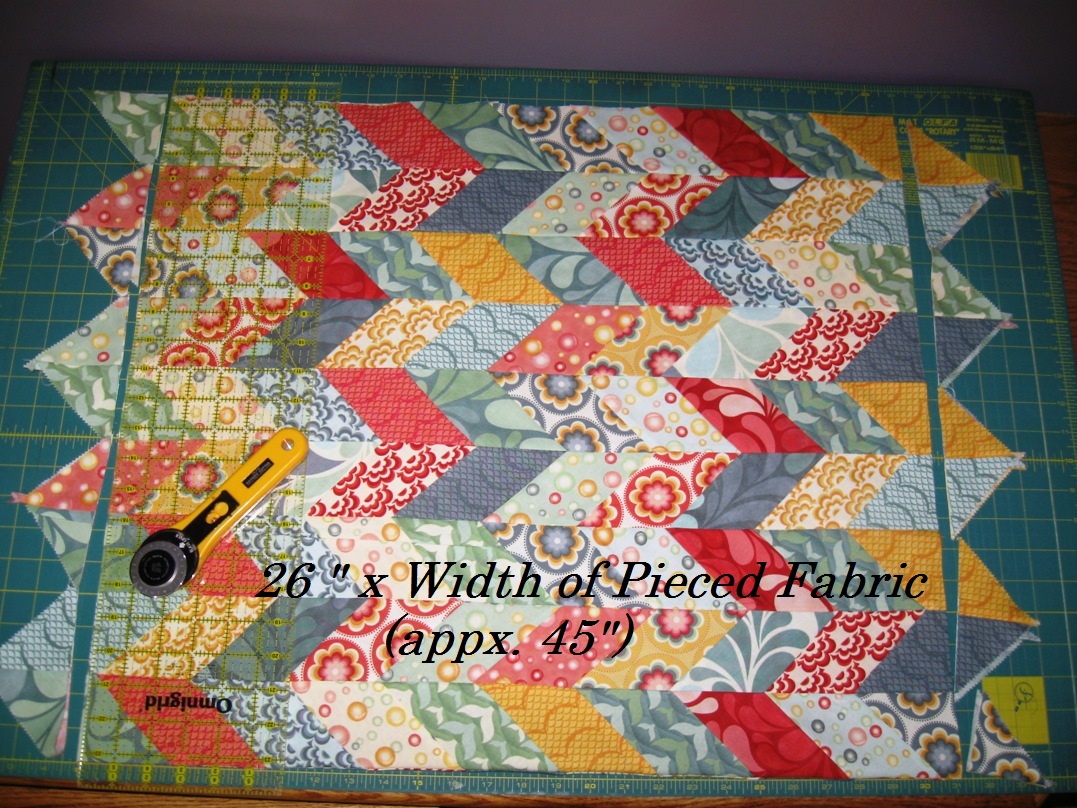
Now grab your interfacing and cut a piece the same size (26″ x 45″) as your pieced fabric. Adhere the interfacing to the wrong side of your pieced fabric.

Optional – If you would like, you can do a little free motion stitching on the outside of your bag if you like. It adds a fun little detail and helps to give the piecing a bit more strength :) I did a fun free motion straight line. I liked how the free motion allowed it to look a bit wavy, matching the theme of the bag :)

STEP 3 – ADDING THE FRONT POCKET
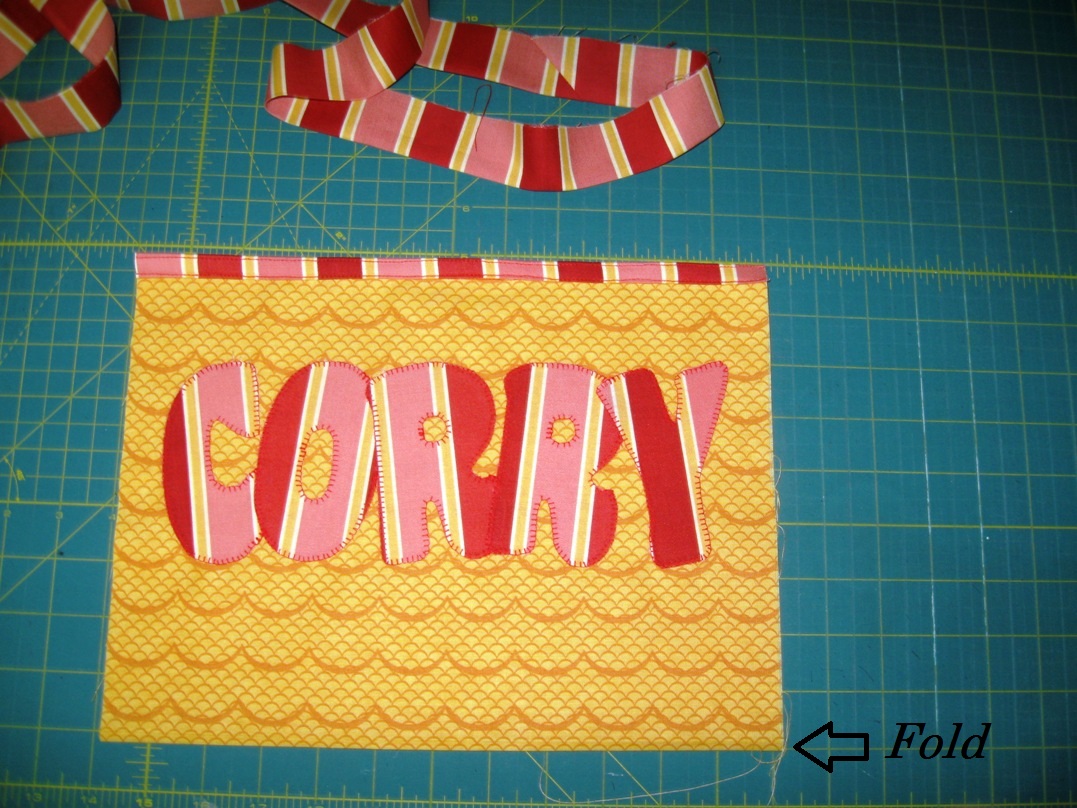
Now you are ready to add some of the detail to the outside of the bag. First lets add the front pocket. So grab your folded 12″ x 18″ rectangle and your remaining applique yardage. Applique your Family Name . . or whatever you would like for that matter, on to the top half of the pocket taking care to leave at least 1/4″ from each edge and staying above the folded line. If you have never appliqued or need help, you can see my video tutorials on Applique here that will walk you through the process step by step.

Now, go ahead and grab your 2 1/2″ x wof strips and turn the 2 strips into a continuous folded binding strip. (See my Binding Video Tutorial here if you are not sure :) Cut a 12″ piece of binding. Fold your pocket back in half. Machine bind the top of the pocket with the 12″ strip. I went back and added a decorative straight stitch along the top of the binding as well so it would match the handles.
Now, to align the pocket onto the bag. Place the pocket 10″ up from the folded line of the bag and 7″ in on either side. Stab 2 pins in on either to mark the place.
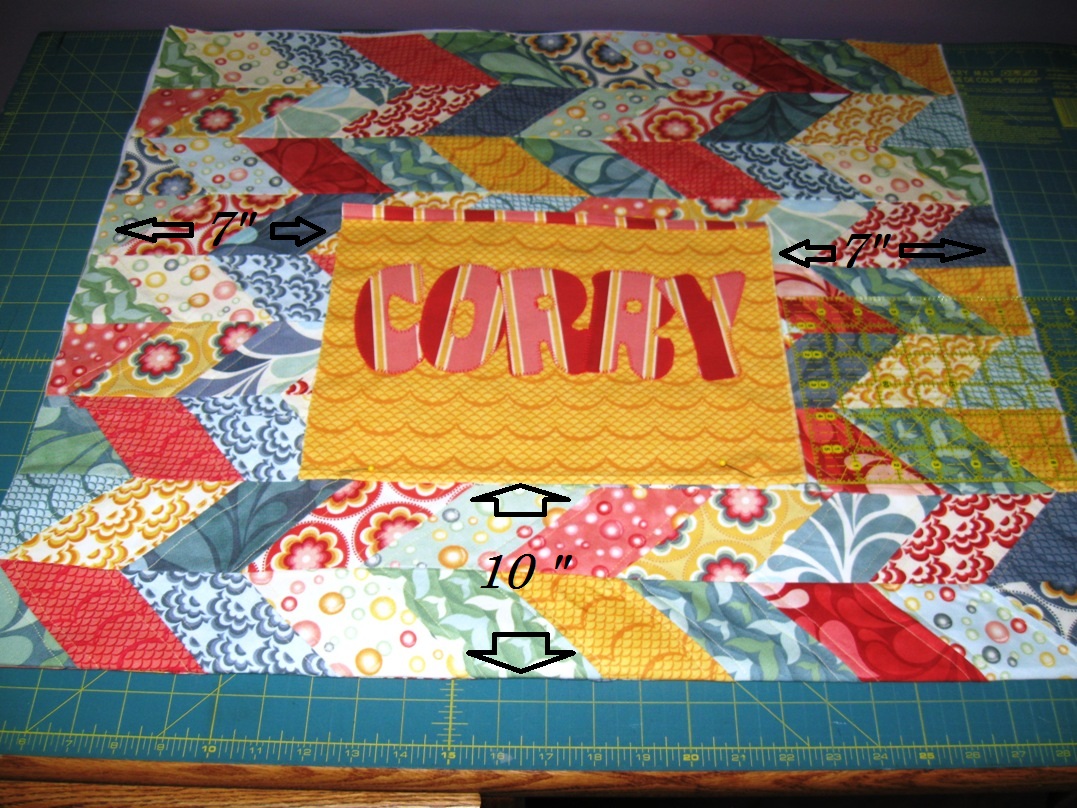
Now unfold the chevron piece and pin the bag in place through 1 layer, we don’t want to be sewing any bags shut :) Stitch along the edge of the pocket starting at the top left hand corner and going around the pocket to the top right hand corner. Remember to back-tack at the start and finish. Do not stitch across the top. And don’t worry about those raw edges hanging out, we will cover those with the handles :)

STEP 4 – ADDING HANDLES
So, let’s get making the handles. These are made double thickness so as to give them lots of strength. So. Start by taking your 4 6″ strips and sewing them into 1 long strip. You don’t need to sew these on an angle like you do your binding strip, just 1/4″ seams along the edges is fine :) Then go ahead and press the entire strip in half. Open the pressed strip up. You will have a crease down the center. Now Fold the top half of the strip over and press down to the crease across the entire strip. Then similarly fold the bottom half over and press up to the crease across the entire strip.
Lastly, go ahead and fold the entire strip in half and press. Now your super strong handles are ready to be attached!!!

Lay your pieced chevrons out on a flat surface. Start with the edge of your handle at the center of the pieced chevrons and the open side facing inwards. Place the handles about 6 3/4″ in from the edge so that the edge of the handle will overlap the raw edge of the pocket. Go ahead and play with the size of the handles that you would like. Trim any excess handle at the center leaving a 1/2″ overlap. Set the excess aside to use a little later.

Now sew the 2 ends of the handles together by opening the center seam and placing right sides together. Sew a 1/4″ seam along the raw edge. Fold the handle once again and press.
Now, go ahead and pin your continuous handle in place where you had lined it up before. You are now ready to stitch your handles down. On the first handle start stitching 1/2″ in from the edge of the top of the bag. Sew in 1/8″ from the edge of the opened side of the handle. (Using a walking foot really helps from keeping this from wanting to shift) Stitch the 1/8″ line down the entire handle ending 1/2″ from the bottom of the bag and back-tacking. Now stitch on the other side of the handle (unopened end) in the same fashion leaving the 1/2″ at the top and bottom. Then repeat with the handle on the other side.

Now just to finish up those handles. Start by folding the pieced chevrons under so that they are out of the way. Place the needle right next to where you stopped sewing before on the open side of the handle. Stitch a few stitches and then back-tack, being careful to only sew the handle and not the pieced chevrons. Continue stitching an 1/8″ seam along the edge of the handle until you get back to the pieced chevrons. Once again, fold the pieced chevrons under and out of the way and stitch right up to the previous stitches. Back tack. Now you can do the same on the folded side of the handle. Done, now just repeat both steps on the other side of the bag :)

STEP 5 – MAKING THE BASE AKA GUSSETS
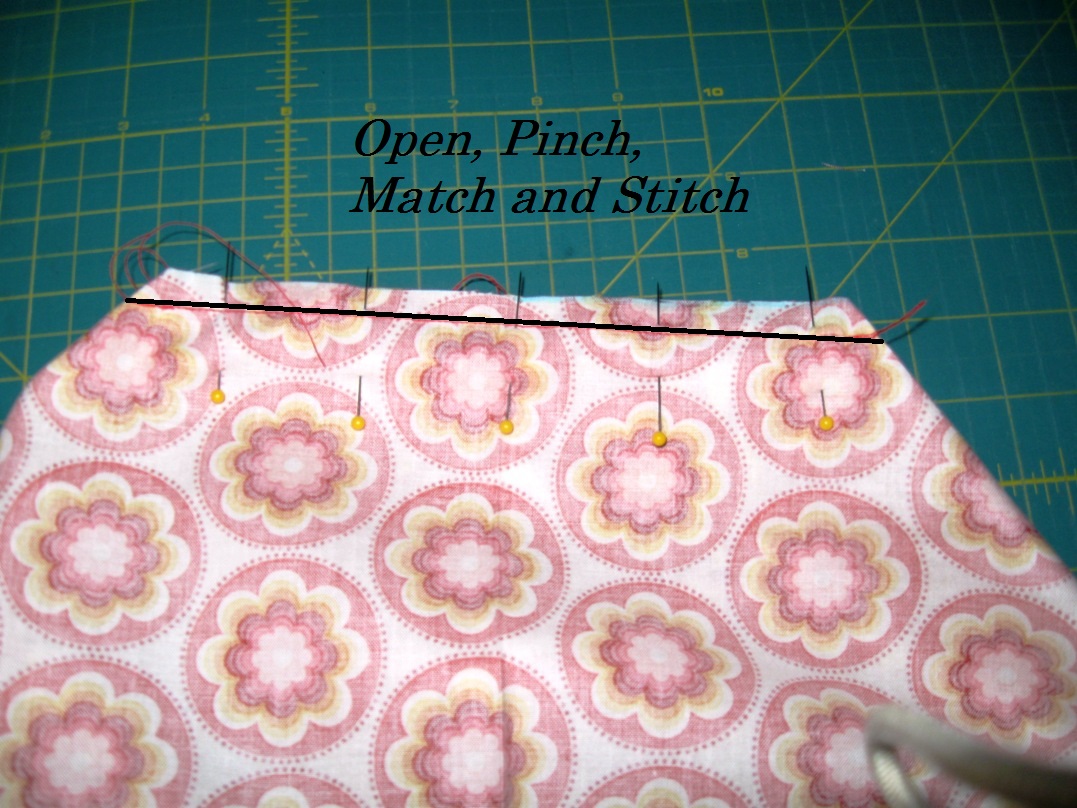
And now with your handles all added, you are ready to add a base to your bag. We do this by adding gussets, at least I think that is what they are called. Lay your pieced chevrons with right sides together aligning the top and bottom and the sides. Pin along the sides of the pieced chevrons. Cut a 4″ square out of the bottom of each side. The easiest way is to just lay your square ruler on the corner, mark the 4″, and then cut it out with your scissors. Now go ahead and stitch a 3/8″ seam along the 2 pinned sides back-tacking at the beginning and end of the seams.

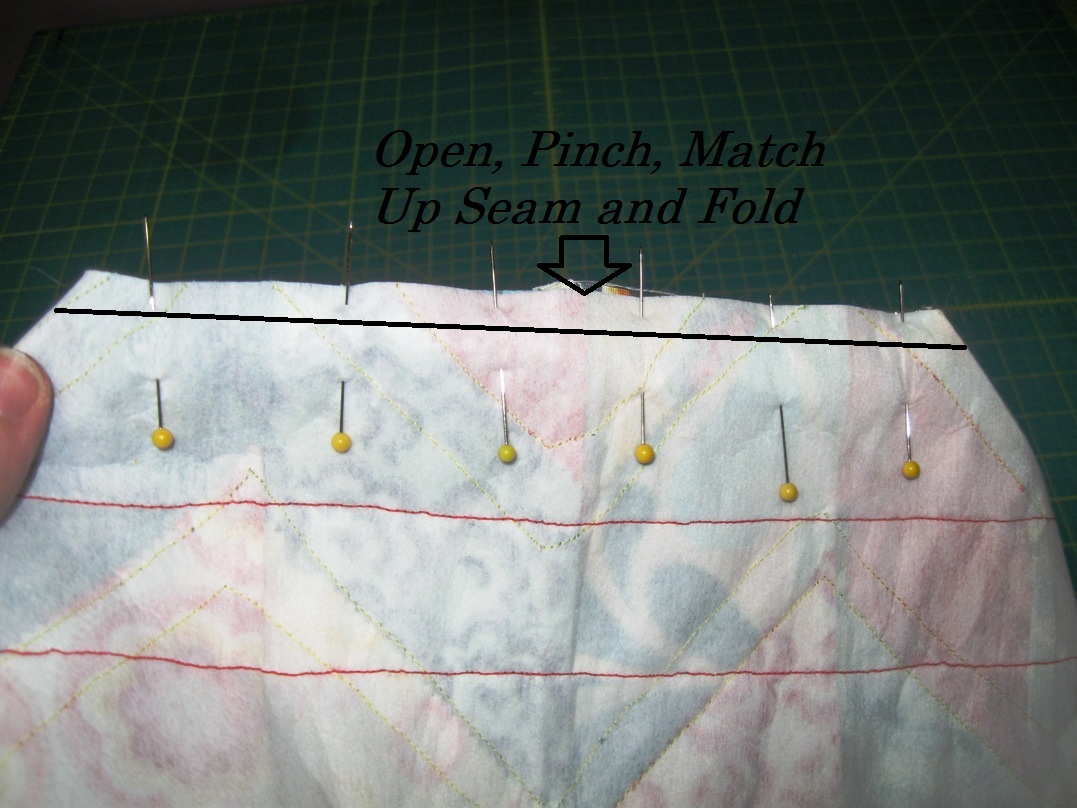
Now for the gusset. This is a lot easier then it sounds. Open the corner and then pinch down so that you line up the seam you just made with the fold at the bottom of the bag. It will make a nice straight line like this. Pin along the raw edges. Now just stitch a 3/8″ seam along the raw edge. Repeat for the opposite corner.
Now turn it right side out, push the corners out with your hands, and you have the outer part of your bag all done!!!

STEP 6 – MAKING THE LINING
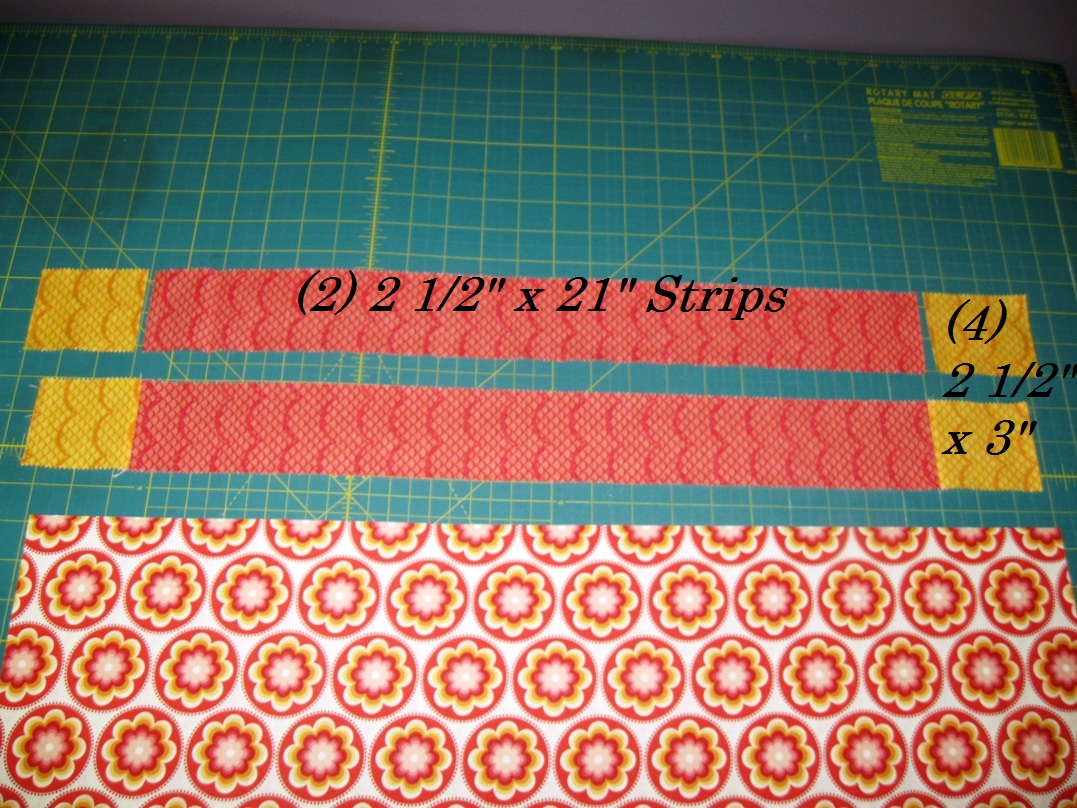
Onto the lining. The lining needs to be just a big longer than the 42″ we cut earlier. So grab 2 more jelly roll strips and from the first one cut (2) 2 1/2″ x 21″ strips and from the second one cut (4) 2 1/2″ x 3″ strips. Piece the 3″ squares onto either side of the long strips to make 2 strips as follows.
Attach the long strips onto each side of the top of the lining with a 1/4″ seam. Then go ahead and cut a piece of interfacing the same size as the lining and adhere it to the wrong side of the lining. (Somehow, I had a major forgetful moment and totally forgot to add the lining to my interfacing, Le Sigh).

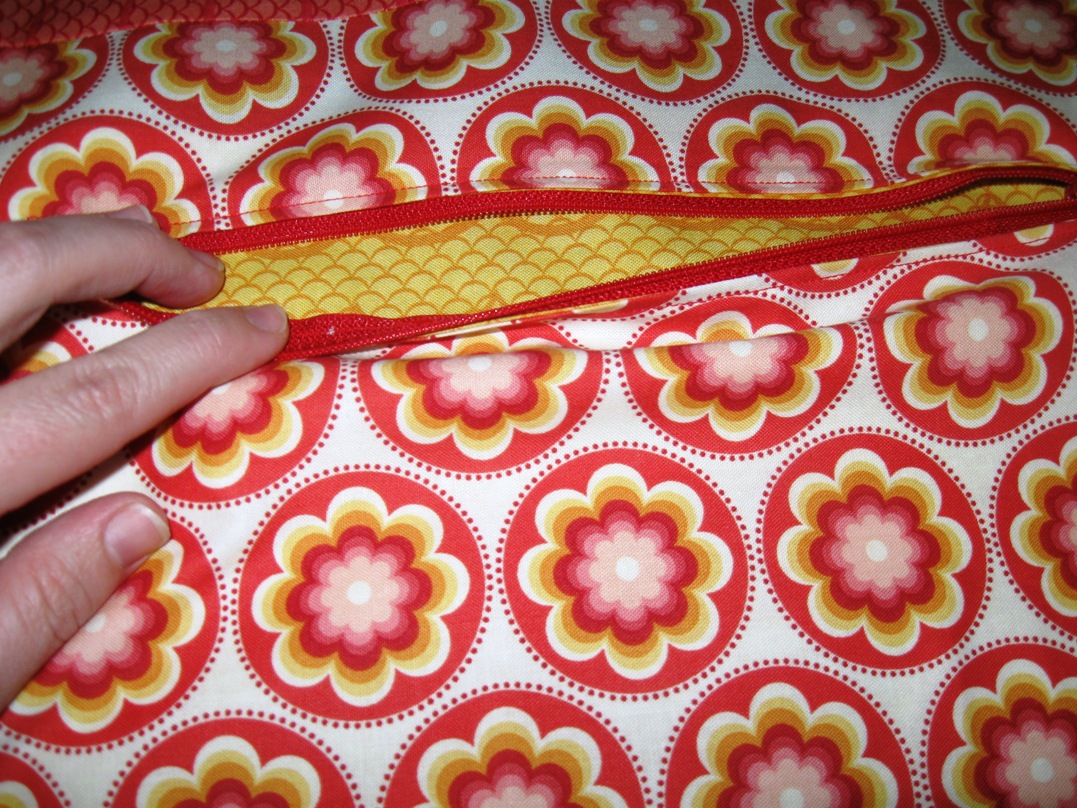
Now, go ahead and grab your zipper and your 2 remaining 11″ x 12″ rectangles to make a hidden zipper pocket in your lining.

If you have made a hidden zipper pocket before go ahead and add it into your lining placing it 2″ down from your added jelly roll strip and centering it from side to side. If you have never made a hidden zipper pocket you can see my tutorial for Adding a Hidden Zipper Pocket here :)
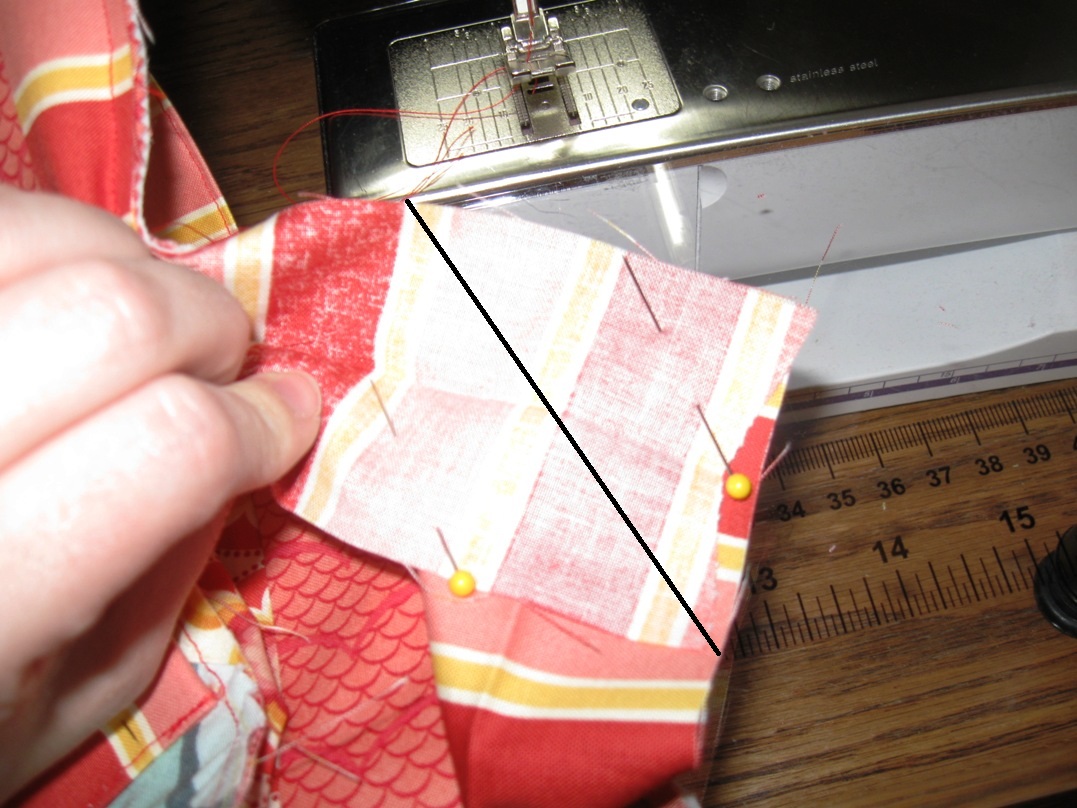
Now with your zipper pocket added you are ready to add the gussets into your lining. Do this the same way you did your outer tote. Fold the lining with right sides together and pin along the sides of the lining. Cut a 4″ square out of the bottom corners and then stitch along each of the sides.

Once again, Open, Pinch, Match your Seams, and Stitch a 3/8″ seam along the both corners. Open it up and your lining is done!!!
STEP 7 – FINISHING THE TOTE
This is where it gets really fun because it actually looks like a tote bag!!! Go ahead and place your lining inside your outer tote bag piece. Align the tops of each piece and pin along the edge. It is easiest to align the side seams first and then the centers. Then work out. (If your interfacing does not want to align with the edge of your tote you can trim as needed :)
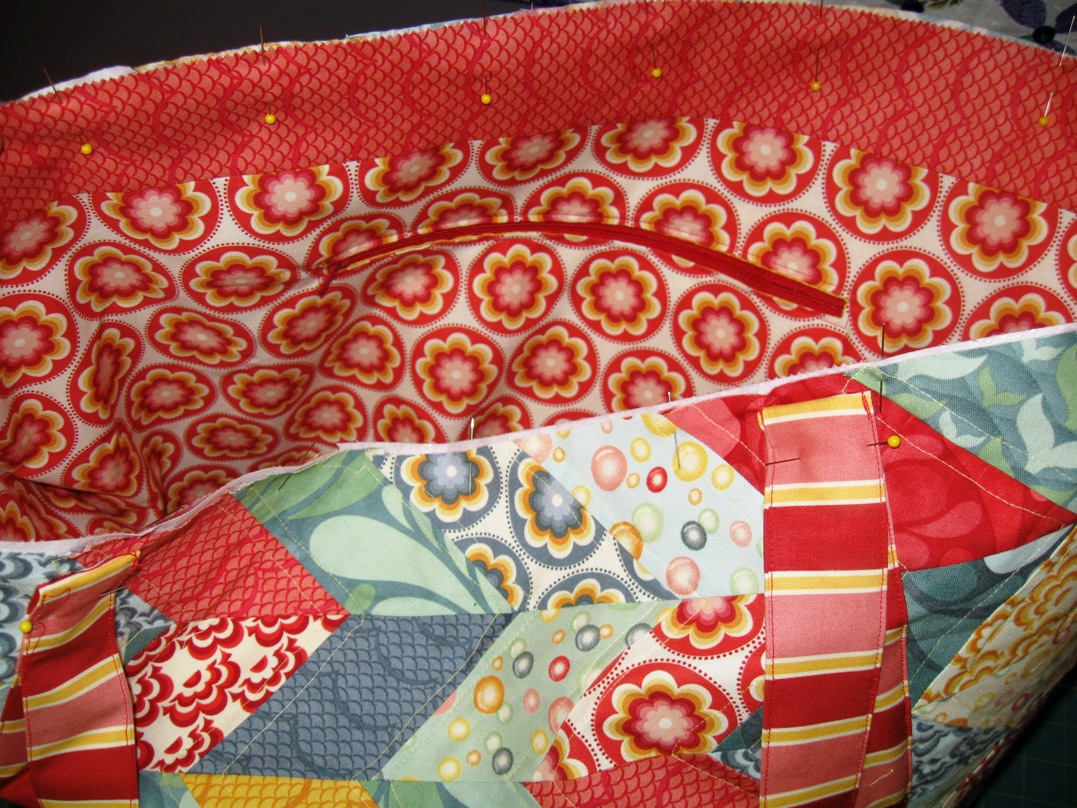
No go ahead and pin your handles back out of the way so you won’t stitch over them. With the handles out of the way stitch a large basting stitch along the raw edge about 1/8″ in. This just holds everything together nice to bind it!

Now, the easiest, and for me, most important part. I hate losing my keys in the bottom of my bag. So . . . My bag totally needs a key holder. So grab that little bit of handle excess you set aside. Stitch 1/8″ seam along either side to close the piece up. Now wrap it through the metal loop of the key holder and then stitch the end close. Don’t worry about that raw edge, it will get put in the binding :)

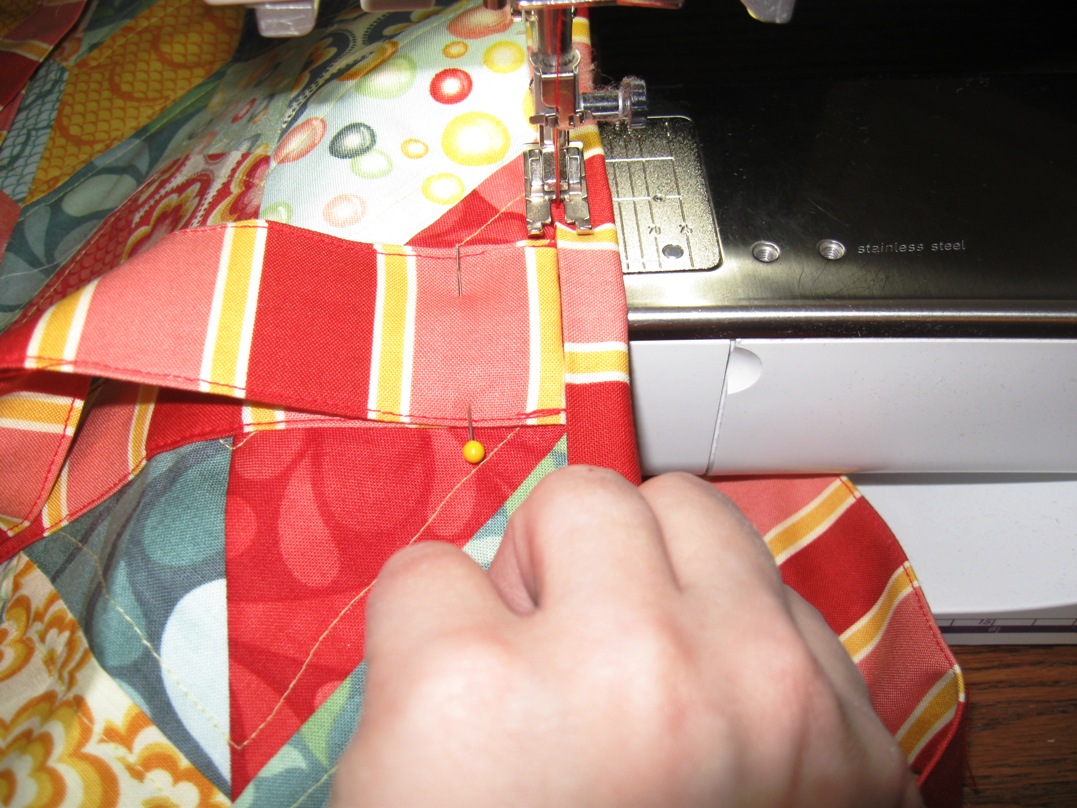
Onto the binding. You are going to bind the bag the same way you would machine bind a quilt. So start by attaching the raw edge of the binding to the raw edge of the bag with a 1/4″ seam. Remember to leave about 6″ unattached at the start. Add your key holder in wherever you would like it (I did it near the side seam) by inserting it under the binding and then stitching over it as well. And watch out for those handles wanting to creep in your way. Be sure not to sew over them :)

Continue stitching until you get to the end. Overlap your binding pieces 2 1/2″, cut, and then sew at a 90 degree angle and then clip and finish sewing down the inside of the binding. (Once again, if this is new to you, you can see this binding tutorial).
Now, simply fold your binding over and stitch along the edge to secure it down. (Aka stitch in the ditch). You want to try and align your binding with the edge of the pinned down handle so that when it is open it matches up. Stitch the binding down all the way around the top of the bag. (if you like, you can add a second decorative stitch along the top of the binding so that it matches your handles and pocket :)
Then just unpin your handles and you are done!!!


Now you have one fabulous Summery Tote measuring 25″ wide, 17″ high, and 8″ deep!!! Now that is a bag that you can load up with everything and then some!!!
I hope you have
enjoyed this tutorial and if you make your own Take it all Tote I would love to see
it!! You can email me a picture at happyquiltingmelissa@gmail.com,
post it to social media with #happyquiltingwithmc or or add it to
my flickr group here ;) I can't wait to see your Take it all Totes!!

So what have you been up to this week?? Link on up:)


I love when you can say "this looks way better than anything I could have bought", it's my absolute favourite thing about crafting, especially for gifts!
ReplyDeleteBeautiful! I think this would be great for carrying quilting projects and "show and tell" back and forth to guild meetings instead of stuffing them in a garbage bag!
ReplyDeleteLaurie Taylor
Oh that tote is so cute. I am thinking of making it in some "grown-up" fabric for me. Great job once again!
ReplyDeletebeautiful, thank's for the tutorial! probably won't use it to beach.. in Québec don't have beach aroud! but maybe for picnic
ReplyDeleteYour bag is so great! I can't wait to make one. Also want to say BRAVO on the great tutorial.
ReplyDeleteYour tote looks fabulous! Great tutorial!
ReplyDeleteVery fun!
ReplyDeleteLove this! Especially the Salt Air fabric--I really need to get back to sewing!
ReplyDeleteI love your tote - really summer-coloured - and the chevrons are fab!
ReplyDeleteEu amo você e.Estamos,minhas primas e eu,sempre fazendo e aproveitando de alguma maneira suas peças,e esta sacola é o que queríamos para levar em tooodos os lugares.Temos dias de costura,bordados,crochê,tricô e que tais...Uma de cada cor e blocos diferentes e vamos ao: SUCESSo!!!!Muito obrigada e Deus te abençoe e inspire.Beijos dê:Cida,Lena,Néa,Paula,Nahthalie,Vanda e eu Maria do Carmo.
ReplyDeleteThat is a super cute tote!!
ReplyDeleteMmm.... It would be a good tote for quilting and sewing kit too.
ReplyDeleteFun tote, and love how bright and summery it is
ReplyDeleteYay! Finally a bag I can take to the beach. You rock!
ReplyDeleteAnd...
I tried to try something new today, my gathering foot. But it would not go on the machine. I guess the store gave me the wrong one. :P
That is gorgeous! Love the fabrics and the chevrons :)
ReplyDeleteI just saw that (on the website) So cool that you've made one =D
ReplyDeleteWhat a cute tote! I am meeting up with kids/grand-kids at a lake this weekend and wish I had time to make one of these. It would be so perfect! Maybe sometime in the future I can put one together.
ReplyDeleteI just love this! And as always, such a detailed tutorial. This fabric line is perfect for this project. I may just have to buy the fabric and put it on my to-do list!
ReplyDeleteLove your tutorial on MBS!! I hope I can make one of your totes one day!! Love your chevron tutorial also: I've been wanting to do that in the Salt Air fabric for a quilt I have going in that fabric, so your chevrons are so totally perfect for me: THANKS!!!! Helen (hlebrett at live dot com)
ReplyDeletePerfect! I've been looking for a bigger tote for roadtrips and 4-H and well, just about anything! And yay for being a Bakeshop Girl today! Thank you - I'm looking forward to stitching this up. Great timing for summer too!
ReplyDeleteI love this bag! I'm in the process of making it but I can't get my rows to match when I sew my 2 angled rows together. Do you have any tips?
ReplyDeleteHI Gina, Are you pinning at each of the seams. Don't worry so much about lining up the 2 ends, those will be cut off anyways. Just try to make sure that each seam you have layed it directly on top of the seam below it. Pin it to keep it right in place. If you need to pull or ease a little fabric in you can do that. It will lay flat with the quilting :) Hope this helps :)
ReplyDeleteMelissa