Monday, October 24, 2011

A Few More VIBee Blocks

I just keep getting more and more excited about this "Going Places" quilt for my little guy!! Here are some of the newest blocks.

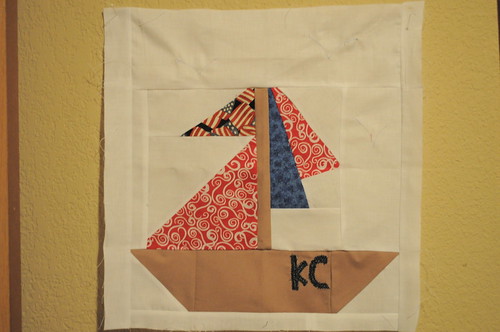
This block was done by Meghan. This is so adorable and I love that she stitched his initials into the boat!! How cute!!!

Vibee blog for Melissa by meghanplessinger

And then there is another block done by Krista but I couldn't get it to link from flickr. So take a second and check out these two links. She even put a dog in the window of the Firetruck!! How cute is that!!!

Fire Truck Block

Detail of Fire Truck Block

Thanks again to the amazing ladies of the VIBee Group!! This quilt is going to turn out so fun for my little guy!!
Pin It!

Friday, October 21, 2011

Fat Quarter Shop Giveaway Winner's!!!!

First off, Thank you to everyone who linked up to the first TNT Thursday!!! I am so excited for this new weekly feature and I hope you are as well. So start thinking about what you want to try this week. I can't wait to hear about it next Thursday :)

  
Onto the Winners of the Fat Quarter Shop Giveaway!!!  Once again, thank you so much to Kimberly and Crew for their continued support of Happy Quilting!!  And the lucky winners are . . .


Congrats to Happy Cottage Quilter and Stevens Family!!!
 Please email me (happyquiltingmelissa (at) gmail (dot) com)  your mailing address and I will see your 2 Ruby Charm packs get sent out :)  

And thank you to everyone who entered!!  Have a Happy Quilting Day!!!
Pin It!

Thursday, October 20, 2011

Introducing T.N.T. Thursday!!!!

Welcome to the Inaugural post of Trying New Things aka TNT Thrusday!!!  I am so excited!!!


So what is TNT Thursday??  We'll lets back up just a bit.  A few weeks ago I attended the Sewing Summit and the main thing I gleaned from it was to keep trying new things.  You know, push out of your comfort zone and find out what you can do.  I was so excited I decided to make a goal to really try and consitenly push myself to try new things in my little hobby world.  So with that goal in mind . . . I decided to make a weekly link up for extra motivation for me and to help motivate you all out there :)

And that is how TNT came to be!!  TNT stands for Trying New Things.  (I wasn't really digging this name but when I figured out that the initials were TNT I decided that I could get to like the name better because I absolutely loved TNT, it just sounds so intriguing. )  It will be here each and every Thursday (hopefully earlier in the future ) for you to link up your post on the New Try of that week :)

Now, let me stress, this doesn't have to be anything big and please don't feel like you can't post if it isn't quilt related.  I would love to get the entire hand sewing / crafty / quilting / crochet / embroidery / ect, ect. ect. industry represented here :)  So whatever it is that you tried new just link it up :)

My TNT Thursday!!!!

We'll this week I really had to stretch myself.  I tried expanding my quilting blogging skills by adding a Linky to this blog so that I can do TNT going forward.  You wouldn't think it would be that hard, it is pretty straight forward, but of course, I still struggled. (Hence the reason this post is up later than I would have liked ;)  However, I persevered and now we have a wonderful linky powered by Linked In with pictures and everything!!  Yippee Skippee!!!!


SO  . . . That's mine, (see I told you it didn't have to be anything big) now you can share yours.  What is one new thing you tried this week.  Blog about it and then link it up :) Oh, and like all great linky parties please remember the following two things.
     1 - Show some comment love to your fellow linkers.  We all like extra encouragment and a bit of praise for tackling new things.
     2 -  Link your post back to my blog somehow.  You can use the awesome button above that was created by my wonderful blog designer, Becca!!  (just FYI . . . She does free-lance work on the side if you are need of a little blog makeover and her prices are really great :)

Pin It!

Wednesday, October 19, 2011

Enjoying the Moments

So I wondered what to post about this morning. I haven't been at my sewing machine to much so I don't have anything to show today.  I mean, I still have a stack of WIP,  but no work on the WIP to show.  Mostly, because I have been enjoying the moments with this little one.  My how time flies.  She will be 4 weeks old tomorrow.  So rather than blather on about nothing, I think I will just end here so I can go lay her down and watch her sleep peacefully :)


Oh, quick side note before I am off,  Remember the Trying New Things linky idea . . . Well, I will be back tomorrow with the announcement of TNT Thursdays :)  I am so excited!!  I think they are gonna be great :)
Pin It!

Monday, October 17, 2011

Freezer Paper Printing Tutorial

How do you print on fabric??  I assumed that as soon as I posted this picture of my name tag for the Sewing Summit that I would get people writing me that exact question.  And since I figured that question would come up, I actually remembered to take pictures of the process while I was making this name tag :)  Yippee Skippee!!  So without further ado . . . I give you the Freezer Paper Printing Tutorial.


Start by cutting an 8 1/2" x 11" piece of freezer paper and a  8 1/2" x 11" piece of fabric that you want to print on.  (It is probably best to use light colors here as I don't know how well the printing would show up on dark colors ;)  

Lay the freezer paper onto the fabric with the shiny side down (you know, the side that feels more slippery and less like paper.)      Press your little freezer paper sandwich.  It only takes a few seconds to adhere the freezer paper to the fabric.

Now just leave the freezer paper adhered to the fabric.  See how it is stiff now.  You can now feed it into the paper tray of your printer and it is ready to be printed on.  It just feeds through as one sheet :)

So get your desired design that you want to print all ready on your computer.  I like to put a box around whatever I am printing as it makes it easier to cut it out :)

When your design is all done you are ready to print.  In your printing advanced options you should be able to change the intensity of your printing.  I like to make the intensity darker since the printing on the material is not normally as dark as paper.

Once the design has printed give it a few seconds to make sure it is dry so it doesn't smear.  Then just peel the fabric away from the freezer paper.  (It will just come right off :)

Cut out your design.  Now just heat set your printed piece.  (note . . heat setting will help to prevent the ink from running in the case that it gets wet, however, this is not a perfect water-proof process.  Certain ink colors and inks can still run even after being heat set.  So if you are wanting to do this in something that will need to be washed I would suggest experimenting with the colors first before sewing it into something :)

Now just take your printed design and sew it into your project!!  Wha-La!!  Easy and affordable Printing on Fabric :)  Enjoy!!!

*** EDIT***  There were some wonderful tips left in the comments so I wanted to add them to make sure everyone saw them.  Thanks to Jessica Jo and NancyinSTL for their wonderful helps!!

1 - The freezer paper can be used many many many times over!
2 - This is a good way to transfer embroidery designs, as long as they are small enough to fit through your machine.
3 - Choose fabric with a high thread count to ensure better printing.
4 - Treat the fabric first with Bubble Jet to make it colorfast.
5 - Cut fabric and paper slightly larger than 8.5" x 11" just before ironing the fabric to the freezer paper, then cut the fabric stuck to the freezer paper to 8.5" x 11". This will help prevent the fabric from peeling back and jamming up in the printer.

Pin It!