Today's Terrific Tuesday Giveaway is being sponsored by Thousands of Bolts . Thousands of Bolts has incredible prices that will have you super excited!!! There are thousands of bolts to choose from and all at amazing prices, staring as low as $5.39 a yard!!! And they have just introduced dozens and dozens of new fabrics to the inventory!! Be sure to check it out :)
And for Today's Terrific Tuesday Giveaway, Thousands of Bolts is giving one lucky winner at $25.00 Gift Certificate!!! You can get just what you always wanted :) And good luck picking because there are literally thousands of bolts to choose from!!!!
You have two entry chances here on the blog, and please leave a separate comment for each. All Entries are welcome, including International Entries. Please just be sure to leave an email address if you are a no-reply blogger ;)
ENTRY 1 - Simply leave a comment that tells me What is your favorite piece of clothing you own?
ENTRY 2 - Lets show Thousands of Bolts some Love!!!! You can follow them on Facebook or Instagram. Or you can visit The Shop and then share a favorite item ;) Just be sure to leave a comment of how you showed your Thousand of Bolts Love!!!
And that's it ;) The giveaway will be open until next Tuesday, February 7th, when I will announce a winner at the beginning of next weeks Terrific Tuesday Giveaway Post :)
You can also pop over to my Instagram and/or Facebook to enter there as well :)
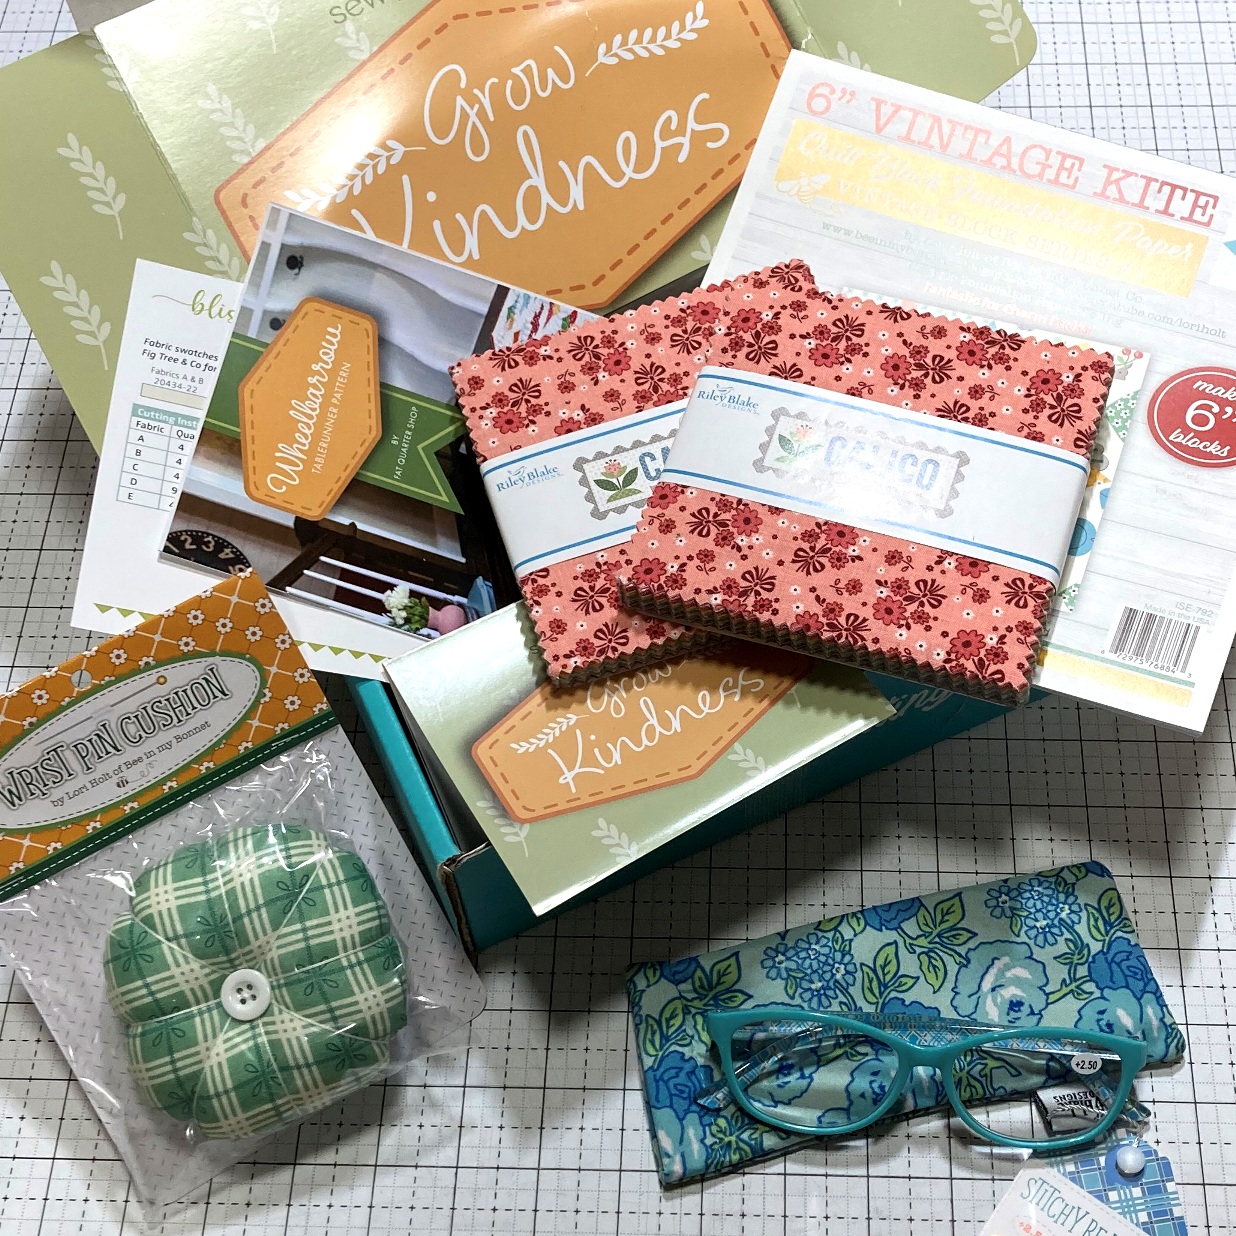
I can't believe January is already winding down to an end. Where did this month go?? But one good thing about time flying, with the end of the month, comes my favorite Sew Sampler Box!! And this January box is so amazing!!! The theme is Grow Kindness and it is a box filled with Loir Holt Goodness ;) This just makes me so happy!!!
First is not one, but two, gorgeous Calico 5" Stackers!!! You all know how I love Charm Packs, and these Calico prints are just so happy and bright. You can see them all in the adorable Wheelbarrow Table Runner pattern. They just remind me of trips to the fabric store with my mom, such a fun throw back!!! Now I have to decide if I will make the table runner, or squirrel these Charm Packs away for another Charming Baby Quilt ;)
And I just love that the notions always go with the box!!! The Wheelbarrow Table Runner pattern uses the Vintage Kite Foundation Paper, so of course, it's in the box, I just love that!!! And how fun is the Bee in my Bonnet Wrist Pin Cushion. So handy!! And finally, those Lori Holt Readers are just to cute for words. I am not at the point of needing readers (although I don't think it is far off) but I have lots of quilty friends that these would make a lovely surprise for ;)
And if you love this box as much as I do, Fat Quarter Shop has a big surprise staring this month!!! You can buy the January Sew Sampler Box Ala Cart with no subscription or membership obligations!! It's a great way to give the box a try and see if it is something you would love to arrive at your door each month :)
And if you love it, you can always sign up membership to the Sew Sampler boxes and get a happy box of quilty goodness at the end of each month :) So fun!!!
When I was asked by my good friends at Fat Quarter Shop if I wanted to participate in their Quilt Goal 2023 event I was all in ;) The idea is to challenge yourself to create something all-new to you in 2023. So I started to think of a quilting goal that is outside my usual fare. And I have to say, I had to think for a little while. I went through the APQ Bucket List, and ya know (making 50+ quilts a year) I had tried most of it. So what to make????
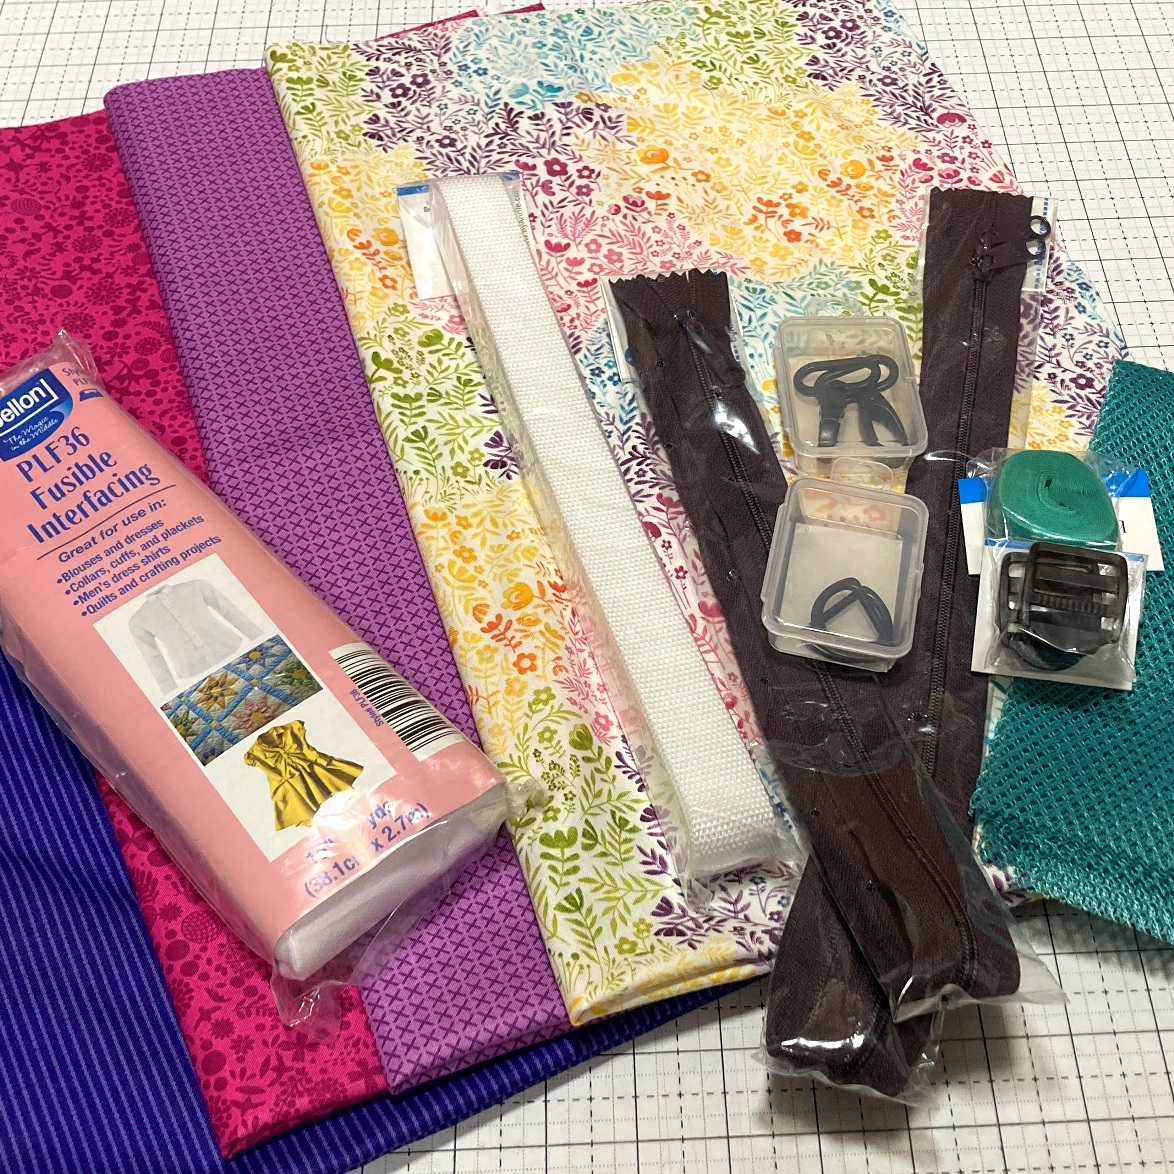
And then it hit me. . . and this is way outside my usual fare!! I am not going to lie, I am a little scared to attempt this. Can you guess what my quilt goal is by all of the supplies??
Yup. . . .I am going to make a Quilted Duffle Bag!!!! With zippers, and lining, and interfacing, and hardware, and wow, just a little overwhelming ;) The most in detailed bag I have ever made is my Charming Tote, and this is a whole lot more detailed than that. But I am excited, and scared, but mostly excited to challenge myself to try this new to me project. Wish me luck :)
So how about you???? Is there a project that you want to try that is outside of your usual fare?? Join in the Quilt Goals 2023 Challenge. And use the #QuiltGoals2023 to share your progress ;) I can't wait to see what your goal will be ;)
It's Month 1 of the Barn Star Sampler Quilt Along and I am just so excited to share my first set of blocks!!! Thanks to Fat Quarter Shop' for hosting this awesome quilt along, I can tell already this is going to be a favorite quilt of the year :) On the last Friday of each month I will be sharing my new Barn Star Sampler blocks, and this month we are starting out with Block 1 :)
I am planning to make my Barn Star Sampler 100" x 100" square, so that is why I made 3 blocks instead of 2. And each block is made in color from my Rainbow of Ombre goodness!!! This month's Block 1 is made . . .
in Blue
Purple (my favorite :)
and Teal
And these Diamond Star Blocks were so much fun to make!!! Talk about lots and lots of points to line up!!! I just loved seeing them come together and am already looking forward to next month's star block :)
So are you joining in the quilt along star fun as well?? Be sure to share all of your Barn Star Sampler progress on social media with #BarnStarSamplerqal and check out Fat Quarter Shops post for Block 1 for lots more Barn Star Inspiration!!! Oh, and be sure to check out the comments, because there have been lots of questions asked and your questions most likely are in there too ;)
And that's it for Block 1 - The Diamond Star Block in the Barn Star Sampler Quilt Along!!!!
Thanks for popping in today ;) Have a Happy Quilting Day!!
Today's Terrific Tuesday Giveaway is being sponsored by Olie and Evie.Rhonda's shop is so fun and full of so much amazing quilting goodness!!!! Of course, there is the amazing fabric shop we all know and love along with longarm quilting, gift certificates, preorders, and an awesome Clearance Sale!! Also, Select precuts, notions, books and patterns, yardage and 108" backings are discounted 10%. In addition, Olie & Evie is now offering flat rate shipping of $9.00 on orders!!!
And Rhonda's has a fantastic Terrific Tuesday Giveaway Day!!!! Olie and Evie is giving one lucky winner a $25.00 Gift Certificate to use in her shop!!! So awesome, someone is going to get a wonderful shopping spree for some end of the year fun :)
You have two entry chances here on the blog, and please leave a separate comment for each. All Entries are welcome, including International Entries. Please just be sure to leave an email address if you are a no-reply blogger ;)
ENTRY 1 - Simply leave a comment that tells me What story does your family always tell about you??
ENTRY 2 - Show your Olie and Evie love. You can follow them on Facebook, Instagram or Pinterestor you can visit The Shop and then share a favorite item ;) Just be sure to leave a comment of how you showed your Olie and Evie Love!!!
And that's it ;) The giveaway will be open until next Tuesday, January 31st, when I will announce a winner at the beginning of next weeks Terrific Tuesday Giveaway Post :)
You can also pop over to my Instagram and/or Facebook to enter there as well :)
It's almost here . . . the Bountiful Charity Quilt Along will start in March, and the Fabric Requirements are going to be released just as soon as we reach our first milestone :) This is Fat Quarter Shop's 10th Charity Quilt Along and I am so excited to be a part of it :) This Charity Quilt Along benefits Make a Wish, and there have been so many wonderful Wishes granted from this Quilt Along in the past, and I can't wait to see what Wishes come true this year!!!!
And not only do you help Wishes come True by quilting along . . . but you also get to make this beautiful Bountiful quilt!!!! Fat Quarter Shop has teamed up with Corey Yoder to design this stunning adorable quilt full of baskets, flowers, and butterflies all in a fun layout. I just love this Bountiful quilt design and can't wait to get started on it ;)
The Bountiful Quilt Along block piecing starts on March 3rd, 2023 and a new block/instructions will be released the first Friday of each month until August 2022. Fat Quarter shop is encouraging a donation of just $10 for the use of each free quilt pattern or a total of $50. Please give what you are able, every little bit counts towards granting a child's wish ;) The Fabric Requirements will be released just as soon as we reach the $20,000 milestone of donations. Oh, and each milestone reached going forward will also release a bonus pattern to go along with the Quilt Along, so fun!!!
If you want your Bountiful Quiltt to be just like the original (and don't want to wait for the fabric requirements release :) there is a Bountiful Quilt Kit and Backing Set featuring Sunwashed Fabrics by Corey Yoder for Moda Fabrics. The kit comes with all the fabrics you need for the blocks, background and binding and it even comes in a Bonus Keepsake Box with Magnetic Closure. And one other bonus . . . The Kit comes with all of the patterns so you don't have to wait each month for them to be released, and yes, it's the only place to get them early ;)
But you can always branch out and choose your own fabrics as well ;) I decided to make my Bountiful Quilt with Meadowmere by Gingiber for Moda Fabrics !! I am using Moda Bella White Bleached Solid for my background. I think this is going to give the quilt a totally different look. Very chic and sophisticated and I can't wait!!! And you know, I just love all of the metallic in this line :)
So will you be joining in and quilting along for a great cause?? You still have lots of time to get ready and it's going to be so much fun!!! Pop on over to the Bountiful Quilt Along Page for all the details and easy access links for the pattern releases :)
I can't wait for some Happy Charity Quilting starting in March and I hope you will be joining in with me for the quilt along fun!!!!
It's always a fun day when I get to share some secret sewing!! I was thrilled when my good friends at Moda Fabrics asked if I would make the Summer Weekend Quilt by Corey Yoder featuring her new Sunwashed Fabrics!!! And of course, I said yes, I mean, how can you not whip up those adorable sunshine blocks set on point, so cute!!!!
I am such a fan of making Coriander Quilts Patterns!! They are always so well written, easy to follow, and she and I have a similar style in piecing that always makes it fun and fast to whip up one of her quilts! And I was thrilled to do this design on-point. I don't often do quilts on-point, but they are so fun, and they create a great negative space to have fun quilting in :)
And I know it looks like a lot of piecing with some complicated shapes, but really, it is just basic piecing that is harder than it looks. These blocks whipped together in no time, and I just love the different backgrounds on the blocks to really add that extra wow factor. It finishes at 64" x 76" so it is a great size to snuggle up in or have as a throw on a couch.
And I had so much fun custom quilting this one!!! Remember how I mentioned that awesome negative space, I quilted feathers in it!!! I just love getting to quilt a vine of feathers moving up the quilt, so fun!!! (which is kind of funny I say that now, when I few years ago that would have scared me to even attempt :) Then in the blocks, I really wanted to make the "sunshine points" pop, so I left those un-quilted and then did tiny pebbling and figure 8's in the block background. I just love how it makes those points stand out. So fun!! !!!
And now this quilt is off visiting lots of quilt shops hopefully bringing some Summer Weekend goodness wherever it travels :) So I will have to wait to snuggle up in it, But you don't have to wait!!! Sunwashed Fabrics are shipping now and Fat Quarter Shop has a Hometown Quilt Kit already available !! (and guess who's quilt that is in the picture, I know I'm silly, but it just makes me smile ;) Now you can whip up your own Summer Weekend Quilt before Summer arrives, so great!!!
I know you are just going to have so much fun making your own ;) And if you are like me, I need this splash of summer in my life right now (so done with snow right now :) I am excited for this one to come back because I think it is just going to make such a lovely gift :) You just can't help but smile at all of those happy prints and colors in adorable sunshine blocks!!!
And that is it for today !!
I hope you all have a very Happy Quilting Weekend!!
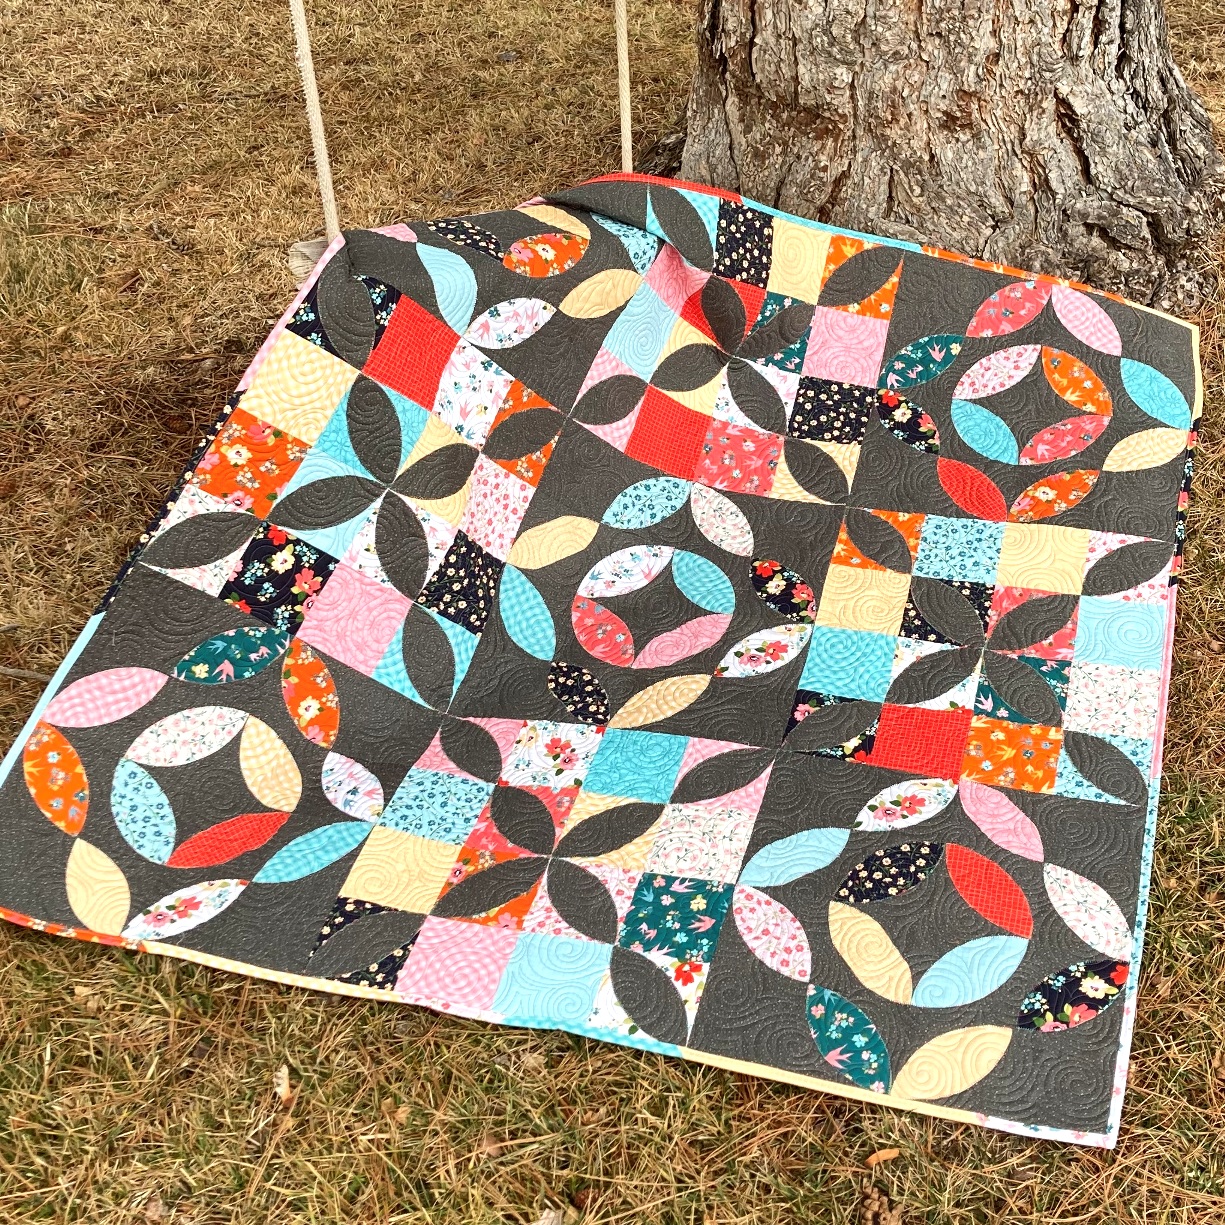
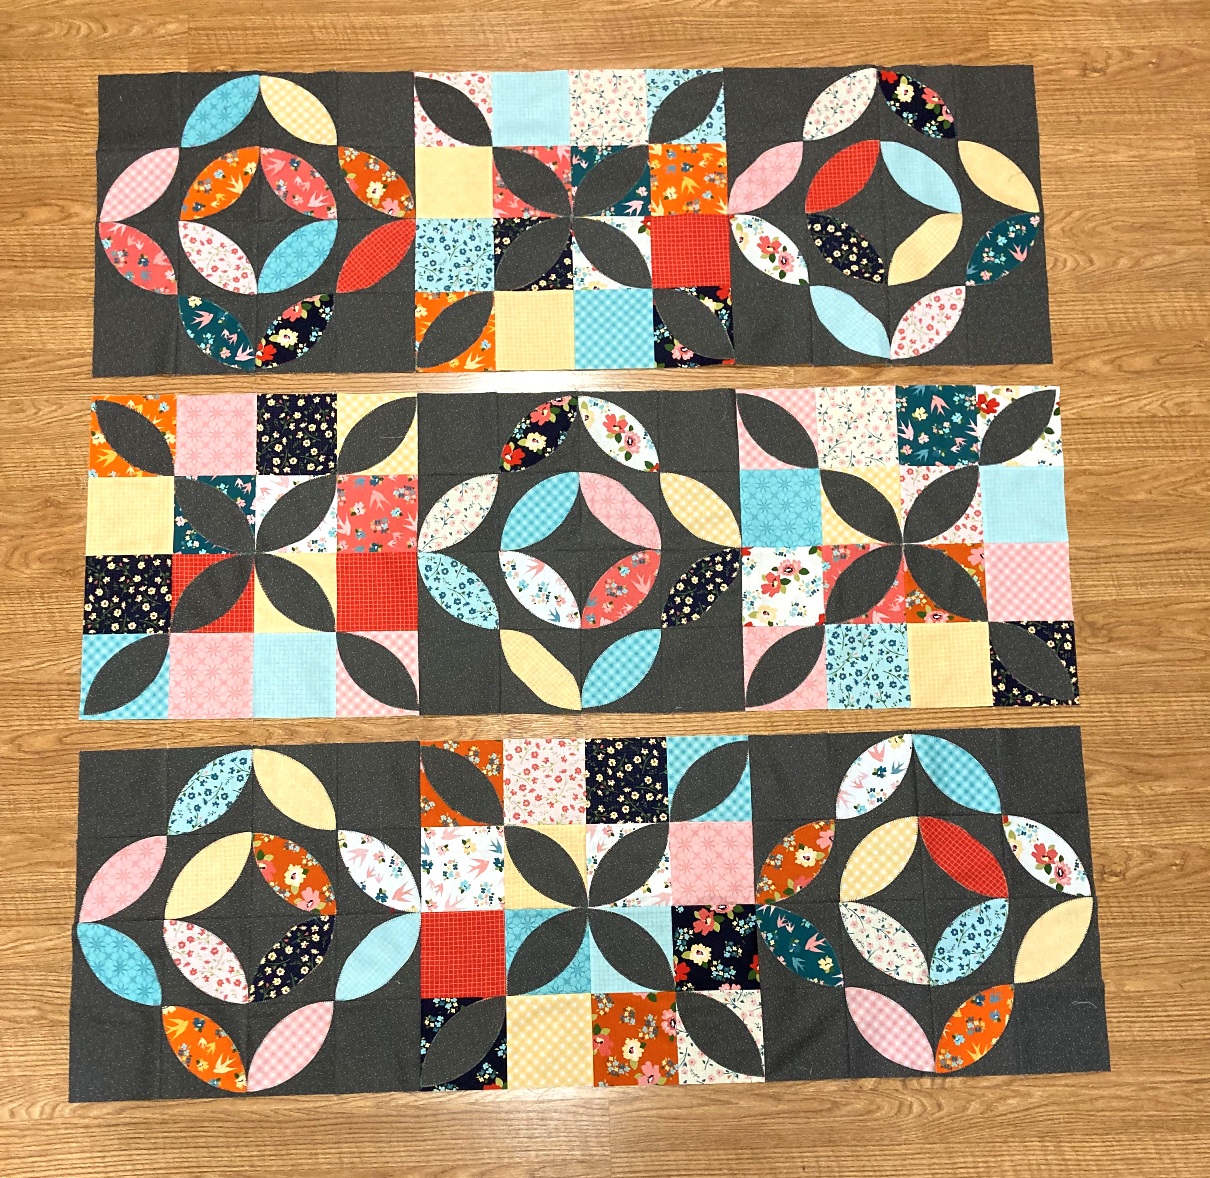
Today I am thrilled to be bringing you a new quilt and a tutorial to go along with it! I just love simple applique, and simple applique added to simple patchwork . . . well that is just the best!!! And so, without further ado . . . here is the Petal Patch Quilt!!!
Petal Patch is Charm Pack Friendly, making it really easy to grab some packs and get going. The quilt finishes at 54" x 54" so it makes for a great lap size quilt. It is a wonderful way to practice simple applique, and makes a gorgeous finish. So, let's get to making your own!!!
3 Background Charm Packsor2 Yards of Background Fabric cut into (14) 5" x WOF Strips and sub cut into (112) 5" Squares
1/2 Yard of Binding Fabric cut into (6) 2 1/2" x WOF Strips
3 1/4 Yards of Background Fabric cut into (2) 58 1/2" x WOF Pieces
STEP 1 - CUTTING THE APPLIQUES
To cut out my "Petal" (also known as Orange Peel) Appliques, I used the AccuQuilt GO! Orange Peel 4 1/2" die. It makes quick work of cutting out applique, and because this die is so small, it even works in my GO! Me Cutter.
If you don't have an AccuQuilt System, there are lots of Orange Peel Templates you can purchase, just make sure to get a 4 1/2" template. Or, if you are using a different size template, be sure your squares are all 1/2" larger than your template.)
And of course, you can always make your own Template!! Here is a 4 1/2" Orange Peel Template, that you can print and use to make your own template from cardboard or template plastic.
Any way you choose to cut your Petals is great! You will need to cut:
60 Petals from the Assorted Print 5" squares &
32 Petals from the Background 5" squares.
When you are finished cutting all your applique Petals you will now have:
32 Background Petals and 80 remaining Background 5" Squares
STEP 2 - SEWING THE APPLIQUE BLOCKS
Because this applique shape is so basic, you don't need to really bother with Heat N Bond for adhering. You can simple Glue or Pin baste your appliques. To Glue Baste, simply place small dots of Applique Glue on the wrong side of your Petal Template. Then center it diagonally on a 5" square. Print Fabric Petals are placed on Background 5" squares and Background Fabric Petals are placed on Print 5" squares. You should have 1/4" extra along the 2 corner edges.
If you are Pin Basting, take care to keep the pins in the center of your Petal Applique and away from the edges. That way when you are secure stitching your applique you don't have to remove the pins.
With your Petal Applique basted to your 5" square, you can now secure stitch around your applique. You can do machine, hand, or needle turn applique and choose any color thread. Stitch around the entire Applique using your desired secure stitch. I like to backstitch 1-2 stitches at the end of my stitching just to hold it. I used a fun variegatedthread with a machine Blanket stitch :)
If you are new to applique, you can see my Applique Basics video's that will help walk you through the previous steps in more detail :)
Continue stitching the Petal Appliques until you have secure stitched them all to a 5" square. You should now have:
60 Print Petal Units and 32 remaining Assorted Print 5" Squares &
32 Background Petal Units and 20 remaining Background 5" Squares
STEP 3 - SEWING THE PETAL BLOCKS
Layout 3 Print Petal Units and 1 Background 5" Square as shown, taking note of the fabric placement. Place the right hand squares in each row onto the left hand squares with right sides together and align the raw edges. Stitch a 1/4" seam along both edges. Press the seams Open.
Now, place the Top Row onto the Bottom Row with right sides together and align and pin the center seam and raw edges. Stitch a 1/4" seam along the pinned edge. Press the seam open. Repeat this process to make a total of 20 Petal Block Corner Units.
And now, with the units made, we can make the block! Layout 4 Petal Block Corner Units as shown, taking note of the fabric placement.
Place the right hand Units in each row onto the left hand Units with right sides together and pin and align the center seams and raw edges. Stitch a 1/4" seam along both edges.
Press the seams Open.
Now, place the Top Row onto the Bottom Row with right sides together and align and pin the seams and raw edges. Stitch a 1/4" seam along the pinned edge. Press the seam open.
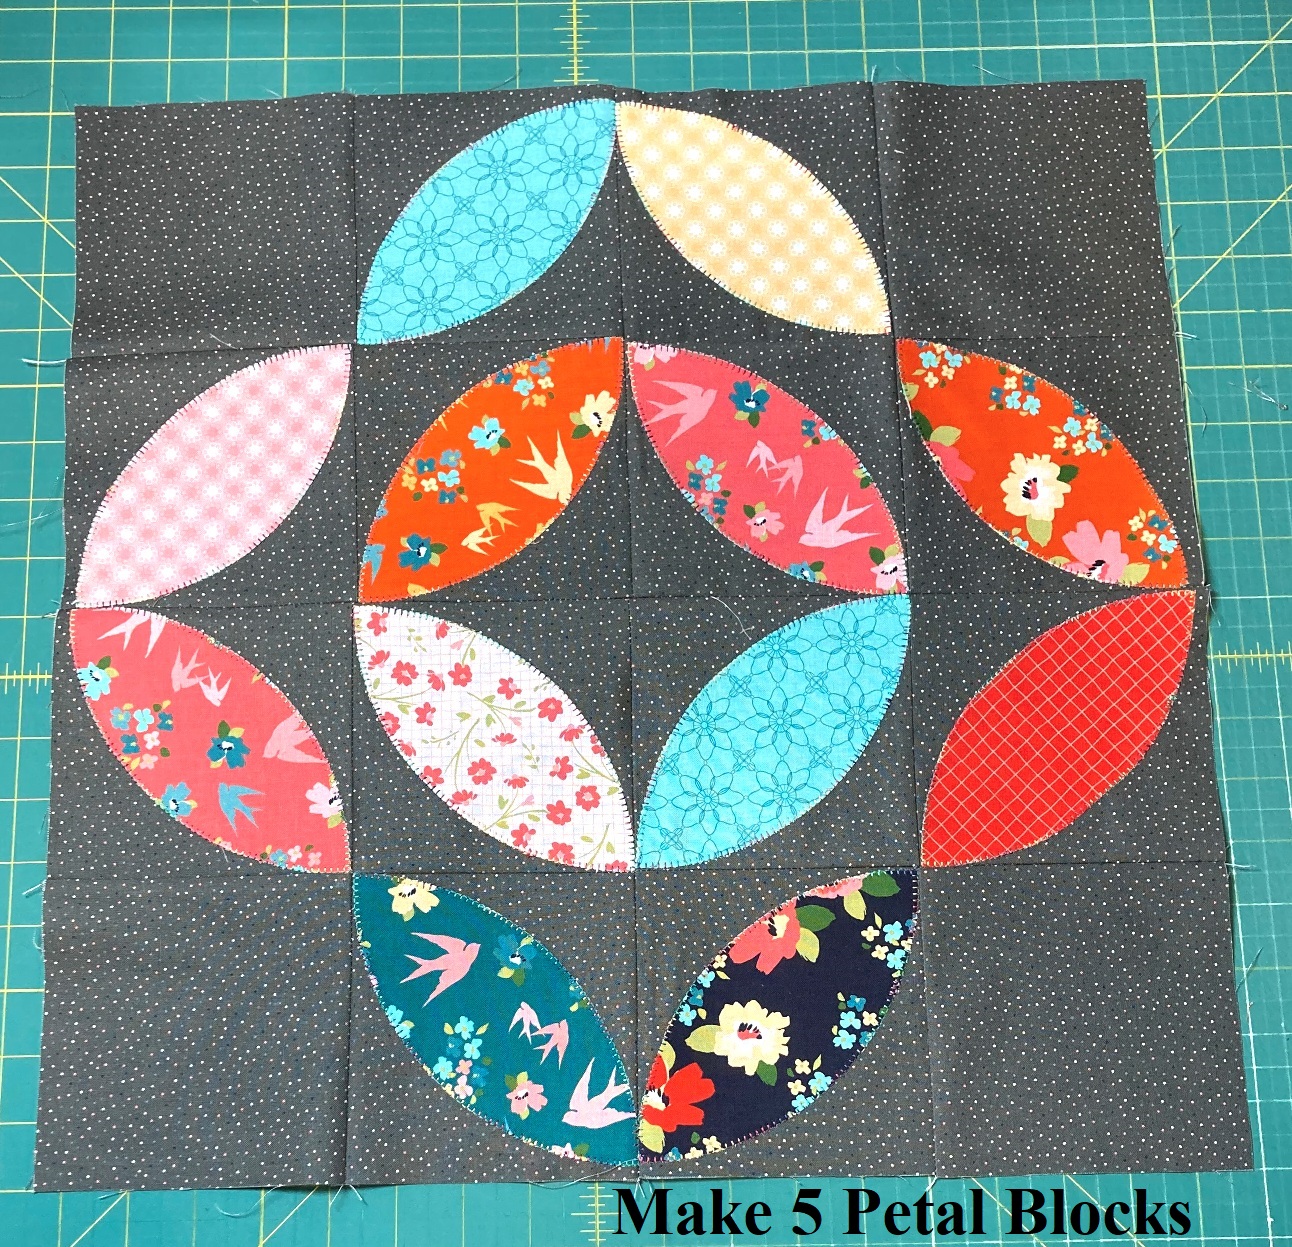
And you have a beautiful 18" unfinished Petal Block. Repeat this process to make a total of 5 Petal Blocks.
STEP 4 - SEWING THE CRISS CROSS BLOCKS
Layout 2 Background Petal Units and 2 Assorted Print 5" Square as shown, taking note of the fabric placement. Place the right hand squares in each row onto the left hand squares with right sides together and align the raw edges. Stitch a 1/4" seam along both edges. Press the seams to opposite sides towards the 5" Print Square.
Now, place the Top Row onto the Bottom Row with right sides together and align and pin/nest the center seam and raw edges. Stitch a 1/4" seam along the pinned edge. Press the seam open. Repeat this process to make a total of 16 Criss Cross Block Corner Units.
And once again, with the units made, we can make the block! Layout 4 Criss Cross Block Corner Units as shown, taking note of the fabric placement.
Place the right hand Units in each row onto the left hand Units with right sides together and pin and align the center seams and raw edges. Stitch a 1/4" seam along both edges.
Press the seams Open.
Now, place the Top Row onto the Bottom Row with right sides together and align and pin the seams and raw edges. Stitch a 1/4" seam along the pinned edge. Press the seam open.
And you have a beautiful 18" unfinished Criss Cross Block. Repeat this process to make a total of 4 Criss Cross Blocks.
STEP 5 - MAKING THE QUILT TOP
And with your Blocks complete, you are ready to sew your quilt top. Layout your 5 Petal Blocks and 4 Criss Cross blocks as shown below. You can rotate them as much as you like until you get a color layout that is pleasing to the eye.
Now, it's time to sew the blocks into rows. Place the second block onto the first block in each row with right sides together. Align and pin the seams and then stitch a 1/4" seam along the edge. (shown in the first row, chain stitch all 3 rows). Then, place the third block onto the now sewn together first and second blocks with right sides together. (shown in the second row). Align and pin the seams and then stitch a 1/4" seam along the edge, chain stitch all 3 rows.
Once all of the blocks are sewn into rows press the seams in each row open. Then layout your rows again.
Now, stitching the rows together is the same, just in a longer fashion. Place the second row onto the first row with right sides together. Align and Pin all of your seams. Sew a 1/4" seam along the edge.
Then, place the third row onto the now sewn together first and second row, with right sides together. Align and pin all of the seams. Sew a 1/4" seam along the edge. Press the seams open.
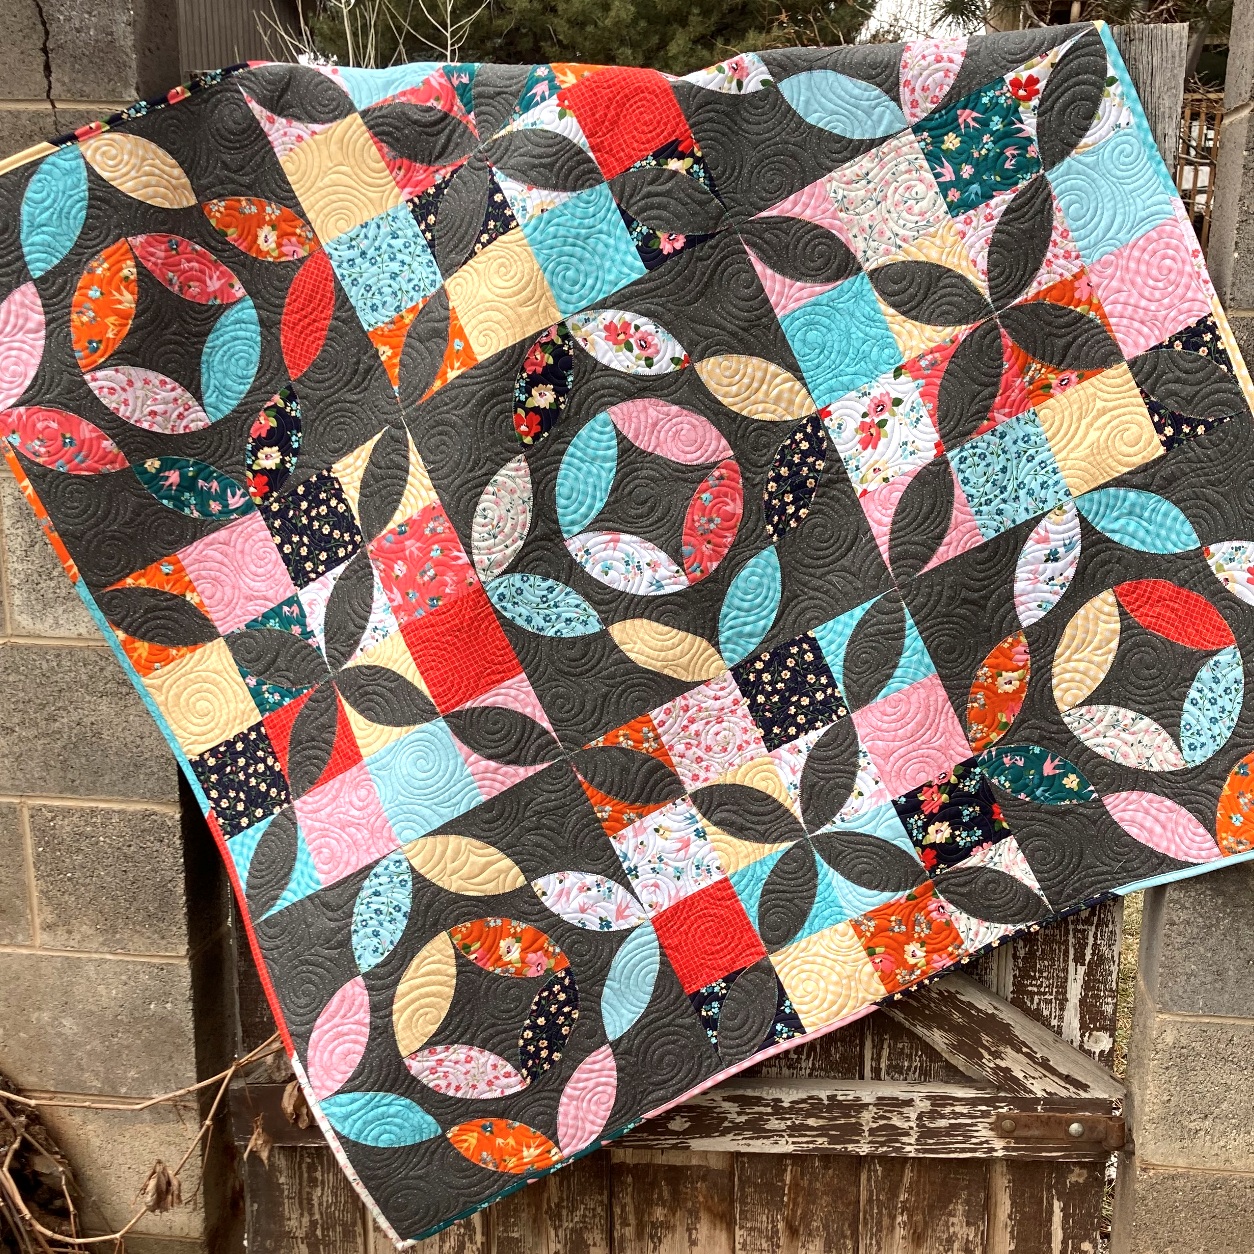
And just like that, you have a beautiful 54 1/2" x 54 1/2" finished Petal Patch Quilt Top!!!! So fun!!!!
STEP 6 - FINISHING THE QUILT
And now let's get this quilt top!! All that is left is to just Baste It, Quilt It, and Bind it!!!! Yup, three big things in one little sentence. If you are new to quilting and need some tips on how to Baste It, Quilt It, and Bind It, you can check out myFinishing Your Quilt Video Series. It will walk you through it all in step by step detail.
I quilted mine with an all over swirl design that I just love to stitch. It is so relaxing and fun, and also it adds lots and lots of texture to the quilt!!! It also will help keep all of that applique super secure stitched ;)
And that is my Petal Patch Quilt!!! I hope you have enjoyed this tutorial and if you make your own Petal Patch Quilt I would love to see it!! You can email me a picture at happyquiltingmelissa@gmail.com, or post it to social media with #happyquiltingwithmc :) I can't wait to see your Petal Patch Quilts!!!
Thanks so much for sharing this new quilt finish and tutorial with me.


