Thursday, February 28, 2013

Easter Bunny Blog Hop

Next week Melissa at Lilac Lane will be hosting an Easter Bunny Blog Hop, and I get to be one of the bloggers participating in it.  So excited!!!   The hop is all about Easter goodies and there will be giveaways going on as well.  Here's the line up!!

Monday, 3/4      Melissa from Lilac Lane with a patchwork bunny
Tuesday, 3/5      Nanette from Freda's Hive with Easter Egg Cups Table Runner

                          Caroline from Sew Can She with Bunny Treat Bag
Wednesday, 3/6 Sabra from Sew a Straight Line
                          Clara from Clover and Violet with an Easter Basket/ lunch bag
Thursday, 3/7    Megan from Quilt Story with a bunny shirt and skirt
                          Jenny from Sew Pretty Dresses with a quiet book
Friday 3/8         Melissa (that's me) from Happy Quilting with an Easter bunting
                          Robin from Create Kids Couture with a Girl's Patchwork Skirt 


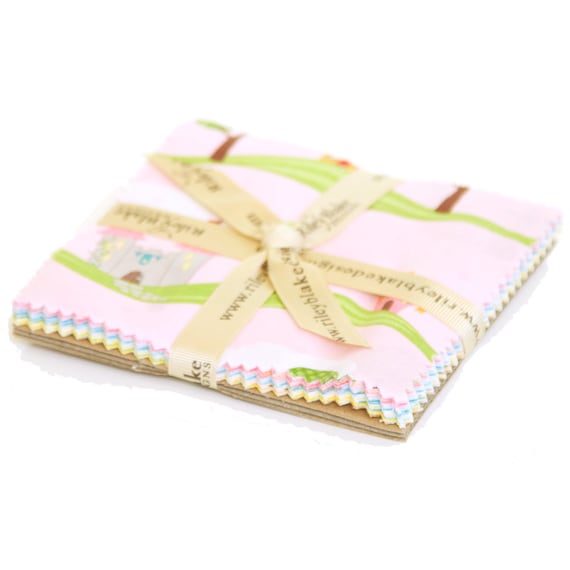
Each project will be made using a charm pack (5" squares) of Happy Ever After by Sandra Workman for Riley Blake. This is such a fun spring line and I am so excited to see projects made using just a charm pack.  I mean, who doesn't have a charm pack lying around :)

So be sure to pop on over to Lilac Lane on Monday and follow along each day to get lots of adorable Easter Sewing Goodness!!  


Pin It!

Wednesday, February 27, 2013

I Missed This and It's a Him!!

While I loved  my vacation, It was wonderful to get back to my children and home.  It was also wonderful to get back to what my husband has deemed "my 6th child, Bernina".  I spent most of Monday unpacking and catching up.  But come Tuesday naptime, I was so excited to run down to my sewing room and break open these lovelies!!


Out came the rotary cutter, and then I flew through some piecing and even got some quilting started.  I can just show a tiny peek as this is one of those secret projects :)   It felt fantastic to be sewing again.  Sometimes it is fun to take a little break, just to remember, once again, how much I love, love, love quilting!!


I also got some fabulous news upon my return!!  My twin Sister is expecting her second child and she just found out that it is a boy!!  Yippee Skippee!!  Her first baby, little Nancy, received Snuggly Squares and it is hanging above her bed.


This new little arrival will be sharing a room with his big sister so he needs a semi matchy quilt.  And wouldn't you know it, I have been saving some fat quarters of Pure that I picked up from Sweetwater when they were clearing out their remnants.  I have always loved this line and am so excited that it will go perfect with Snuggly Squares but still be all boy!!  

Now to decide on a pattern.  I think I want to keep it squares but change it up a bit.  Luckily for me, the wee one isn't slated to arrive for a while, which is nice because I have a few more of those deadline projects to finish first.  But it sure is going to be fun to have this one in the back of my mind pondering over ideas :)
Pin It!

Tuesday, February 26, 2013

Aloha

So can you guess where I have been from that title??  Yup, I just got back from the beautiful island of Maui in Hawaii!!  My husband had a conference there last week and I was all for tagging along.  So for the last 9 days we have been  . . .


Walking along beautiful endless beaches.  The beaches really weren't that busy and so we enjoyed a daily walk in the morning or evening pretty much to ourselves.


Playing in the water.  We actually saw 2 sea turtles while snorkeling.  My husband wanted to swim closer to them but I admit, I chickened out and started backpedaling.  They are big!!


Chasing the waves on the black sand beach.  They call it black sand, but it is more like little black pebbles.  They felt really cool on your feet.  

Enjoying the tropical views while bombing around the island in this!!  Seriously, you can see so much with the top down that you would miss otherwise.  It is absolutely stunning to be able to see everything above you while driving through the super lush part of the island.

Hiking to lots of hidden water falls.  Some of the hikes were a little crazy and a bit more difficult that I was expecting, but they were all totally worth it.  The green is just so beautiful and the natural pools are so clear!


Rock hopping on the volcanic rock that made up some of the shore lines.  These were incredible, especially with the waves constantly crashing and spraying.

Exploring the island.  On one exploration we finally found this blowhole.  It was quite the trek and the winds were blowing at 40 mph.  Major crazy rock scaling, but oh so much fun!!

(And ya, we got a little to close to the blowhole :)

Watching the water.  I could watch the movement and color for hours.  It is so incredibly beautiful   So many shades of blue moving in and out and the sound of the waves crashing over and over.   In a word, Stunning!!


And finally, enjoying some absolutely stunning sunsets!!  I looked forward to this time every evening!


All in all . . . It was an absolutely wonderful getaway for my husband and I.  I feel like one of the luckiest gals around! (Yup, had to add the sappy photo at the end :) 

Thanks for indulging me in my little trip recap.  We took over 200 pictures so it was hard to narrow them down.  So how about some fabric!!!  I was so excited to find this Hawaiian fabric shop.  (Husband not so much, but he endured :)  


Rows and Rows of beautiful Hawaiian print bolts!!  I love all of the beautiful bright colors!!


And . . . I even got to take a little class on Hawaiian quilting.  I forgot to take any pictures during the class, but this is the general gist of what we were doing.  It is all hand quilting of turned applique.  It was major intense hand quilting.  I don't see myself making a Hawaiian quilt anytime soon (we all know I am not such a fan of hand quilting ;) but it was so much fun to learn how it is done!

So now it's time to get back into the swing of things.  I think Mother Nature is trying to help us get used to Utah again as it is snowing outside :)  Gotta love it!!

Pin It!

Friday, February 22, 2013

Starburst Quilt Back

Well, I decided that my Starburst Quilt is going to be quilted via a Long Arm.  And, I figured, why not turn it into a little girls day out!  So come Monday, my Mom, my Mother-In-Law and I will be cruising on down the I-15 to have a little date at Let's Quilt!!  Oh, I am so excited for another Long-Arm Adventure!!  I have absolutely fallen in love with working on those large machines!!   Both my Mom and my MIL have never quilted a quilt using a long-arm and they are so excited!!  We are guaranteed to have lot's of fun and I will try to remember to take pictures :)


So anyhow, in order to quilt this up . . . I need a quilt back!   I pulled some fabrics from the good ole stash in orange, pink, and black to match the top :)  I just love the look of a pieced quilt back.  They are always just so much fun!!


Have a Happy Quilting Weekend and I will catch up on Monday evening with all of the fun from the Girls Quilt Day Outing :)
Pin It!

Thursday, February 21, 2013

Virtual Quilt Bee

So have you heard about Amy's Smart's new Virtual Quilt Bee???  I love Amy!!  She is the nicest person in the whole world, and I am being totally serious.  I met Amy at the first Sewing Summit and we became fast friends.  So of course I was all, "Uh Yes a million times over" when she asked me to be a designer for the bee :)


The Virtual Bee will be a lot like a Block of the Month except it will be every other week.  And each post will be done by a new designer who will be hosting a tutorial for an 8" block.  The cool part is that the block will be done in 2 ways.   One block will have a  traditional feel using the incredibly fun Happy Go Lucky by Bonnie and Camille and One block with more of a modern flair using a monochromatic color palette of Kona Solids!!


This Bee is going to be super casual, allowing participants to do as much or as little as they feel up to.  You can read all about it here.  So whether you want to jump on board or just watch from the side lines you should check it out!!  We are going to have so much fun :)

Pin It!

Tuesday, February 19, 2013

Hugs Before Kisses - A MBS Quilt Tutorial

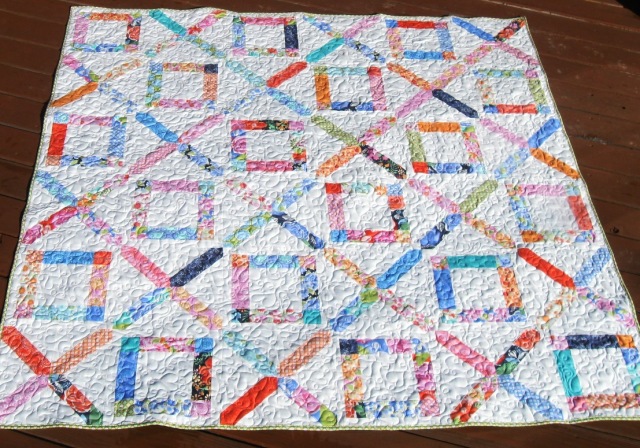
Okay, so I have been hinting for the last week or so about this tutorial and today is finally the day!!  Introducing . . . Hugs Before Kisses my newest  Moda Bake Shop Tutorial !! 


X's and O's are my favorite part of Valentine's day!! (Yes, I know it is past Valentine's day, but I figured we can celebrate love for a whole month :)  When I was a kid, my Grandparents used to send me presents with XOXO written on the card or in the front of the book.  Those far away hugs and kisses have always meant so much to me.  So around this time of year, I always have a desire to figure out some design that I can tie X and O into :)  This years happened to be a twist on a basic lattice quilt.


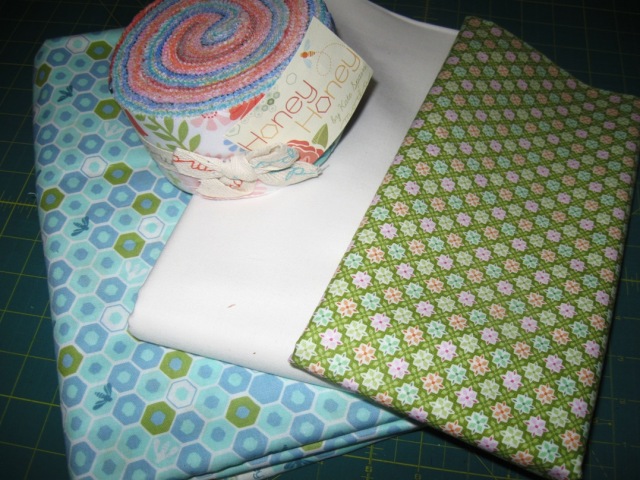
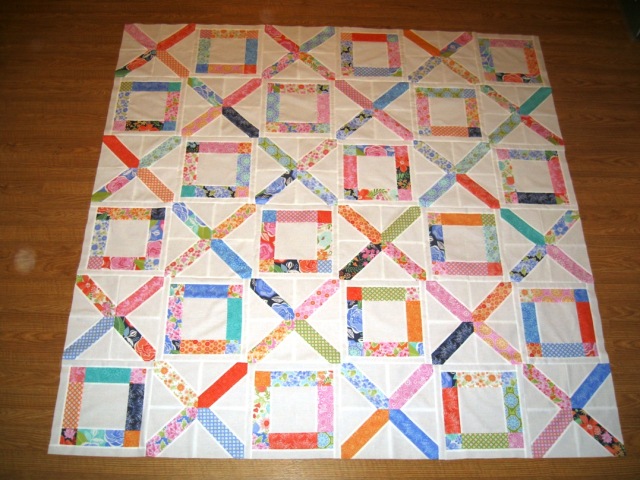
The quilt measures 72" x 72", just the perfect size for you and someone special to snuggle up in :)  It is made using a Honey Honey by Kate Spain jelly roll and some Bella Solid.  It really is a fun quilt to put together and is very beginner friendly.  Don't you just love how those lattice strips blend together framing out the O's :)  So fun!!!


And now that this Moda Bake Shop Tutorial has been published for a while, I can now post it here on my blog for your convenience ;)   So just follow along below for the full step-by-step tutorial.  And if you love it, you can get the printer friendly version here :)  


1 Honey Honey Jelly Roll
3 1/4 Yards of Bella Solid White
3/4 Yard for Binding
5 Yards for Backing


STEP 1 – CUTTING

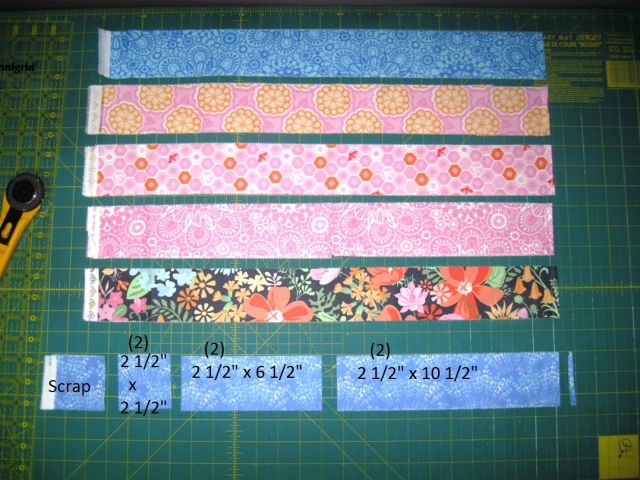
Choose 36 jelly roll strips from your bundle.  (I set aside 4 of the double prints)  Lay them out as follow, keeping them folded in half.  You can cut about 6 rows at a time.  Using the lines on your mat as a guide, cut a sliver off the end to remove the fold.  Then cut a 2 1/2″ x 10 1/2″ rectangle, a 2 1/2″ x 6 1/2″ rectangle, and a 2 1/2″ x 2 1/2″ square.  Place the remaining bit in scrap.  You will have 2 of each cut.  Repeat with all 36 strips to have a total of (72) 2 1/2″ x 10 1/2″ rectangles, (72) 2 1/2″ x 6 1/2″ rectangles, and (72) 2 1/2″ x 2 1/2″ squares.


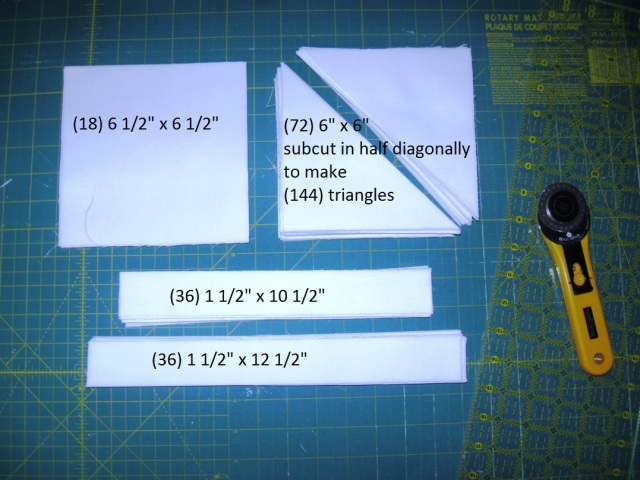
Now from your white yardage cut the following.


Separate your cut pieces into 2 groups as follows.  The first grouping will be used to create the O blocks and the second grouping will be used to create the X Blocks.


STEP 2 – O BLOCKS

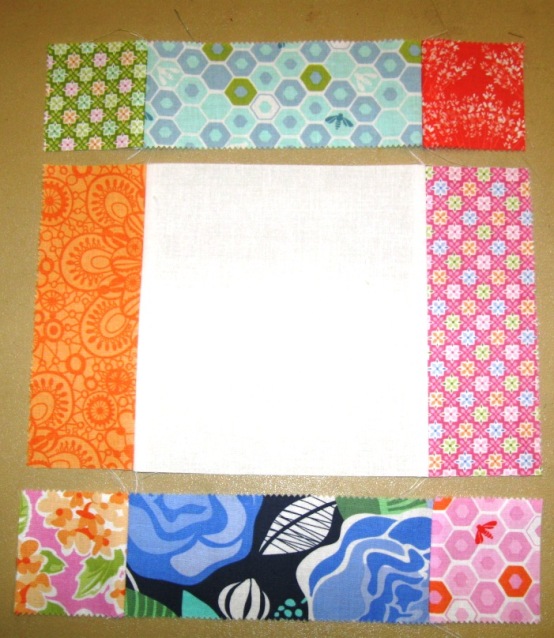
We’ll start by making the O blocks.  Gather a 6 1/2″ square and (2) 6 1/2″ print strips and lay out as shown below.  Place the strips onto the square with right sides together.  Sew a 1/4″ along the edges, aligning as you sew.  Press towards the center square.  Repeat to make 18 center units total.  (Chain stitching saves time)


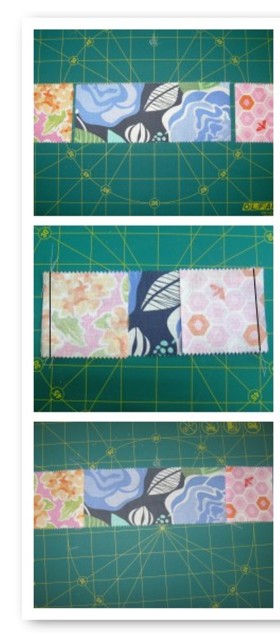
Gather a 6 1/2″ strip and (2) 2 1/2″ squares and lay out as shown below.  Place the squares onto the strip with right sides together.  Sew a 1/4″ along the edges, aligning as you sew.  Press towards the squares.  Repeat to make 36 top and bottom units total.  (Chain stitching will save lots of time :)


Lay (2) top and bottom units and one center unit out as follows.


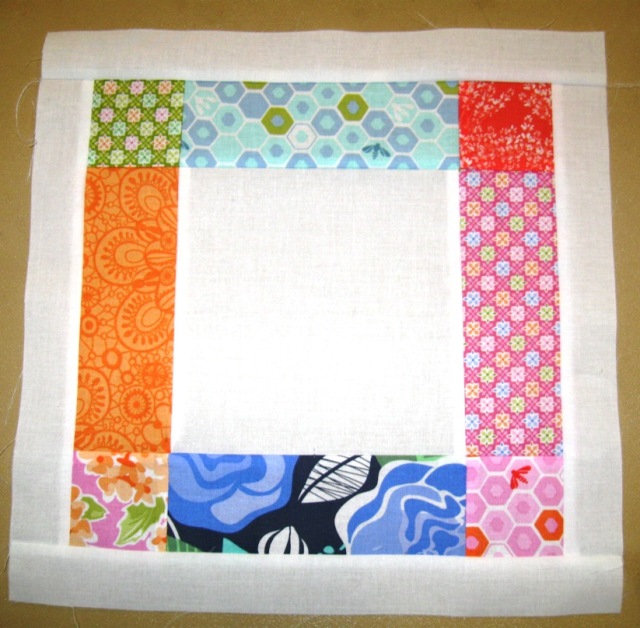
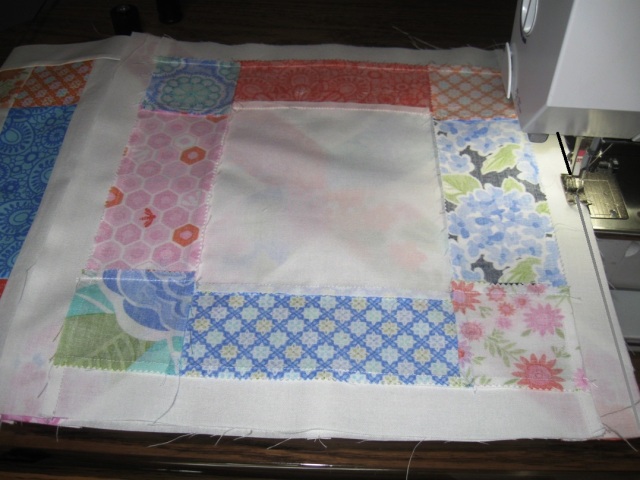
Lay the top and bottom units onto the center with right sides together.  Nest the seams and pin.  Sew a 1/4″ seam along the pinned edge.  Press.  And now, you just have to add the sashing border.  Gather (2) 10 1/2″ white strips and (2) 12 1/2″ print strips and layout as shown.  Lay the top and bottom border onto the O with right sides together.  Sew a 1/4″ seam aligning as you go and press.  Repeat for the two side borders.


And the O Block is finished measuring 12 1/2″ x 12 1/2″.  Repeat the last 2 sub-steps to make a total of 18 O Blocks.


STEP 3 – X BLOCKS

Gather a 10 1/2″ strip and 2 subcut white triangles and lay them out as shown.  Place the right hand square onto the strip with right sides together centering the triangle.  Sew a 1/4″ seam along the edge, aligning as you go.  Open and finger press the triangle.  Lay the second triangle onto the left hand side of the strip with right sides together and lining the tips of the triangles up.  Sew a 1/4″ seam along the edge, aligning as you go.  Press towards the triangles.  Repeat to make 72 lattice units.  (Chain stitching will save lots of time here)


Print of the Squaring Up guide that is attached at the end of this post.  Lay any square ruler onto the guide.  (It is okay if your ruler is larger than the guide, it just means you will have to turn it while trimming.  If you have a 6 1/2″ square ruler it will save time :)


Using masking tape, mark the edges of the diagonal lines creating a guide on your ruler for squaring up your units.


Place your marked ruler onto your unit, aligning the lines of the seams with the edges of the masking tape.  Trim the excess along the edge of your ruler.  If your ruler is larger, trim 2 sides, then spin your unit, realign and trim the remaining 2 sides.  


And you have a perfect lattice unit that measures 6 1/2″ x 6 1/2″.  Repeat for all 72 lattice units.  


Lay 4 lattice units out as shown.  Lay the right hand side units onto the left hand sides with right sides together.  Align the diagonal seams and pin.  Sew a 1/4″ seam along the pinned edge and then press seams open.  Lay the top row onto the bottom row with right sides together.  Align the diagonal seams as well as the center seam and pin.  Sew a 1/4″ seam along the pinned edge and press the seam open.  


And the X Block is finished measuring 12 1/2″ x 12 1/2″.  Repeat the last step to make a total of 18 O Blocks.


STEP 4- SEWING THE QUILT TOP 

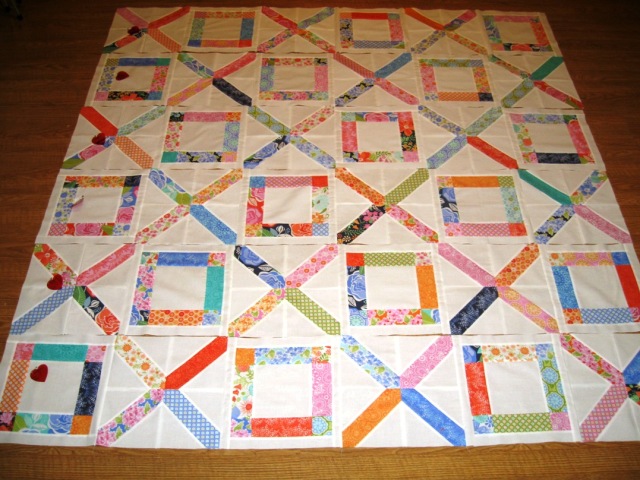
Lay the X and O blocks alternating into 6 rows of 6.  Play with the layout until you get a look that is please to the eye.  I tried to separate the red and navy units most as they tend to pop.   Once you have a please layout you are ready to sew the blocks into row.


I find the easiest way to do this is to stack each row and place some sort of marker on the first block indicating what row it is.  This way you don’t lose the layout you just did.


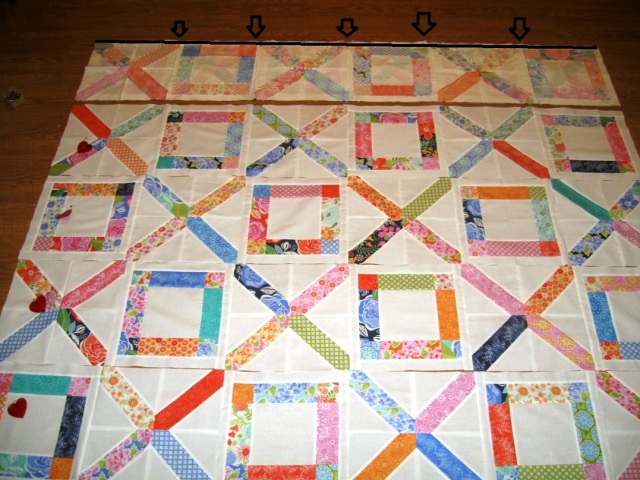
Then just start sewing the blocks together, one block adding to the next, and the next until you have sewn all 6 in the row.  Then just repeat for all 6 rows.  I do not pin my blocks when sewing them into row as there are no seams to line up.  I just align as I go.


Press your seams in the rows towards the O blocks.  This will allow you to nest the seam and avoids bulk around the X corners.


Sewing the rows together is just like creating them.  Lay the first row onto the second with right sides together.  Nest the seams and pin them and then along the rest of the edge.  Sew a 1/4″ seam along the pinned edge.  Press open.  Then repeat adding the third row to the now sewn together first and second row and so on.


And before you know it, you have a beautiful Hugs before Kisses Quilt Top!!


STEP 5- FINISHING THE QUILT

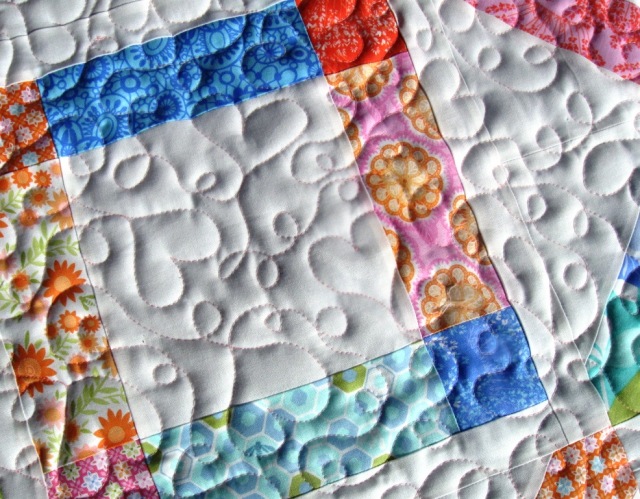
So now it is time to turn that finished quilt top into a finished Quilt ;)  Time to  Baste It, Quilt It, and Bind It!!!  Which is a whole lot in one little sentence.  If you are new to quilting, you can see my Finishing Your Quilt Series of video tutorials that will walk you through Basting, Quilting, and Binding step by step ;)      I choose to quilt mine in an all-over free motion design of traveling loops and hearts to fit the Valentines theme.  There is also a video tutorial of how to do this on the Video Tutorial Tab of my blog, Just look down the page a bit ðŸ™‚ 


One adorable Hugs before Kisses quilt measuring 72″ x 72″ perfect for snuggling under.


I hope you have enjoyed this tutorial and if you make your own Hugs Before Kisses Quilt I would love to see it!!  You can email me a picture at happyquiltingmelissa@gmail.com, post it to social media with #happyquiltingwithmc  or or add it to my flickr group here ;)  I can't wait to see your Hugs Before Kisses Quilts!!!


Have a Happy Quilting Day!!


Pin It!