Today's Terrific Tuesday Giveaway is being sponsored by Fat Quarter Shop. Fat Quarter Shop is amazing and they never cease to amaze me with everything they have going on at their shop!!! And did you know they have a 24 Hour Flash Sale and Precuts of the Week!! You can also save big on the Basics of the Month!!!! This month Butter Churn Basics are on sale. Also, Triangles on a Roll are on sale for the Notion, and all Cluck Cluck Sew Patterns are on sale for the Pattern. Save 20% off of all of them for the whole month of June!! So great ;)
You have two entry chances here on the blog, and please leave a separate comment for each. All Entries are welcome, including International Entries. Please just be sure to leave an email address if you are a no-reply blogger ;)
ENTRY 1 - Simply leave a comment that tells me if you prefer Pancakes or Waffles?? (I am a waffle girl myself, especially with fresh summer berries on top!!) ENTRY 2 - Show your Fat Quarter Shop love. You can follow them on Facebook, Twitter, Instagram, Pinterest, You Tube or at their Blog. You can Sign up for their Newsletter which will ensure you catch all of their amazing sales, or you can visit The Shop and then share a favorite item ;) Just be sure to leave a comment of how you showed your Fat Quarter Shop Love!!!
And that's it ;) The giveaway will be open until next Tuesday, June 13th when I will announce a winner at the beginning of next weeks Terrific Tuesday Giveaway Post :)
You can also pop over to my Instagram and/or Facebook to enter there as well :)
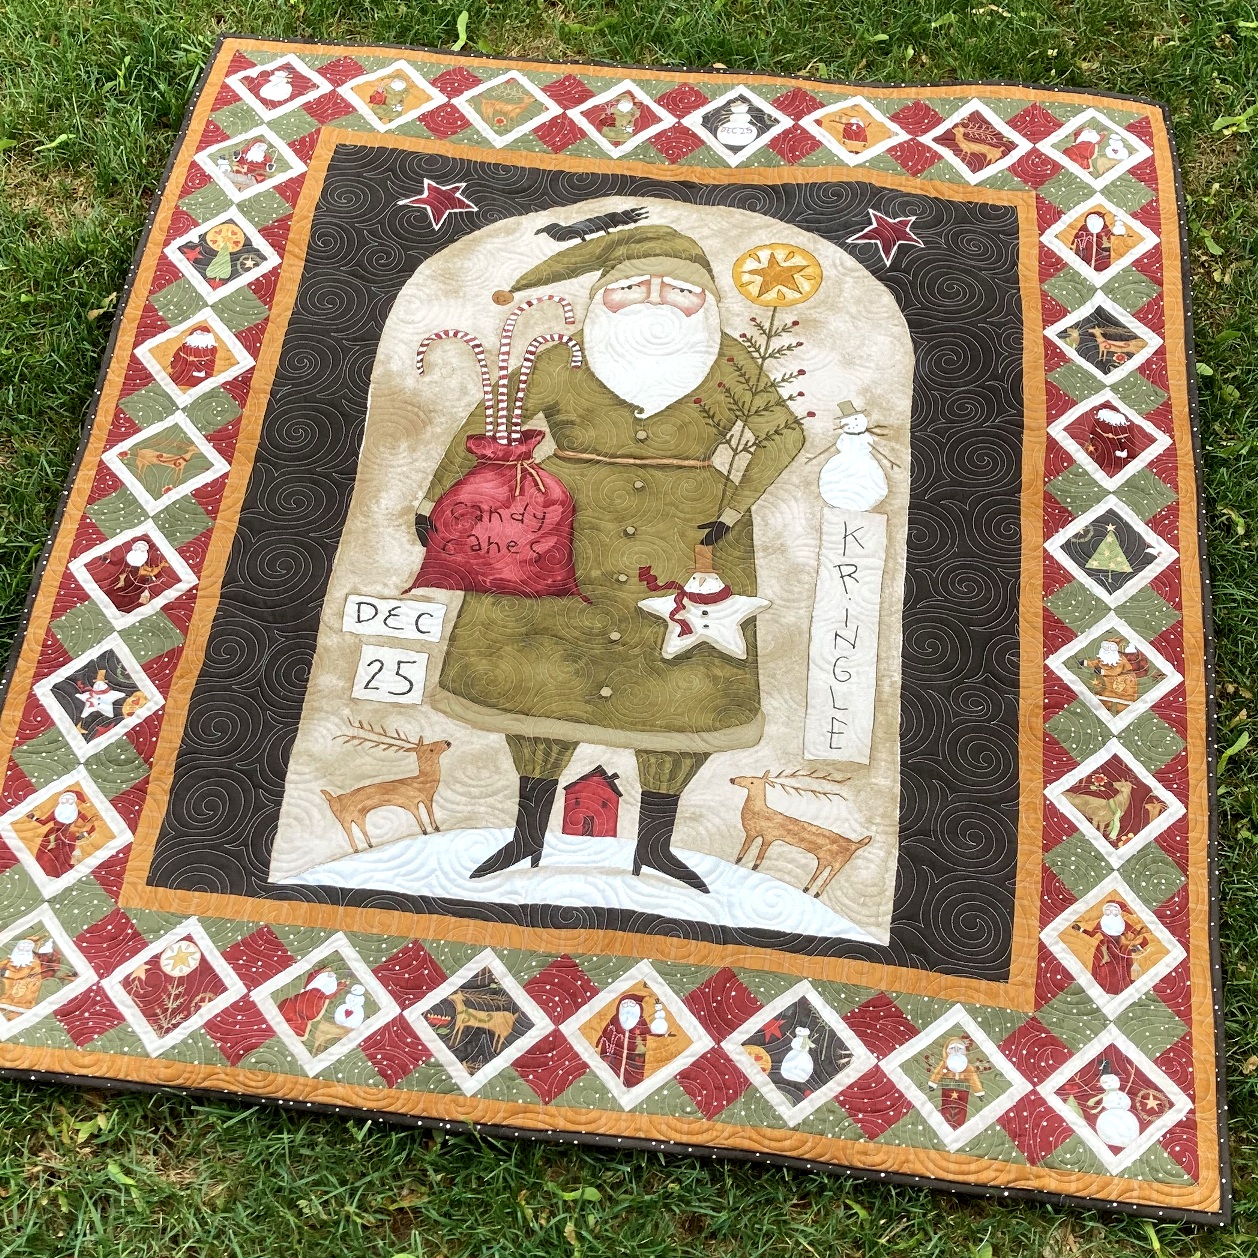
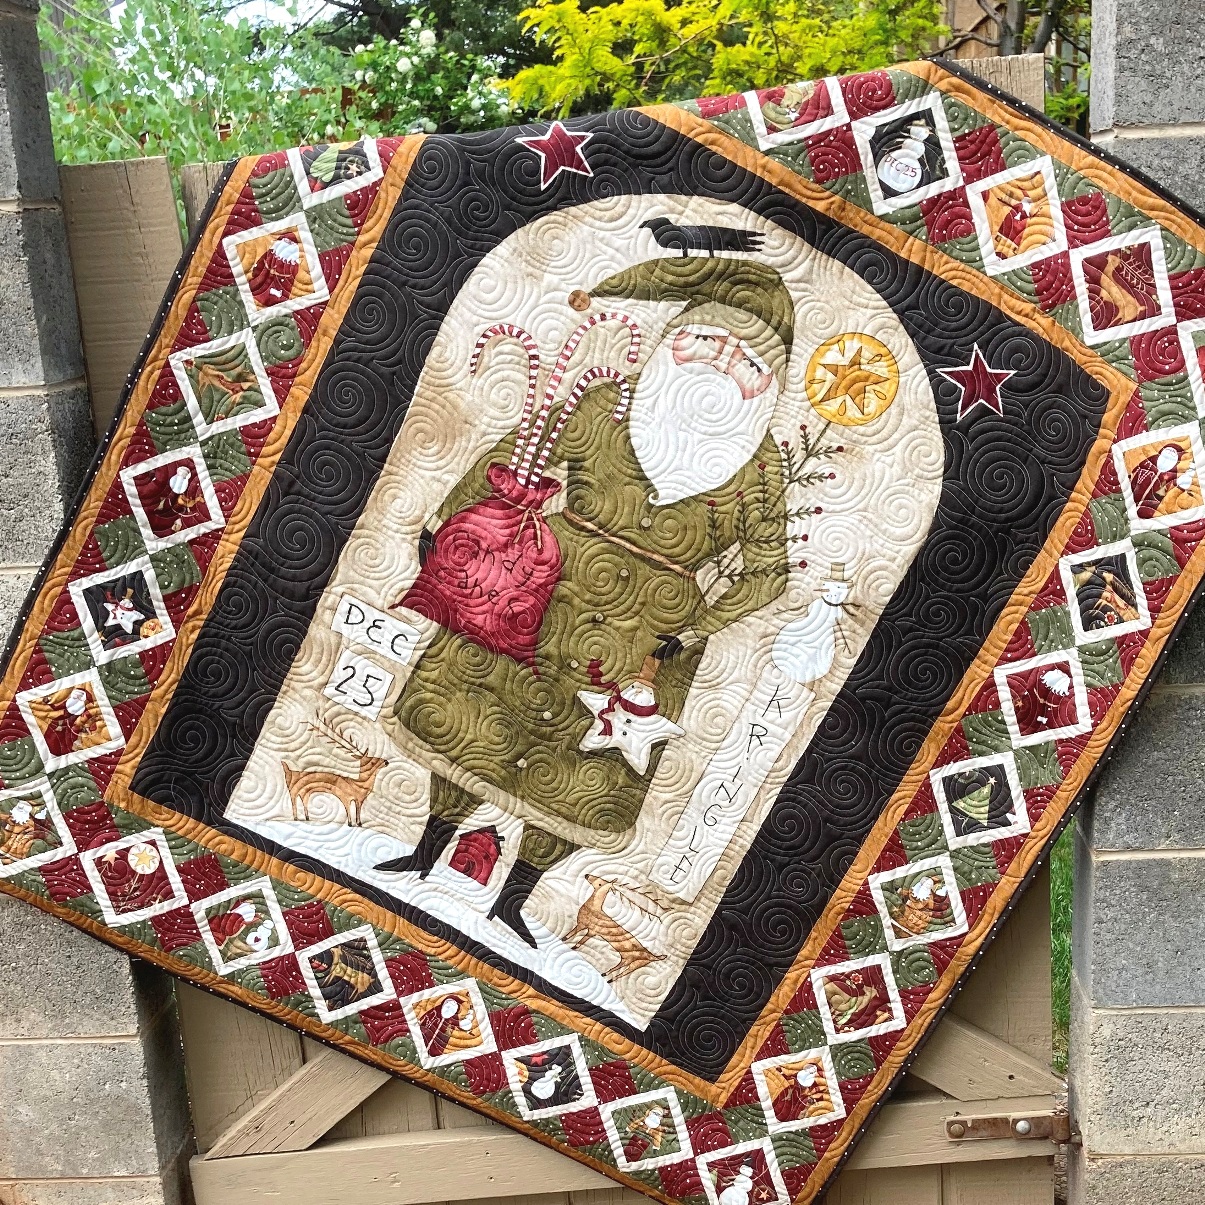
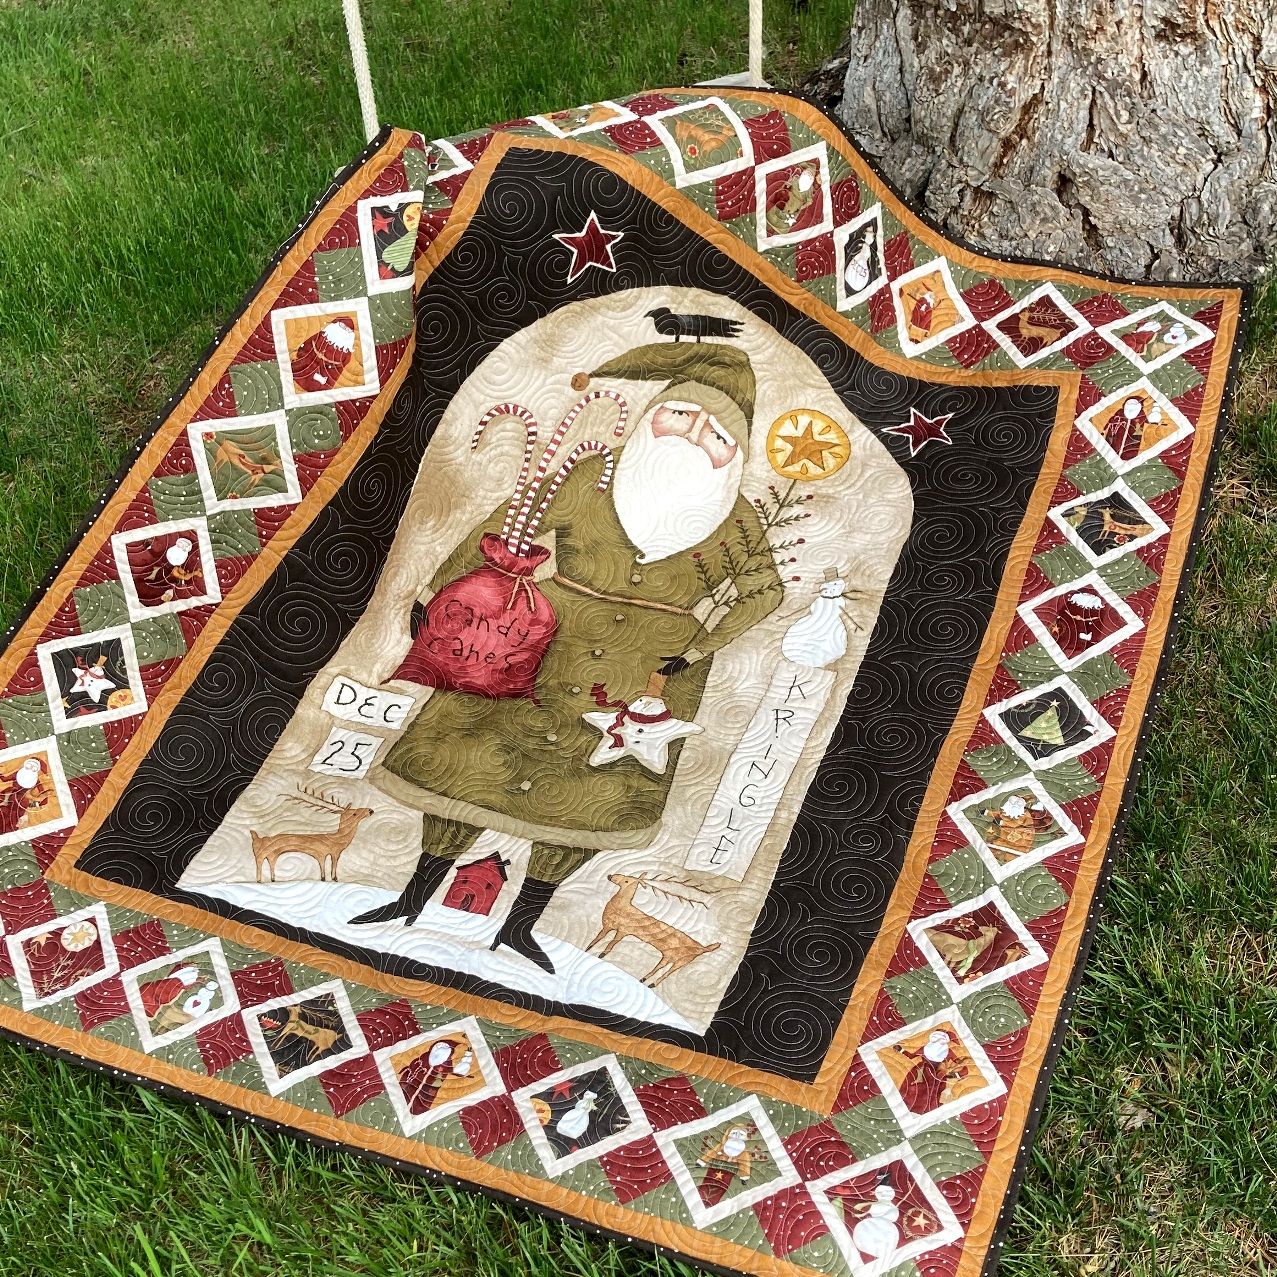
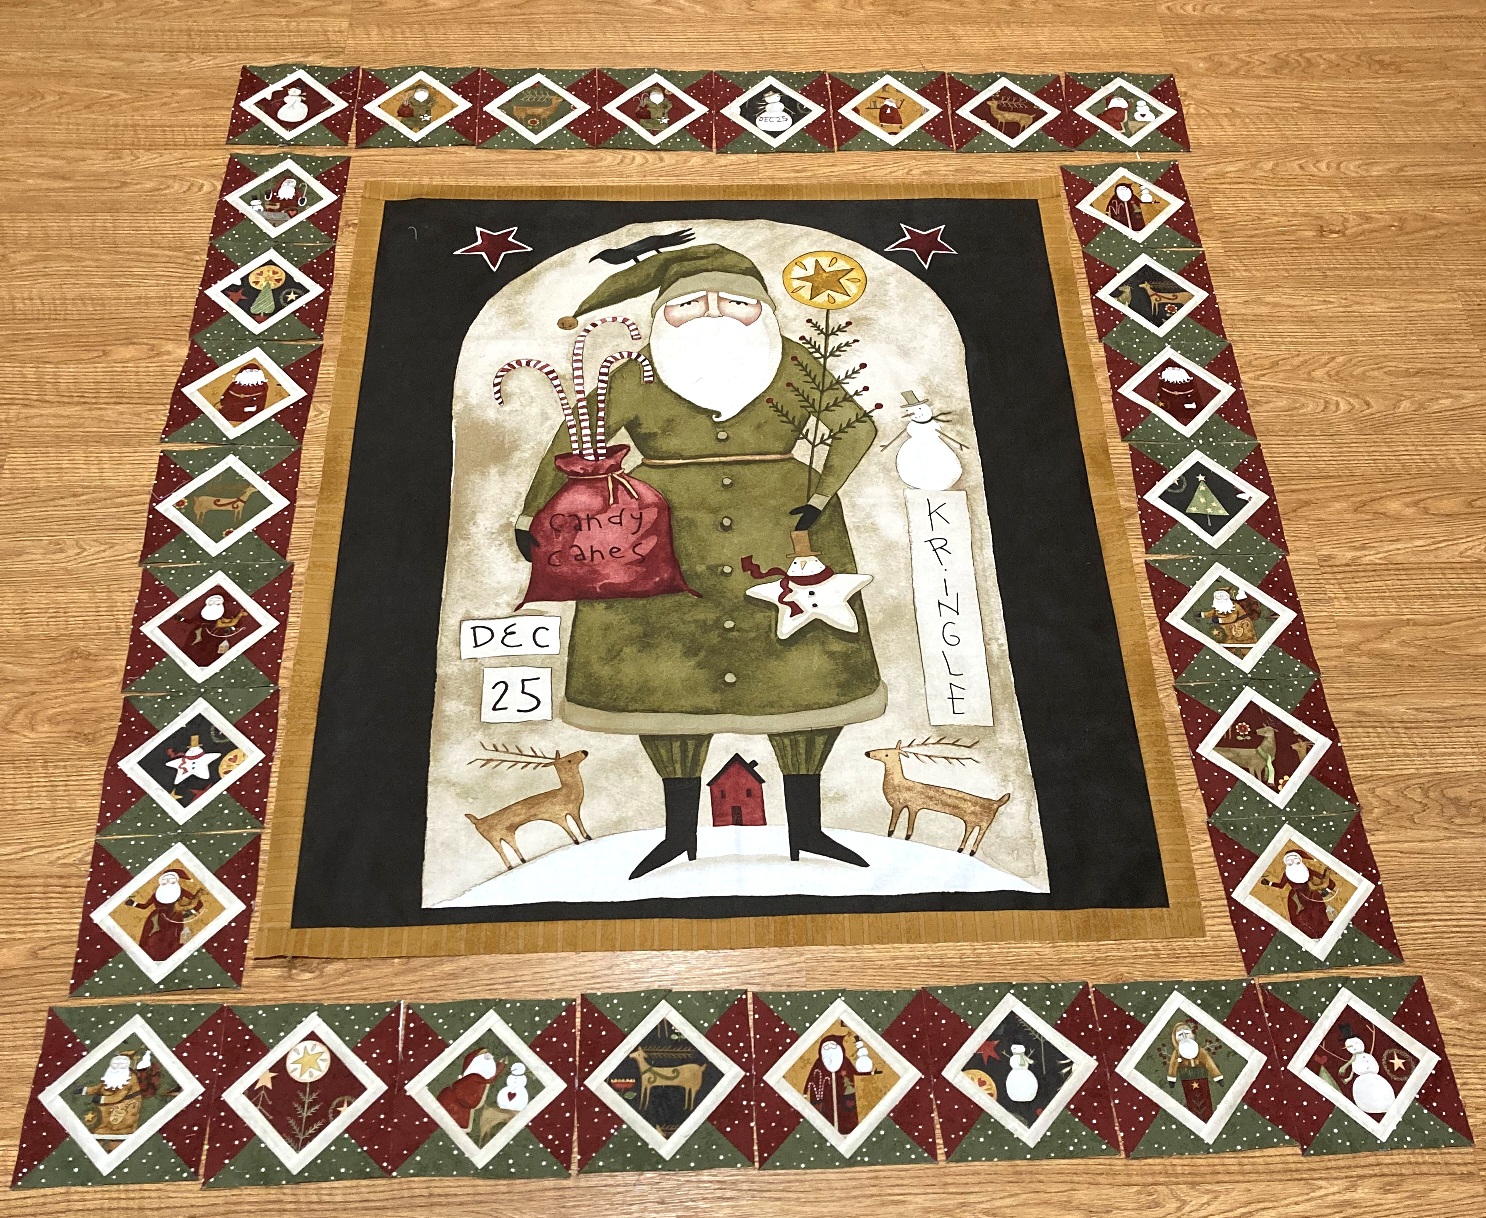
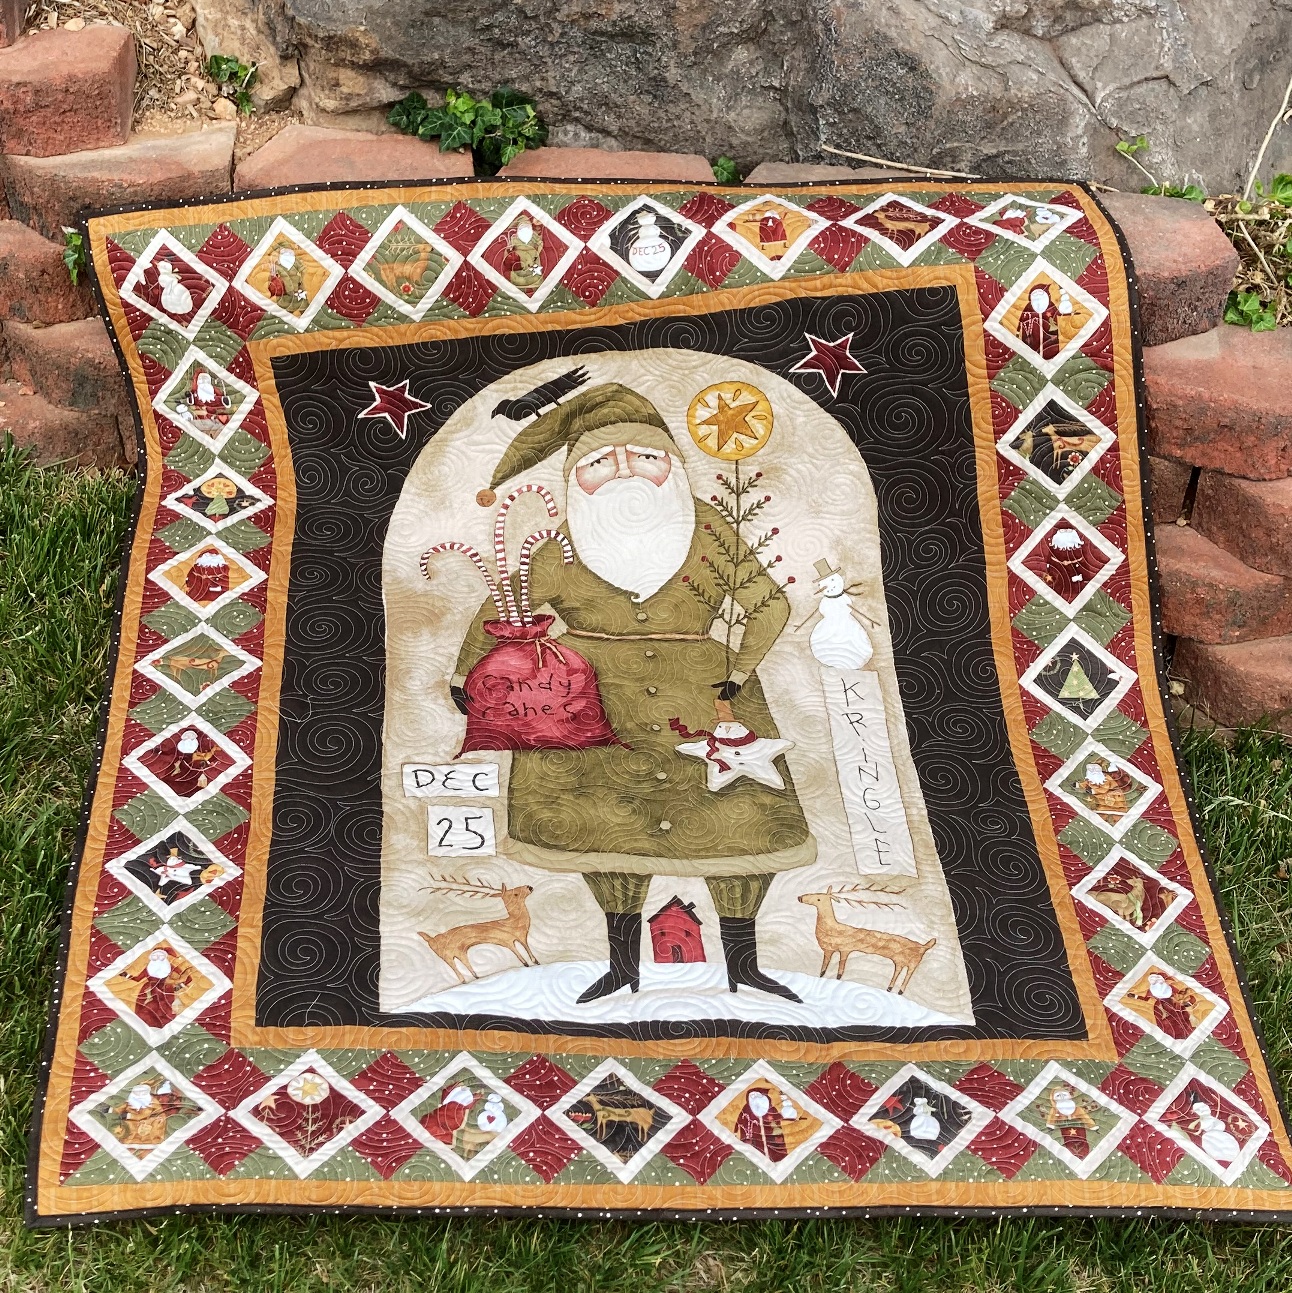
Hello Friends! I am thrilled to be bringing you a new quilt finish and a tutorial to go along with it! I just love a good panel, and they make for some stunning quilts!! I just love this Kris Kringle Panel from the Kringle Fabric Line by . It just has such a wonderful Old World Christmas feel to it . And I just love all of the reindeer, snowmen, and Santa's in the prints from Kringle, so I did a featured fussy cut border to really make that panel pop!!!
For our tutorial today, we are using the beautiful panel I mentioned, framed in a gorgeous gold stripe. Then, we get to whip up some fun square in a square pieced blocks to make that adorable fussy cut border. One more gold stripe border and a black binding, and you are done!! I just love the way the black and gold just make all of those fun vintage Christmas tones pop!! So great ;)
The quilt finishes at 48" x 56" so it makes for a perfect lap size quilt. It is a wonderful go-to Christmas gift that is easy to whip up, but also looks amazing!! So, let's get to making your own!!!
MATERIALS NEEDED:
To make your own Kris Kringle Panel Quilt you will need
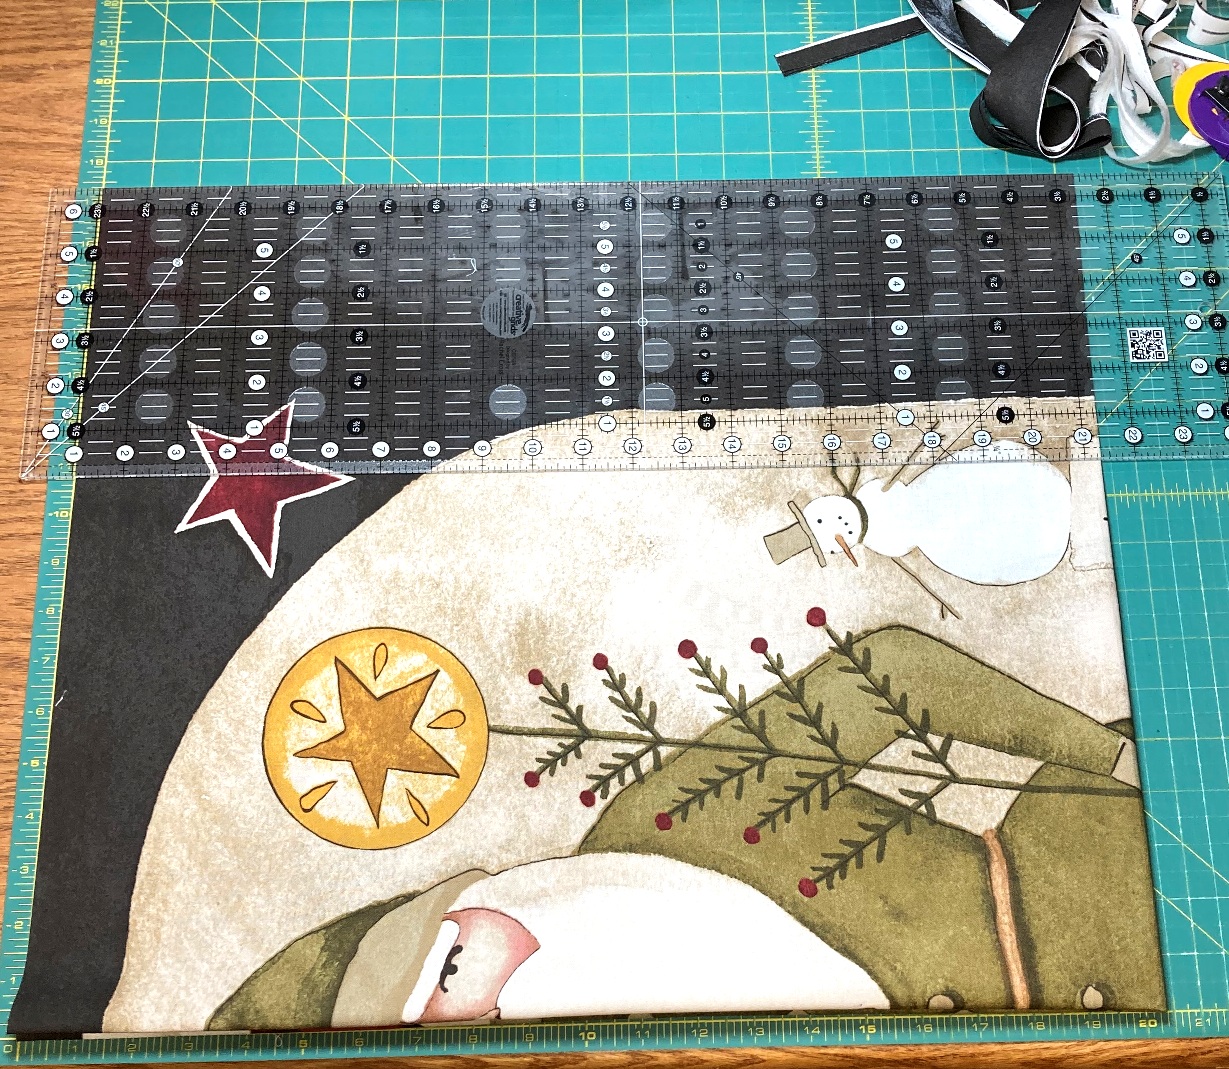
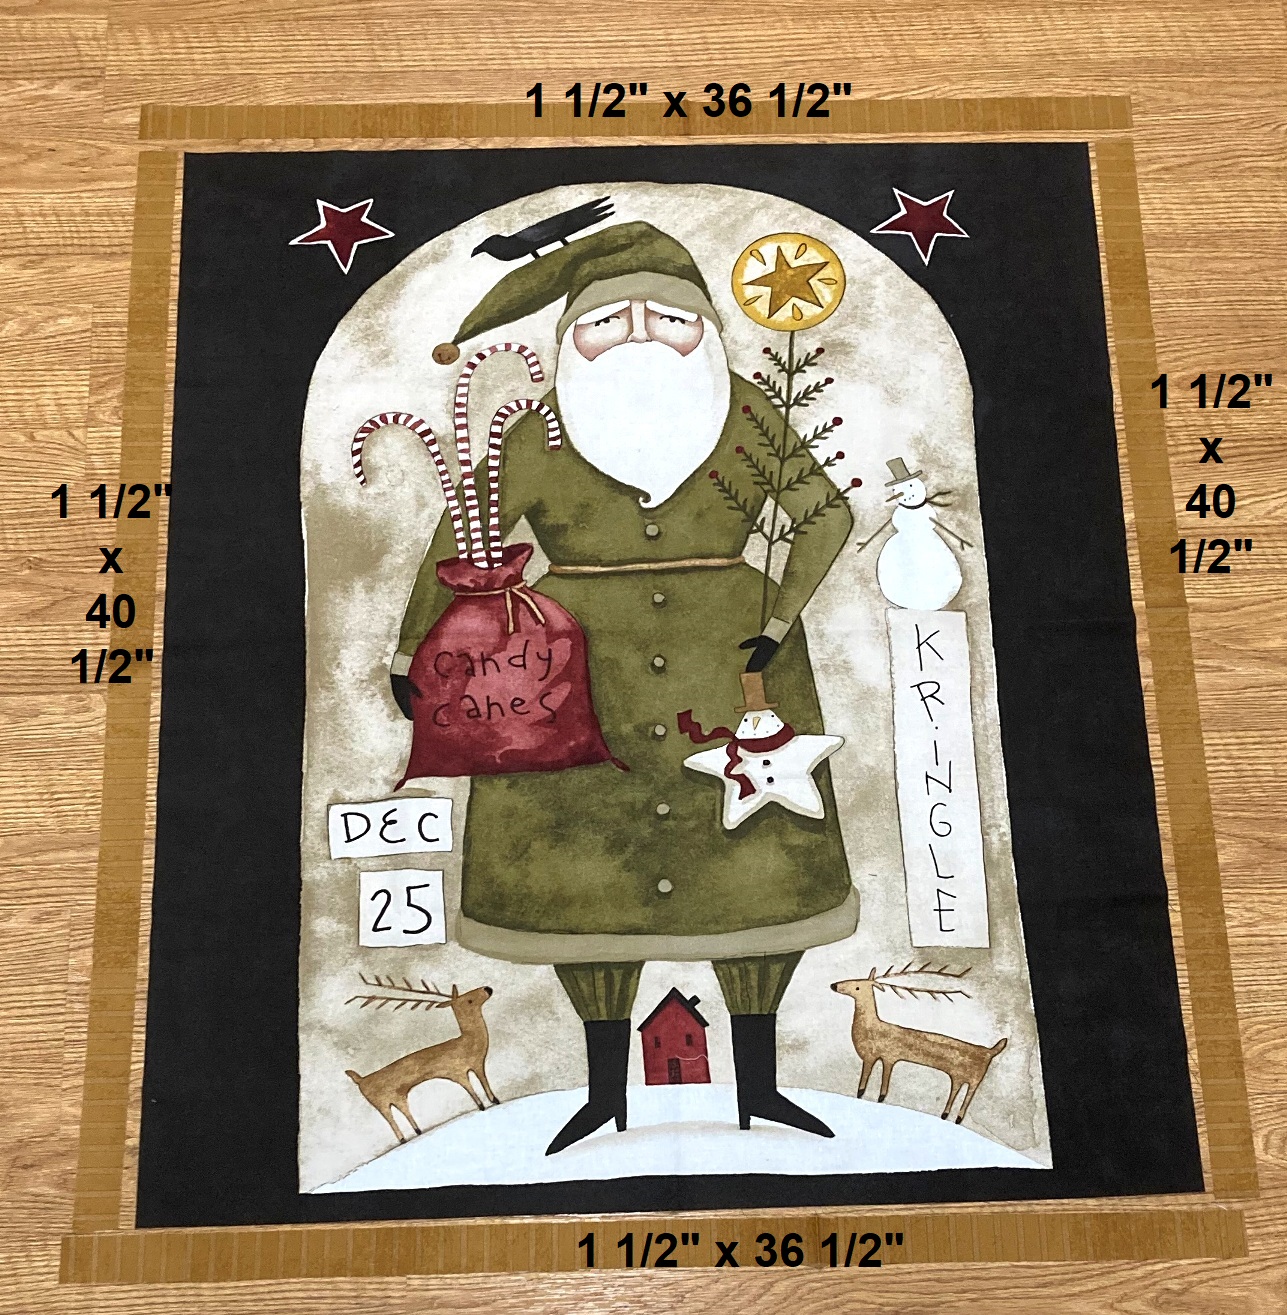
Begin by Trimming the Panel to measure 34 1/2" x 40 1/2". The easiest way to do this is to fold your panel in half twice, and then align the panel as shown, with the folds along the 0 Horizontal line and the 20 1/4" vertical line. Trim the raw edges on the 0 Vertical line and the 17 1/4" horizonal line.
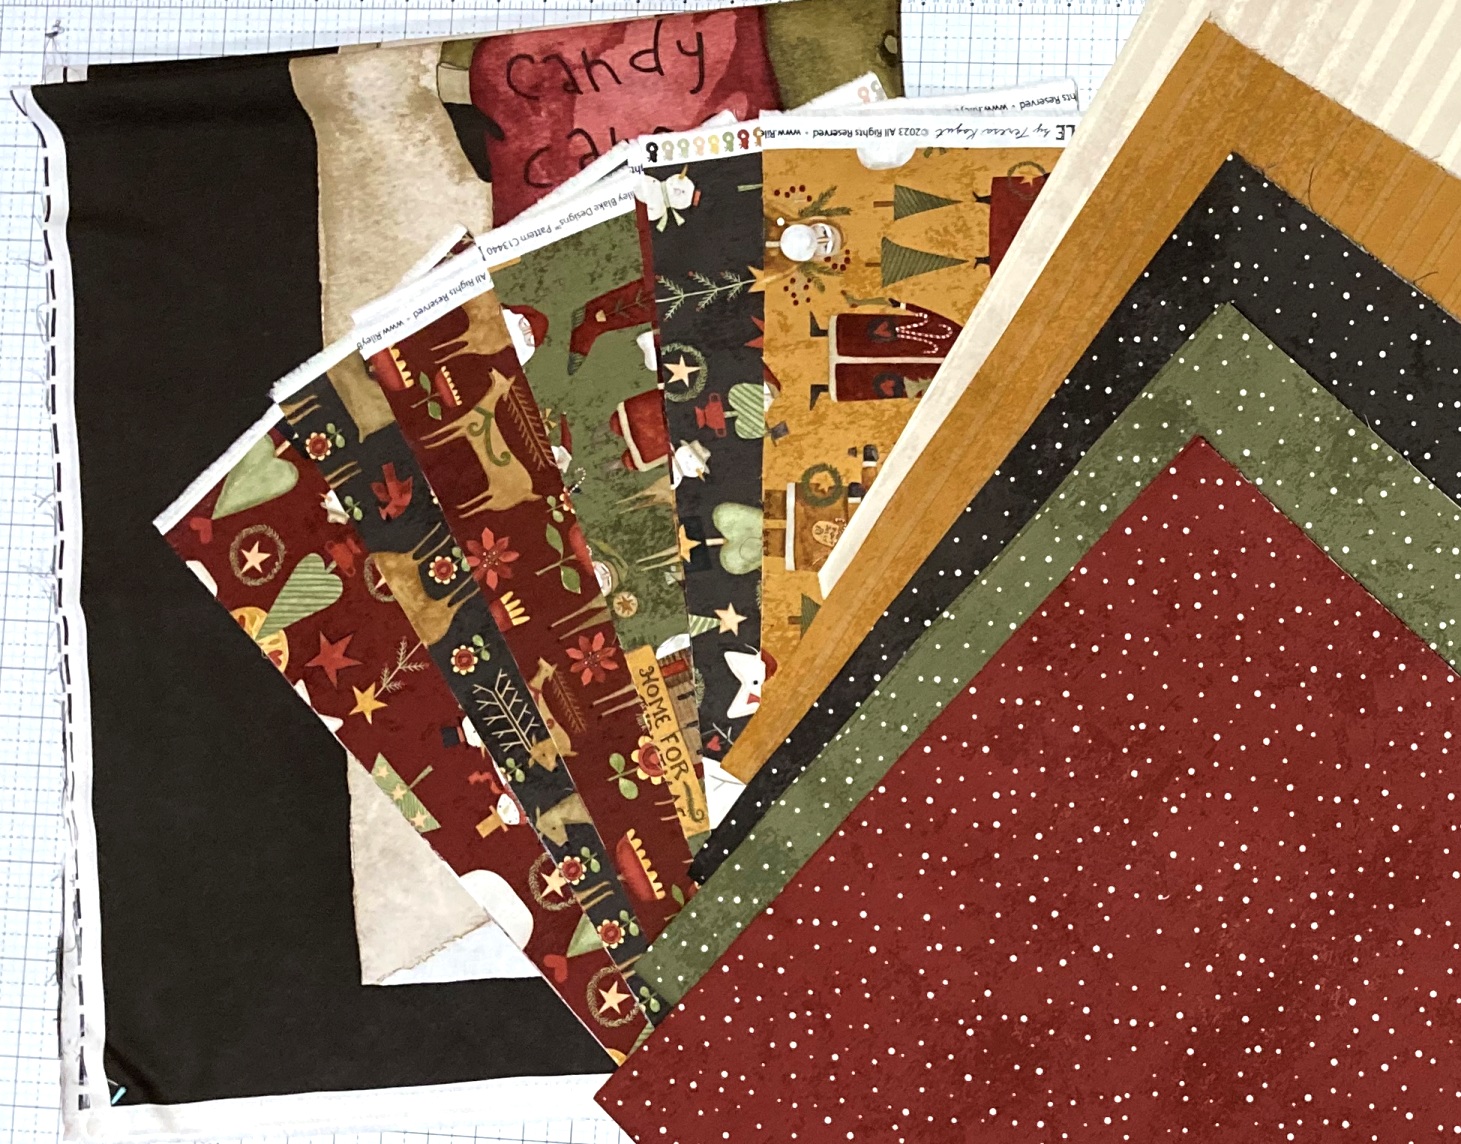
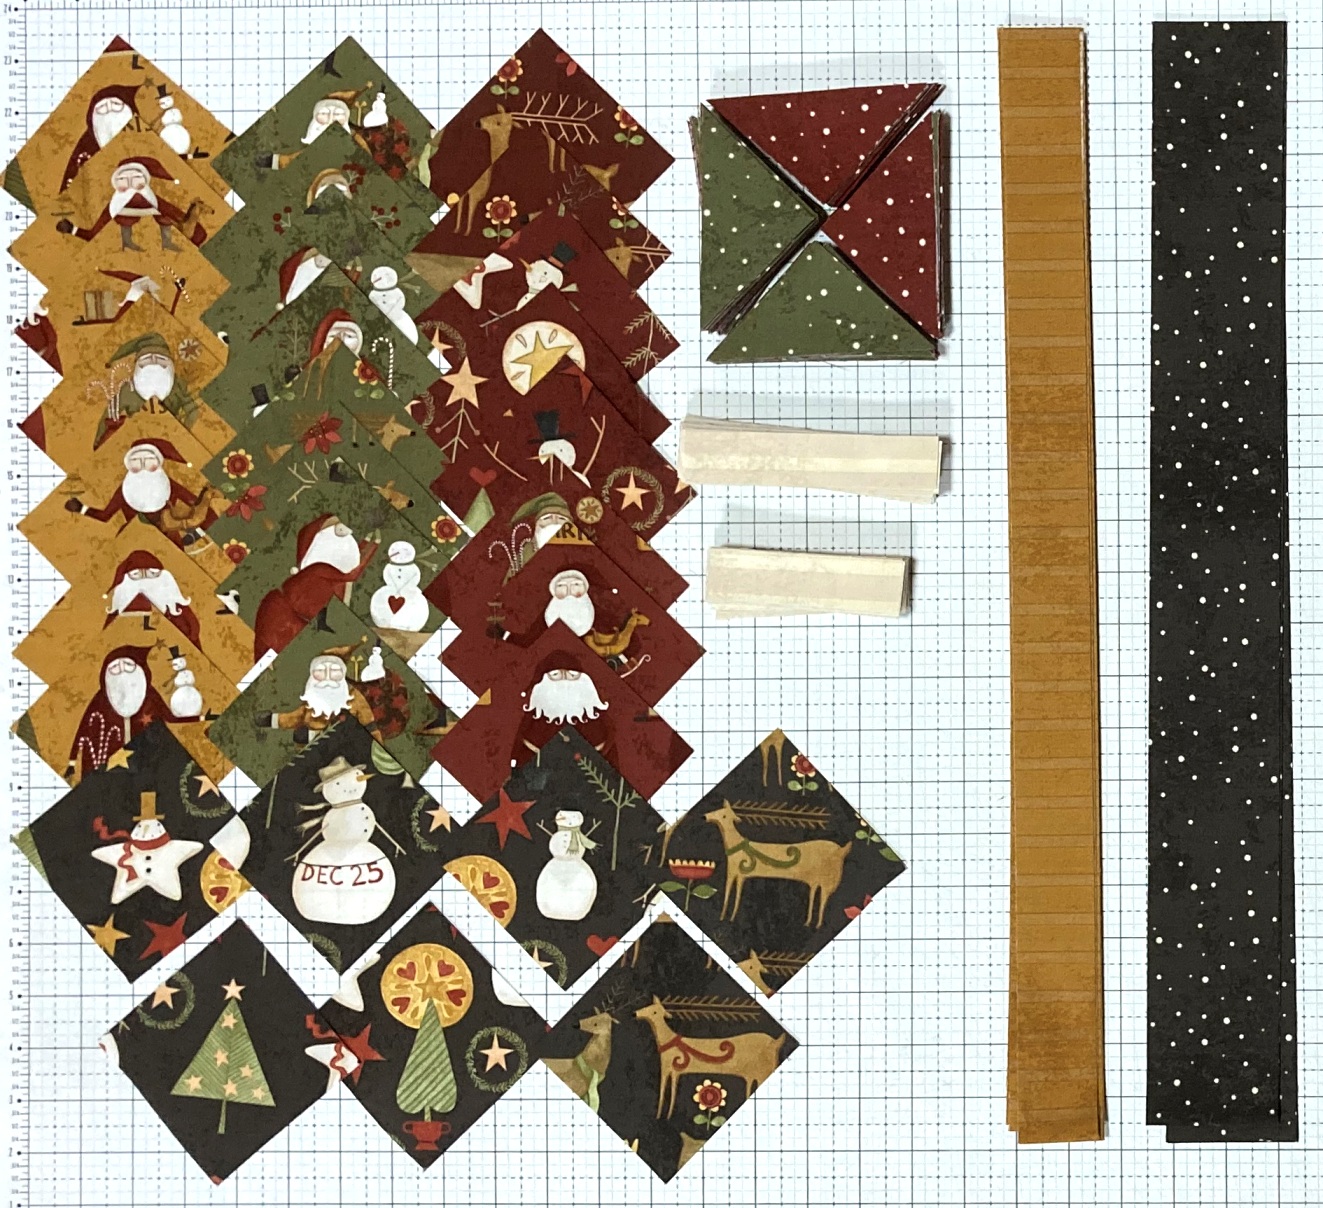
From the Focal Fat Quarters cut:
(30) 3 5/8" x 3 5/8" squares fussy cut on point.
From each of the Red Polka Dot Print and Green Polka Dot Print cut:
(30) 4 1/4" x 4 1/4" squares subcut in half diagonally twice to make 120 Red triangles and 120 Green triangles.
From the Cream Stripe Print cut:
(60) 1" x 3 5/8" rectangles and (60) 1" x 4 3/4" rectangles.
From the Gold Stripe Print cut:
(2) 1 1/2" x 36 1/2" strips and (2) 1 1/2" x 40 1/2" strips and (6) 1 1/2" x 42" strips.
From the Charcoal Polka Dot Print cut:
(6) 2 1/2" x WOF Strips for binding.
I found it helpful when fussy cutting the 3 5/8" square to make a plastic template. It was just quicker and easier to see where the fussy cutting lined up. If you don't have plastic template material, I recommend marking a small square ruler.
STEP 2 - ADDING THE INNER BORDER
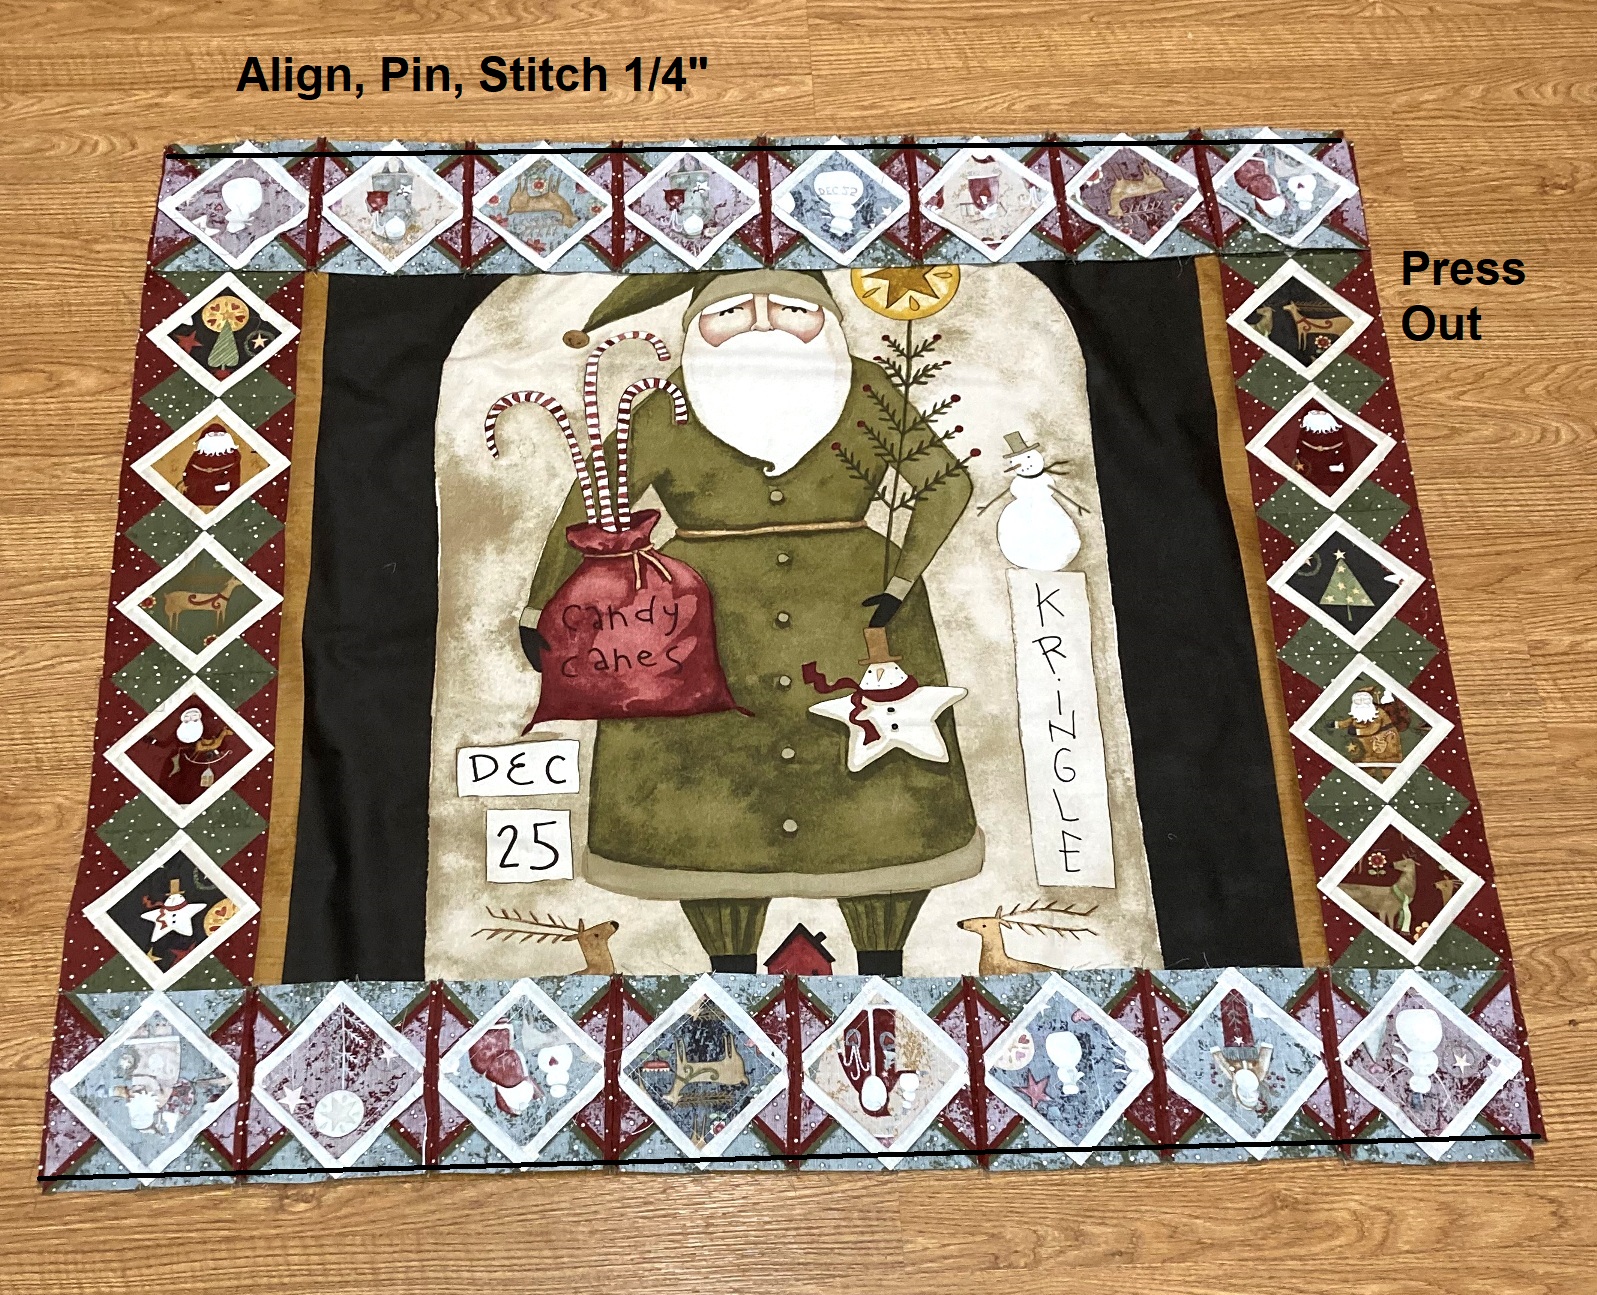
And with the cutting done, we are ready to do some stitching. Layout the Panel and the 2 Gold Strips 1 1/2" x 40 1/2" and 2 Gold Strips 1 1/2" x 36 1/2" as as shown below.
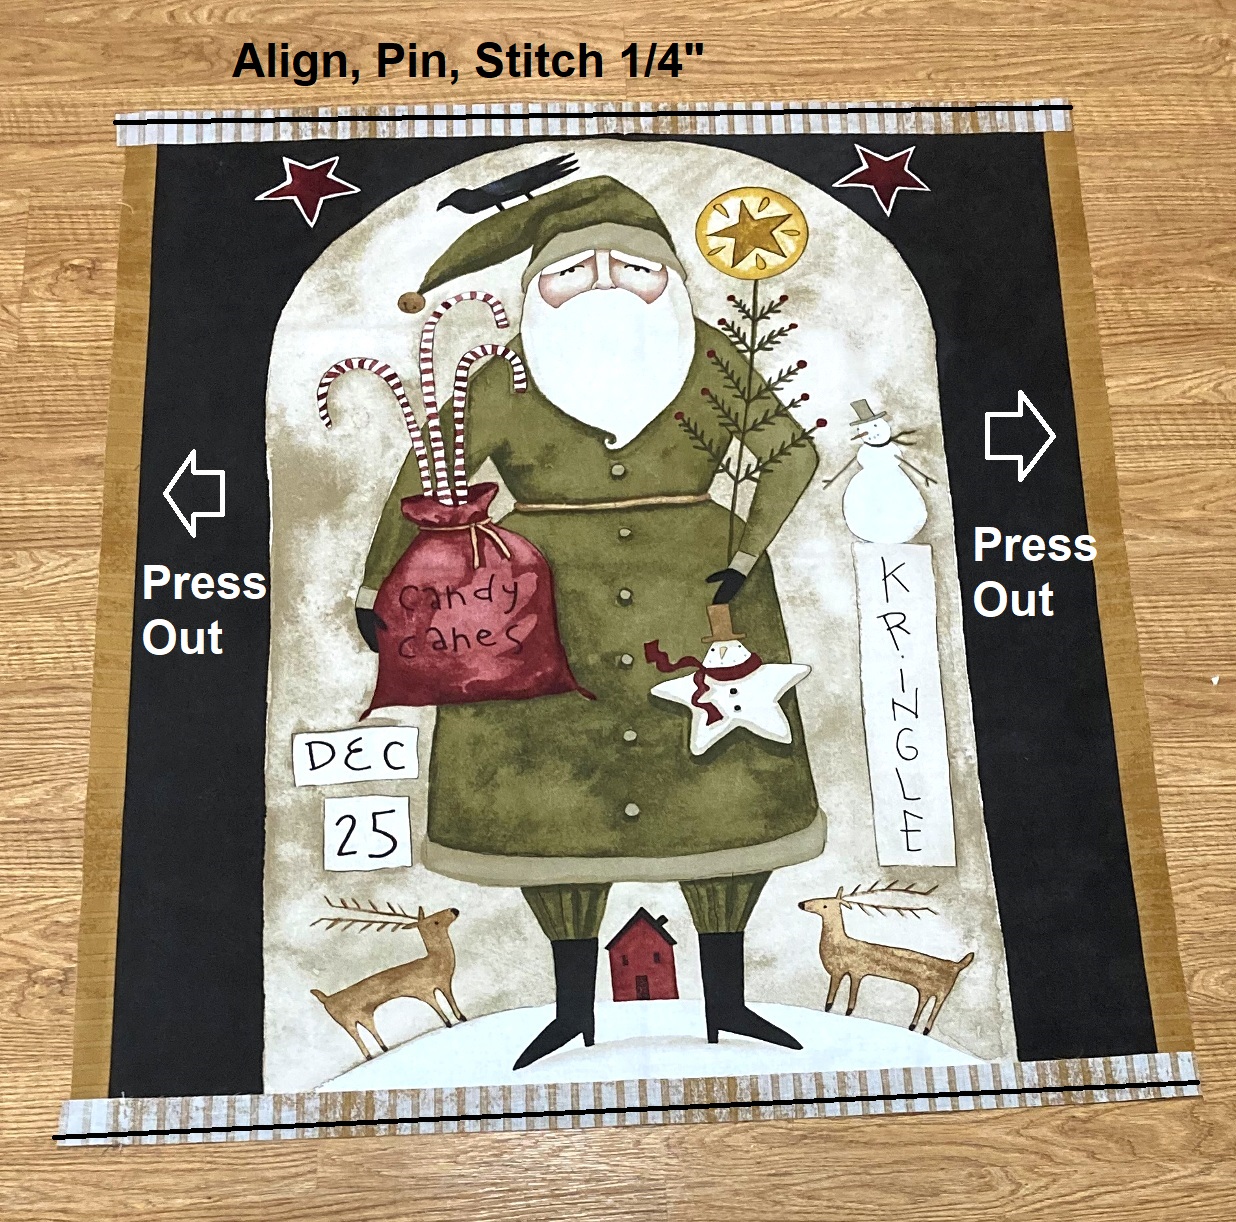
Place the side strips onto the sides of the Panel with right sides together. Align and pin the strips, and then stitch a 1/4" seam along the two edges.
Press the seams out towards the Gold strips. Place the top and bottom strips onto the top and bottom of the Panel with right sides together. Align and pin the strips, and then stitch a 1/4" seam along the two edges.
Press the seams out towards the Gold strips. You can now set the bordered panel aside for a minute while we make the patchwork border.
STEP 3 - ADDING THE PATCHWORK BORDER
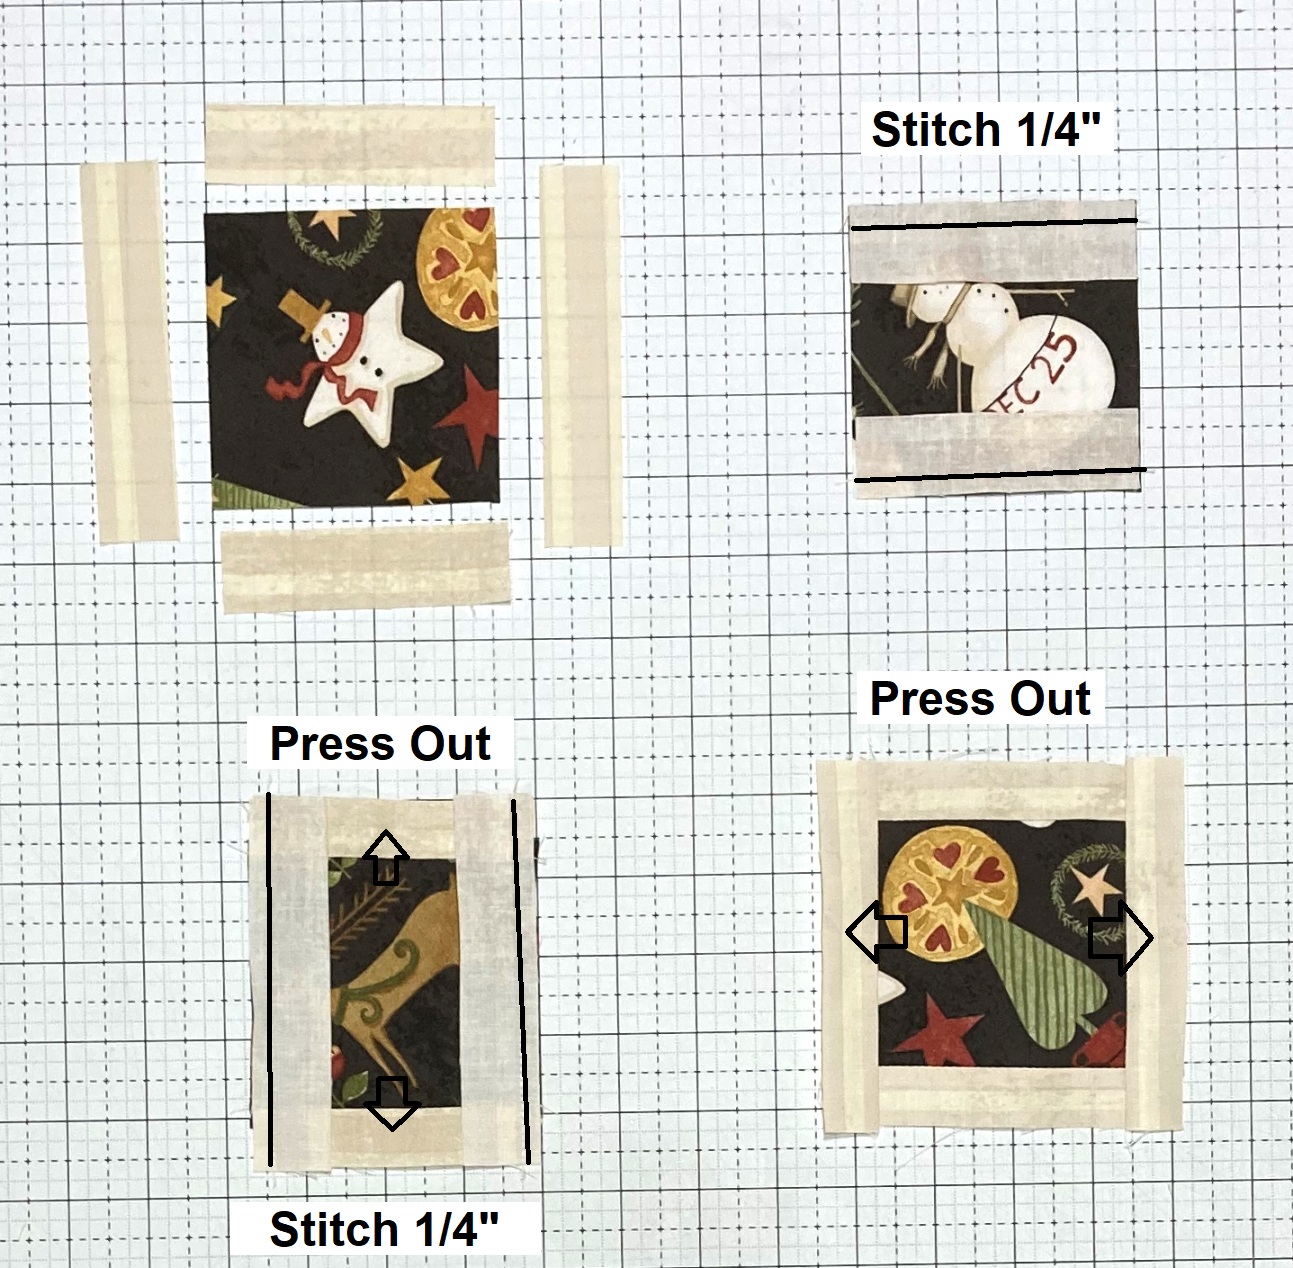
So now we need to make the Square in a Square blocks for our second border. We will start with bordering the fussy cut squares. Layout a Fussy cut 3 3/8" square, 2 Cream stripe 1" x 3 5/8" rectangles and 2 Cream rectangles 1" x 4 3/4" rectangles as shown below. Place the top and bottom rectangles onto the top and bottom of the square with right sides together. Align and then stitch a 1/4" seam along the two edges. Press the seams out towards the Cream rectangles. Now, place the side rectangles onto the sides of the square with right sides together. Align and then stitch a 1/4" seam along the two edges. Press the seams out towards the Cream rectangles.
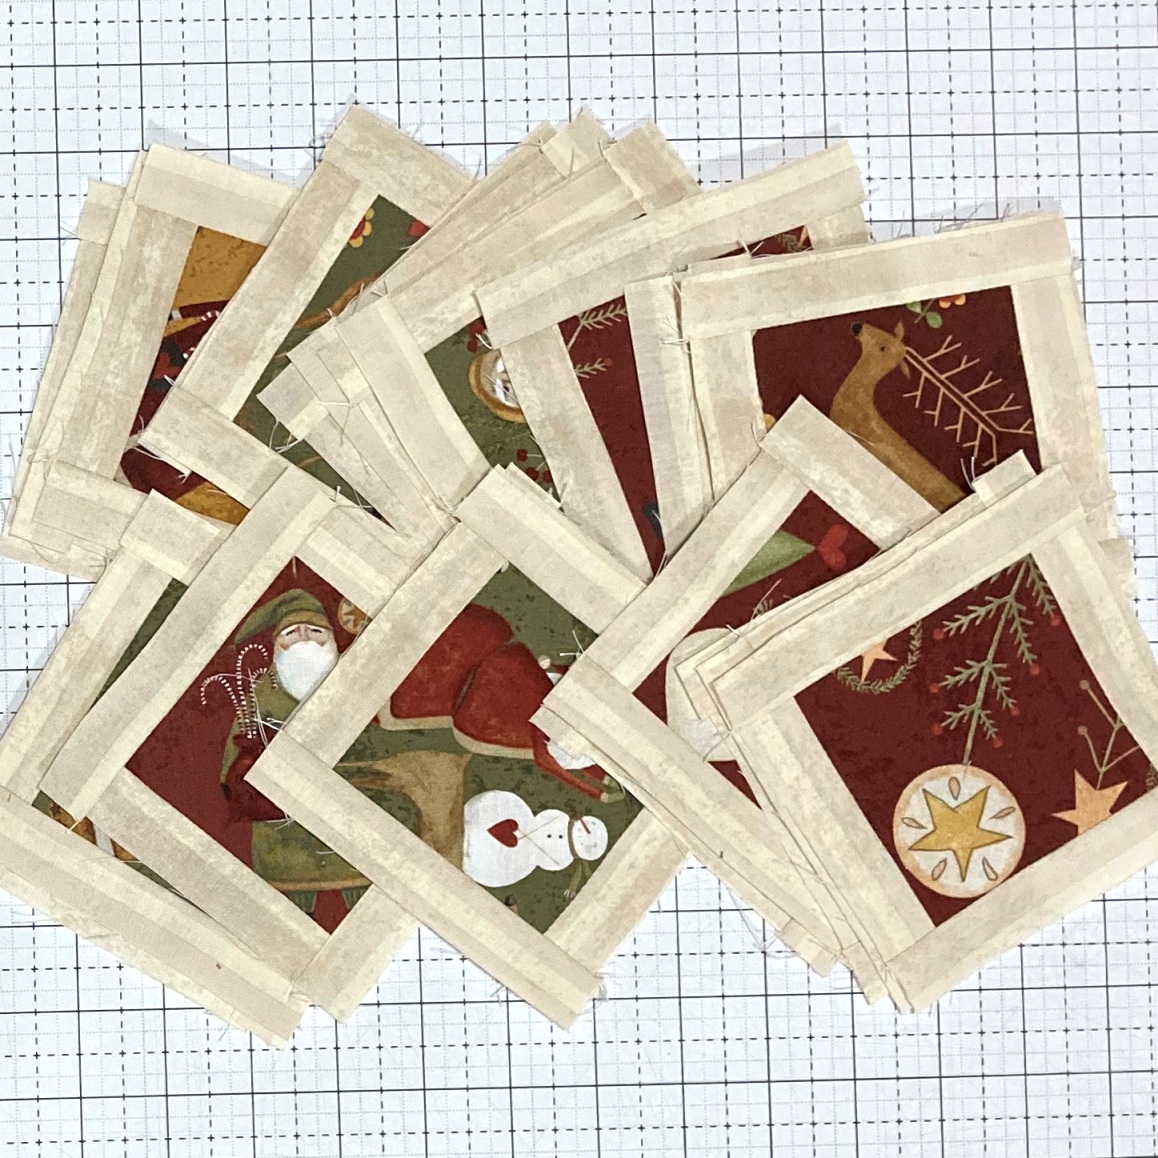
Repeat this process to border all 30 of the Fussy Cut squares.
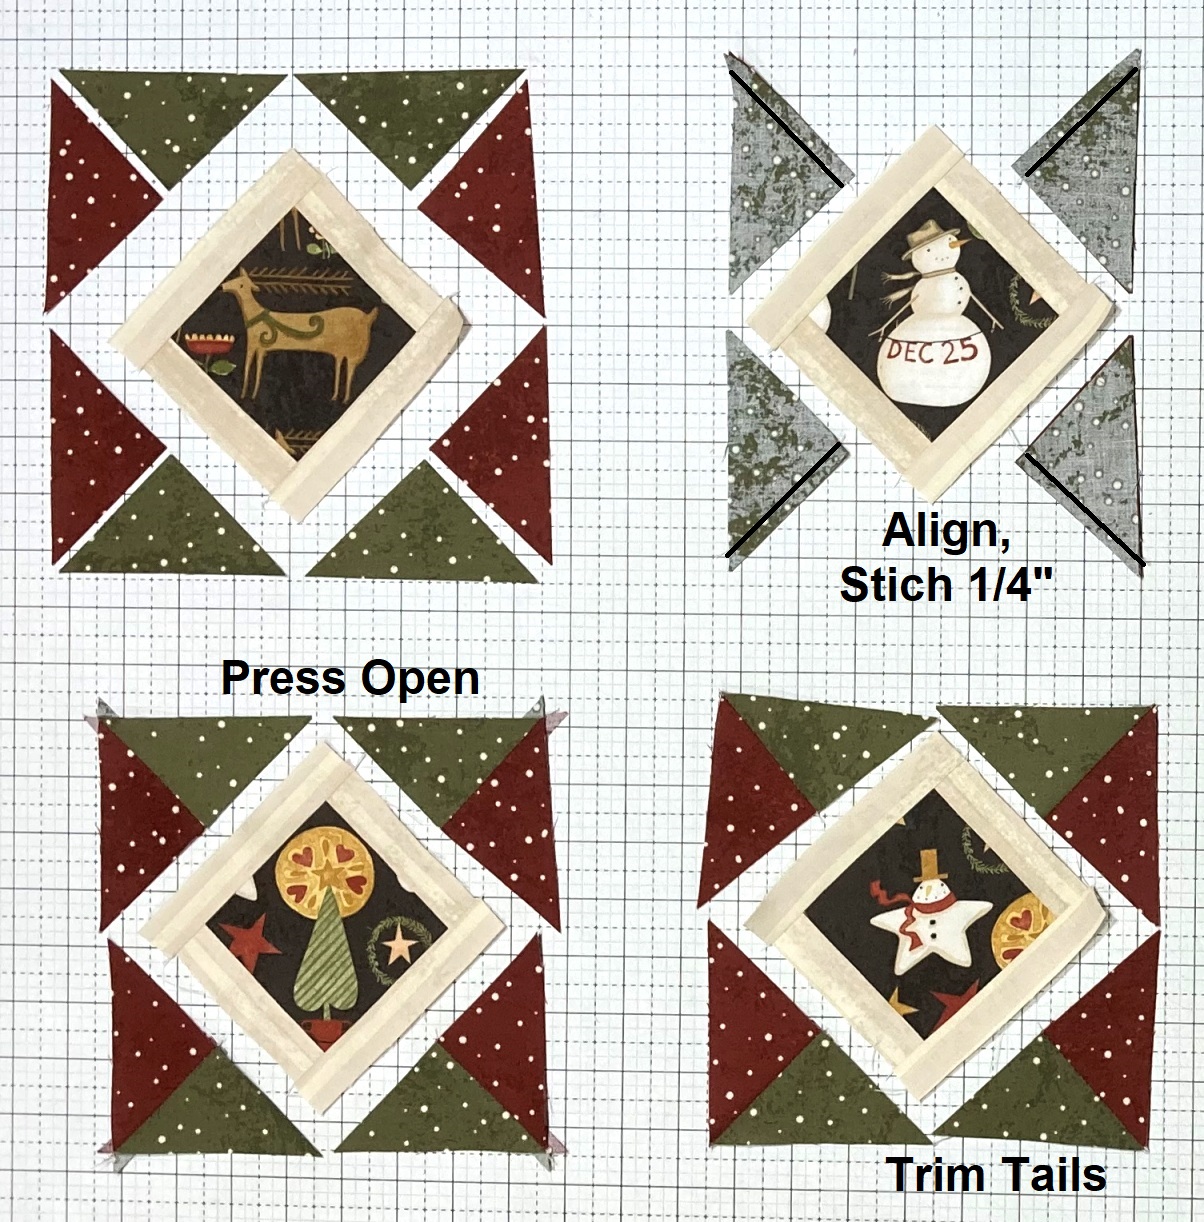
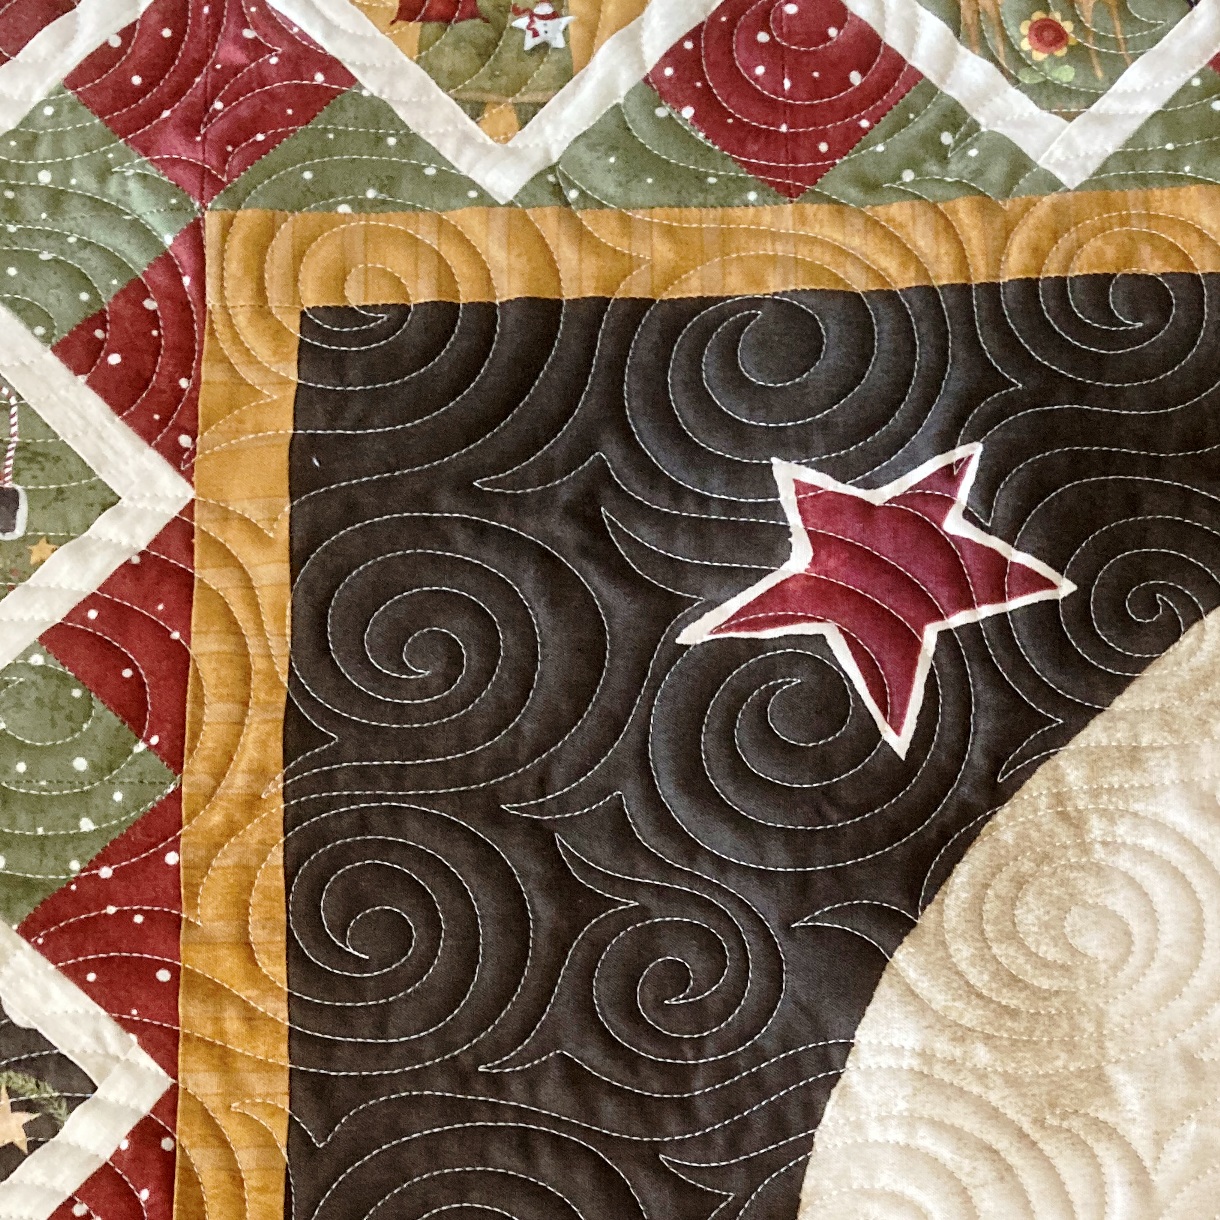
And now, we are going to add the square in a square borders to each center square. To do this, layout 4 Green triangles and 4 red rectangles around the bordered squared as shown. Place the Green triangles onto the Red triangles with right sides together and aligning the edges. Sew a 1/4" seam on all 4 units as shown. Press the seams open and then trim the tails from the Pieced Triangle Units.
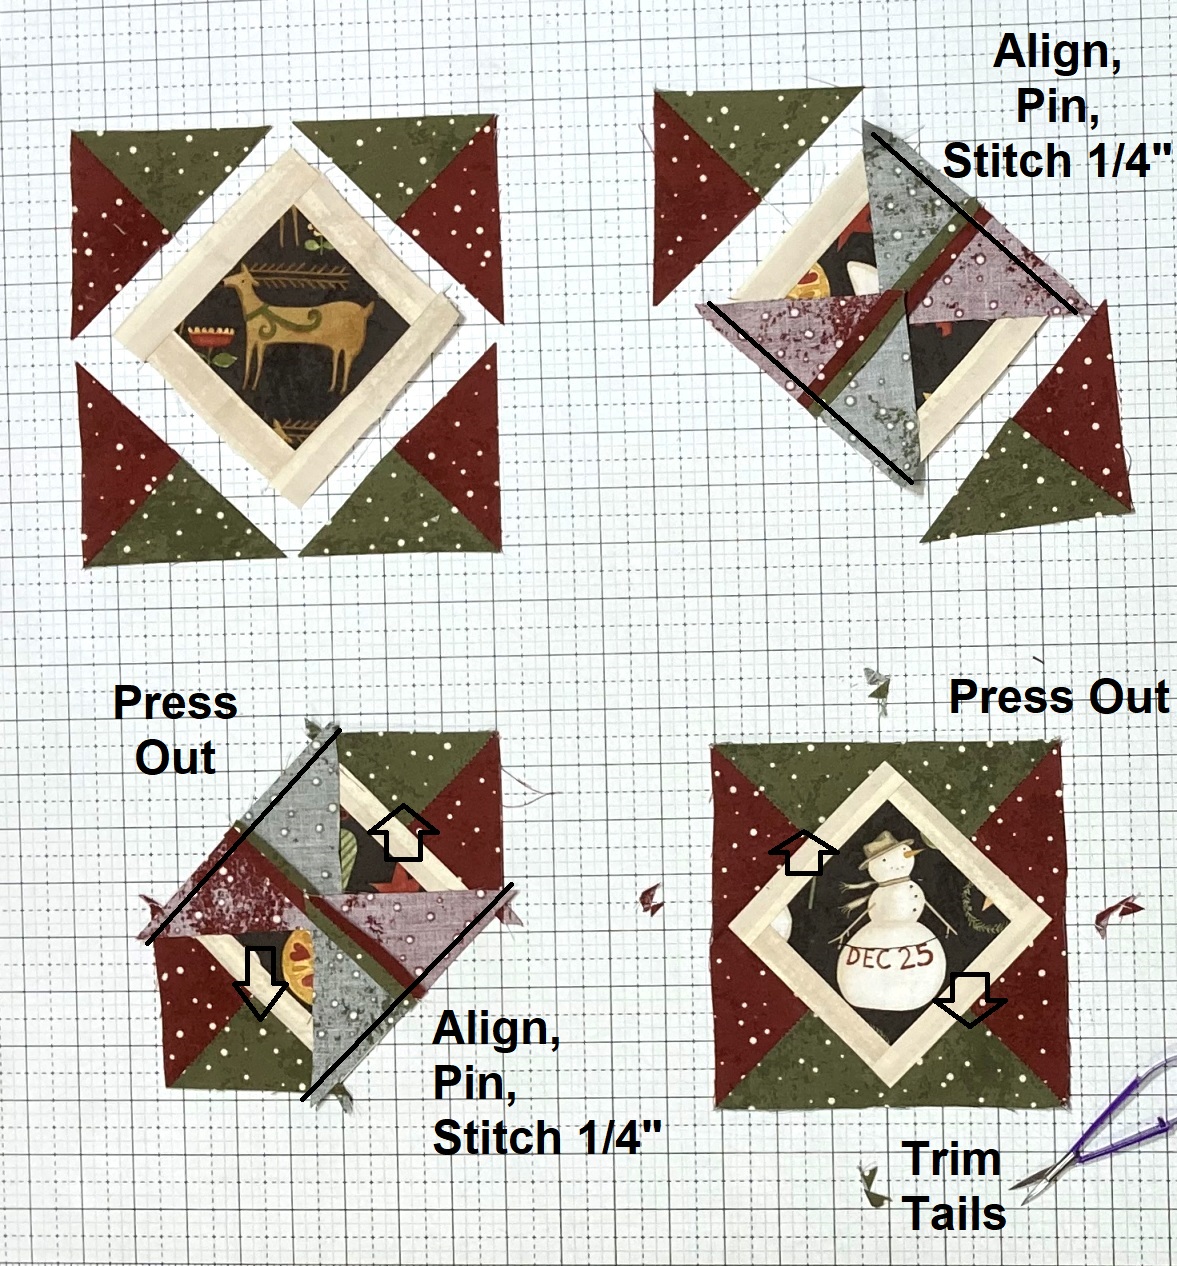
Finger press a bordered Fussy Cut square in half twice. Layout the square and the 4 pieced Triangle Units as shown. Place the top right and bottom left Triangle Units onto the square with right sides together aligning the seam with the finger crease. Pin and then Stitch a 1/4" seam along the two edges. Press the seams out towards the Triangle Units. Now, place the top left and bottom right Triangle Units onto the square with RST, aligning the seam and crease. Pin and stitch a 1/4" seam along the edges. Press the seams outwards and then trim the tails from the pieced block.
Repeat the last 2 steps to make a total of 30 pieced blocks that are 6 1/2" x 6 1/2" including seam allowances. There is no need to square up the blocks, you can just trim the tails from them. If you do choose to square up your blocks, just be sure you leave a 1/4" seam allowance at the points and keep the triangles point in the corner of the block ;)
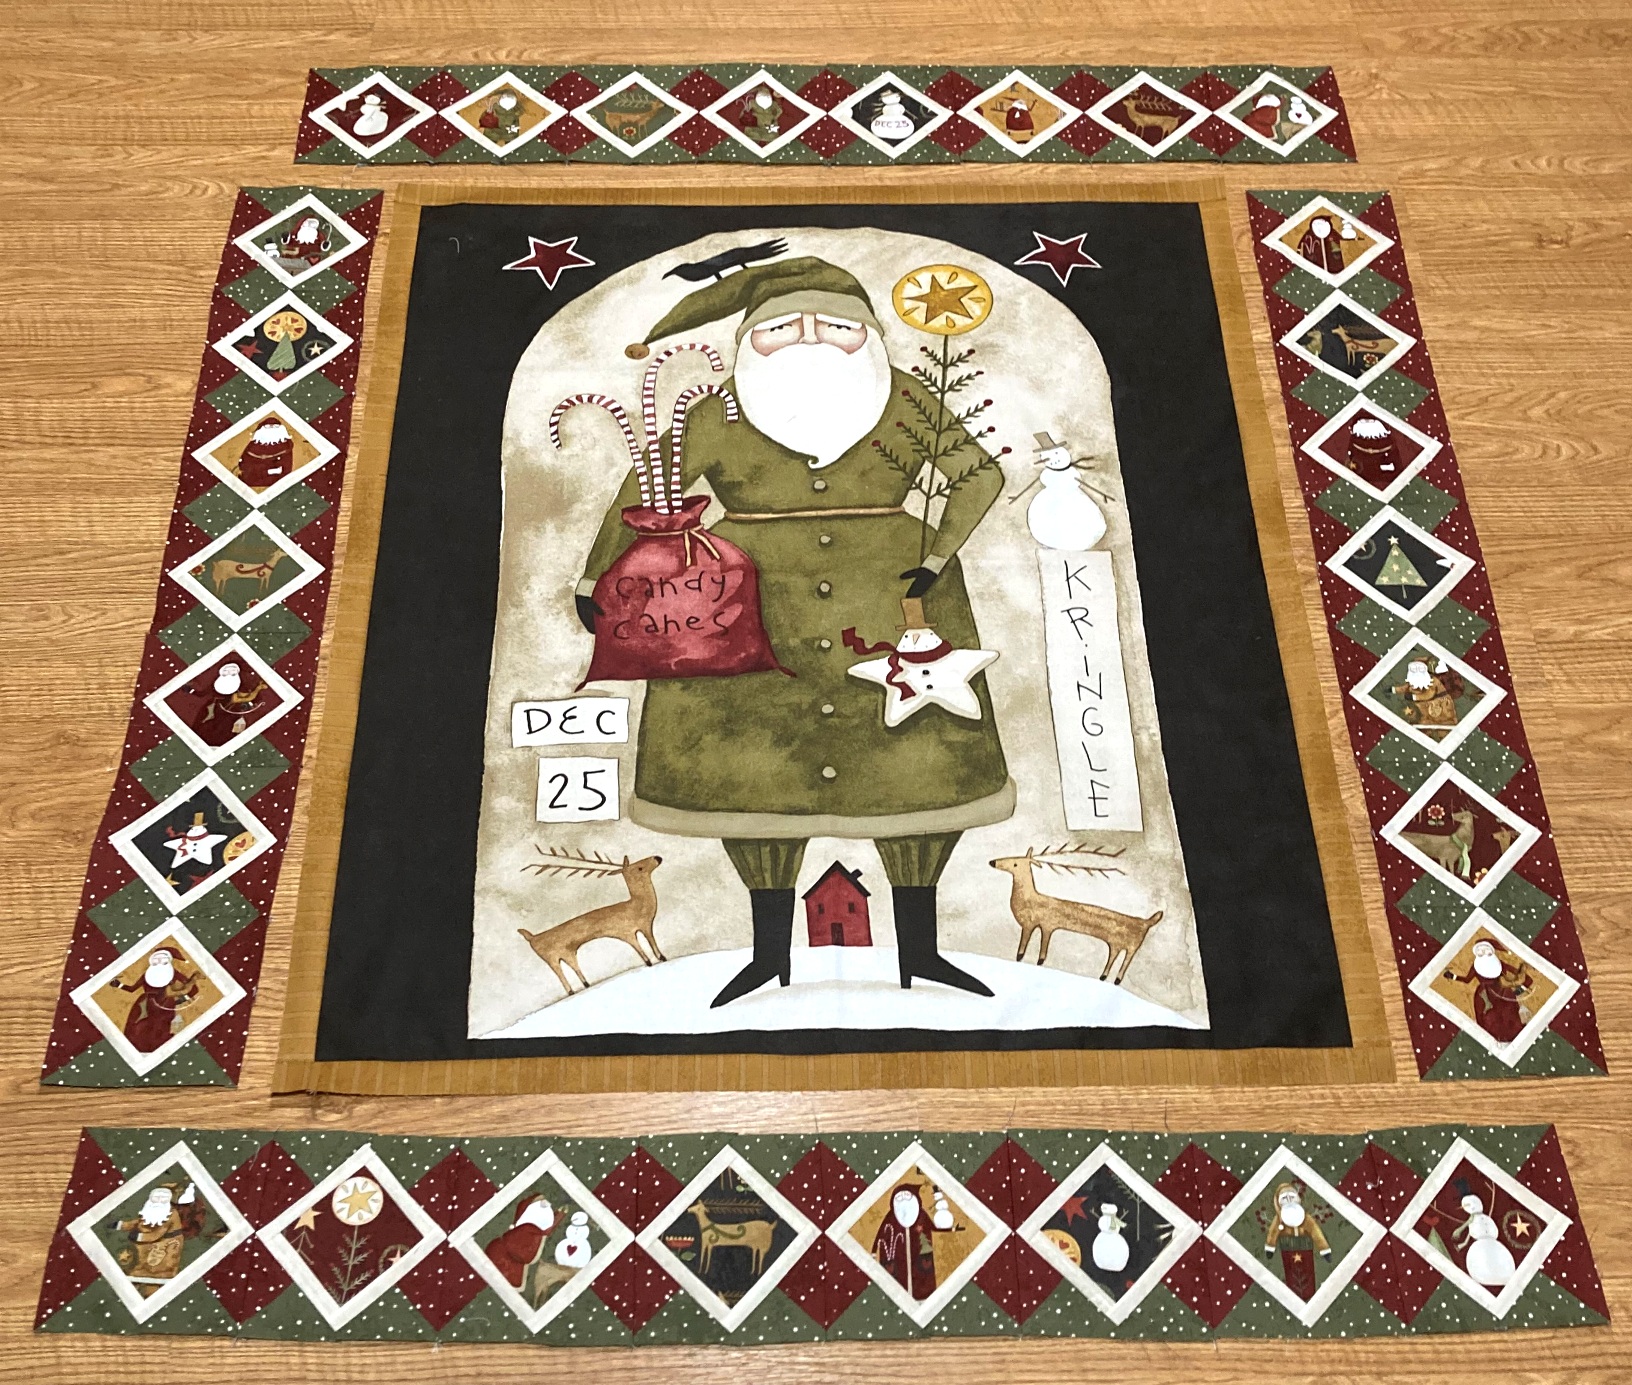
And now, with the pieced blocks made, we can whip up the border. Layout 8 blocks along the top and bottom of the panel, and 7 blocks along each side of the panel. Sew the blocks in the top and bottom into rows. Sew the blocks in the two sides into columns.
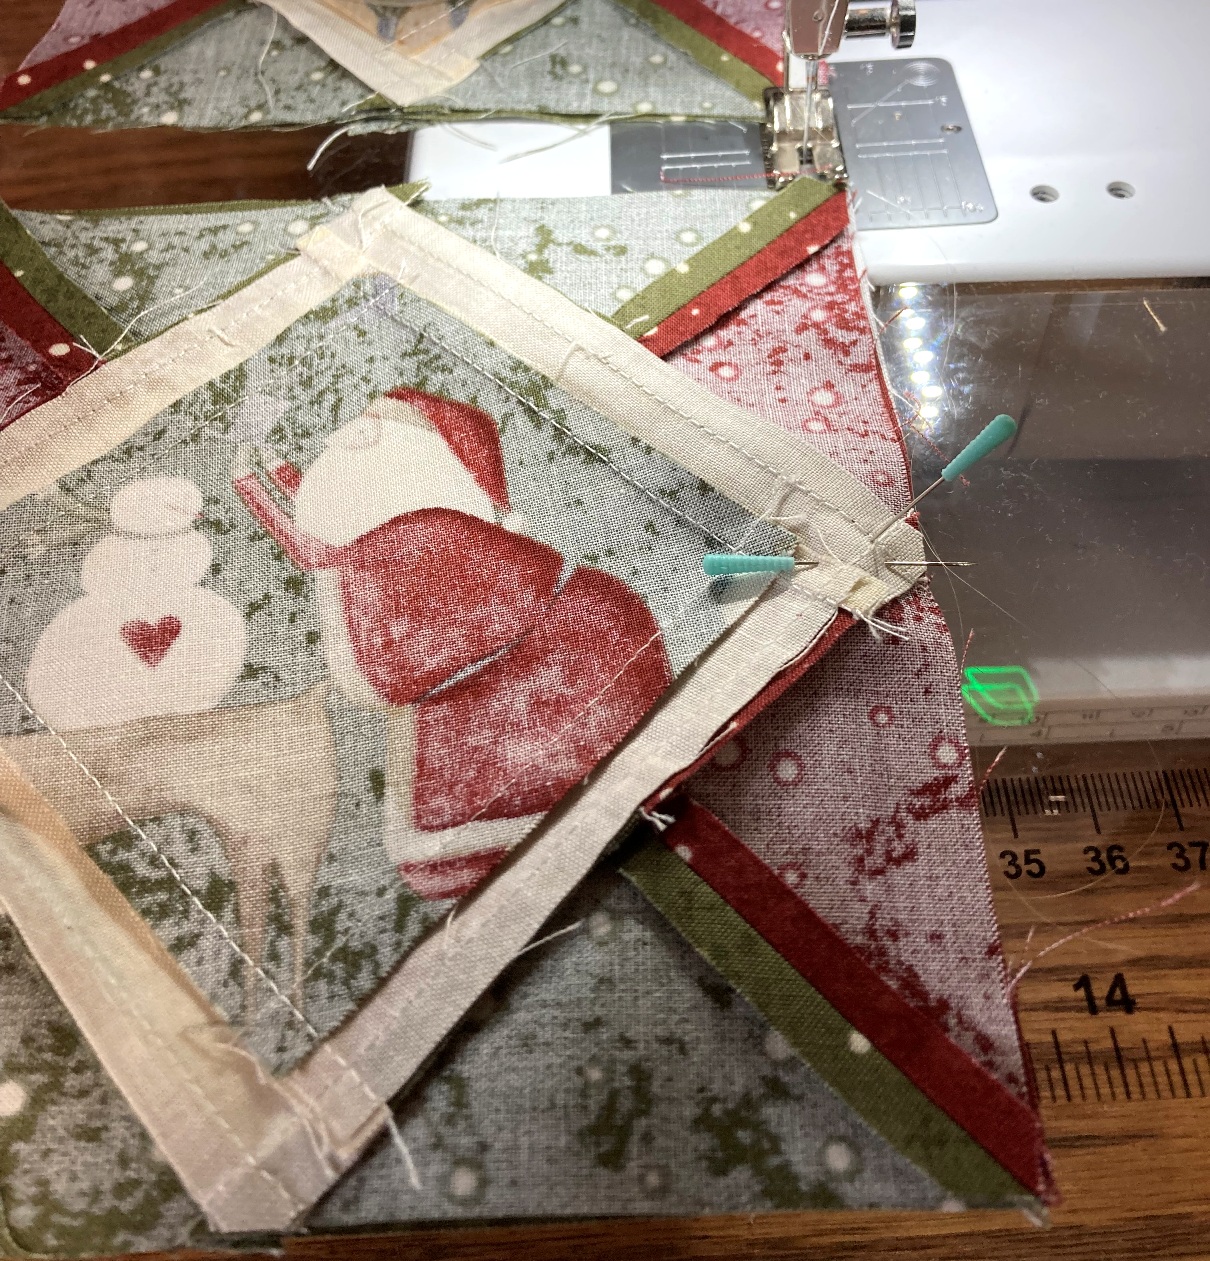
I find it helpful when sewing the blocks together to use this little pin trick. That way all of the points line up perfect!!
Once your block rows and columns are all sewn together, press the seams open and then lay them out around your panel again.
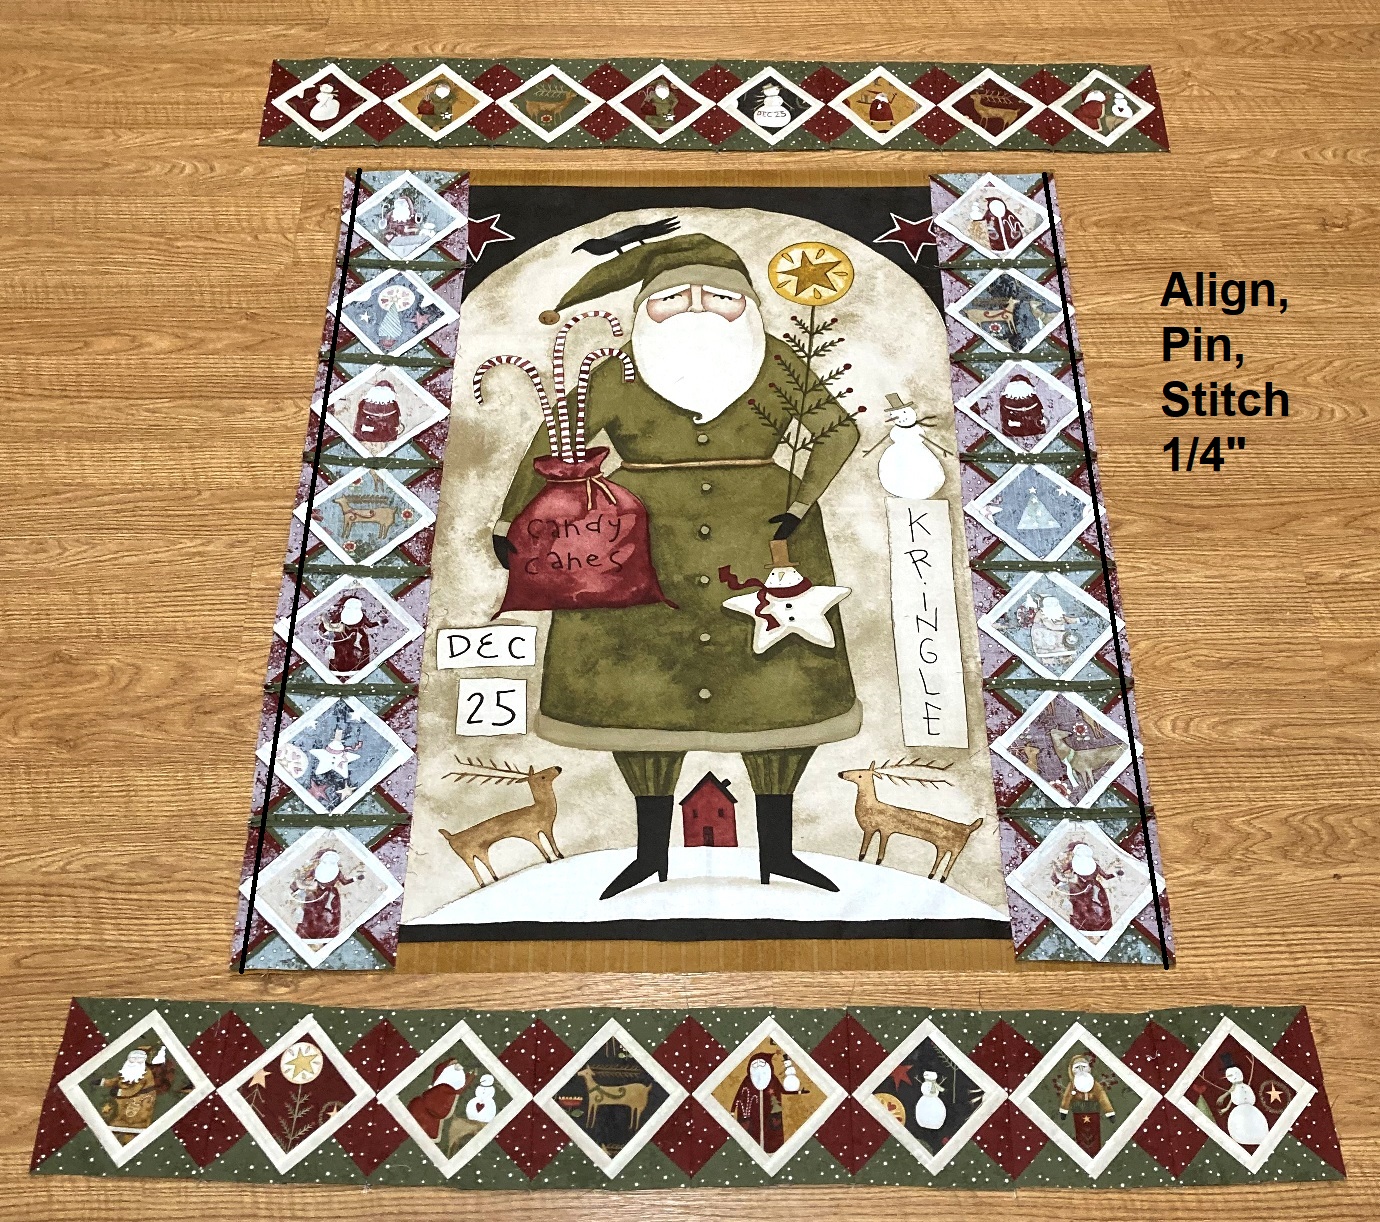
Place the side Patchwork Rows onto the sides of the Bordered Panel with right sides together. Align and pin the rows, and then stitch a 1/4" seam along the two edges.
Press the seams in towards the Gold strips. Place the top and bottom Patchwork rows onto the top and bottom of the Bordered Panel with right sides together. Align and pin the rows, and then stitch a 1/4" seam along the two edges. Once again, press the seam allowances in towards the Gold strips.
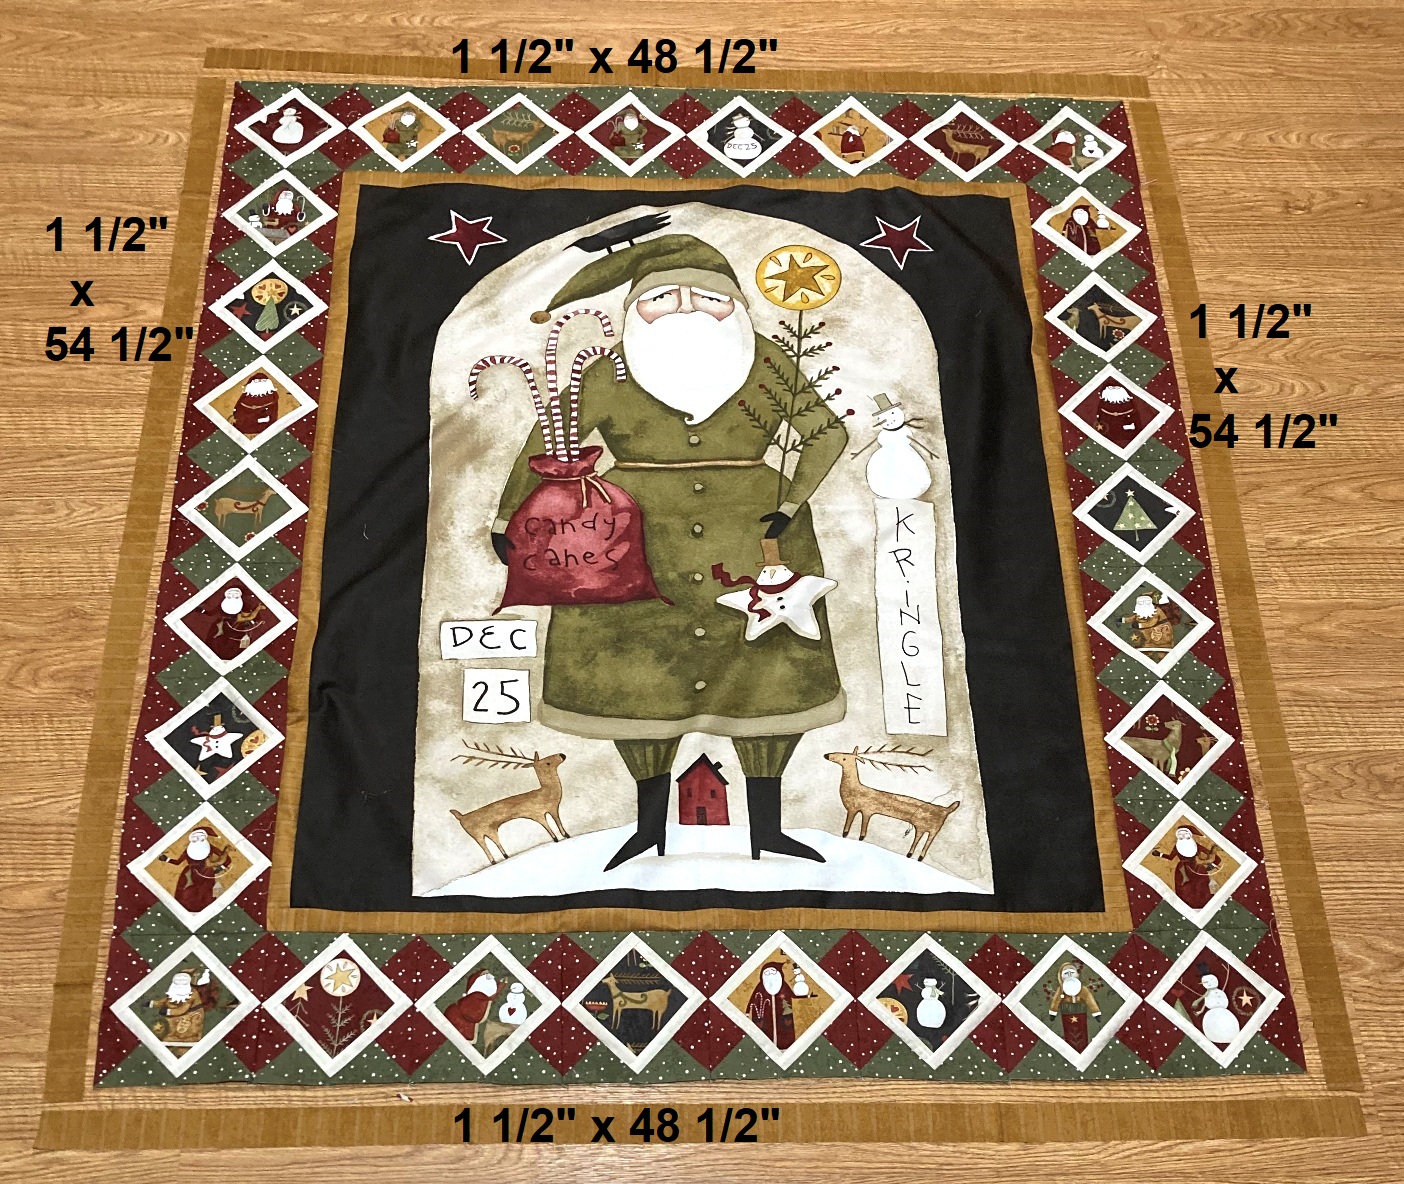
STEP 4 - ADDING THE OUTER BORDER
And now you are ready to add the final Outer Border. Sew the remaining 6 Gold Strips 1 1/2" x 42" together end to end. Cut 2 strips 1 1/2" x 54 1/2" and 2 strips 1 1/2" x 48 1/2". Using the same instructions for adding the Inner Border, add the outer Gold border.
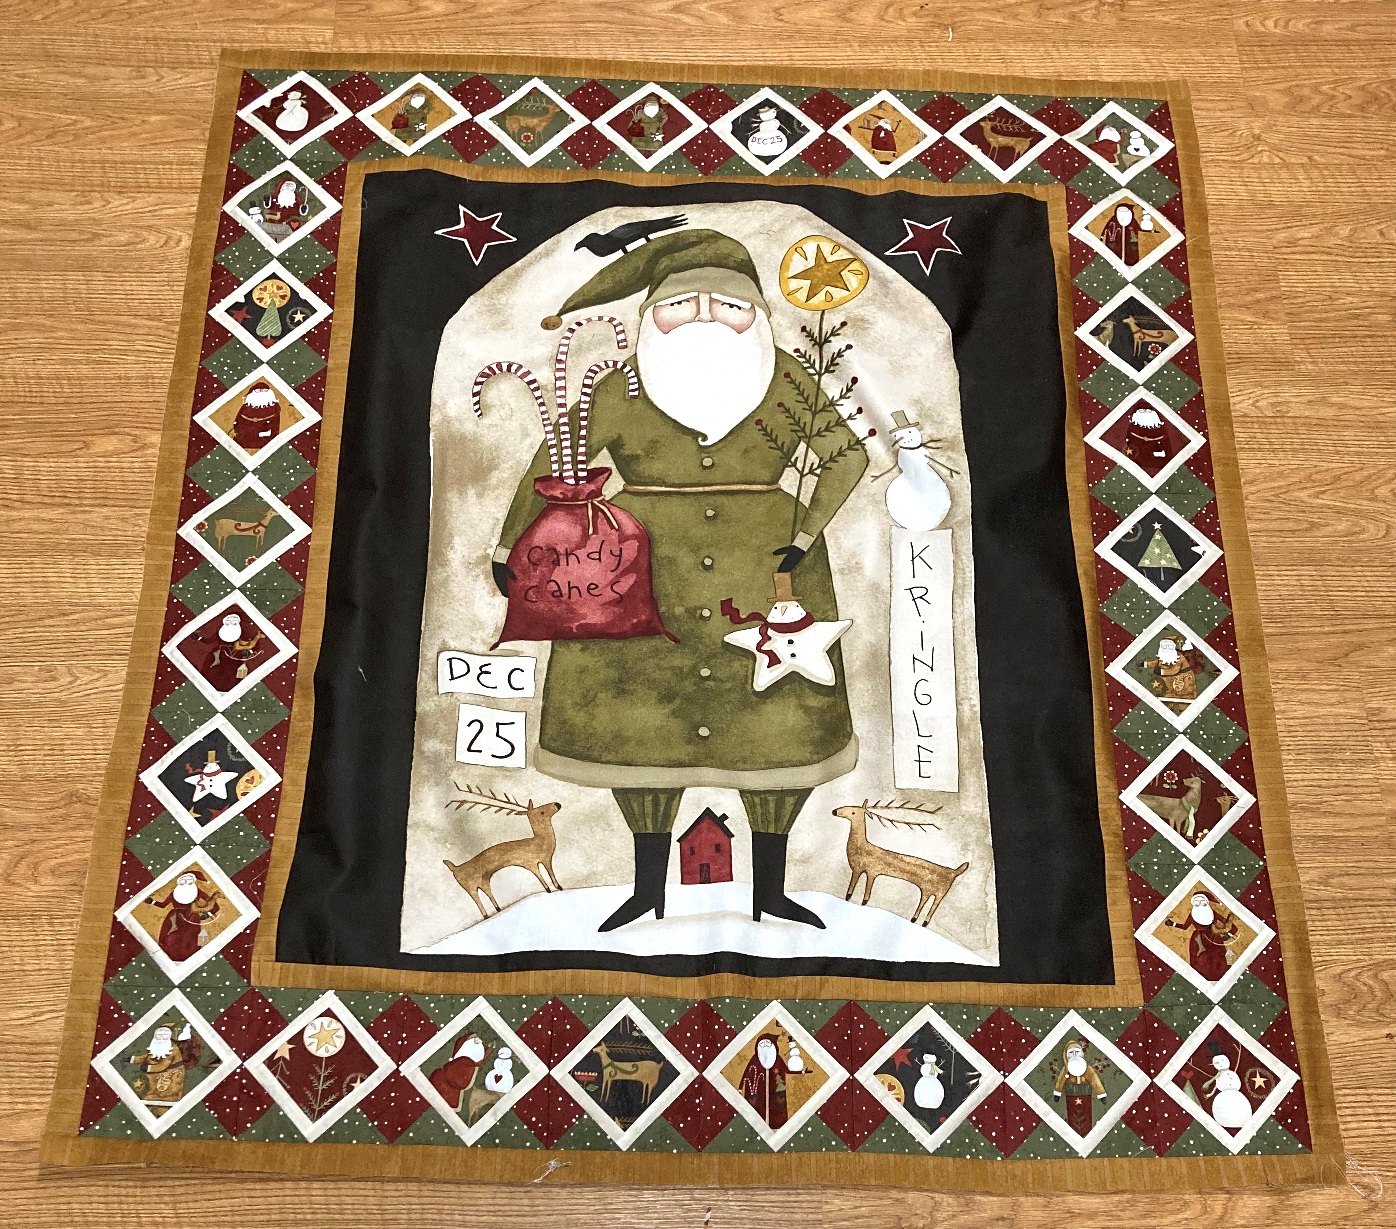
And just like that, you have a beautiful 48" x 56" finished Kris Kringle Quilt Top!!!! So fun!!!!
Isn't it just so great how you can just add a few borders to a gorgeous panel and make such a striking quilt!!! Just so fast and so fun!!!
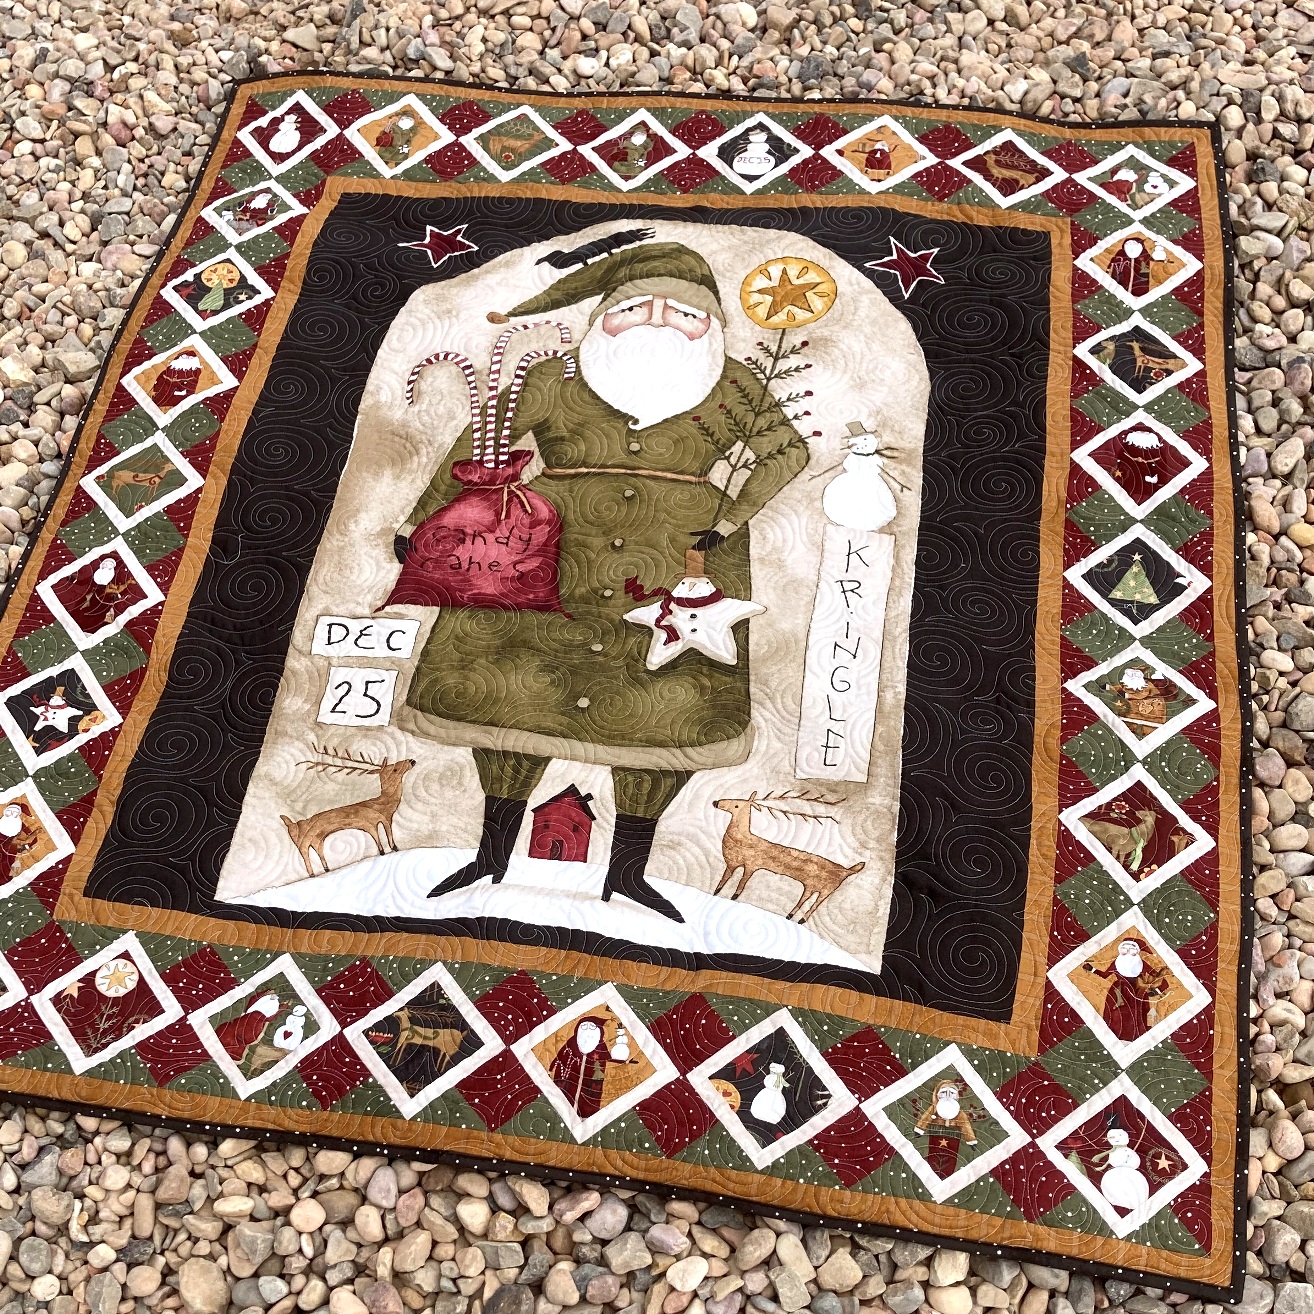
STEP 5 - FINISHING THE QUILT
Now all that is left is to finish the quilt!! Just Baste It, Quilt It, and Bind it!!!! Yup, three big things in one little sentence. If you are new to quilting and need some tips on how to Baste It, Quilt It, and Bind It, you can check out myFinishing Your Quilt Video Series. It will walk you through it all in step by step detail.
I quilted mine with an all over swirl design that I just love to stitch. It is so relaxing and fun, and also very fast, perfect for this fast, go-to, quilt!!! I used a white thread as I didn't want it to stand out on Santa's face ;)
I hope you have enjoyed this tutorial and if you make your own Kris Kringle Panel Quilt I would love to see it!! You can email me a picture at happyquiltingmelissa@gmail.com, or post it to social media with #happyquiltingwithmc :) I can't wait to see your Kris Kringle Quilts!!!
Thank you so much for popping in today and sharing this new quilt with me ;)
Today is the fourth release of the Bountiful Quilt Along and I can't wait to put this all together!!! This is Fat Quarter Shop's 10th Annual Charity Quilt Along and they are always my favorite :) The 1st Friday of each month will be a new release for blocks and today are the Butterfly and Posy Blocks. And how cute are these blocks!!!
I am using Meadowmere for by Gingiber for my blocks. I just love how all of that gold metallic just pops, especially on the butterfly body, so great!!! Next month we get to put it all together, and I am so excited to see all of these prints come together into the quilt top!!!! I really think this is just going to be so chic when it is all done :)
So are you joining in with the Bountiful Quilt Along fun??? You can download the block pattern right here and it is requested for each pattern you download to donate $10.00 to the Make a Wish Foundation :) And I am super excited to say , Fat Quarter Shop's annual charity QAL has already raised over $ 50,000!!! The goal is $1000,000 which will allow for 16 wishes to be granted. How awesome is that!!! And Moda Fabrics and Fat Quarter Shop have joined to match up to $30,000 :) So many amazing wishes :)
It's June, that means it is time to share the May Sew Sampler Box :) The theme for this month is The Sweetest Thing, and I so agree, it is indeed The Sweetest Thing when my Sew Sampler Box arrives in the mail. I just get so excited to see all of the surprise quilty goodness each month!!!
And the notions for this month are so fun!!!! I just love how they keep making everything into macaroon's, they are just so cute!! And this Macaron needle minder/sharpener, again, just cute! And I actually have a thread cutter block with this same Clover Pendant that is getting a little dull, perfect timing !!! And you know, I can always use more thread ;) And the Nail Files, such a fun little bonus, that I can totally use ;)
And last but not least . . . With a new year of the Sew Sampler Box, comes a new sampler quilt and this year it is the Pressed Flowers Quilt Along!!!! I am trying to decide if I want to use a particular fabric line for this, or just go all scrappy. I was thinking of doing each block a different color of the rainbow, I love scrappy rainbow quilts!!! So I figure I will give is a few months to decide what to make these in. Hopefully I will jump in at the end of the summer when things slow down a bit ;)
And just a note, there are currently some openings for this new years Sew Sampler boxes but they filling up super fast. So you can jump right in and sew along with this Year 7 of Sew Sampler!!!
And that is May Sew Sampler Box and I am so looking forward to June's Box ;) I can't wait to see what the Box Theme and the Block 3 will be, maybe by then I will have decided a direction to go in ;)
And for today's Terrific Tuesday Giveaway, Green Fairy Quilts will be giving one lucky reader an Good News Layer Cake by Fancy That Design House for Moda!!! Looks like a little Christmas in Summer sewing, I just love it!!!!
You have two entry chances here on the blog, and please leave a separate comment for each. All Entries are welcome, including International Entries. Please just be sure to leave an email address if you are a no-reply blogger ;)
ENTRY 1 - Simply leave a comment that tells me some recent Good News you have had?? ENTRY 2 - Show your Green Fairy Quilts love. You can Sign up for their Newsletter which I highly recommend as it will ensure you catch all of their amazing sales!! You can follow them on Instagram or Facebook, or you can visit the Shop and then share a favorite item ;) Just be sure to leave a comment of how you showed your Green Fairy Quilt Love!!!
And that's it ;) The giveaway will be open until next Tuesday, June 6th, when I will announce a winner at the beginning of next weeks Terrific Tuesday Giveaway Post :)
You can also pop over to my Instagram and/or Facebook to enter there as well :)


