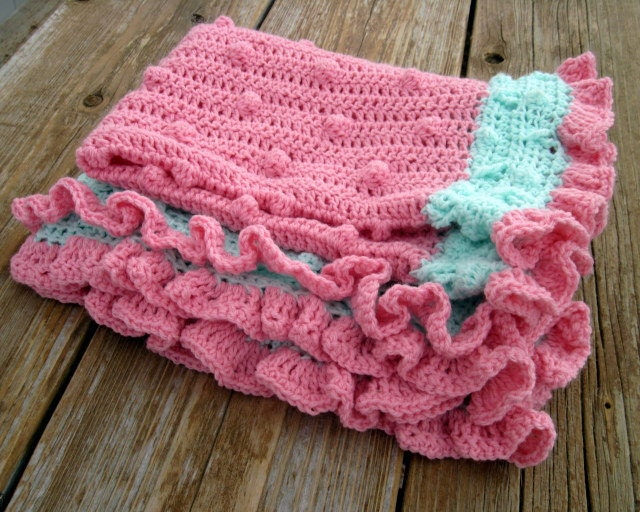
My Sister-In-Law has an amazing talent when it comes to crocheting. In the past she has made me slippers, hats, sweaters, and blankets. (for all my kids, mind you :) This last weekend she was down visiting and brought this beautiful blanket for Jocelyn. Isn't it just stunning!!! She made it in Josie's nursery colors and I can't begin to express how much I love it!!!!
Now she doesn't know I am adding this next part, but it's my blog, so I'm doing it. This particular blanket is rather cool because not only is it an awesome gift, but it also served as her tester for her very first pattern!!!! Yup, Charlotte, my amazing Sister-In-Law, has created a pattern on how to make this beautiful blanket and it is available for purchase here in her cute little etsy shop, Salutations :) So, if you find yourself wanting to try out some crocheting, it might just be perfect for you :)
And of course I had to add a shot of Josie on her new blanket. She just loves playing with all those puffy little dots!!! Thanks Aunt Charlotte!!! We love it!!!!!
I just finished registering!!!! I even managed to have quick enough fingers to get one of the first 50 spots equaling a $50.00 discount on my registration fee. Yippee Skippee!!! (Although it would still totally be worth it without, it is just icing on the cake :) Sign up for classes isn't until August. The anticipation might just do me in. So are you going???? You can register here :) I would so love to meet so many of you!!!! And this year I don't have a 2 week old baby so I get to enjoy a little more of the Sewing Summit Night Life. I can't wait!!!!!!
So I completely forgot to post yesterday. (Busy weekend, and I don't normally get online on Sunday) However, I was guest posting over at Quilter in the Gap with a fun new tutorial. So in case you missed it, I will post it again here. And there is a bit of an announcement at the end of the tutorial that I am super excited about . . . Make sure to check it out :)
As it is close to Easter, I thought it would be fun to do something in beautiful pastels. So let me introduce you to Watercolors, A simple little quilt that goes together fast and would work perfect as a table topper, wall hanging, or baby blanket.
Let's get started. To begin, you will need to get 8 fat quarters. I choose to use 8 Fat quarters in pastels from the Dimples collection by Andover. (I did swap out that red one though, it was just to bright.) Now go ahead and lay out your fat quarter on your mat and cut a straight edge along the right and side and bottom of your fat quarter. (You can also stack up your fat quarters and cut up to 4 at a time.) From each of your 8 fat quarter cut (1) 7" x 17 1/2" rectangle, (2) 2 1/2" x 17 1/2" strips, and (2) 2 1/2" x 11" strips.
Select a 7" x 17 1/2" rectangle of one fabric and 2 2 1/2" x 17 1/2" strips in a different fabric. Lay them out as follows. With right sides together place the long strips onto your rectangles. Pin along both edges. Sew a 1/4" seam along both pinned edges, and remember to remove the pins as you go :) Press towards the strips. Repeat for the 7 other sets so you have 8 pieces like the last picture.
Now grab your 2 small strips that match the long strips. Lay them out as follows. With right sides together place the short strips onto the sides of your rectangles. Pin along both edges. Sew a 1/4" seam along both pinned edges. Press towards the strips. Repeat for the 7 other sets. Now you have 8 framed squares.
Lay your squares out as follows. Go ahead and play with the color arrangement until you like it. Then either take a photo or mark your pieces so that you remember how they go back :)
Now well make sets of 2. We'll start in the upper corner. Place the first sashed rectangle onto the second with right sides together. Pin along the edges, taking care to match up the seams. Sew a 1/4" seam along the pinned edge. Press either direction or open, it really doesn't matter. Now you have a set of 2. .
Repeat the last step with the other 3 sets to make 4 sets total So your top should look a little something like this. And now you are ready to finish up your top.
Lay your top 2 pieces onto the bottom 2 pieces with right sides together. Once again, pin along the edges and sew a 1/4" seam along the pinned edge. Press the 2 pieces in opposite directions. Now lay the right hand piece onto the left hand piece with right sides together. Pin along the edge taking care to match your center seam. (It should nest nice and snug where you have pressed in opposite directions). Sew a 1/4" seam along the pinned edge and press whichever way you like. And it should look a little something like the last picture :)
And you are done!!! A beautiful little quilt top finishing up at 34" x 34" . This top whips together in no time at all so it is just in time for Easter :) Oh, and it is perfect for some sampler quilting :) (More on that a little farther down :)
So that is the Watercolors quilt top :) Hope you enjoyed the tutorial. If you make one I would love it if you added it to my Happy Quilting Tutorials Flickr page :)
A few things before I sign off.
First, I hope you liked the background to the photo's. I did it in a new software that I reviewed on my blog Friday. If you want to check out the review and enter for a chance to win your own free copy you can go to this post :)
Second, I am sure you noticed that this tutorial was just for the quilt top and the quilt wasn't finished. That is for a very special reason. Thanks so that new software I mentioned in point 1, I now have the capability to do something that I have been working on for a few months. Videos!!!! So, over the next month of so I will be doing a series of videos. They will include Preparing your Quilt to be free motion quilted, several Free Motion Quilting videos, and finally ending with a binding video. And this quilt will be the demo quilt for those videos. I am so super excited to be announcing this!! (Now I will have to do them for sure :)
*** GIVEAWAY CLOSED*** The winner is #24 who is Barb!!! Congrats Barb!!!
So I am super excited about today's post. A few weeks ago I was contacted by My Memories, a digital scrapbooking software company. They asked if I would be willing to review their My Memories Suite. At first I thought, "Ugghh I'm not a scrapbooker". But I figured it couldn't hurt to try so I uploaded the software and Hoolay!!!! Was I blown away. Let me share a little bit about my test run.
TEST RUN
I started out basic. It's a scrapbooking software so why not make a scrapbook, right :) So I decided to make one of my Quilts from 2011. So you start by picking a template (which there are so many to choose from) and then you just simply drop in the pictures and type a few words. Seriously, within 20 minutes I was done!!!
And then I thought, I need to show this on my blog. So I clicked on the Share button. Once again, Hoolay options. You can have your digital book made into an actual book, made into a calendar, export individual pictures, turn it into a slideshow, burn it on a dvd, and even . . . . . Make it into a movie file!!!!! So fun!!! (I mean, how awesome would it be to have a video like this playing at a wedding, birthday, graduation, ect. ect. ect.)
So now that I had played a bit, and was a little more familiar with the software (which is super user friendly) I got to thinking . . . "How can I use this on my blog". Instantly, I thought of blog buttons. Why start from scratch when all you have to do is add in some words and you are done. These 2 buttons took about a minute each!! And aren't they so fun!!! (oh, and in case you are wondering, I am not doing these swaps, they were simply for playing purposes :)
And ya, you can have pictures in your blog buttons as well. So fun!!! One of my favorite things about the software is how easy it is to customize. For instance, I made that white text box bigger than the original template. And in the buttons above, I deleted out the picture spots and added text instead. It is so simple to make it look exactly the way you want!!
And why stop at buttons??? Headers are always fun too!!! I made this up on the center of a page and then exported the digital image, cropped it to header size and WhaLa!!! A header whipped up in 4 minutes.
And what about tutorials?? Could I use this software in my tutorials?? You betcha!!! How much cuter is it to see this mosiac of pictures then a plain old black and white. And I love being able to type instructions right on the pictures!! (I think you will be seeing this on a tutorial soon :)
So now I was really having fun. And I got a little daring. I figured, I was getting so familiar with customizing a template to the look I wanted, why not start without a template. Like as in make up a page completely from scratch. So I picked a background (oh so many to choose from), added some embellishments (cuteness galore), added some photos (easy) , and added some words (so many fonts). And within minutes, ShaBam!! I made this page all on my own! This software is so easy to use!!! You can literally make whatever you can dream up!!!
Oh, and side note, While I was adding the words I stumbled on to what I think might be my favorite "cool thing". You can have a image show up in your words. How cool is that!!!! That's my quilt in the Happy Quilting title :)
So by now I am feeling really comfortable, and honestly, having a really good time. So I figured, lets see if this software can solve the little video problem I have been having. You remember that FMQ video I showed a few months ago, well not much has happened with it. Why?? Well I want to be able to add printed words to the video and I wanted to figure out how to be able to take several videos and put them all into one video. And I wasn't getting very far with video software that came with the computer.
So I thought, I wonder if I can put a movie into a scrapbook, have the words come up first, then switch to the movie and then back to the words. And sure enough, Yes you can!!!!!
This has go me so excited. (I have some serious plans for some videos in the near future now!!!!) I can add as many small videos as I need into one scrapbook and then turn the entire thing into a movie file. And after I made this I found you can also add narration, so maybe you won't have to listen to the sound of my sewing machine in the background, unless you like that :)
I know that there are lots of free programs out there that you can use to do similar things. I have used them in the past. I have used one program for mosiacs, another for banners, another for buttons, another for a book of my kids, on and on. I really liked that this program has it all and in 1 place and has capabilities beyond what any of the separate online programs have.
I liked that the templates made things fast!!! Fast is important to me. This program was so great for whipping up a blog button. I used to create buttons in Microsoft Word and then I got a graphic designer to help me when they looked awful. This program literally gives you the graphic designer's templates, you just have to add the words.
I also really liked how much freedom I had with this program. I could use a template for speed, but if there was something I didn't like I could just delete it. If there was something I wanted to add, I could just add it.
For me personally, I felt like the program was really user friendly. But, As I had mentioned before, I have used other programs for editing digital images and making buttons and so forth. I think that knowledge helped to translate to this software. There was a bit of a learning curve at first, but the more your play with it, the more you get to know it.
Finally, I liked the versatility of this program. It is fabulous for creating scrapbooks but it can do oh so much more than that. (In fact, I was just thinking, It would be great for making up some business cards!!!) You can create anything that you can dream up.
So ya, I liked it!!! I am excited to continue to play with it to see what I can come up with. And you can bet that you will be seeing more creations from the My Memories Suite on the blog rather soon :)
GIVEAWAY and DISCOUNT
So are you intrigued?? Are you excited??? Do you want to try out the My Memories Suite for yourself ??? We'll there is 2 ways you can.
First . . . If you are lucky enough, you can win a copy of the My Memories Suite.
To enter for a chance to win simply pop on over to My Memories and then pop back here and leave me a comment telling me your favorite Digital Kit :)
Easy as that :) One comment per person please :) The giveaway will be open until April 5th and I will announce a winner on the morning of the 6th. International Entries welcome :)
But we all can't win . . . and so for the rest of us there is a DISCOUNT!!!
My Memories is offering a special discount to Happy Quilting Readers!!! Simply copy and paste the code
STMMMS89139
and enter it into the promotional code field on the shopping cart page for a $10.00 discount off the purchase of the My Memories Suite Scrapbook software and a $10 coupon for the My Memories.com store. That's a $20.00 value!!!
Oh, and if you buy the software and then happen to win the giveaway you can be reimbursed. No worries., We have got you covered :)
So jump on over to My Memories and check out this amazing software!!! I think you will like it every bit as much as I do. Have a Happy Quilting Weekend!!!!
So a few weeks ago I was asked by the My Memories group to take a look at their digital software for making Digital Scrapbooks. Yesterday, I finally got to play with it some. Now, I don't know how many scrapbooks I will be making, but it sure was super easy to whip up some banners and buttons.
Come back tomorrow when I will do a full rundown on this awesome software. Oh, and there will also be a giveaway for one of you to get it for free :) Trust me, your gonna love it!!!
So I was playing on the computer and having a ball for my Trying New Things. What have you been up to??