Monday, February 16, 2015

Leaders and Enders

Several of you have emailed me asking about Leaders and Enders, so I whipped up this quick little tutorial.  Leaders and Enders are a great way to work on a quilt in the midst of all your other sewing.  It also makes it so you never have to clip threads at the end of your sewing and you don't have to hold on to your threads to start sewing.  It's a win-win ;)  I first learned about these in a beginner quilting class back in 2005.   And  Bonnie Hunter of Quiltville is the Queen of this technique and I am told she has several books with lots of ideas on how to use them ;)  I love Leaders and Enders!!! So here is how you do it.

For my Leaders and Ender's I choose to use 2 1/2" squares.  I sorted them in a rainbow and then have a stack of Low Volume prints to match them with.  These just sit right next to my machine so they are always convenient.


Start by sewing whatever you happen to be working on.   I was working on some Great Granny Squares Bee Blocks when I took these pictures.  (Bee blocks always let you do lots of leaders and enders because there isn't a ton of chain stitching ;)  When you get to the end of your chain stitched sewing, (mine was only 2) grab a 2 1/2" white square and a 2 1/2" colored square and with right sides together sew a 1/4" seam along the edge.  This creates the Leader.


Then clip your project, leaving the Leader in your machine.


Once again, Sew your project aka my bee blocks, and then at the end of your chain stitching, add another Leader by sewing a 2 1/2" colored and white square together.


Now your original leader has become the ender and it is done.  Clip the threads between your projects, once again leaving your new leader in the machine.   Put your sewn 2 patch in a pile next to your machine and your are ready to do it again.   I found it is helpful to leave my little snipping scissors on my sewing table behind my machine.  That way whenever I am ready to clip they are right where I need them ;)


So every time you sit down to sew you will have a Leader waiting for you that you will turn into an Ender.  At the end of your sewing always add a Leader.


And it just keeps going around and around ;)


 And before you know it, you have a huge stack of 2-patches.  My top ones are the ones waiting to be sewn and the bottom ones are already sewn.  And this is only after a week of using Leaders and Enders.


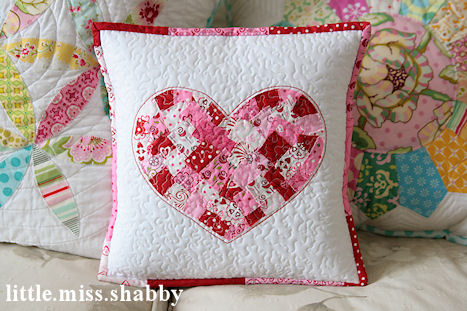
And then you can turn your 2 patches into 4 patches and the possibilities are endless from there.   I hope you enjoyed this tutorial and give it a try.  Trust me, you are gonna love it!!!  I think I will always have 2 1/2" squares next to my machine now ;)

Have a Happy Quilting Day!!!
Pin It!

Sunday, February 15, 2015

Snapshots QAL - Sew On & Sew On

It's month 2  of the Snapshots QAL and that means that there is a new block to work on!!!  This month, is Sew On & Sew On and how could I not absolutely love this month's block!!!  It's a sewing machine, Love It!!!


Two fun things came about when I was cutting this block out.  First off, I realized that some of the fabric was directional on purpose.  Yup, didn't realize that with the first block and went back to find that my cake stand words were a little askew.  And now that I had realized it, of course it bothered me enough to go back and unpick it and put new pieces in with words going the right way.   So if you are QAL, pay attention to the fussy cut and directional print directions ;)  

Also, I tried something new, marking the labeling letters on my fabric with a Frixion pen.  This got a lot of replies on Instagram and some of them having some scary experiences with it.   But I loved how easy it made finding the pieces I needed, there are a lot of very similar sizes in the same fabrics in this block.  So someone suggested labeling on the back of the fabric, and I figure that will be my win win situation going forward ;)  


So, do you want to make a adorable sewing machine block too??  You can download the pattern right here and then don't forget to donate the $5.00 for the pattern to St. Jude Children's Research Hospital ;)  This is such an amazing cause and it is so fabulous that Fat Quarter Shop and Moda will be matching our donations up to $10.000.00!!  


Kimberly also made putting this block together even easier with this fabulous You Tube video.  Bonnie and Camille start it off with some of their special sewing memories as well ;)  Love It!!!


Be sure to  share all of your Snapshots progress on social media with #fqssnapshots and check out these fabulous bloggers for some Sew On & Sew On inspiration :)  


Camille Roskelley of Thimble Blossoms
Bonnie Olaveson of Cotton Way
Pat Sloan of The Voice of Quilting
Lori Holt of Bee in My Bonnet
Sherri McConnell of A Quilting Life
Melissa Corry of Happy Quilting
Thelma Childers of Cupcakes N' Daisies
Pam Viera-McGinnis of Pam Kitty Morning
Anne Sutton of Bunny Hill Designs
Stephanie Kendron of The Modern Sewciety
Natalia Bonner of Piece N Quilt
Greg Jones of Grey Dogwood Studios
Jessie Fincham of Messy Jesse


Thanks for popping in today ;)  Have a Happy Quilting (and maybe sewing on) Day!!!
Pin It!

Saturday, February 14, 2015

Happy Valentines Day!!!


And if today fills you with desires to start some projects in red, white and pink . . . Check out some of these fun filled Simply Charmed projects made by my wonderful friends for my Valentine's Hop 2 years ago.   Each one is Charm Pack Friendly and so fun to whip up ;)  


 Heather from Quilt Story with the Heart Garland Tutorial

 Melissa from Lilac Lane with the Be Mine Tote Tutorial

Angela from Cut to Pieces with the Pincushion Tutorial

 Natalia from Piece N Quilt with the Trio of Pillows Tutorial


 Corey from Little Miss Shabby with the Shabby Heart Pillow


Yup, I know I have a few Red, White, and Pink projects on my list for next year ;)  

Happy Valentine's Day!!!


Pin It!

Thursday, February 12, 2015

Irish Chain Twist Quilt-A-Long - Improvisational Piecing Units

**  NOTE  - This post is part of a series of posts for the Irish Chain Twist Quilt-A-Long.  If you would like to join (and have a chance to win $100.00 or $75.00 Gift Certificate grand prizes sponsored by The Intrepid Thread and Fat Quarter Shop ) you can find a list of the post links here :)  Here is the schedule:

Improvisational Piecing Units - Feb 12th
Improvisational Piecing Block - Feb 19th
Twists on Tradition Units - Feb 26th
Modern Patchwork Block - Mar 5th
Appliqued Chains Block - Assembling - Mar 12th
Appliqued Chains Block - Stitching - Mar 19
Piecing Top and Grand Prize Linky - Mar 26th
Parade and Grand Prizes - April 23rd


**You might notice a slight change in the schedule.  Before today, the Twists on Tradition (referred to in cutting as Square Blocks) were first.  But somehow, I got mixed up and thought the Improvisational Piecing Units (referred to as X Blocks) were first and did the work for those blocks this week.   So anyhow, since they are the blocks I have a tutorial ready for, they are now first.  Just FYI, if you are wondering why the change.


Before we get any farther,  we need to pick a winner for the Cutting Assignment.   And great job to everyone on finishing that assignment, I can tell already that this is going to be a great group to quilt-a-long with :)

The cutting  assignment winner who gets a $15.00 Gift Certificate to Green Fairy Quilts is . . .
# 33 -  Just a Mom who Sews !!! - Congrats :)


So here we are, ready to start piecing!!! ,I am so excited, Let's get right to it :)  If you are just finding this QAL, it's never to late to join in the fun :)  Just see the schedule above for the posts you missed and start quilting along ;)  


THIS WEEKS ASSIGNMENT - IMPROVISATIONAL PIECING UNITS

So if you have never done Improvisational Piecing before you are in for a real treat.  The fun thing about it is most of the time, you don't have to be as accurate.  Lots of eyeballing and close enough and it still works out perfect.  So just remember, for today, just relax, this is going to be fun!!

Start by gathering your 2" x 10" X Block Print rectangles and your 6" x 6" Subcut X Block Background Triangles.


Place a Background Triangle on a Print Rectangle with right sides together as shown below.  You want to center the Triangle on the Rectangle so that there is about the same excess amount on the top and bottom.  But remember, you can just eyeball, no need to make sure it is perfectly centered.


Sew a 1/4" seam along the edge.  You will sew from the top of the rectangle to the bottom.   Once again, this is improv, so no need for pins.  Just hold your pieces in place with your hands and stitch away.  If it isn't perfect it is okay.


Now, after you have sewn the first, don't stop ;)  This is where we are going to save some serious time and thread with Chain Stitching.  Meaning, we don't clip the threads between each unit.  So once you get to the end of your first unit, simply start feeding the next unit through your machine.


And just keep going.  You will make a long snake of units behind your machine ;)    This really is some speedy and pretty mindless  so have some fun with it.  I like to listen to a book on CD when sewing like this or you can always watch (aka listen and look up at the best parts) of a favorite DVD.


And once you are done with the last unit you can take your pieces from your machine and see how big of a pile they make ;)


And now, it's tie to stack that pile back up again.  Clip the threads between the units and stack your units into piles once again.


And then it it time to move to the ironing board.   And yes, my ironing board cover is in desperate need of a makeover ;)  I find it is actually easier to press these units face up, so that is what I like to do.  Either way you press, just be sure and press the seam allowance towards the Background Triangle.  And just press, press away ;)


And once you have all your units pressed. you are ready to Rinse and Repeat ;)   Now you will be adding the Background Triangles to the other side of your Print Rectangle.  


So like before, Lay a Background Triangle onto the other side of a Print Rectangle.  Once again, try to leave about the same distance on the top and bottom.  You can also double check that you are centered by eyeballing that the points from your two triangles are lined up ;)   Sew a 1/4" seam along the edge.   Once again, don't bother with pins ;)


And just like before, we are going to Chain Stitch away saving time and thread.  Just keep feeding your units through your machine one after the other.   Remember to keep it fun and relaxed.


And once you are done sewing all your units, again, clip your threads, stack up your units, and move to your ironing board.   And like before, press your seam allowances towards the Background Triangle.  And press, press away ;)


And before you know it, you will have all of your units pressed and you are done with this weeks assignment!!!!    That's right, get to this point and you are done for the week!!!  (But don't worry, they don't get pieced like this, next week we will wonky trim and then piece ;)


And just in case you are wondering, here is how many Improvisational Piecing Units (the wonky squares above) you should have when you are done.  (but you don't have to count them, if you ran out of Triangles and Rectangles, you should be good ;)
And with your Assignment all complete, you are ready to link up for a chance to win the Weekly Prize!!!!

This weeks Weekly Prize is being sponsored by Discover Fabrics and a huge thanks goes to them for their support of the Irish Chain Twist Quilt-A-Long.

This weeks  prize is a My Sunshine Charm Pack!!!


So what do you have to do for a chance to win this Gift Certificate?  Simple . . . Just link up your Improvisational Piecing Units at the end of this post :)  You can link to a blog post, flickr picture, Instagram, Facebook . . .  or whatever.  Just make sure to link up by next Thursday morning as I will be announcing a winner at the beginning of next weeks post :)

If you don't get your improvisational piecing units done by next week you can still link it up :) (just not in time for the prize :)    The linky will remain open until the end of the Quilt-A-Long.  So if your out of town, or just had a busy week, no worries!!!  Just link up when you can :)

And Don't forget to add your sewn units to the Happy Quilting Quilt-A-Long Flickr group and to post it on social media with using #irishchaintwistqal.    I am so excited to see you all get to start sewing ;)

So let's get our chain stitching groove on!!!  And if you have questions, don't hesitate to email me at happyquiltingmelissa@gmail.com.  Have a Happy Quilting Day!!


Pin It!

Wednesday, February 11, 2015

Where's the Day Gone

Well, I had hoped this morning to do a post on Leaders and Enders.  Several of you asked about them.  Sadly, between an early morning workout, and then dentist appointments for the whole family the whole morning is gone.  And it's Early Out Wednesday so I have 1 hour to go finish the sewing for tomorrows Irish Chain Twist QAL post ;)


So sorry, the Leader and Ender tutorial post is going to have to wait another week.   But know that it is coming ;)

All right, I'm off to go get my Irish Chain Twist piecing on ;)


Pin It!