Showing posts sorted by date for query new sewing machine. Sort by relevance Show all posts

Monday, November 29, 2021

A Little Quiet

 Hi Quilting Friends,   Sorry it has been a little quiet around here in the last week.  I went out of town for the Holiday and was so busy before hand, I didn't even think about setting up pre-written posts before I left.   Which meant I totally missed my annual Black Friday - Cyber Monday posts.    So instead, I have decided I will be having a "Holiday Sale" soon.  I am working on a new pattern and would like to get it released with the sale, so I am not sure exactly what date the "Holiday Sale" will be, but just keep an eye out.  It's going to be a great one!!!

And just because every post should have a quilt picture . . . here is a sneak peek of one of my secret projects.  Can't wait to share more!!!


I hope you all are having a very Happy Quilting Day!!!  I know I for one am super happy to get back to my sewing machine and get stitching!!!  

Pin It!

Friday, October 29, 2021

The Wall In the Woods

 I am so very excited to share my newest finish, The Wall quilt along with the free The Wall PDF Pattern  to go with it!!!!  This is a super popular quilt tutorial that I did back in 2014, and I have been wanting to make it in a larger size for a long time as I am always getting requests for how to size it up.    It's perfect for beginners and experts alike and goes together super fast :)

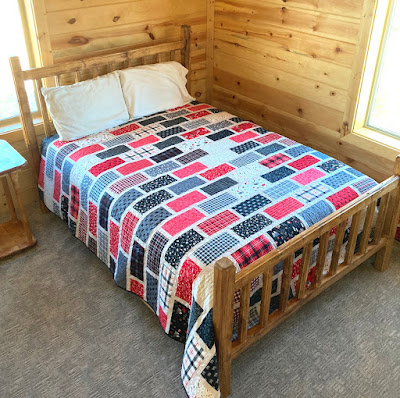
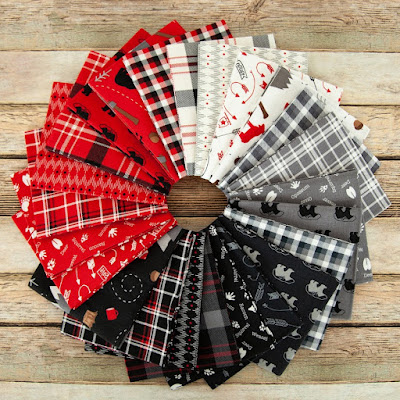
And I knew as soon as I saw this wonderful Into The Woods collection by Lori Whitlock for Riley Blake Designs that it would make a perfect The Wall in the Woods quilt for the cabin!!!   (Remember, I am working on making "cabin" quilts for all of the beds and I have made this one, and this one so far :)   This makes three and Jessica has already "called it" for the bed she sleeps in :)  She just loves it!!  The Wall originally used Jolly Bars (half a Layer Cake square) but for the larger sizes, I used Fat Quarters :)    Either way, it is easy cutting that goes really fast!

And I just love how it is such a great design in it's super simpleness.   Sometimes, it's all about just basic squares and rectangles.   So fun!!   And like I said, I have wanted to make a The Wall PDF Pattern to include multiple sizes as the comments in the Tutorial started to have all the adjustments anyways, it was about time to put it all in one place.   But if you are new to quilting, you might find The Wall Tutorial helpful to go along with the PDF Pattern :)


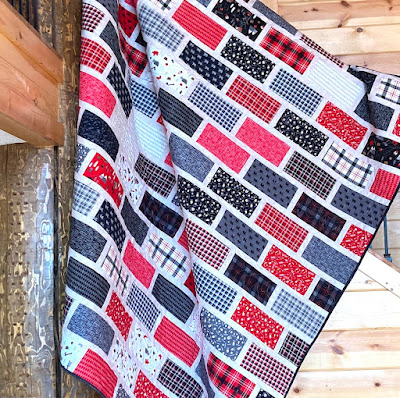
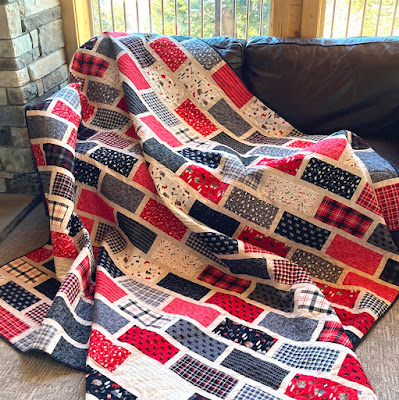
And this is where I share a huge Thank You!!  I have been super busy with some secret sewing so Barbara actually pieced and quilted this The Wall in the Woods Quilt so that I could share it here.   Isn't she just amazing!!!   She quilted it with an adorable all over Ivy design and it is just perfect to go with The Wall theme.  And super fun, she actually quilted it at the cabin!!!   Ya, when we got this new machine, the Avante wen't up to the cabin, so fun!!! 


Then all it needed was a quick binding and this version of 
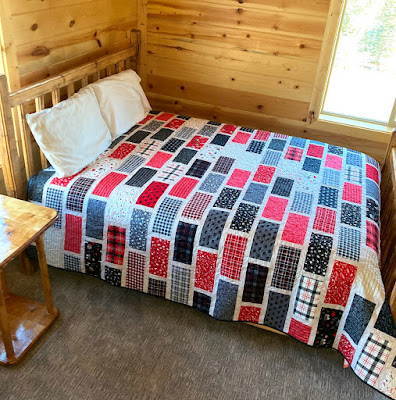
The Wall was done!!   And I just love it!!  It's already up at the cabin on the bed, in fact, that is where I took these pictures :)      And now, it's your turn to make your own The Wall Quilt!!!   Download the free The Wall PDF Pattern ,  check out The Wall Tutorial and get cutting :)


And like I was saying, there are multiple size options in the PDF.   I made the Queen Size, but you can also make a Baby Size, Lap Size, Twin Size,  and a King Size.  All 5 size options are in the The Wall PDF Pattern.   Here is the details of what you will need and the finished sizes for each of the 5 quilt options.  


I hope you enjoy this free The Wall PDF Pattern and that you make your own quilts!!!  And if you do, I would love to see them ;)   You can email me a picture at happyquiltingmelissa@gmail.com or add it to social media with the hashtag #happyquiltingwithmc and #thewallquilt ;)  I can't wait to see your The Wall Quilts!!!


Thanks so much for popping in and sharing this finish with me.  If you have any questions at all on making your own, don't hesitate to email me at happyquiltingmelissa@gmail.com  

I hope you all have a very Happy Quilting Weekend!!!!  

Pin It!

Wednesday, July 28, 2021

New Works in Progress

So when I said I was excited about my Happy Mail the other day, I wasn't kidding.  I have missed my machine so I got right to work on some of these new projects.   And ya know, sometimes you start stitching and you just can't stop!!!   So ya, between last night and this morning, I whipped up the Stars and Strips mini from the Liberty Box.   Isn't it just so fun!!!  So ya, a work in progress that just needs to be quilted and bound, and I even made the binding strip already, yippee!!  


So I obviously needed another WIP, so I pulled out the adorable Joy in the Journey Rolie Polie fabric from my May Sew Sampler Box, and got to work on the Leaves pattern.  It's all cut out now, and I am going to start sewing on this just as soon as I am done typing this post.   I just think the colors are so great and perfect for a little baby born this fall ;)  
 

And last but not least, while I was away I got a ton of hits on my Playing the Scales quilt.    Looking back over the tutorial, it is getting pretty old and I thought it might be time to do an update.    So of course, new Work In Progress!!!   I dug through my stash and found this beautiful Fat Quarter Bundle of Dwell in the Possibility (which totally stuck out to me as it is the same fabric as the giveaway this week!!)   I knew right away it would be perfect with all of it's low volume and high volume prints!!  (I am saving the black FQ's for another project as I wanted the black and white to stand out in the low volume prints :)   


 I am thinking that for the update rather than share another tutorial do a new Free PDF Download, like the one I did for Cabin Among the Stars.   It was so well received, so why not take a favorite quilt and make it easier!!  Then there would be a tutorial for it as well as a pattern.  And I might even do a second PDF for the Queen Size version that I have written in the comments about.   What do you think, is that something that would be helpful??


I cut the quilt out yesterday and stated the strip piecing this morning so hopefully this one won't be to long of a work in progress ;)  

 Can I just say, it is sew nice to be back on my machine just stitching away!!!  What are you Working Away on???

I hope you are all have a Happy Quilting Day!!!
Pin It!

Monday, July 26, 2021

Back with lots of Happy Mail!!!

 Oh my goodness, what a wonderful few weeks!!!   We spent the last two weeks in the mountains at a Family Reunion and then at Lake Powell with our dearest Friends.   And in both places, we had zero cell reception.   Talk about a wonderful way to unplug, play, and relax with wonderful people, good food, and lots of laughs.   And yes, if you are counting we are missing one.  We also began all of this crazy family fun with Spencer starting his Church Mission, so he spent the time with my parents for Home Missionary Training and we picked him up this weekend so he is back home with us until he goes to Germany in mid August.  

And of course, it is always nice to come home, sans the mountain of laundry that I have been tackling today.    But I also had a whole stack of Happy Mail that made it super fun to come home as well and has given me the excuse to squeeze in some much missed time with my sewing machine. 

First Happy Quilting treasure in the mail box was the Liberty Box from Fat Quarter Shop!!!  This is an exclusive box to celebrate July and all the fun of fireworks that comes with it ;)  And there are still a few left in stock!!  And talk about a box packed with quilting goodness!!   Red, White, and Blue in all of it's glory for sure :)


I was so excited about the adorable Stars and Stripes Quilt Pattern that I already cut it out in-between loads of laundry.   This is going to make the cutest little table runner for next year!!   And now that it is cut out, I know I will get to sewing it even sooner rather than later :)


Next up, was my May Sew Sampler Box, which was lost at my post office so I was super excited they found it!!!  I absolutely adore this Joy in the Journey Rolie Polie and the exclusive Leaves pattern.  It has bumped up to the top of my to make list :)   And I just love all of the notions from this month.  My Sew Sampler Box is always a favorite to open . . . and I just checked and there are now openings available . . . .no wait list or anything ;) 


And of course, with a new box comes a new block!!! This is Block 2 in the Bright Side Quilt Along!!!!  And I am using scraps from Basic Grey's Neutral Lines (ie, Little Black Dress, Little Black Dress 2, Stiletto, and Maven)  I am just loving these blocks!!!


And what can be better than the May Sew Sampler Box, showing up, then the June  Sew Sampler Box arriving while I was gone as well!!!  2 Boxes of Aqua goodness . . . .I call that Happy Mail indeed!!!  June's  Sew Sampler Box theme was Vintage Soul and will filled with wonderful vintage quilty goodness, including these gorgeous The Seamstress Charm Packs!!  You all know how I just love Charm Packs!!!  I think this would make the cutest Hugs and Kisses quilt from my Charming Baby Quilts Book, as it already has a fun vintage feel to it.   Another to add to the list ;)


And yup, I whipped up the  Bright Side Quilt Along Block 3 as well today!!!!  These are super fun to make and super fast.   I don't know the layout yet, but I am loving the blocks so much I am debating making 2 of each so I can make a bigger quilt.   I will have to think on that ;)


And last but not least . . . I got one last package of Happy Mail and this one was from Moda!!!   It's my Stroll Quilt that I made for Moda to use as a sample last year.  And I am just thrilled to have it back for summer!!   This is just such a happy quilt and it was oh so much fun to make!!!  There are still a few Stroll Kits available if you want to make your own ;)    This one just puts a smile on my face!!! 


 And that is all of the Happy Mail!!!   The rest were just bills and junk, not near as fun as fabric and quilty goodness ;)   

And I wanted to say thank you to all of the sweet notes you left me on taking a bit of time away.   I don't often take a break, and this one was pretty much forced upon me due to no wi-fi but I found it so very refreshing and I am super charged to get back to some Happy Quilting!!

Be sure to pop back in tomorrow for TTGD and Wednesday I have a fun new secret project that I have been waiting to share ;)

I hope you are all have a Happy Quilting Day!!!
Pin It!

Wednesday, March 24, 2021

Over the Rainbow Quilt and Pillow Tutorial!!

 I am so thrilled to be sharing my newest finishes today and to also be sharing a new AccuQuilt Tutorial for them as well.    It's called Over the Rainbow, and it has Gnomes!!!  How cute is that ;)   I created a fun geometric cascading rainbow using the Half Hexi unit and then added that pop of cuteness with a Gnome applique. . . .and there is even a pillow to go with the quilt.  So fun!!!   And here they are ;)


The quilt is made with 2 Layer Cakes and a 4 1/2" Half Hexagon die as well as the New Gnome Die for the added applique.   I used 2 treasured Kate Spain Layer Cakes, Early Bird and Daydreamer, and I just love the beautiful rainbow of color they created!!!   I knew they were just perfect for this rainbow, and I am so glad I have been holding on to them for just the right project ;)  


When it came time to quilt I decided on an all over wavy horizontal line.  I really think it added to the whole rainbow idea, and I just love all of the amazing texture it created.   And I quilted my Gnomes in place while quilting the quilt as well, I can't wait to wash this and to see how fun and scruffy they get :)  
  

The Over the Rainbow quilts is made up of 160 Half Hexi units.  It really pieces together super fast, once you have the layout you like.  Honestly, I spent more time working on the layout of my rainbow, then I did sewing it together ;)    It measures 60" x 62" when it is finished so it is a great size to be used as a lap quilt and snuggle up with.  


And you know, I couldn't waste the scraps from cutting my Half Hexies, they cut out so quick with the  GO! AccuQuilt Cutting System and you have just enough scrap to use the smaller 1 12" Half Hexagon Die  to make this matching pillow  So awesome!!!   Isn't that just the cutest, I can't get over those tiny 1 1/2" half hexies.  So adorable.   

 
I quilted the pillow on my home machine (Bernina Aurora) with a wavy scallop quilted on a diagonal.  Again, I was trying to add to the whole rainbow concept.  And of course, I had to add the Gnomes on the pillow as well ;)    I did them in Solids so they would stand out on the rainbow background, and I think they are just so adorable!!


Oh, and the pillow uses the exact same layout as the quilt, so it's rainbow came together much quicker ;)   But of course, you can always switch it up from the layout of the quilt and the pillow.  Your rainbow can be Vertical, Spiral, Random . . . anything you like ;)     I trimmed my pillow to 16" x 16" so it fit a pillow form just nicely.


And that is my Over the Rainbow Quilt Pillow and Tutorial!!!  And I hope you love it as much as I do ;)   If you want to make your own Over the Rainbow Set just pop on over for the free step by step tutorial!!!     And when you are done, I would love to see it!!!  You can email me a picture at happyquiltingmelissa@gmail.com or post it to social media with #happyquiltingwithmc and #AccuQuilt ;)  I can't wait to see your Over the Rainbow Quilts and Pillows!!!


Thanks for joining me today and sharing this new tutorial with me ;)  I am so glad to have made this quilt.  I have had the idea kicking around in my head for a long time, and I am just thrilled that it came out just as I imagined ;)    This just makes me so happy for Spring and I hope it does you as well!!!! 


I hope you all have a very Happy Quilting Day!!!  
Pin It!

Tuesday, January 12, 2021

Texas Monthly - Month 4

 I am always so excited when I go to my mailbox and find my BOM!!!!  And today I am so happy to share the next tutorial  for the Texas Monthly Block of the Month program!   This BOM is hosted by Stitchin' Heaven  and is so much fun!!!   

So let's get going with Month 4 and we are back to just regular piecing and there are 4 blocks this month!  But  no worries, they are all pretty basic and fast and fun to sew.    So let's get piecing!!!  


Cutting
I like to start out by pressing all of my fabrics.  Then it is time for cutting!!!  I like to cut all of my pieces for all of my blocks at the start.  Just be sure to keep them in piles separate for each block.  (oh, and yes there is background pieces needed for the Carolina Lily block, I didn't realize I missed cutting them until I was actually making the block which is why they are not pictured ;)

And with all your pieces cut . . . you are ready to move on to the first block.


The Daisy and Mr. Frog Block


First up, we need to trim the beautiful watercolor panel.   We will be trimming the panel to 7 1/2" high and 9 1/2" wide.   So I like to use a 9 1/2" square ruler.   Align the ruler so that you have appx. 1 1/4" white space on either side before the graphic daisy starts.   Align the bottom and top so you have appx. 1" of white space from the top of the daisy and the bottom of the frog.   Trim the sides and top. 


Now flip your panel 180 degrees and align the sides with the raw edges and the bottom with the 7 1/2" line of your ruler.   Trim the top.  And now your panel is ready and you can set it aside.  


Now grab your 5 colored rectangles.  Lay them out in the following order and then sew the 5 rows together.   Press in one direction.  Take care when pressing not to stretch the rows.   I like to press towards the purple.


Now place your pressed unit onto your cutting mat.   Cut a straight edge slightly in from the end.   Then measure 3" in and subcut a strip set, and finally, measure another 3" in and subcut another strip set.  You will now have two 3" x 7 3/4" sets.


And you will notice as soon as you put them next to your block that you actually need them to be 7 1/2" long.   So to fix this little oopsie, simply place your strip sets onto either side of the panel with right sides together and sew a 1/4" seam along the edge.   Then before pressing, flip your block over, and trim the bottom of the block even with the panel.  Easy fix!!!  Now simply press towards the panel.


And just like that, you have an adorable Daisy and Mr. Frog Block that should measure 7 1/2" x 14 1/2" unfinished.  


So now you are ready to move onto to making two of the . . . 

Pieced 4-Color Blocks

Start out by laying your blocks out as shown on the left hand side.  You will be sewing your blocks into two columns.  I find this quicker than sewing it into rows.   So using a 1/4" seam, sew all of the pieces in the first column together followed by the second.   And you are making two blocks so you should have two of each column.  Then press the two columns in opposite directions, pressing the first column up and the second column down for both sets of units. 


Now place the second column onto the first with right sides together.  Align each of the seams and you can pin them in place or simply nest them as your sew your 1/4" seam along the edge.   Do this for both sets, and then press the seams open in both blocks.  


And in no time at all,  you have two Pieced 4-Color Blocks that should measure 6 1/2" x 14 1/2" unfinished.  


So now you are ready to move onto to making two of the . . . 

Dimensional Bowtie Blocks

Now if you have never made a Dimensional block before, this might be a little new.  But it is no different than piecing straight seams, you just have more fabric layers in the seam.   
So start by taking your yellow square and finger pressing it in half with wrong sides together.   Place it on top of a purple square with right sides together and the 3 raw edges aligned at the top.     Then grab a white square and place it directly on top of the purple square with right sides together.  Sew a 1/4" seam along the side.  Repeat to make 2 of these.  


Now finger press the purple and white square outward so that your folded yellow piece is sticking out as shown.   Then grab the second white and purple square and sandwich them with right sides together around the folded yellow rectangle as shown.  Be sure that you have purple and white squares alternating on the top and bottom.  Align the 4 raw edges on the top and side and stitch a 1/4" seam along the side.   Repeat this step for both units.  


Again,  finger press the purple and white square outward so that your folded yellow piece is now in the middle as shown.   Now fold the center inwardand align all of the seams in the center.   The yellow piece in the middle will not be flat.   Pin the center seam.   Repeat for both units. 


When sewing this seam, it is easier if you just worry about half of the seam at a time.   So start by aligning the folded yellow triangle with the raw edges of the purple and white square on the left hand side.  Be sure that your edges are aligned and the left side of the yellow triangle is lying flat for at least 1/4" from the edge.  You might have to fiddle with this a bit, but just keep trying to smooth it to align to the top.   Stitch a 1/4" seam from the left hand side to the center seam.  

Then remove the unit from your machine and   align the folded yellow triangle with the raw edges of the purple and white square on the right hand side.  Again, be sure that your edges are aligned and the yellow triangle is lying flat for at least 1/4" .  Stitch a 1/4" seam from the center to the right hand side of the top of the unit.    Repeat this for both blocks. 


Now press the seam open, you will have to flatten the yellow part as it is sewn into the seam.    Then gently pull on the center of the yellow diamond to give it the cool dimensional look.  Repeat for both blocks.  


And now you have made two very neat Dimensional Bowtie Blocks that should measure 7 1/2" x 7 1/2" unfinished.  


So now you are ready to move onto the last set of blocks, the . . . 

Carolina Lily Block

We will start by making some Half Square Triangles.  So draw a diagonal line on the wrong side of each of your two white 4" squares.  Place each onto a purple 4" square with right sides together aligning the raw edges.   Sew a 1/4" seam on either side of the drawn line on both units.  


Then cut on the drawn line of both units and press the 4 Half Square Triangles towards the purple.   Trim the dog ears from the sides of the 4 HST's.  


Now, cut each of the 4 HST's in half diagonally to create 8 two color triangle units.   There will be 4 side triangles and 4 top triangles.  


Place a side triangle onto a 3 1/4" white square with right sides together as shown aligning the bottom and side raw edges.  Sew a 1/4" seam along the side and then press towards the white square.   Then place the top triangle onto the white square with right sides together as shown aligning the top and side raw edges.   Sew a 1/4" seam along the side and then press the seam open. Trim the little dog ear at the center of the long side.   Repeat to make 4 units total.  
 

Now we will add the orange triangle to make the corners of the blocks.   Place a pieced triangle onto an orange triangle with right sides together aligning the raw edges.  Pin and sew a 1/4" seam along the long side.   Note - when you sew the seam at the center, if you cross directly where the white and purple fabrics meet at a point you will get a perfect point in the front, even if that means you need to stray from 1/4" for a tiny bit ;)    Then press the seam towards the orange triangle and trim the two dog ears.   Repeat to make 4 corner units.  


Now layout your 4 Corner Units, 4 3 1/2" x 6 1/2" white rectangles, and your green 3 1/2" square as shown.  


Sew the pieces into rows.  To do this, simply place the center piece in each row onto the first piece in each row with right sides together and then a 1/4" seam along the edge.  Repeat for the last piece in each row so that all three rows are sewn together. 


Press the top and bottom row inwards towards the white rectangles.  Press the center row outwards towards the white rectangles. 


And finally, place the center row onto the top row with right sides together.  Pin or next the center seams.  Sew a 1/4" seam along the pinned edge.   Then repeat that same process for the bottom row.  Press the two seams open and you are done.  


And you have a beautiful Carolina Lily Block that should measure 14 1/2" x 14 1/2" unfinished.  


And all that is left is to sew these blocks into Two Block Sections!!  So for 

Section 1

So to start, layout your two  Bowtie Blocks, the Daisy and Mr. Frog Block, and one 4-Color Block as shown below.  


Place the second Bowtie block onto the first with right sides together.  Align and pin the center seam.  Stitch a 1/4" seam along the pinned edge.   Press the seam open. 


Now place the Daisy and Mr. Frog block onto the Bowtie Blocks with right sides together.  Align and pin the raw edges.  Sew a 1/4" seam along the pinned edge and press the seam open.  


Finally, place the 4 Color Block onto the rest of the block with right sides together as shown.  Align and pin the center seam.   Sew a 1/4" seam along the edge and press the seam open.  


And Section 1 is complete!!!


And that leaves us with 

Section 2

Layout a 4 Color Block and the Carolina Lily Block as shown. 


Place the Carolina Lily block onto the 4 Color Block with right sides together.  Align and pin the raw edges and seams.   Sew a 1/4" seam along the pinned edge.   Again, when sewing, if you cross your seam directly across the bottom of the fabric or thread V's in the seam allowance, you will get a perfect point in the front, even if that means you need to stray from 1/4" for a tiny bit ;)   Press the seam open.   


And you are done with Section 2 and done for Month 4!!!!


Wasn't  Texas Monthly Month 4 just so fun!!!  I know I sure liked it :)

If you have any questions on this tutorial, please don't hesitate to email me at happyquiltingmelissa@gmail.com or leave a comment.  

Hope y'all enjoy making this month's blocks! 

 Looking forward to Next Month!

Pin It!