From your Month #1, Pinwheel bag, cut the fabrics according to the page 1 supplemental cutting list. Again, I cut my squares 3" instead of the 2.875" and will trim.
Place the Second Unit in each row onto the First Unit with right sides together and align and pin the raw edges. (The seams will nest so you don't have to pin if you feel secure in nesting) Stitch a 1/4" seam along both pinned edges.
And you have your fifth block finished and it is perfect!! The Pinwheel Block measuring 4 1/2" x 4 1/2" unfinished.
So that means it's time to move on to Block 6, the . . .
From your Month #1, Churn Dash bag, cut the fabrics according to the page 1 supplemental cutting list. Again, I cut my squares 3" instead of the 2.875" and will trim.

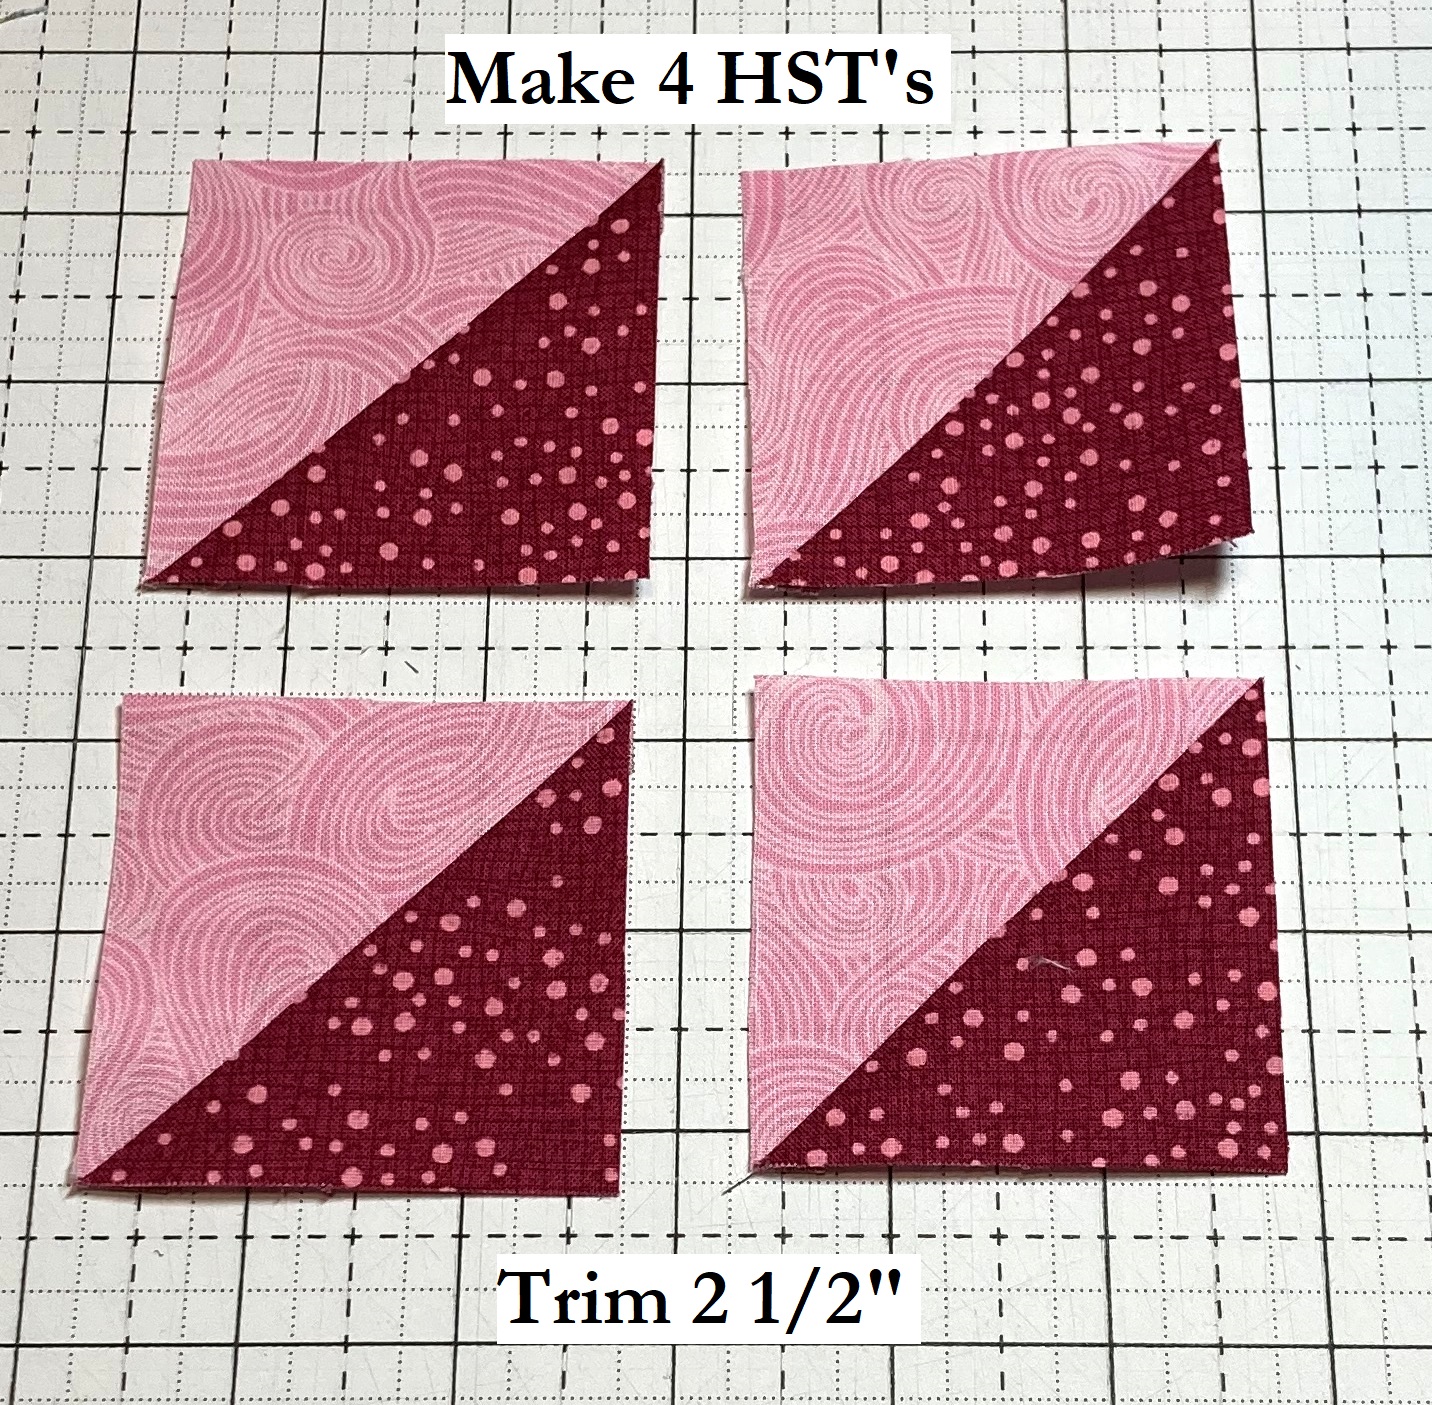
Using the 3" Pink Squares and the Half Square Triangle Directions make 4 Half Square Triangles and trim them to 2 1/2" x 2 1/2". They can be set aside for the moment.

Now we are going to Strip Piece. Gather your long rectangle pieces. Place them with right sides together. Stitch a 1/4" seam along the long edge. When strip piecing, I like to use a smaller stitch length so my stitches don't unravel when the pieces are subcut. It's totally okay if your strips do not match perfectly at the ends.

Press your strip set towards the Darker Strip. Take care when pressing a strip set that you don't stretch the material. I like to press from the front and run my finger along the edge of the seam just in front of my iron. This keeps bubbles out of the seam and ensures no stretching.
Once you have pressed the strip set, lay it on your cutting mat so the top is aligned with a horizontal line on your mat. Using a vertical line on the mat as a guide, cut a straight edge. Measure in 2 1/2" from your straight edge and cut a Side Unit. Continue measuring in 2 1/2" and cutting sub-cutting side units until you have a total of 4 Side Units measuring 2 1/2" x 2 1/2". The remainder of the strip can be scrapped.
And now, the units are made and we are ready to piece the block. Layout the 4 Half Square Triangle Units, 4 Side Units, and 1 Pink Center Square as shown.
Place the center column pieces onto the left hand pieces with right sides together. Align and pin if desired. Stitch a 1/4" seam along the edge of all the units.
Then, place the left hand column pieces onto the center pieces with right sides together. Align and pin if desired. Stitch a 1/4" seam along the edge of all the units.
Press the top and bottom row Inward. Press the center row outwards towards the Darker Pink rectangles.
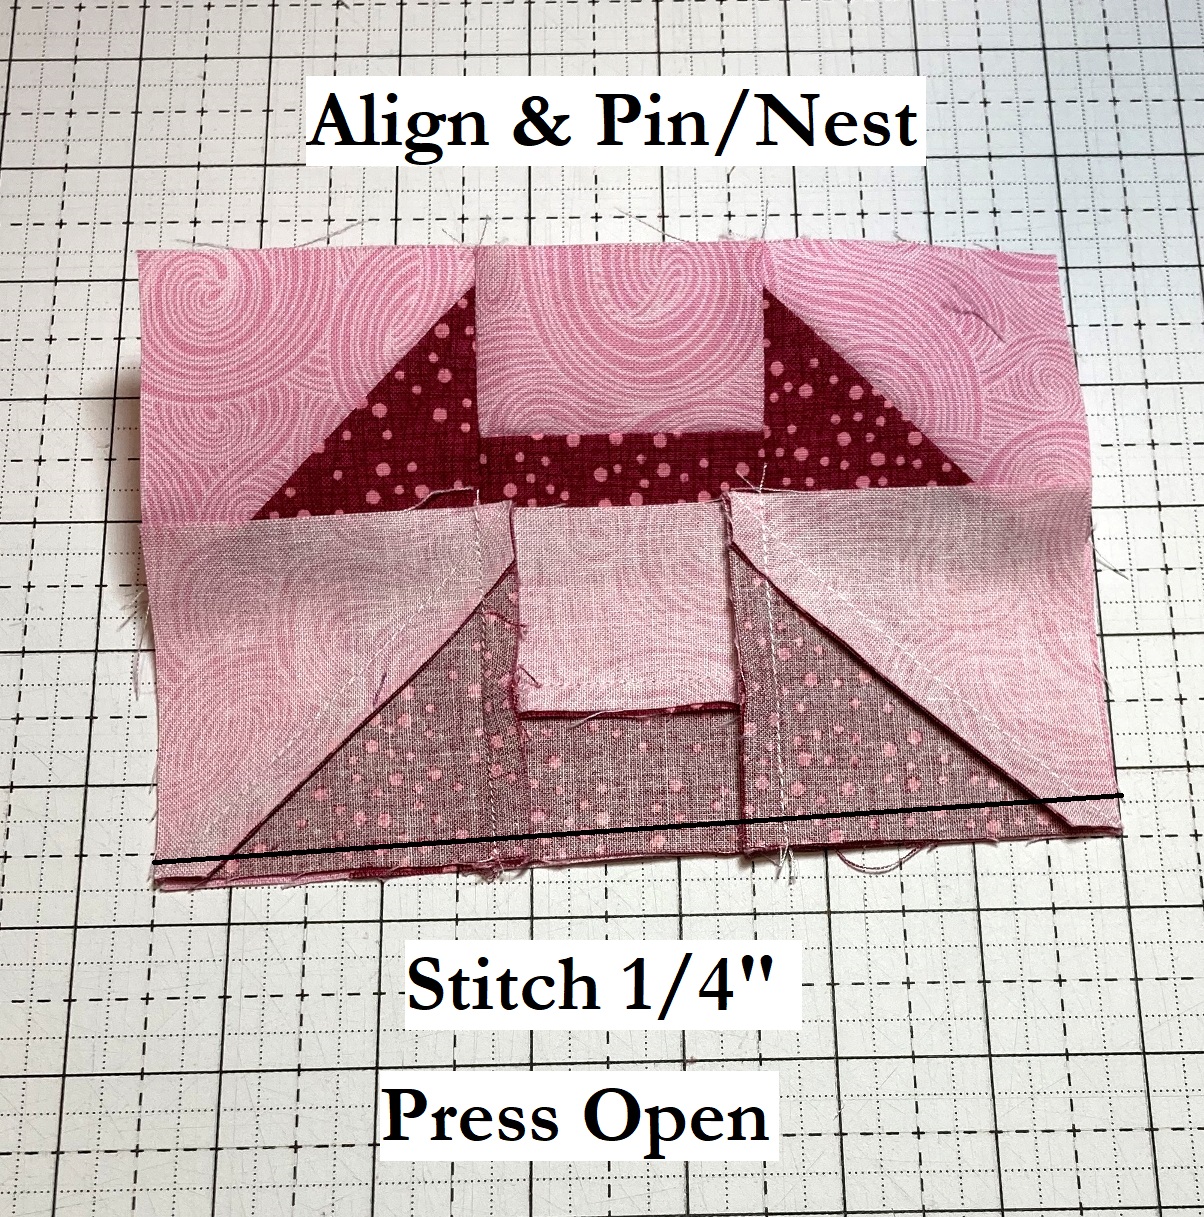
Place the Center Row onto the Top row with right sides together. Align and pin/nest the seams. Stitch a 1/4" seam along the pinned edge.
And now, place the bottom row onto the center row with right sides together. Align and pin/nest the seams. Stitch a 1/4" seam along the pinned edge. Press the last two seams open.
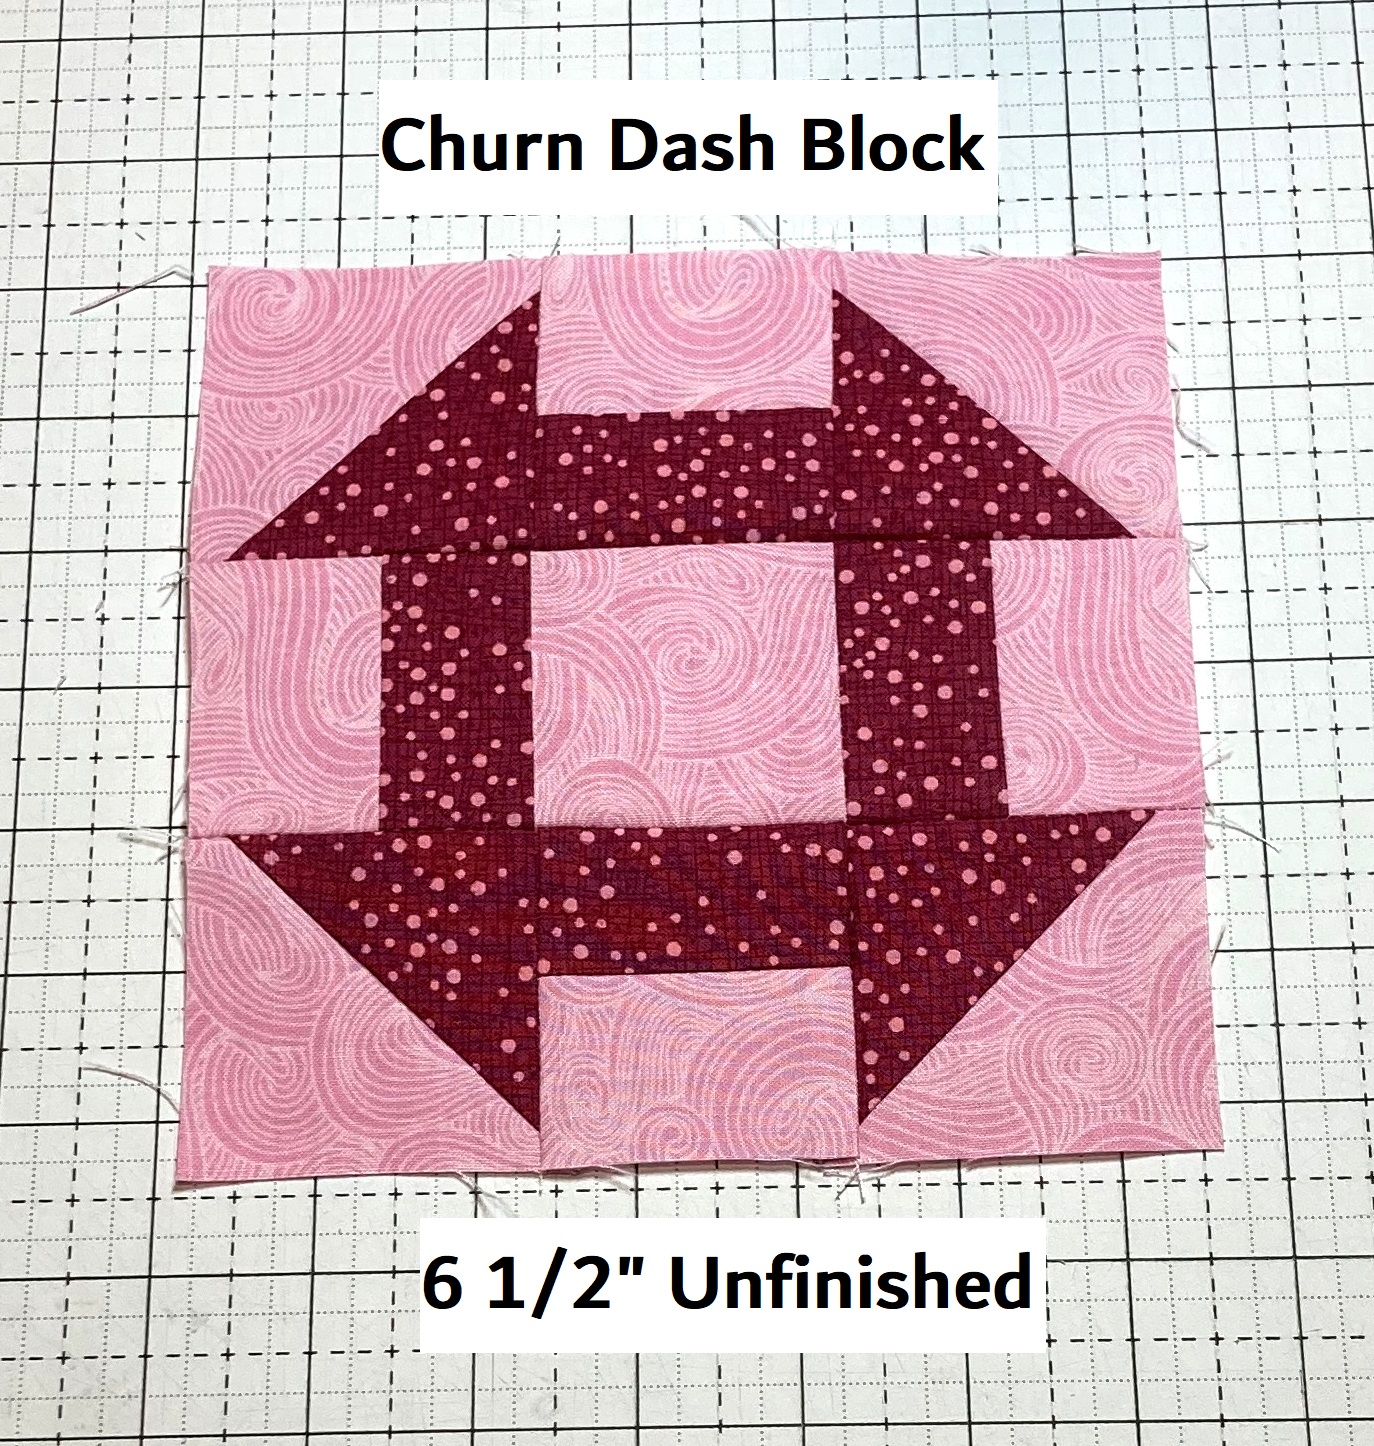
And just like that, you completed Block 6, the Churn Dash Block that should measure 6 1/2" x 6 1/2" unfinished.
And now we can move onto Block 7, the . . .
X’s and O’s Block

From your Month #1, X's and O's bag, cut the fabrics according to the page 1 supplemental cutting list.
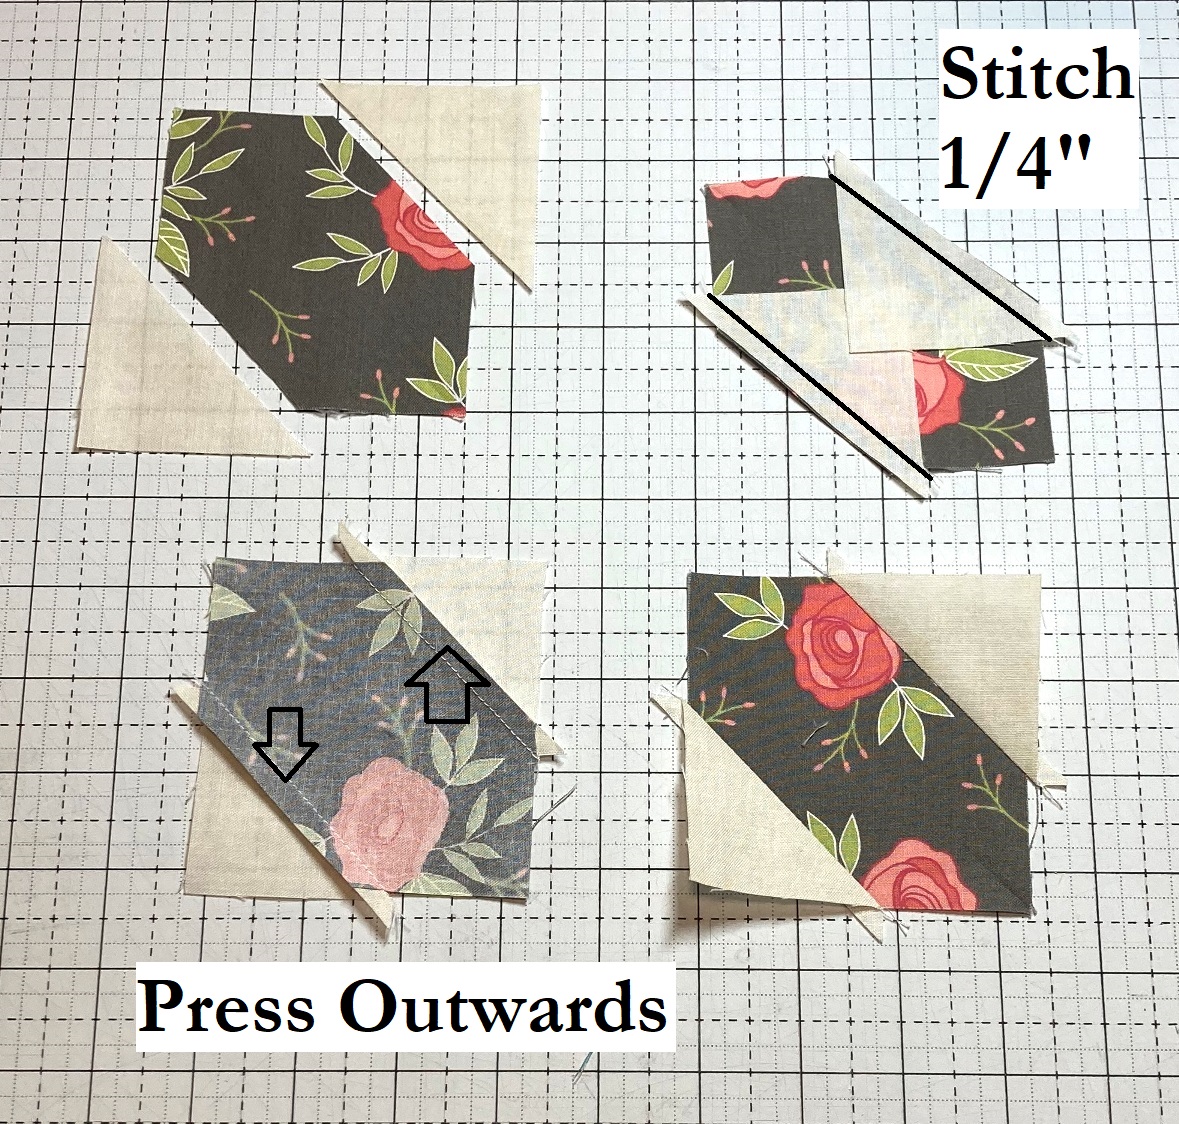
Draw a diagonal line from corner to corner on the 8 Yellow fabric squares. Place two of the marked squares onto each of the 4 Black Squares with right sides together as shown and pin in place.
Stitch a seam directly on each of the drawn lines. Trim 1/4" over the stitched lines and scrap the excess. Press the seams so they are going in the same direction, this will allow you to nest them later. ISo one seam will be pressed to the dark, and one to the light on each X Unit.
Layout the 4 X Units as shown below, taking note of the direction of the pressed seams.
Place the Second Unit in each row onto the First Unit with right sides together and align and pin/nest the raw edges. Stitch a 1/4" seam along both pinned edges.
Press the Seams Open.
Place the First Row onto the Second Row with right sides together and align and pin/nest the raw edges. Stitch a 1/4" seam along the pinned edge. Press the seam open.
And now your Block 7 is done. The X's and O's Block should measure 6 1/2" x 6 1/2" unfinished.
And now we are moving into our bigger blocks, with the . . .
Sawtooth Star Block
From your Month #1, Sawtooth Stars bag, cut the fabrics according to the page 2 supplemental cutting list. Note, the 4 White squares are cut from a different fabric than the 4 White rectangles.
Layout your 8 Small Yellow and 8 Small Blue squares as shown below. Sew the squares into 4 rows.
To do this, I simply place the second square onto the first square in each row and stitch a 1/4" seam. Then place the third square onto the second square in each row and stitch a 1/4" seam. Repeat for the last square in each row.
Press the seams of each row in opposite directions. So press the seams in the First and Third row to the right and press the seams of the Second and Fourth row to the left. This way you can nest them.
Place the First Row onto the Second Row with right sides together and align and pin/nest the raw edges. And do the same with the Third Row placed on the Fourth Row. Stitch a 1/4" seam along the pinned edges.
Press the seams open. Yes, you could wait until all the rows are sewn together to press, but I just find it easier for everything to lay flat with such tiny seams if I press now.
Place the Top Row onto the Bottom Row with right sides together and align and pin/nest the raw edges. Stitch a 1/4" seam along the pinned edges.
Press the center seam open and then set this Center Unit aside for the moment.
Now, it's time to make some Flying Geese. Draw a diagonal line on the wrong side of all 8 Large Blue squares. Place a Marked Square onto each of the 4 White Fabric rectangles with right sides together as shown and pin them in place.
Sew a seam directly on the drawn line. Trim 1/4" over the stitched line and scrap the excess. Press the seam allowance upwards towards the Blue Triangle.
And now you can repeat for the second side of the 4 Units. Place a remaining Marked Square on the other side of each of the 4 units with right sides together. Stitch a seam directly on the drawn line, trim 1/4" over the seam line, and then press towards the Blue Triangle.
And you have 4 perfect Flying Geese Units measuring 2 1/2" x 4 1/2" and again, these are one of those things you need to be very careful with if you decide to square them up. Leave 1/4" seam allowance at the top point and ensure the two sides come to a point at the bottom.
And now we are ready to piece the block. Layout the 4 Flying Geese Units, 4 White Squares, and 1 Center Unit as shown.
Place the left hand column pieces onto the center column pieces with right sides together. Align and pin. Stitch a 1/4" seam along the edge of all the units and when stitching the center row, be sure and stitch directly along the center of the Thread X made in the seam allowance to ensure a perfect star point.
Then, place the left hand column pieces onto the center pieces with right sides together. Align and pin and stitch a 1/4" seam along the edge of all the units, hitting the center of the Thread X on the Center Row.
Press the top and bottom row Outwards. Press the center row Open.
Place the Top Row and the Bottom Row onto the Center row with right sides together. Align and pin/nest the seams. Stitch a 1/4" seam along the pinned edge, stitching through the center of the Thread X. Press the seams open.
And you now have a Sawtooth Star Block that should measure 8 1/2" x 8 1/2" unfinished.

We are getting closer to finishing the blocks. On to the . . .

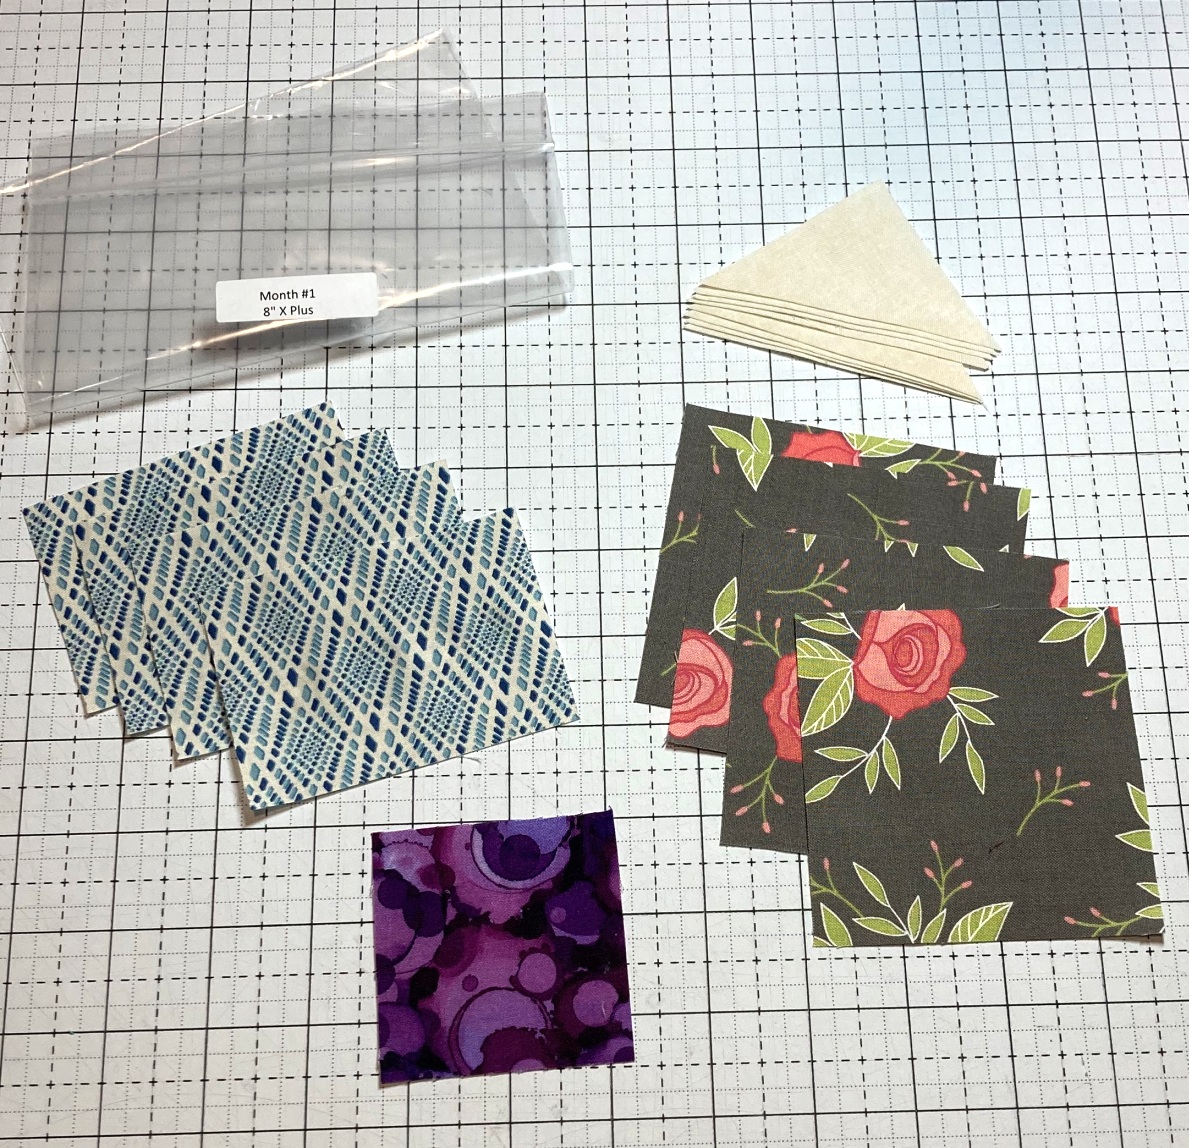
From your Month #1, X Plus bag, cut the fabrics according to the page 2 supplemental cutting list.
Using a 2 1/2" Wide ruler, align the Center of the Ruler with 2 diagonal points of your Grey Square. (Note, I had to draw a center line on my ruler, you might need to as well :) Trim the two sides along the edge of the ruler to make a Lozene Unit. Repeat for all 4 Grey Squares.
Place 2 Off White triangles onto the sides of each of the 4 Lozenge Units. You can simply eyeball center them. Stitch a 1/4" seam along the edges of the Lozenge Units. Press the seams of all 4 units outwards.
Using a Square Ruler, (3 1/2" is best) align the corner of the ruler with the Grey Corner of the Lozenge Unit. Trip the sides of the entire unit to 3 1/2" square. Repeat for all 4 Lozenge Units.
Layout the 4 Pieced Lozenge Units, 4 Blue Rectangles, and 1 Center Purple Square as shown.
Place the center column pieces onto the left hand column pieces with right sides together. Align and pin. Stitch a 1/4" seam along the edge of all the units.
Then, place the right hand column pieces onto the center pieces with right sides together. Align and pin and stitch a 1/4" seam along the edge of all the units.
Press the top and bottom row Inwards. Press the center row Outwards.
Place the Center Row onto the Top row with right sides together. Align and pin/nest the seams. Stitch a 1/4" seam along the pinned edge.
Place the Bottom Row onto the Center row with right sides together. Align and pin/nest the seams. Stitch a 1/4" seam along the pinned edge. Press the last 2 seams Open.
And done, a beautiful X Plus Block that should measure 8 1/2" x 8 1/2" unfinished.
Only 1 more block to go, let's make the . . .
Gardenvale Block

From your Month #1, Gardenvale bag, cut the fabrics according to the page 3 supplemental cutting list. One last time, I cut my 2.875" squares to 3" and will trim.
Using the Green and White 3" squares and the
Half Square Triangle Directions , make 4 Half Square Triangles and trim them to 2 1/2" x 2 1/2". These can be set aside for a moment.
Layout 4 Red Small Squares, 4 :White Small Squares, and 1 Green Small Square as shown. Sew the squares into 3 rows.
Press the top and bottom row Outwards. Press the center row Inwards.
Sew the 3 rows together into the Center Unit. Press the seams open. Set the Center Unit aside.
Draw a diagonal line from corner to comer on the reaming 8 Red Squares. Place a Marked Square onto either side of each of the 4 Green Fabric rectangles with right sides together as shown and pin them in place. Sew a seam directly on the drawn lines. Trim 1/4" over the stitched lines and scrap the excess. Press the seam allowances of all 4 Side Units outwards towards the Red Triangles.
Layout the 4 Half Square Triangle Units, 4 Side Units, and 1 Center Unit as shown.
Place the Right Hand column pieces onto the Center Column pieces with right sides together. Align and pin. Stitch a 1/4" seam along the edge of all the units. You can use the
Pin Trick to align the diagonal seams on the center row, you will just have to eyeball the 1/4" align as there are no threads to mark it. And if it doesn't line up right the first time, you can use your unpick lines as a 1/4" guide ;)
Then, place the left hand column pieces onto the center pieces with right sides together. Align and pin and stitch a 1/4" seam along the edge of all the units using the pin trick in the center row.
Press all the seams open to avoid bulk.
Place the Top Row and the Bottom Row onto the Center row with right sides together. Align and pin/nest the seams, using the Pin Trick in the center. Stitch a 1/4" seam along the pinned edges and Press the seams Open.
And your Final block is made, a wonderful Gardenvale Block measuring 10 1/2" x 10 1/2" unfinished.

And that means it is time to start putting all the blocks together, but first, we are going to need some of those Low Volume Background strips!!
Start by pressing all of your Low Volume Background pieces. I like to stack up 3 strips on top of one another, trim the selvages, and then cut as many 1 1/2" strips as I can. If you cut super straight, you can get 3 strips from the larger fabric pieces and 2 strips from the smaller fabric pieces.
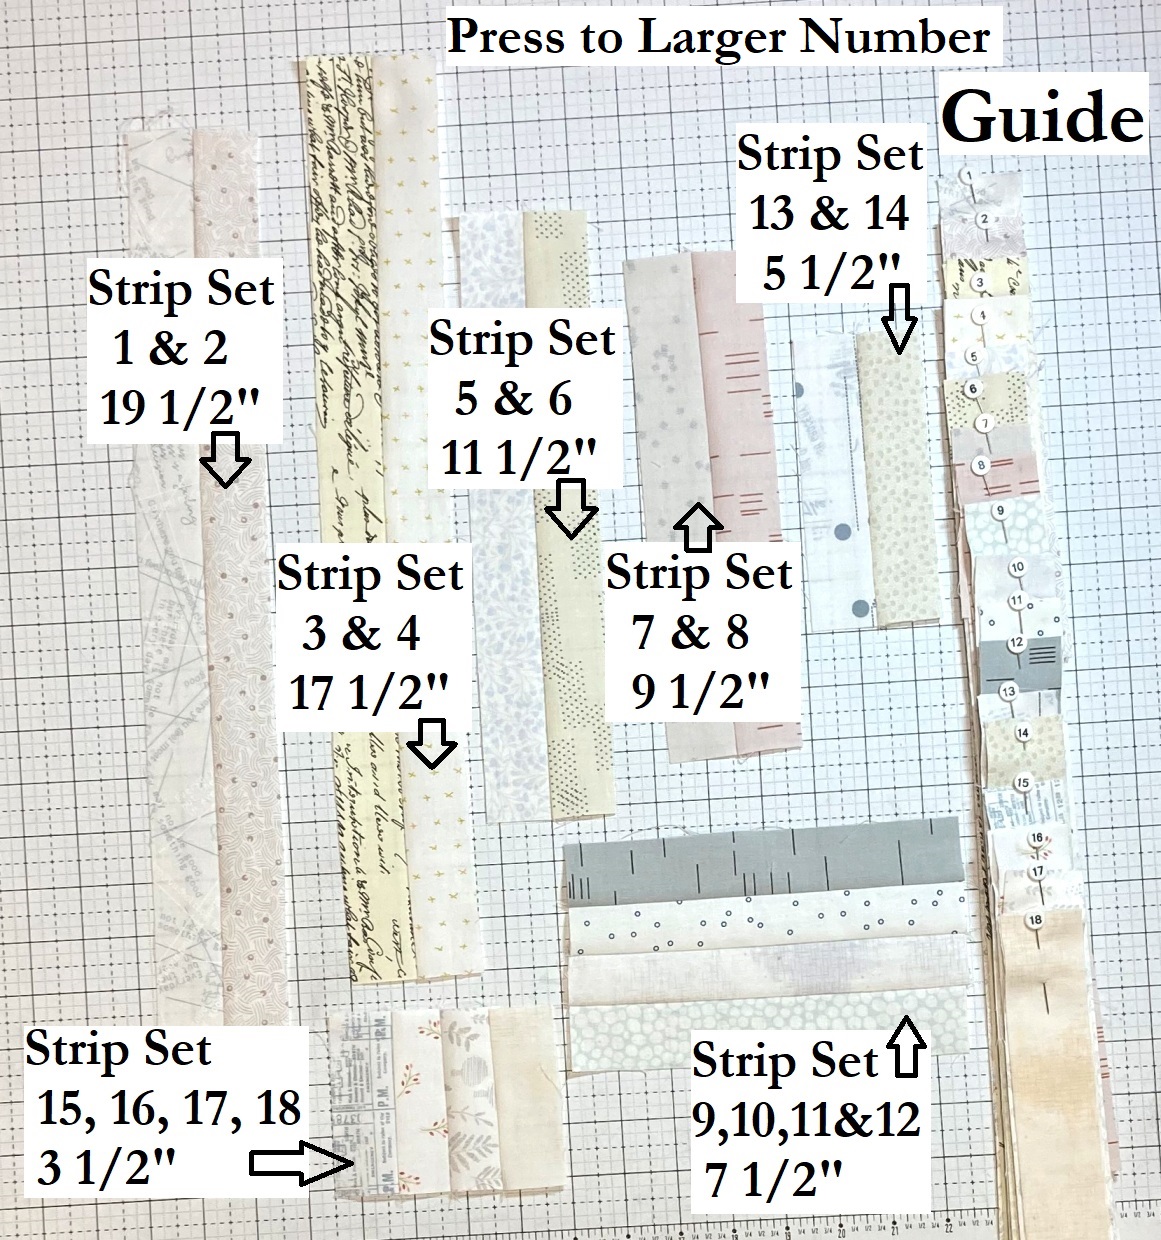
From the Low Volume Strips sent with your Month #1 package, cut the fabrics according to the pages 4 and 5 in the supplemental cutting list. Note - You will have to piece some of the strips together to get the desired length of the strips. On those, the cutting directions say 44" and 46" but it should be 44 1/2" and 46 1/2".
There is no right or wrong order to number your strips, you can do your low volume strips in any order you like, only take care to do fabrics 1-12 from the fabrics that you have 3 strips and strips 13-18 from the fabrics you have 2 strips of.
Also, most importantly, once you have cut all the pieces from one fabric, take care to keep them together and marked with the Number of that vertical row/fabric. You are cutting the strips for Month 1, 2 and 3 so you will be keeping these grouped and marked for some time.
***NOTE*** A few of the Background cutting directions were omitted by accident. You need to add cutting for the "Grey Holes" I mentioned at the beginning of the post. So to your already cut fabrics, add the following to each of your strip sets.
Fabric 11 - (2) 1 1/2" x 2 1/2"
Fabric 12 - (2) 1 1/2" x 2 1/2"
Fabric 13 - (2) 1 1/2" x 2 1/2"
Fabric 14 - (2) 1 1/2" x 2 1/2"
Fabric 15 - (2) 1 1/2" x 2 1/2"
Fabric 16 - (2) 1 1/2" x 2 1/2"
Fabric 17 - (1) 1 1/2" x 2 1/2" and (1) 1 1/2"x 6 1/2"
Fabric 18 - (1) 1 1/2" x 2 1/2" and (1) 1 1/2"x 6 1/2"
Sorry, I didn't get a pic of this as I didn't realize it until I was already past this point ;)
And now with all your Background Pieces cut, you can start sewing together your . . .