Monday, January 14, 2013

Starburst Quilt-A-Long - Cutting

**  NOTE  - This post is part of a series of posts for the Starburst Quilt-A-Long.  If you would like to join (and have a chance to win one of the $75.00 Gift Certificate grand prizes sponsored by The Intrepid Thread ) you can find a list of the post links here :)  Once again, here is the schedule, but if you want to work ahead you can use the tutorial  just be sure to take pictures of your weekly assignments so you can link them up for weekly prizes :)


January 14 - Cutting Post
January 21 - Goose in the Corner and Half Square Triangles
January 28 - Flying Geese
February 4 - Building Blocks - At least 2
February 11 - Finish Blocks and Sashing
February 18 - Baste it, Quilt it, Bind It
March 4 - Starburst Parade and Grand Prizes

So here we are at January 14th and this weeks assignment is cutting your fabric!!   Now I was hoping to show you lots of fun pictures of my new fabric that I will be using, but there was a bit of a post office mishap and my fabric is a little stuck in transit.  (But I should be able to track it down today.)  So, for the mean time, I will just show you some fun random fabric pictures :)

THIS WEEKS ASSIGNMENT - CUTTING

Now, before you just jump on into cutting, you have to make some decisions.  This is going to determine the layout of your quilt.  So, I am going to show you the way I decide a layout.   With that said, there are a million ways to do your layout so don't feel like you need to do it this way, it is just a help in getting started :)   If you have already done this, feel free to skip down to the cutting directions :)

Start by laying your 12 fat quarters out so you can see all of those pretty fabrics.


Now I like to get an equal balance of tones so I like to separate my fabrics into 3 groups, that each have 4 prints and I separate them by lightest tones, medium tones, and darkest tones.


 Once your tones are separated, its time to look vertical.  Now you are making 4 groups of 3, but once again, I like to keep a dark, medium, and light in each group. Each vertical group of 3 represents a star, so you are moving prints around horizontally until you like each of the 3 groupings.  So for example, I didn't like the 2 pearl bracelets in the grouping 3 so I moved them.  When I did this I got two of the same prints in grouping 4 but liked that.  Just keep shuffling until you like all 4 groupings.


Lastly, you need to decide which fabric in each grouping will be for which part of the Starburst.  The Starburst consists of a Center Star, Star Surround  and Burst Points.  I find it easiest to label each and then take a photo to refer to when I start cutting everything up, if you don't like referring to photos, just write your groupings and fabric assignments down somewhere to refer to :)  For this fabric, I decided that I wanted my dark prints to all be the center star, so they really pop :)  Then I decided, I wanted the 2 medium grey's to be burst points, but I labeled them 1 and 4 so that they would be opposite each other in the quilt layout.  From there, I figured the other 2 burst points could be done in the lights to contrast.  Once you start making a few decisions  the rest just falls into place.  


So, now that you have your decisions all made, you are ready to cut :)  Now, I promise to add some more photos here soon, so if you are nervous about cutting from a chart, just wait a day or 2.  I just didn't want to cut into these fabrics as my intended fabrics are stuck at the post office ;)

EDIT - My fabrics finally arrived and these are my groupings ;)


Oh, and if you are having trouble seeing the chart, just click on it, and it will come up larger ;)
* Sew WOF strips together to create the desired length of sashing.

Cut your fabrics according to the chart above.  Remember to refer to the column of the size quilt you want to make :)   And remember, press your fabric before cutting to aid in accurate cutting.

EDIT - I just found out that the post office managed to send my fabric package back instead of holding onto it.  So I have gone ahead and made some cutting diagrams as I won't have my fabric until later this week.  The blue is the 24" blocks, the pink is the 32" blocks and the green is the 40" blocks.  I hope these help and if you have questions, please don't hesitate to email me!!

Start with cutting the four fat quarters that you have set aside for Burst Points.  From each of the 4 fat quarters cut according to the following diagrams.  With all of your cutting, the leftover scraps can be set aside for a scrappy binding or can but used for another project.
 Now you are ready to cut your four fat quarters that you have decided will be your Star Surround.  From each of the 4 fat quarters cut according to the following diagrams.

And now you can cut your last four fat quarters that will be your Star Centers.  From each of the 4 fat quarters cut according to the following diagrams.


And now, you have simply to cut your background yardage :)  Once again, you will need to refer to column of your size quilt to know what sizes you need to cut.  Be sure you cut the designated quantity for each line.


Once you have finished cutting your 12 fat quarters and your background yardage, Sort your fabrics into piles of similar descriptions. ie, CS for center star,  FG, for flying geese, HST for half square triangle, GC for goose in the corner,  B for background and S for sashing.  This will make it easier as you begin to put the pieces of the block together.  (This is why you wanted to label your groupings earlier, because you will be mixing them all up now :)

And now you are done!!!   Here's my fabrics all cut up :)  This weeks assignment wasn't to hard, right :)   And now the fun part, you can enter to win the weekly prize :)


The Weekly Prizes are sponsored by the Fat Quarter Shop and a huge thanks goes to them for their support of the Starburst Quilt-A-Long.

This weeks  prize is a Salt Water Charm Pack by Tula Pink for Free Spirit Fabrics


So what do you have to do for a chance to win this beautiful Charm Pack??  Simple . . . Just link up your fabrics all cut up at the end of this post :)  You can link to a blog post or a flickr picture, or whatever.  Just make sure to link up by next Monday morning as I will be announcing a winner at the beginning of next weeks post :)

If you don't get your cutting done by next week you can still link it up :) (just not in time for the prize :)    The linky will remain open until the end of the Quilt-A-Long.  So if your out of town, or just had a busy week, no worries!!!  Just link up when you can :)

And Don't forget to add your beautiful cut up fabric to the Happy Quilting Quilt-A-Long Flickr group!!!  I am so excited to see all of your beautiful groupings ;)

So let's get cutting!!!  And if you have questions, don't hesitate to email me at happyquiltingmelissa@gmail.com.  Have a Happy Quilting Day!!
Pin It!

Thursday, January 10, 2013

Modern Baby - A New Book!!

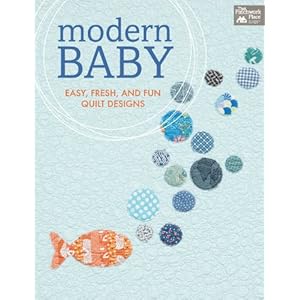
EEEkkk!!  I am so excited to share, this has been a secret for a long time!!  I have a quilt in a new book that will be released in April called Modern Baby!!!   Double EEEkkk!!!   Martingale has gathered an amazing group of quilters to create this diverse collection of modern baby quilts.  The designers include Amy Smart, Audrie Bidwell, Carolyn Friedlander, Carrie Bloomston, Dana Bolyard, Jake Finch, Jen Eskridge, Lindsey Rhodes, Melissa Corry, Pippa Eccles Armbrester, Sarah Flynn, Shea Henderson, and Victoria Findlay Wolfe.  Ya, can I just say I am so honored to be among this group!


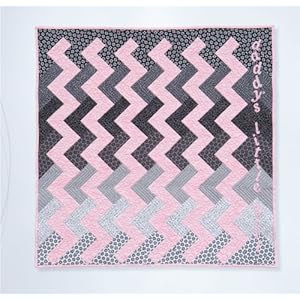
Here's my project,  It's called Daddy's Little Girl. ( I can't believe I finally get to share this, so excited!!!!)   I had a lot of fun designing this quilt.  My design concept was to take a basic chevron (totally modern, right) and then create a sort of moving background for it so that you don't quite know if it is moving up and down, or across. I love the boldness of the black and white prints but yet how the pink tones it down so that it is still soft and girly.  I used prints from Doodle Bug Designs Tuxedo Collection for Riley Blake and the pink is Cotton Candy from Riley Blake's Shades collection.     


I did the quilting myself for this little project and I was so happy with it.  I did a loopy flower and scroll vine design on the pink chevrons and I think it is some of the cutest quilting I have ever done.  Ya, I am just a wee bit proud of it, can you tell??  I did straight line echo quilting in the background to really help give it that modern feel and to really make those pink chevrons pop!!


I think my favorite part of the design are these cute little applique letters.  They are just so dainty and petite, which just makes me thing of cute little snugly babies.  And I really loved the way they finished the quilt.   It is so fun to see the name of the quilt actually on the quilt ;)


So that's Daddy's Little Girl!!   Modern Baby is now listed on Amazon, Barnes and Noble, and Shop Martingale and I have to admit, it still makes me giddy to see my name listed as an author there.  So if you have a minute  pop on over to one of these sites and check out all of the other projects in this adorable book!! Like I said before, I am in some amazing company!!


Oh, and since this is the first time I am able to show this finish, I am linking on up to Amanda's :)
Pin It!

Wednesday, January 9, 2013

Whole Cloth Quilting

I am hoping to get to basting this today.  I am excited to try whole cloth quilting for the first time.  I don't have anything fancy planned, just straight lines, but there is something awfully fun about the idea of quilting on such a clean surface.


Then, once I get it all quilted it will be time to play with these.  So fun!!!


Pin It!

Monday, January 7, 2013

Starburst Quilt-A-Long - Intro, Fabric, and Prizes

It's here!!  The Starburst Quilt-A-Long officially starts today!!!  Today's post is going over everything you need to know to Quilt-A-Long.   There will be a post each Monday from now until Feb 18th with weekly assignments and then there will be a Parade and Grand Prizes on March 4th.  So . . . onto a little rundown on how it's going to work!!


THE HOW TO

The Starburst Quilt-A-Long is based on my Starburst design that I did last year.  Each quilt consists of 4 large Starburst blocks.   The design is given in 3 different sizes so you can choose to make your quilt 57" x 57" (24" blocks), 76" x 76" (32" blocks), or 95" x 95" (40" blocks).  This quilt is not made by making one block at a time but rather making one complete set of quilting units (goose in the corner blocks, half square triangles, and flying geese) at a time.  Once the units are done, then the blocks will be created.   I broke down the construction of the quilt into 5 weeks and then added an additional 2 weeks to get it basted, quilted, and bound.  The schedule will be as follows

January 14 - Cutting Post
January 21 - Goose in the Corner and Half Square Triangles
January 28 - Flying Geese
February 4 - Building Blocks - At least 2
February 11 - Finish Blocks and Sashing
February 18 - Baste it, Quilt it, Bind It
March 4 - Starburst Parade and Grand Prizes

So count on checking back each Monday to see what the next week's assignment will be.  You will want to try to keep up weekly as there will be prizes along the way!!  With that said,  there is a tutorial, so if you get super excited and feel the need to work ahead, go for it!!  Just be sure to take a picture of each weekly assignment so that you can link it up for the weekly prizes :)  Oh, and if you are new to quilting, no worries, this will be super beginner friendly! I will go through each step in great detail in the Monday posts.

THE FABRIC REQUIREMENTS

Quilt Top

Regardless of what size quilt you decide to make, you will need 12 fat quarters.  You can pull these from your stash or Julie at the Intrepid Thread  has put together 7 stunning Starburst Quilt-A-Long Custom Bundles.  They are listed in Fat Quarter Bundles, which is what you need.  But, if you really love a bundle and want a little extra for a second quilt or another project, Julie has also listed them in Half Yard Bundles.

I went ahead and put each custom bundle into the quilt layout so you could get an idea of how they will look in the quilt.  These bundles are at a special Quilt-A-Long discount price, but  there is another little surprise father down, think coupon code :)

Fairy Dell
  

Figs and Plums
 

Peaches No Pits

Frosty Autumn

Key Lime Strawberry Pie

Sun and Sea


 Fruit Loops and Cocoa Puffs


Aren't these just fabulous. Julie has impeccable taste in fabric!! Good Luck choosing a favorite!! It was a super hard choice for me, but in the end I decided I am going with Fruit Loops and Cocoa Puffs.  I am so excited!!

Background Fabric (solid white in quilt sketches)
Once you have chosen your 12 fat quarters you need to get your Background Fabric.  I would suggest using a solid for this.  The background fabric needed is as follows

For the 57" x 57" (24" blocks)  size you need 2 2/3 yards background fabric
For the 76" x 76" (32" blocks)  size you need 4 yards background fabric
For the 95" x 95" (40" blocks) size you need 6 1/3 yards background fabric

Binding
If you like scrappy bindings, there will be enough left over from your fat quarters to do a lovely scrappy bindings.  If you prefer a one fabric binding you will need the following:

For the 57" x 57" (24" blocks)  size you need  1/2 yard binding fabric
For the 76" x 76" (32" blocks)  size you need  5/8 yard binding fabric
For the 95" x 95" (40" blocks) size you need 3/4 yard binding fabric

Backing
If you like scrappy backings, piece your backing together to be at least 6" larger on all sides than your quilt top.  If you prefer a one fabric backing you will need the following:

For the 57" x 57" (24" blocks)  size you need 2 3/4 yards backing fabric
For the 76" x 76" (32" blocks)  size you need 4 1/2 yards backing fabric
For the 95" x 95" (40" blocks) size you need 9 yards backing fabric

Coupon Code!!!

Julie is not only offering these beautiful bundles at a tremendous price, but she is also giving members of the Starburst Quilt-A-Long another fabulous discount.  Use the coupon code STARBURST at your checkout and receive and extra 10% off your order.  This means you can get an extra 10% off your already low priced bundle as well as getting 10% off your background fabric, and if you so choose, your binding and backing.  Score!!  Thank you to Julie for this extra little perk!!


THE PRIZES

I am so very excited about the Prizes for this Quilt-A-Long!!  I don't know about you, but I know that I am highly more motivated to keep up and finish when there are prizes at stake ;)  So how about this for a little motivation.

All those that finish their quilt top will be eligible for the Grand Prize.  The Grand Prize's are sponsored by The Intrepid Thread and huge Thank You goes out to Julie for her generosity in these prizes.  Wan't to know what they are???

A $75.00 Gift Certificate that you can spend as you like!!  There will be 3 lucky Grand Prize winners and each will get their own little shopping spree at The Intrepid Thread!!  And if that whopping amount of fabric goodness isn't motivation, then I don't know what is!!


But . . . Sometimes it is hard to keep motivated when the end is so far away.  So for that . . . We have a little Weekly Motivation.  Each week you will be able to link up (You don't have to have a blog to link up, you can link to a flickr picture :) your completed assignment for a chance to win the weekly prize.    These Weekly Prizes are sponsored by Fat Quarter Shop and a huge thank-you goes out to Kimberly and her team for their support in this Quilt-A-Long!!!


So ya,  there is lots of wonderful fabric to be won!!!  So keep up and sew on!!!

BUTTONS AND FLICKR

 Now down to the last of the nitty gritty.  First, If you are Quilting-A-Long and have a blog, It would be wonderful if you added the button to your blog :)   It really helps to spread the word and  the more that Quilt-A-Long the better!!!  If you have already added the button, thank you!!!


Second, I would love it if you joined the Happy Quilting Quilt-A-Long Flickr group.  You can post your fabric here, your progress, ask questions, ect.   And it is a super fun place to get to chat along with everyone participating :)  

LET'S GET GOING!!
So that just about wraps it up!!!  This week's assignment, round up your fabric.  Next Monday you will be getting your cutting assignments.  (And you will have a whole week to cut your fabric so if you don't have it by next Monday, it's okay, you still have some time :)

 If you have any questions at all regarding the Quilt-A-Long please do not hesitate to email me at happyquiltingmelissa@gmail.com.  I don't want anyone to not participate because they are confused by my rambling :)  I am just so excited, I can't wait for next Monday!!!
Pin It!

Saturday, January 5, 2013

Jan. Lucky Star and Starburst

I finished up January's Lucky Star block and boy does it keep your eyes moving.  I am totally loving these blocks.  They are super fun to make, come together great, and are pretty quick, now that I have my mind wrapped around paper piecing again.  One of my wonderful nieces has now claimed this quilt for her bed when it is finished.   Maybe I can even get the last block done early Dec and get it all quilted up by Christmas.   I just love quilting for someone, it makes the process that much more fun!!


And in other news . . . If you have been waiting for the Starburst Quilt-A-Long you need not wait much longer!!!   It all comes out on Monday!!  I am so excited :)  I just can't wait to quilt-a-long with all of ya!!


So grab your button and get ready to go.  It's going to be so much fun!!!


Pin It!

Friday, January 4, 2013

Paper Pieced Practice Block - Check

I finished up my practice block for the Lucky Stars BOM this morning and I am quickly remembering that I really like paper piecing!!  I mean, look at those points, what is there not to love about perfect points!!  I opted to alternate the blue and green diamonds hoping it would create a bit of an optical illusion.  It didn't have quite the desired effect I was going for, but I still like it so that's okay.  


This block started by making 4 sets of 2 templates.  It took me a little while to make the first template, I haven't paper pieced a lot and the little I have done was a while ago.  Thanks to Elizabeth's amazing instructions though I caught on and before you knew it was cranking them out assembly line style.


I always love a good trimming pile.  And it is fun to add paper to the mix of trimmings :)


After paper piecing the templates it's time to sew the eighth's into quarters, the quarters into halves, and the halves into a block.  This is where the finesse comes in and honestly, I just love this part.  I just love lining up the seams ever so perfectly and creating nice crisp points!


And before I knew it I was done.  When I was done, I wished I would have changed the center fabric so that I could see the awesome central point better, but I suppose that is all part of the learning process.  Once again, I still like it so I am happy with the overall outcome!!


So now it's onto January's block!!  So excited!!!  I think I will go pick out fabrics now :)

And since I finished it up, I am adding it to Crazy Mom Quilts Linky
Pin It!

Thursday, January 3, 2013

Trying me some Paper Piecing

First off, thank you for all of your well wishes for me being sick.  I am really starting to feel on the mend and am ready to get to some sewing today.  I so appreciate your thoughtfulness.

As I mentioned in my New Years post, I really want to continue to work on some of my skills, including paper piecing.  When Elizabeth from Don't Call Me Betsy, introduced her Paper Pieced Lucky Stars BOM  I knew it would be just the thing for me to stop procrastinating and really get paper piecing under my belt.  So of course, I signed right up, and then I promptly got behind.  

But it's a new day and I am ready to go.  I have my fabric picked.  Some lovely blue and green prints from Denyse Schmidt that have been waiting for the perfect project.  


And I have my templates all printed out for the practice block from last month and the January block for this month.  Time to give this a go.  Wish me luck!!


Pin It!

Wednesday, January 2, 2013

Playing Around and Laying Around

I have not sewn a stitch since Christmas!!  We have been to busy checking out new toys, putting together puzzles, playing games, making food, and basically partying!!  We even attempted to squeeze in a family picture before church.  Family picture's are always tuff around here, there's is a lot of bribing and whining that comes along with them.  It's not printing and framing worthy or anything, but it is nice to get a family shot every once and a while, just to see how everyone is growing up.


So now it is the new year and just as I am ready to get back to my sewing room,  I catch a nasty case of the stomach flu.  I was in bed all day yesterday and am still not feeling so hot today.  What ya gonna do. At least I can type here and there whilst lying about.  (I missed sewing so much I tried to go down to my room this morning to work on a block, I ended up back in bed in 2 minutes)

I did get some wonderful quilting news a few days ago that I am excited to share!!  My Refracted quilt was accepted to be in the Quilt Con show.  Yippee Skippee!!  Now I need to add a quilt sleeve to it and get it shipped off.  This will be my first quilt sleeve so here's hoping it isn't to tuff :)


And since it is the first Wednesday of the year, I best have a little rundown on what I will be working on.  Sorry, I really should add some photo's of these WIP's but I am stuck in bed.  So here is the list.  

Designing Stage
  • Starburst Quilt-A-Long - More Info Coming Very Soon!!!!
  • Circle Meets Square Quilt - This is getting pushed to 2013 for sure
  • Pillow Cases and Table Topper for Master Bedroom
  • Pillow Case for Kristian Bed
  • Hugs Before Kisses
  • Read with Me
  • Ring Around
Piecing Stage
  • Jessi and Me Quilt 
  • Block of the Month - Lucky Stars
  • Scrunchy Strips - For Kami
Quilting Stage
  • Solids Quilt for Free Motion
Completed Stage
  • Nothing completed but lot's of Family Time instead.  And hey, that's a good thing too!!!


So that's it for today.  I am rolling over to get some rest so I can get over this nasty bug and get back to whittling down this list!!
Pin It!