It's Week 7 of my Fast & Fun Lap Quilts Book Tour and today I am sharing a second version of the Jacks quilt! And this week, it is all about scrappy!!! And you know, I love nothing better than a scrappy rainbow of blocks ;)
For this version of Jacks, I was really trying to show how even if you aren't using Layer Cake pieces, you can always have fun playing in your scraps!!! Scrap quilts can often be overwhelming in balancing color, which is why my favorite kind is to pick a color for each block. The easiest way to start is to grab twenty 2 1/2" squares of varying colors and lay them out in the "color order" you want your quilt to be in. From there, simply sort though your scraps and add a scrap to whichever 2 1/2" square it matches best. Don't overthink it to much, as long as it is in the same realm of color, it will look awesome :) I mean, how can you not just love a scrappy rainbow :)
And using a dark background and white cornerstones just made all of those happy colors pop!!! I used white scraps for the cornerstones, and the background is Lead Grunge. It is an all time favorite for rainbow quilts. The dark grey is just so lovely, but it still has whisps of light grey to keep it fun and add texture. And don't you just love the scrappy binding, I matched the binding color to the block color!! There is a tutorial here on how I do that, just in case you want to do the same ;) Jacks finishes at 62 1/2" x 77 1/2" so it is a great size to cuddle up in, and your toes will still be covered ;)
Since I custom quilted all the quilts in the Fast & Fun Lap Quilts I thought it would be fun to do all over designs for these second versions. For this Jacks quilt, I quilted all over paisleys. It is such a fun design to quilt and I even have a video tutorial of how I quilt that design here. And for dark grey backgrounds and happy light prints, I am all about a medium grey thread to blend with it all ;)
And that is another Jacks quilt, the seventh lap quilt in my new Fast & Fun Lap Quilts book ! You can find the Fast & Fun Lap Quilts book in your local or online quilt shops, C&T Publishing, or if you would like a personalized signed copy, you can order from my Etsy shop. And if you make your own Jacks quilt, I would love to see it!! You can share your quilts with me on social media using hashtag #happyquiltingwithmc and #fastandfunlapquilts and tag me @happyquiltingmc or you can email me a picture at happyquiltingmelissa@gmail.com.
It's Week 7 of my Fast & Fun Lap Quilts Book Tour and today I am sharing the Jacks quilt! This quilt is the cover quilt on the book and I just love it. This is probably the last "fast" of all the quilts in the book, but it can still be whipped up with lots and lots of chain stitching ;) There are some more no -waste lattice units and a whole bunch of stitch and flip corners. And you have to love the scrappy binding to finish it all off, so cute!!!
Here is the introduction I wrote about Jacks in the Fast & Fun Lap Quilts Book. "When I was a child, whenever we had recess indoors at school I always wanted to play jacks. It was the best. Designing this quilt brought back many fun memories of playing my favorite game. I hope it will for you as well. Jacks is made of a lot of tiny stitch-and-flip squares, but don't be overwhelmed. They're fast to finish with chain piecing, and the result is a great quilt to snuggle up in."
When writing this book, I tried to give you all of the tips and trick that I would share if I were teaching a quilting class. This is my favorite tip from the Jacks quilt. Cutting out quilts is actually one of my favorite parts of making a quilt. I know, kind of crazy, but I just really enjoy it. And some of the reason I so enjoy it is because I can do it super fast. Below is a tidbit on how I cut so many squares so quickly, hopefully it will help you speed up your cutting as well :)
Jacks was made using Paisley Rose fabrics by Crystal Manning for Moda Fabrics. All the quilts in Fast and Fun Lap Quilts are made with 1 Layer Cake/10" Stacker and a background fabric. You will use 40 of the 10" squares for this quilt so you really use up just about every last piece. This quilt finishes at 62 1/2" x 77 1/2", making it a perfect lap size quilt for snuggling up in.
I had so much fun custom quilting each of the quilts in Fast & Fun Lap Quilts . For this Jacks quilt, I quilted little loop d loops in the main part of the background and echoed the center "star" of the block with pebbles. Then I quilted wishbones on the spokes and left the center unquilted so it would pop. a I used 402 So Fine thread to blend perfectly into the white background and all of the prints. I know, your shocked right :)
And that is my Jacks quilt, the seventh lap quilt in my new Fast & Fun Lap Quilts book ! You can find the Fast & Fun Lap Quilts book in your local or online quilt shops, C&T Publishing, or if you would like a personalized signed copy, you can order from my Etsy shop. And if you make your own Jacks quilt, I would love to see it!! You can share your quilts with me on social media using hashtag #happyquiltingwithmc and #fastandfunlapquilts and tag me @happyquiltingmc or you can email me a picture at happyquiltingmelissa@gmail.com.
And speaking of making a Jacks Quilt, my good friend, Melanie Call has made up her own Jacks Quilt using Dwell Fabrics by Camille Roskelly for Moda. She used Chambray Grey on the background and I just love the way it makes all of those beautiful colors from Dwell just sing!! Didn't Melanie's quilt just turn out amazing!!! It is an absolutely stunning finish!! You can see all the details at Melanie's Instagram, ABitofScrapStuff.
And while you are visiting Melanie at ABitofScrapStuff, be sure to enter her giveaway. She is sharing a Dwell Layer Cake with a Happy Quilting Reader so you can make a Jacks quilt just like Melanie's!!! How fun is that, You can enter the giveaway at her Instagram.
Today's Terrific Tuesday Giveaway is being sponsored by Lou Lou's Fabric Shop . Did you know that Jamie makes a new Lou Lou Bundle every Tuesday . . . here is the latest, isn't it just Festive!! Along with hosting the giveaway, Jamie is also offering all Happy Quilting readers a special Early Black Friday discount of 20% off your Entire Order with the code HappyQuilting!!! (code will expire on Nov 22)Oh, so much fun shopping!!!
And speaking of Bundles, for Today's Terrific Tuesday Giveaway, Lou Lou's Fabric Shop is letting you Pick any 2 Lou Lou Bundles!!! That's right, the winner will get to choose their favorite 2 Lou Lou Bundles that Jamie has in stock!!! Oh my goodness, how will you ever decide :) What fun the winner will have this week!!!!
You have two entry chances here on the blog, and please leave a separate comment for each. All Entries are welcome, including International Entries. Please just be sure to leave an email address if you are a no-reply blogger ;)
ENTRY 1 - Simply leave a comment that tells me when do you put up your Christmas Tree and decorations??
ENTRY 2 - Lets show Lou Lou's Fabric Shop some Love!!!! You can follow them on Facebook, Twitter, Pinterest, or Instagram. Or you can follow their blog or visit The Shop and then share a favorite item ;) Just be sure to leave a comment of how you showed your Lou Lou's Fabric Shop Love!!!
And that's it ;) The giveaway will be open until next Tuesday, November 22nd, when I will announce a winner at the beginning of next weeks Terrific Tuesday Giveaway Post :)
You can also pop over to my Instagram and/or Facebook to enter there as well :)
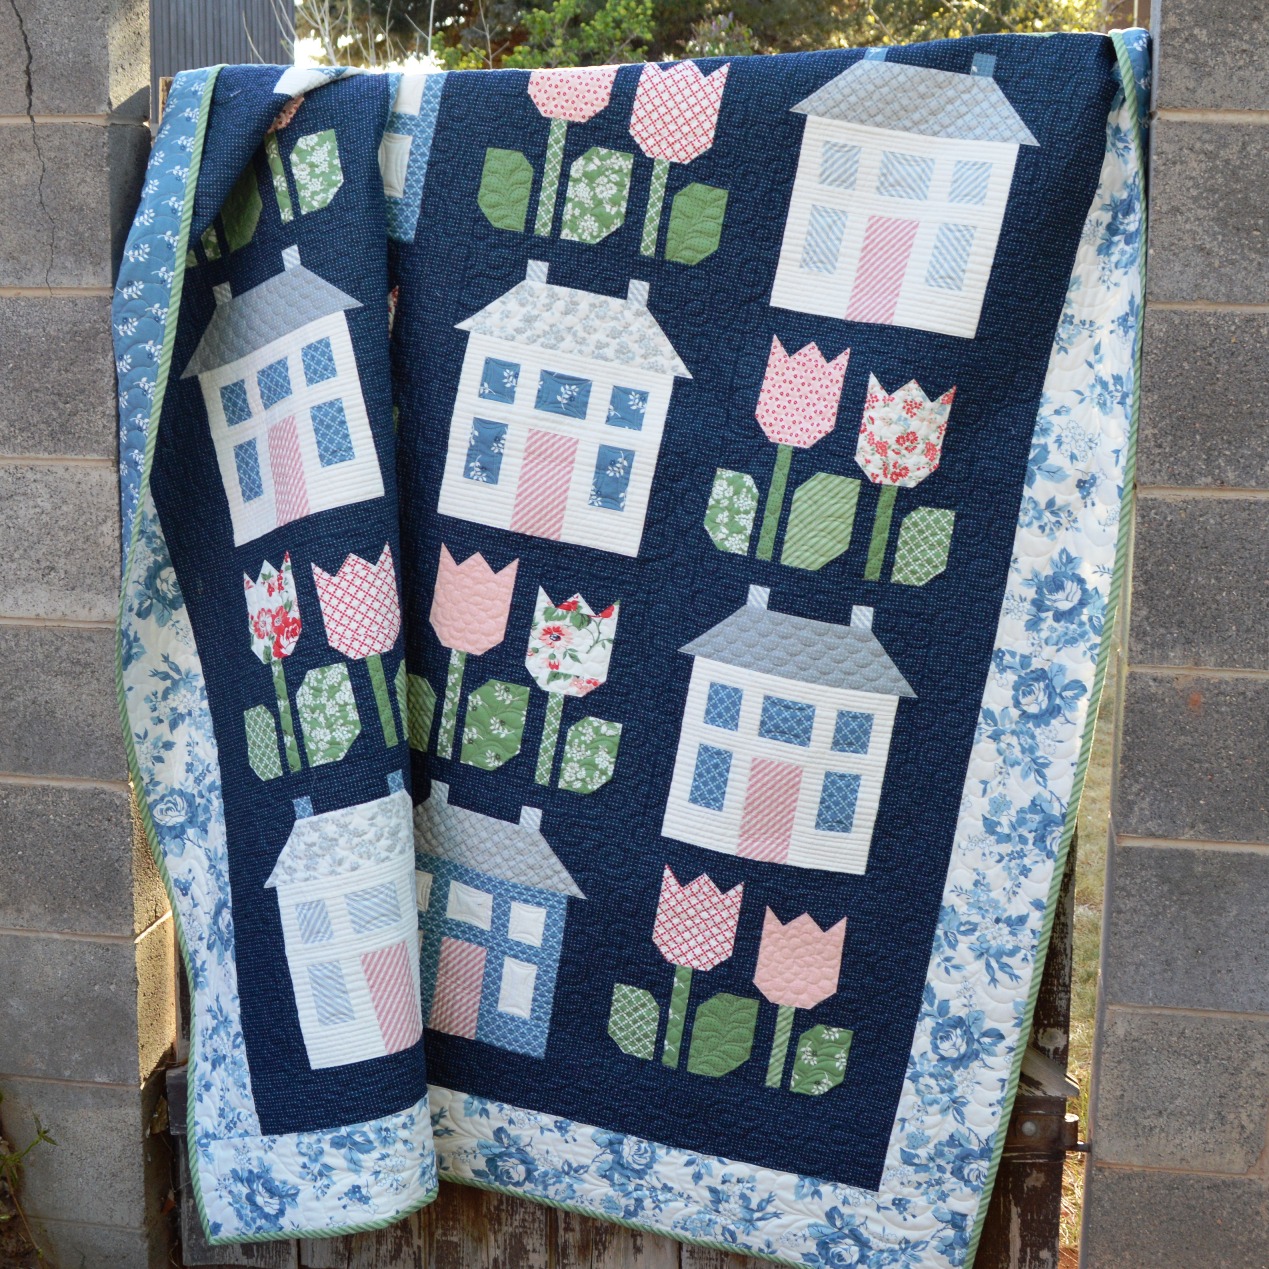
It's always a fun day when I get to share some secret sewing!! I was thrilled when my good friends at Moda Fabrics asked if I would make the Hometown Quilt by Camille Roskelley featuring her new Dwell Fabrics!!! And of course, I said yes, I mean, how can you not whip up those adorable tulips and houses, so cute!!!!
I love making Thimble Blossom patterns, they are always so well written, easy to follow, and just fun piecing! And I truly did have so much fun making up this Hometown Quilt !!! My favorite was the tulips, just so sweet. And I love the print Camille chose for the border, it just frames up that navy dot background perfectly.
And I know it looks like a lot of piecing, but it is all piecing on the larger size, and you can chain piece the house blocks and the tulip blocks, so it truly goes together quite fast. And wouldn't it just make the perfect wedding present or a new homeowner gift!!! It finishes at 70" x 80" so it is a great size to snuggle up in or have as a throw on a couch.
And I had so much fun custom quilting this one!!! I quilted all over curly q's in the background. Then on the houses I did scallops on the roof, arches in the windows, and straight lines in the door. I just love the way it all came together, don't they just look so cozy!!!
And on the tulips I pulled out all the fun flowy designs. I did echoed petals on the petals (makes sense :) and loose feathers on the leaves and a wavy line on the stems. I just love all of the texture this gives the quilt, especially on those petals. So adorable!!! I just had a blast quilting this one!!!
And now this quilt is off visiting lots of quilt shops in a whole bunch of hometowns :) So I will have to wait to snuggle up in it, But you don't have to wait!!! Dwell Fabrics are shipping now and Fat Quarter Shop has a Hometown Quilt Kit already available !! So you can whip up your own Hometown Quilt before the end of the year, so great!!!
I know you are just going to have so much fun making your own ;) It really is such a fun quilt to make and comes together so easy!! And then you have such a beautiful finish to show for it!!!! I am excited for this one to come back because I think it is just going to make such a lovely wedding gift :)
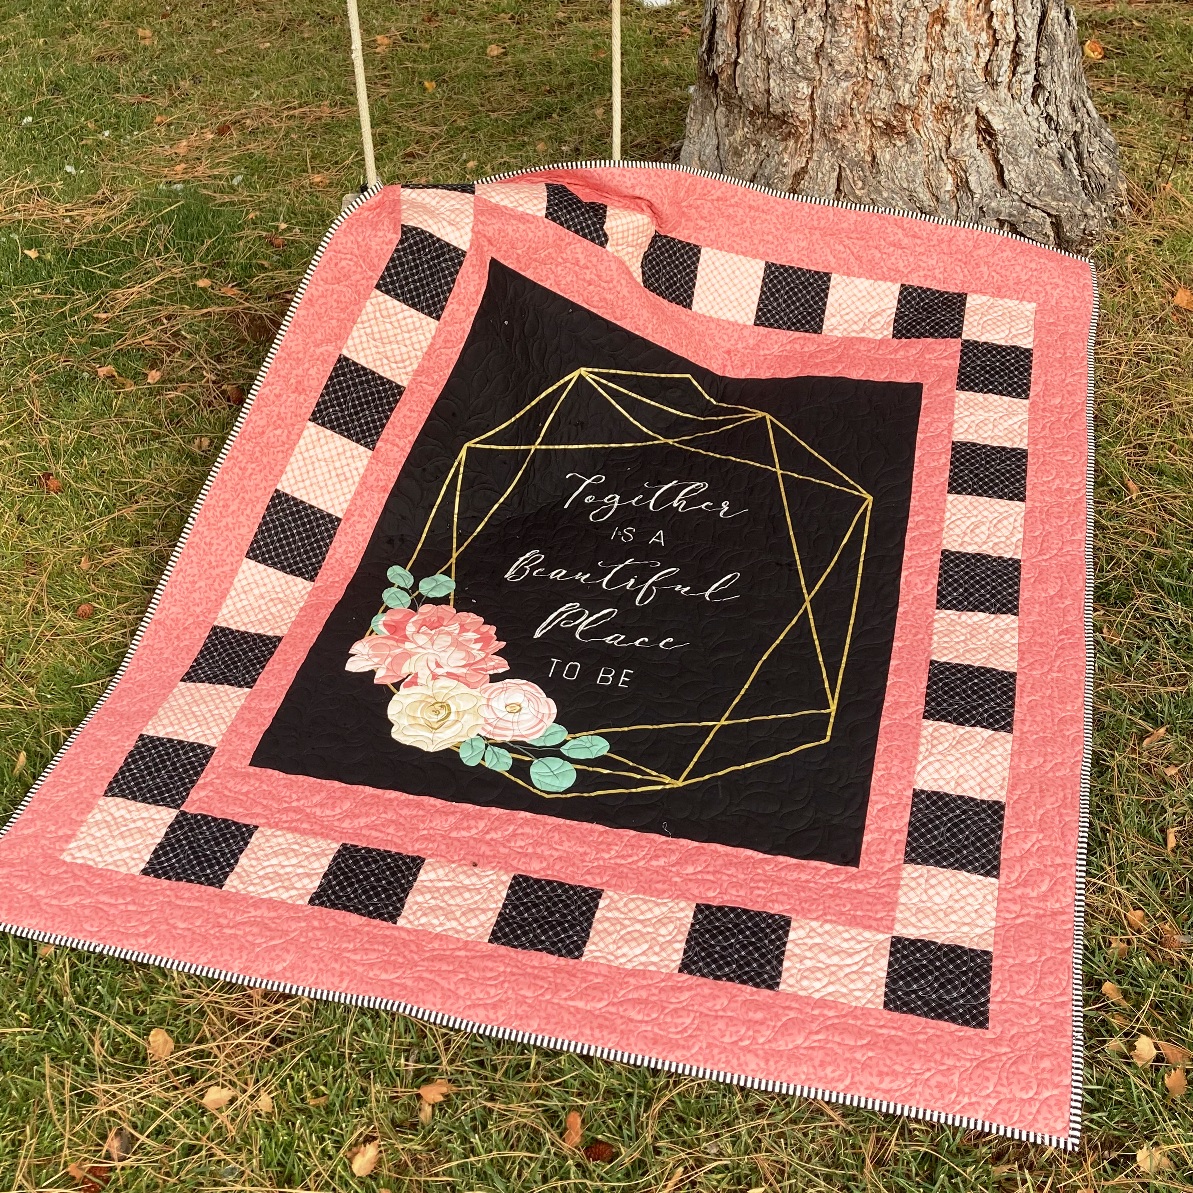
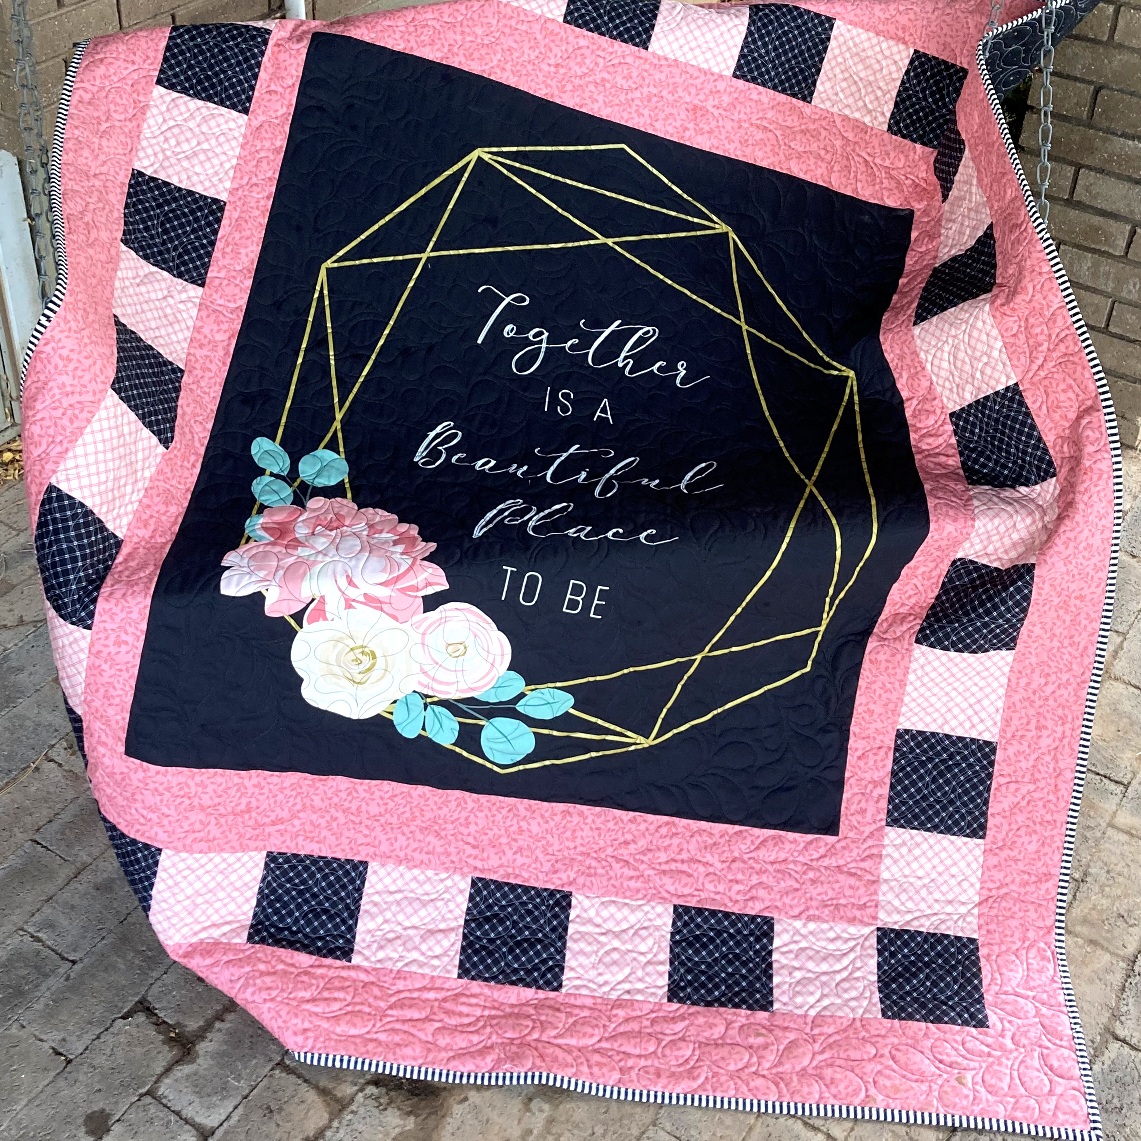
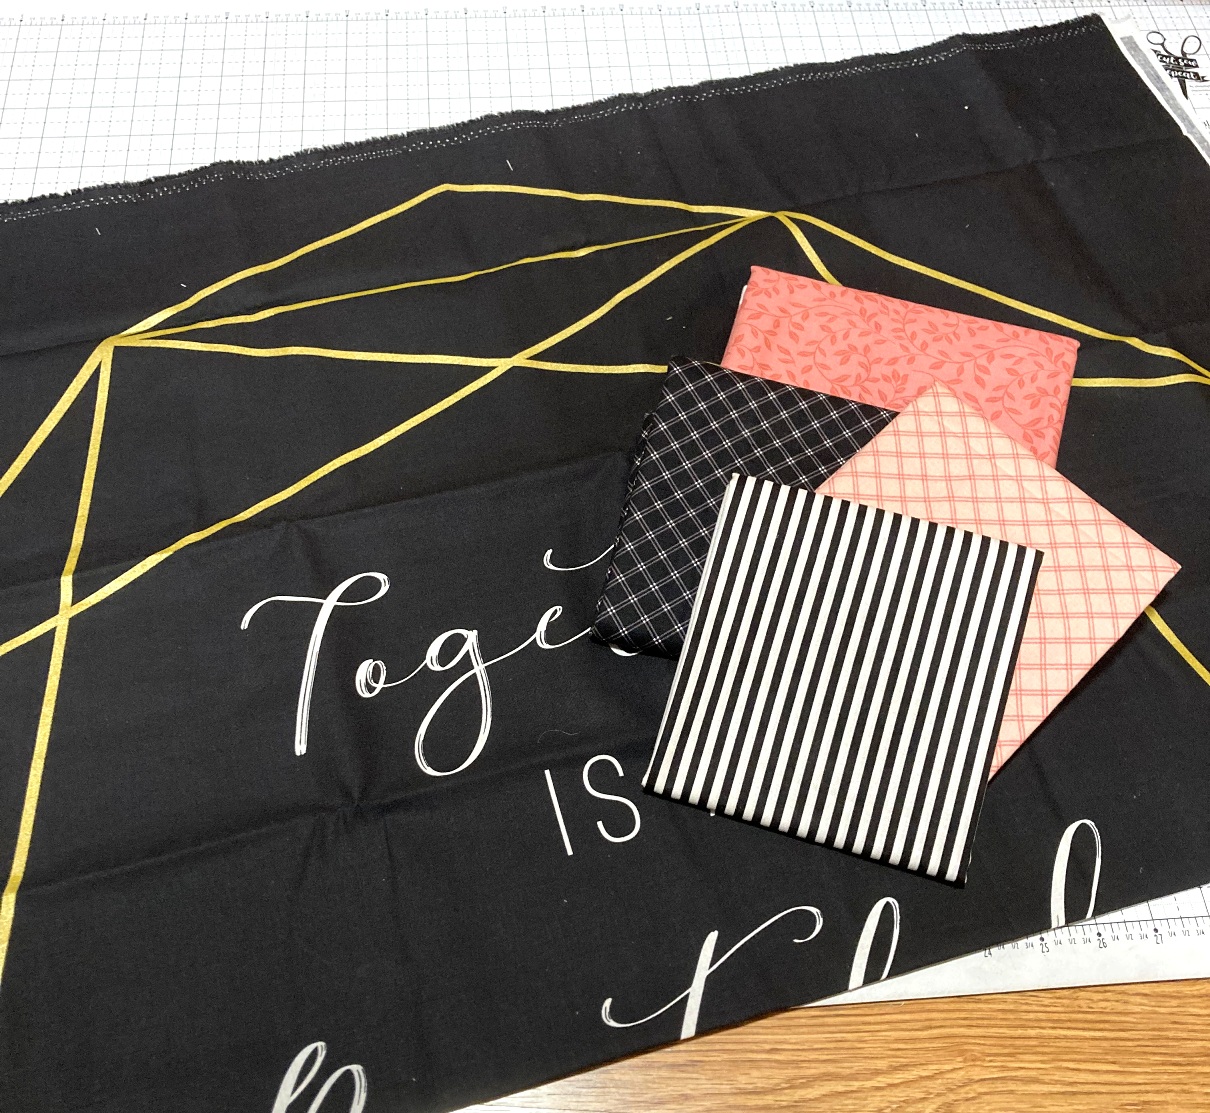
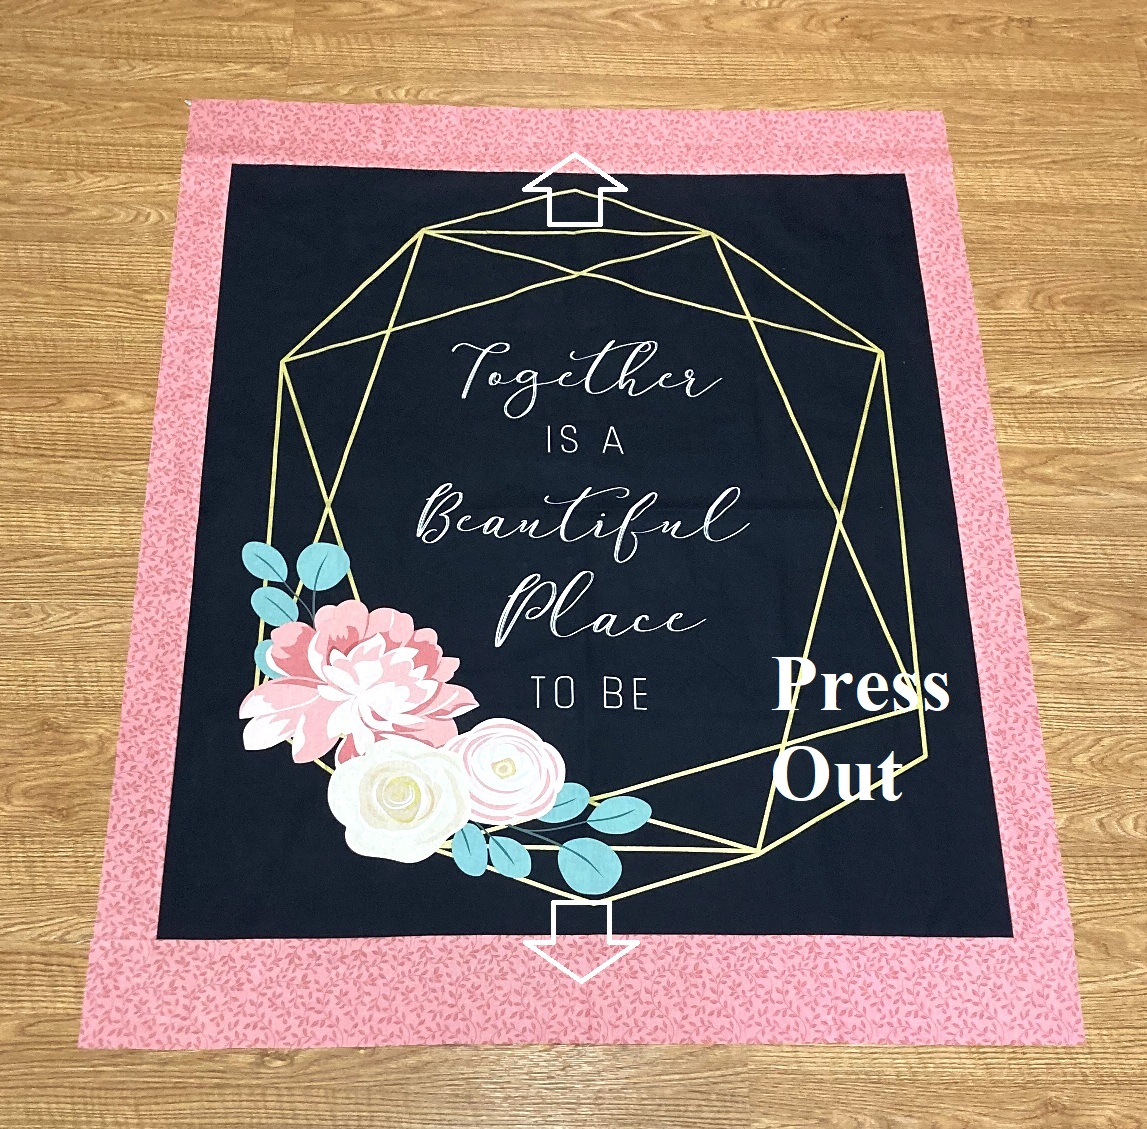
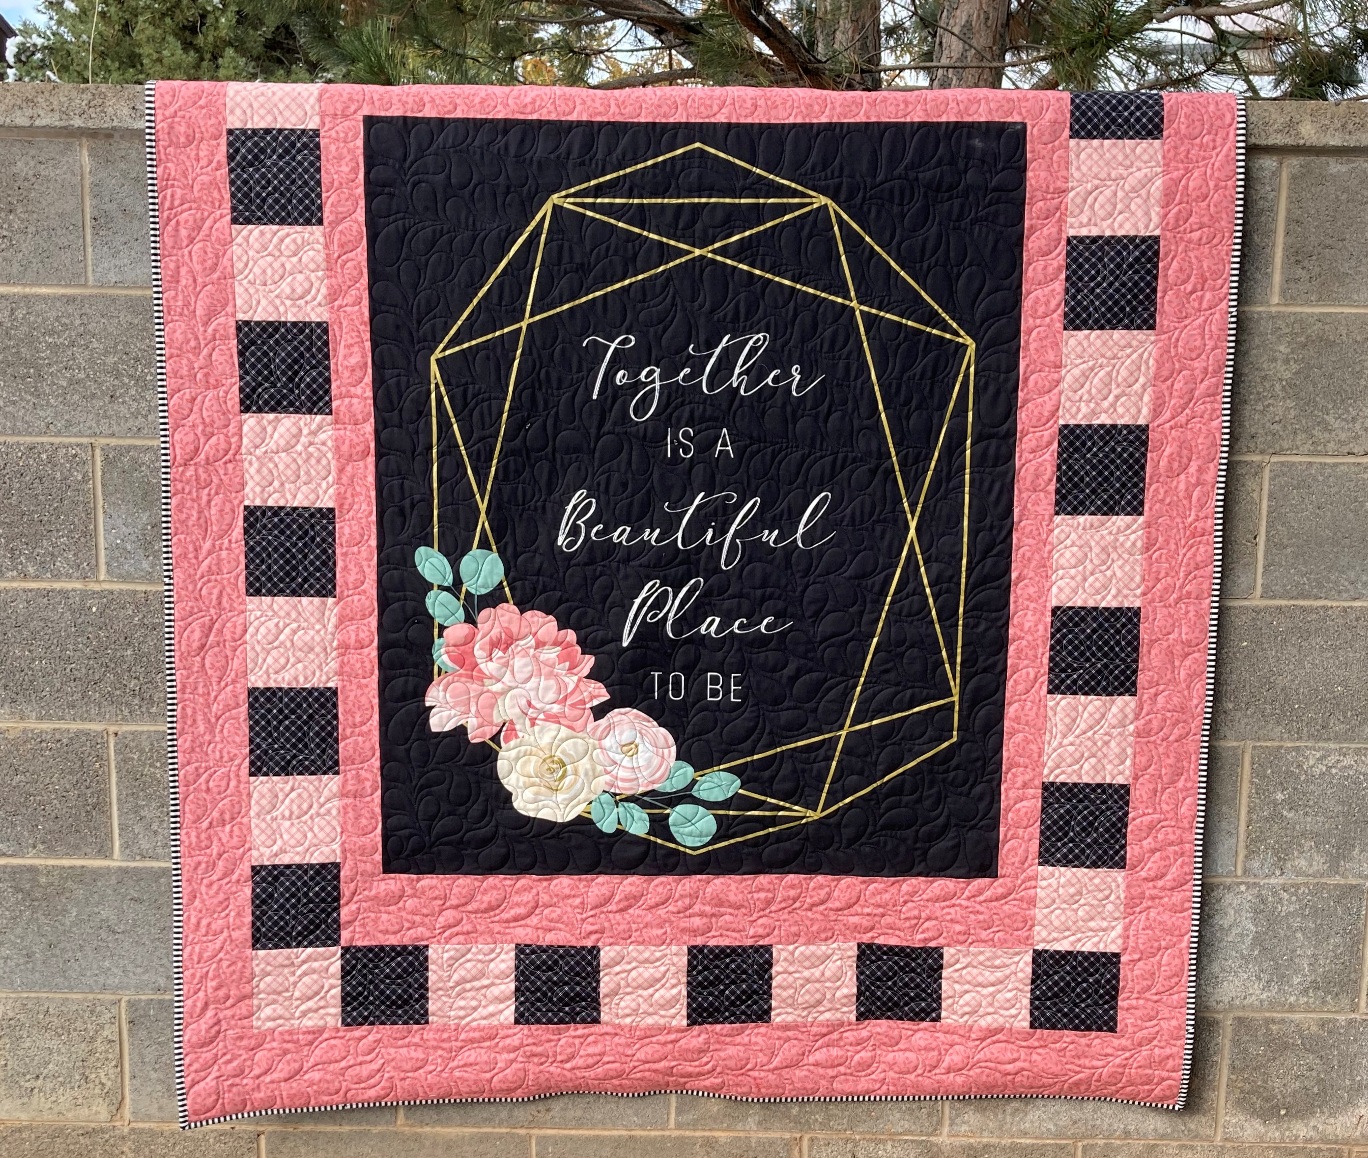
Today, I am thrilled to be bringing you a new quilt finish and a tutorial to go along with it! I just love a good panel, and they make for some stunning quilts!! I was immediately drawn to the gorgeous Together is a Beautiful Place to Be Panel from the At First Sight Fabric Line by Dani Mogstad. It is so beautiful in it's simple elegance. So I thought, why not add some simply borders and make a stunning Wedding Quilt that you can whip up in no time at all :)
For our tutorial today, we are using the beautiful panel I mentioned and 4 prints from the At First Sight Line to make the borders. I choose the Coral Vine for the inner and outer border so that it would really pop against the black. Then the Blush and Black Plaid print make up the patchwork border, which really brings back the colors of the panel. And of course, you can never go wrong with a Striped Binding, especially when it is in black and white ;)
The quilt finishes at 58" x 70" so it makes for a perfect lap size quilt. It is a wonderful go-to wedding gift when you need to whip up something quick that also looks amazing!! So, let's get to making your own!!!
MATERIALS NEEDED:
To make your own Simple Wedding Panel Quilt you will need
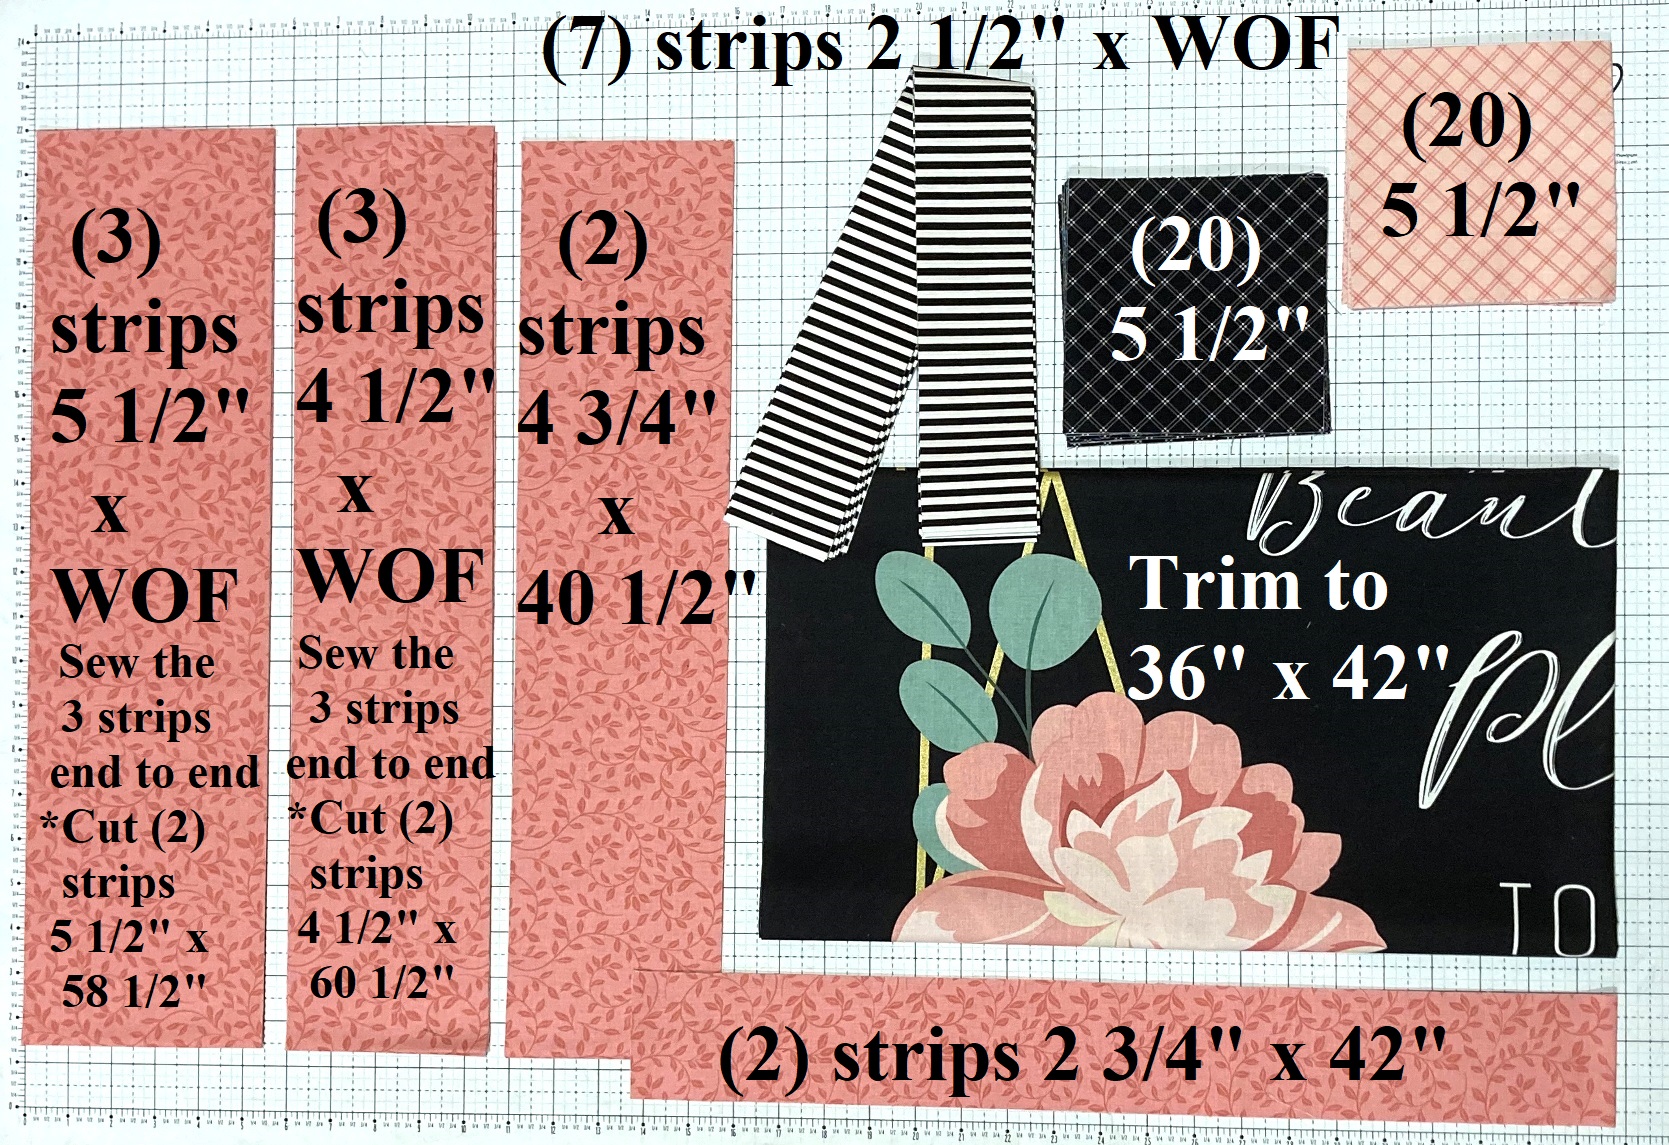
Begin by Trimming the Panel to measure 36" x 42". This is super close to the selvage, and if you have to cut a little selvage into the panel that is fine, as long as it is less than 1/4" it will just go into the seam allowance.
From the Coral Vine Print cut:
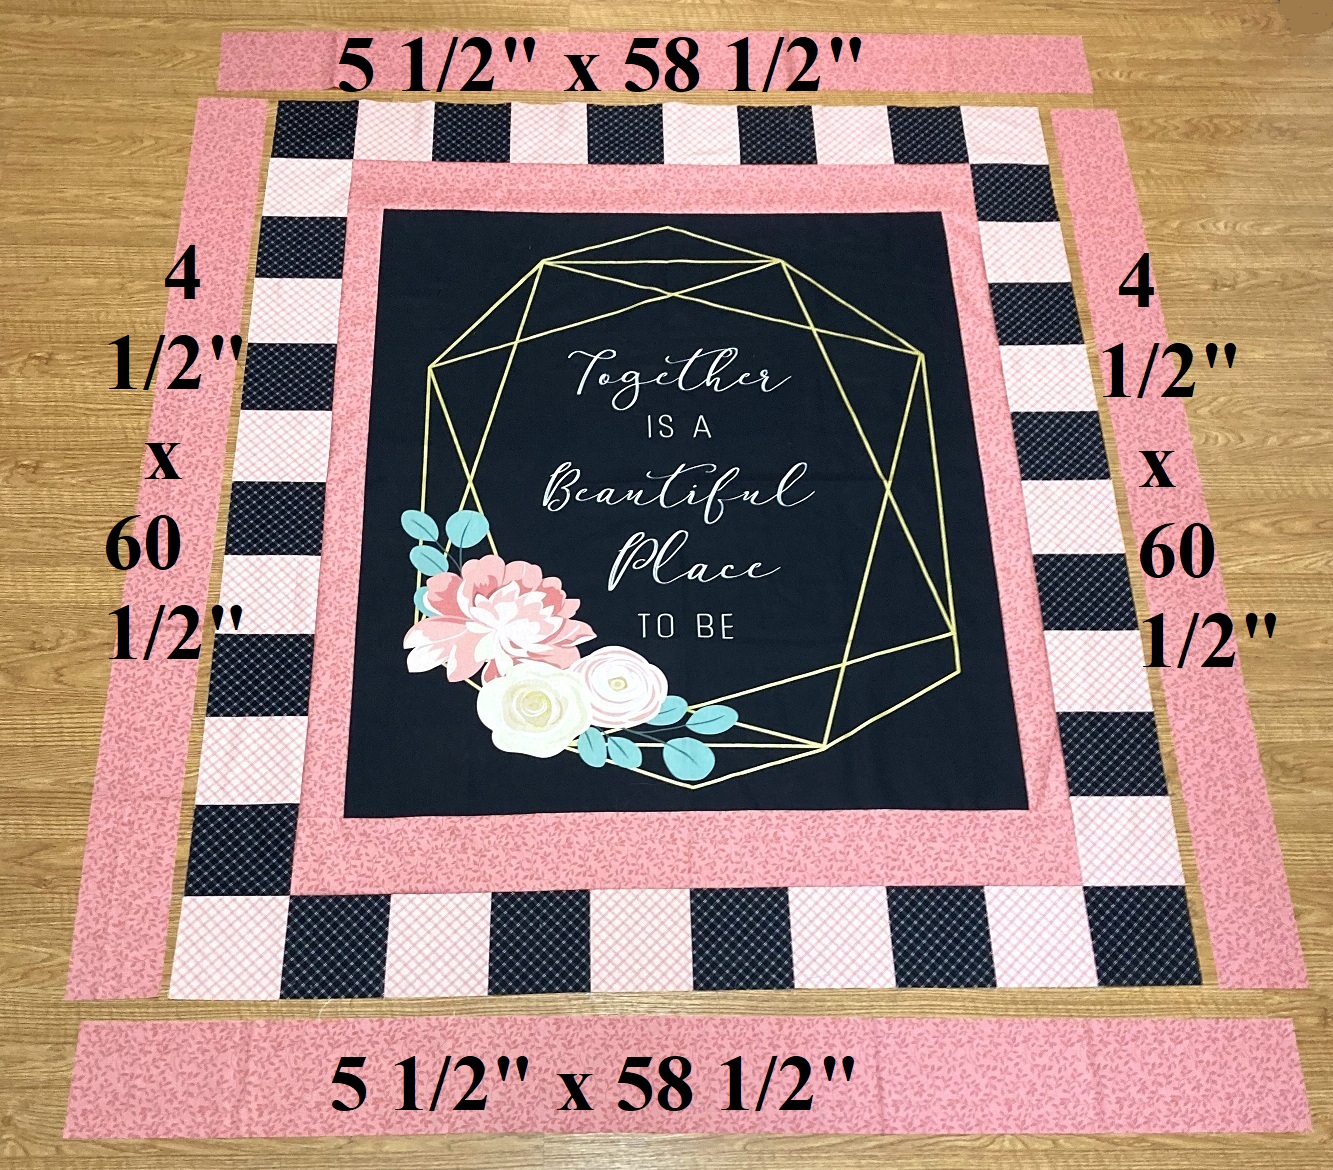
(3) 5 1/2" x WOF strips. Sew the 3 strips end to end and subcut (2) 5 1/2" x 58 1/2" strips for the outer border.
(3) 4 1/2" x WOF strips. Sew the 3 strips end to end and subcut (2) 4 1/2" x 60 1/2" strips for the outer border.
(2) 4 3/4" x 40 1/2" strips for the inner border.
(2) 2 3/4" x 42" strips for the inner border.
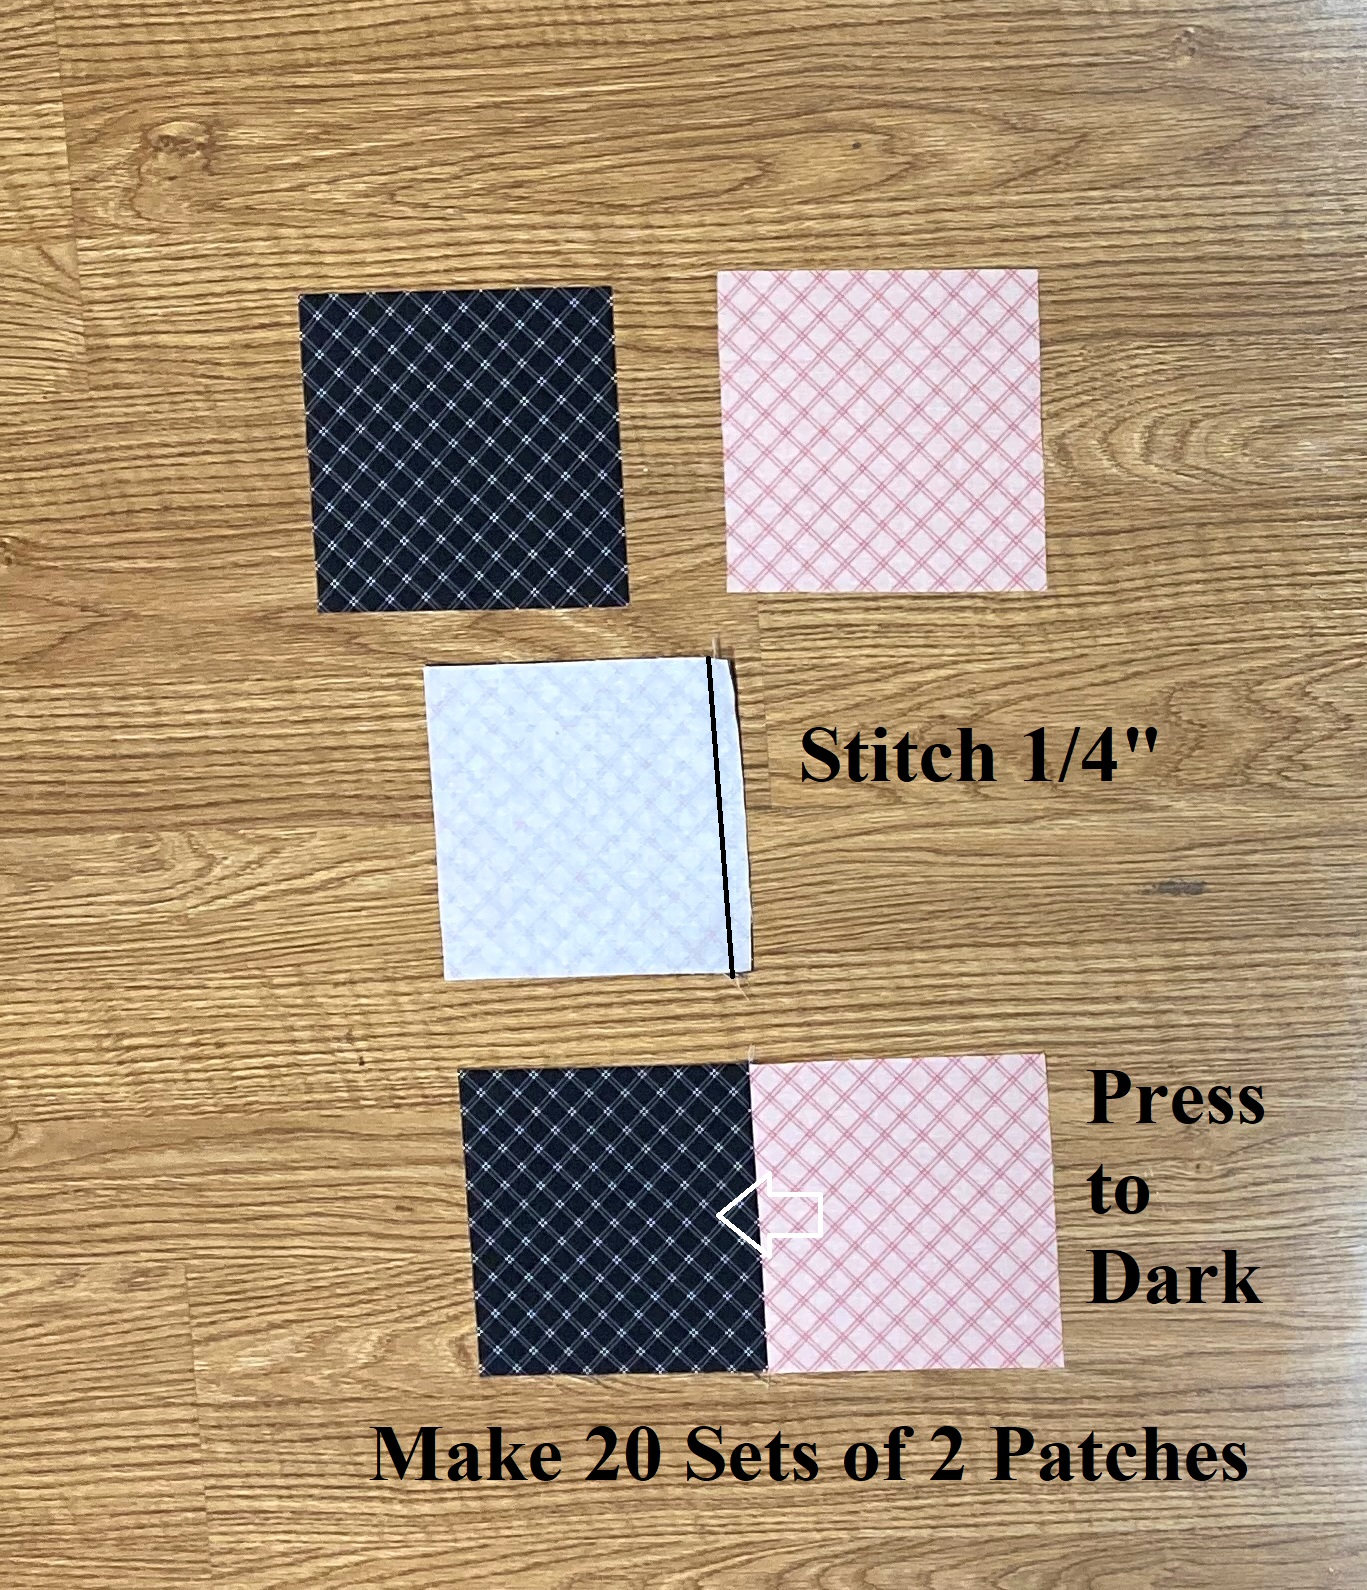
From the Black Plaid Print cut:
(20) 5 1/2" x 5 1/2" squares for the patchwork border.
From the Blush Plaid Print cut:
(20) 5 1/2" x 5 1/2" squares for the patchwork border.
From the Stripe Fabric cut:
(7) 2 1/2" x WOF Strips for binding.
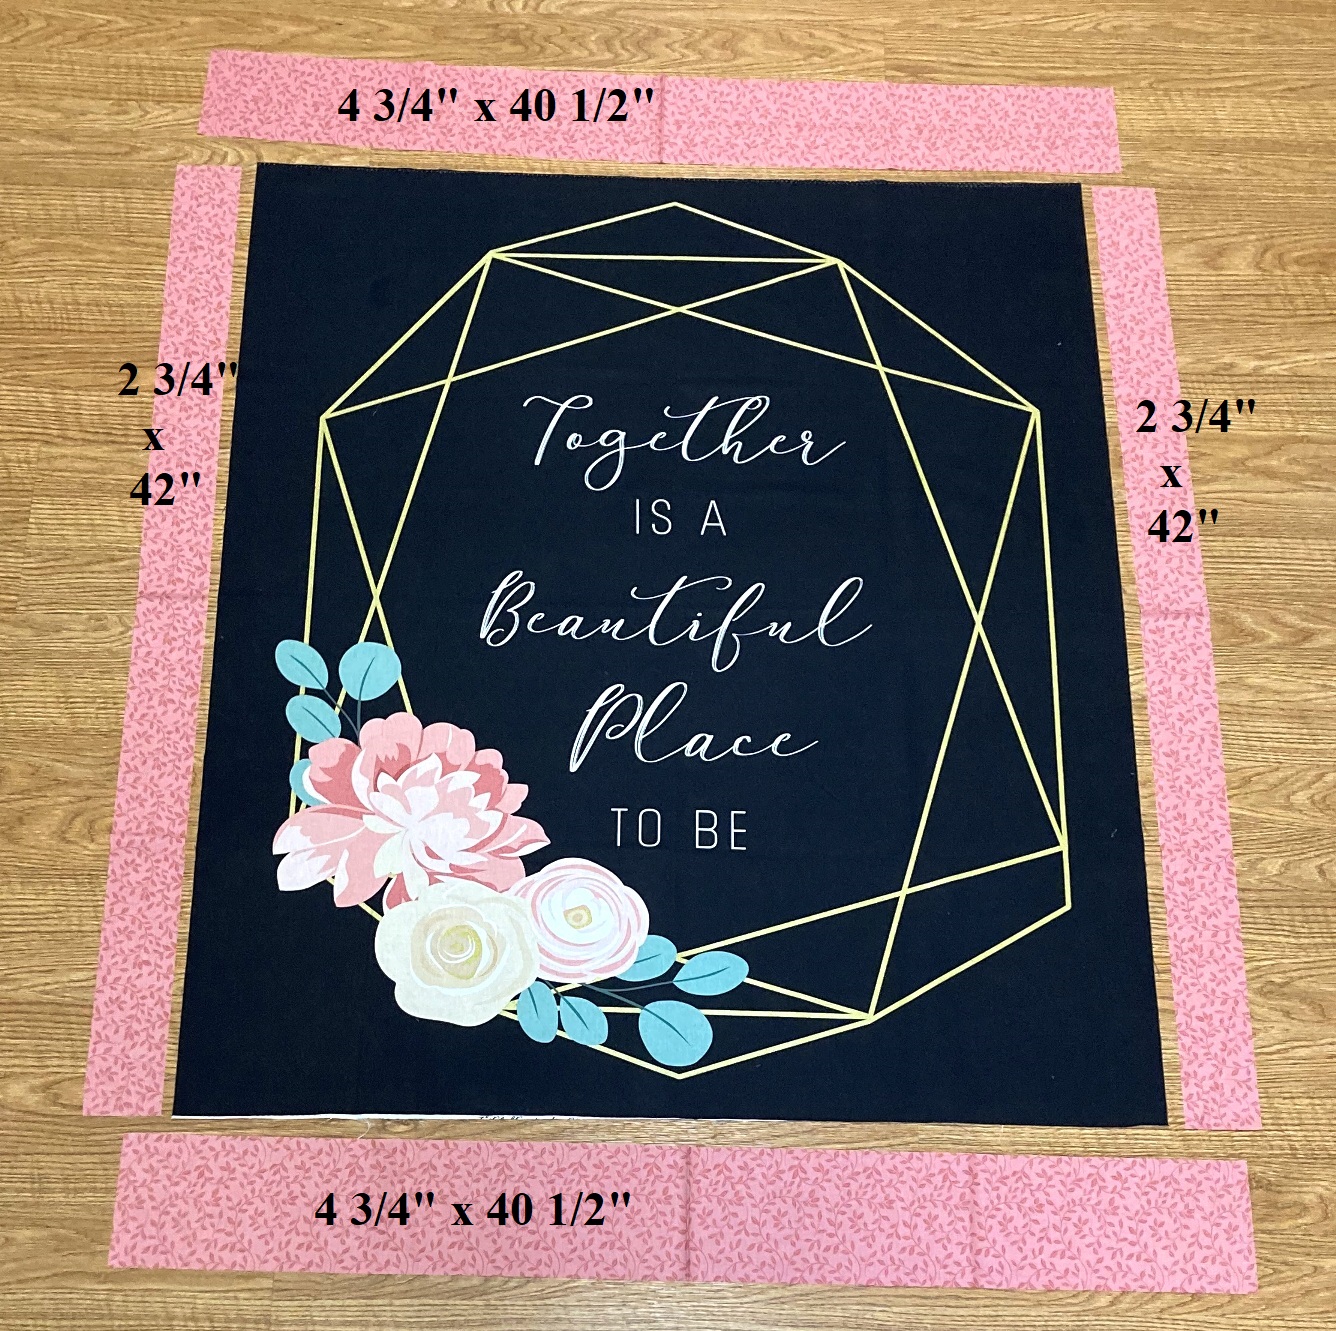
STEP 2 - ADDING THE INNER BORDER
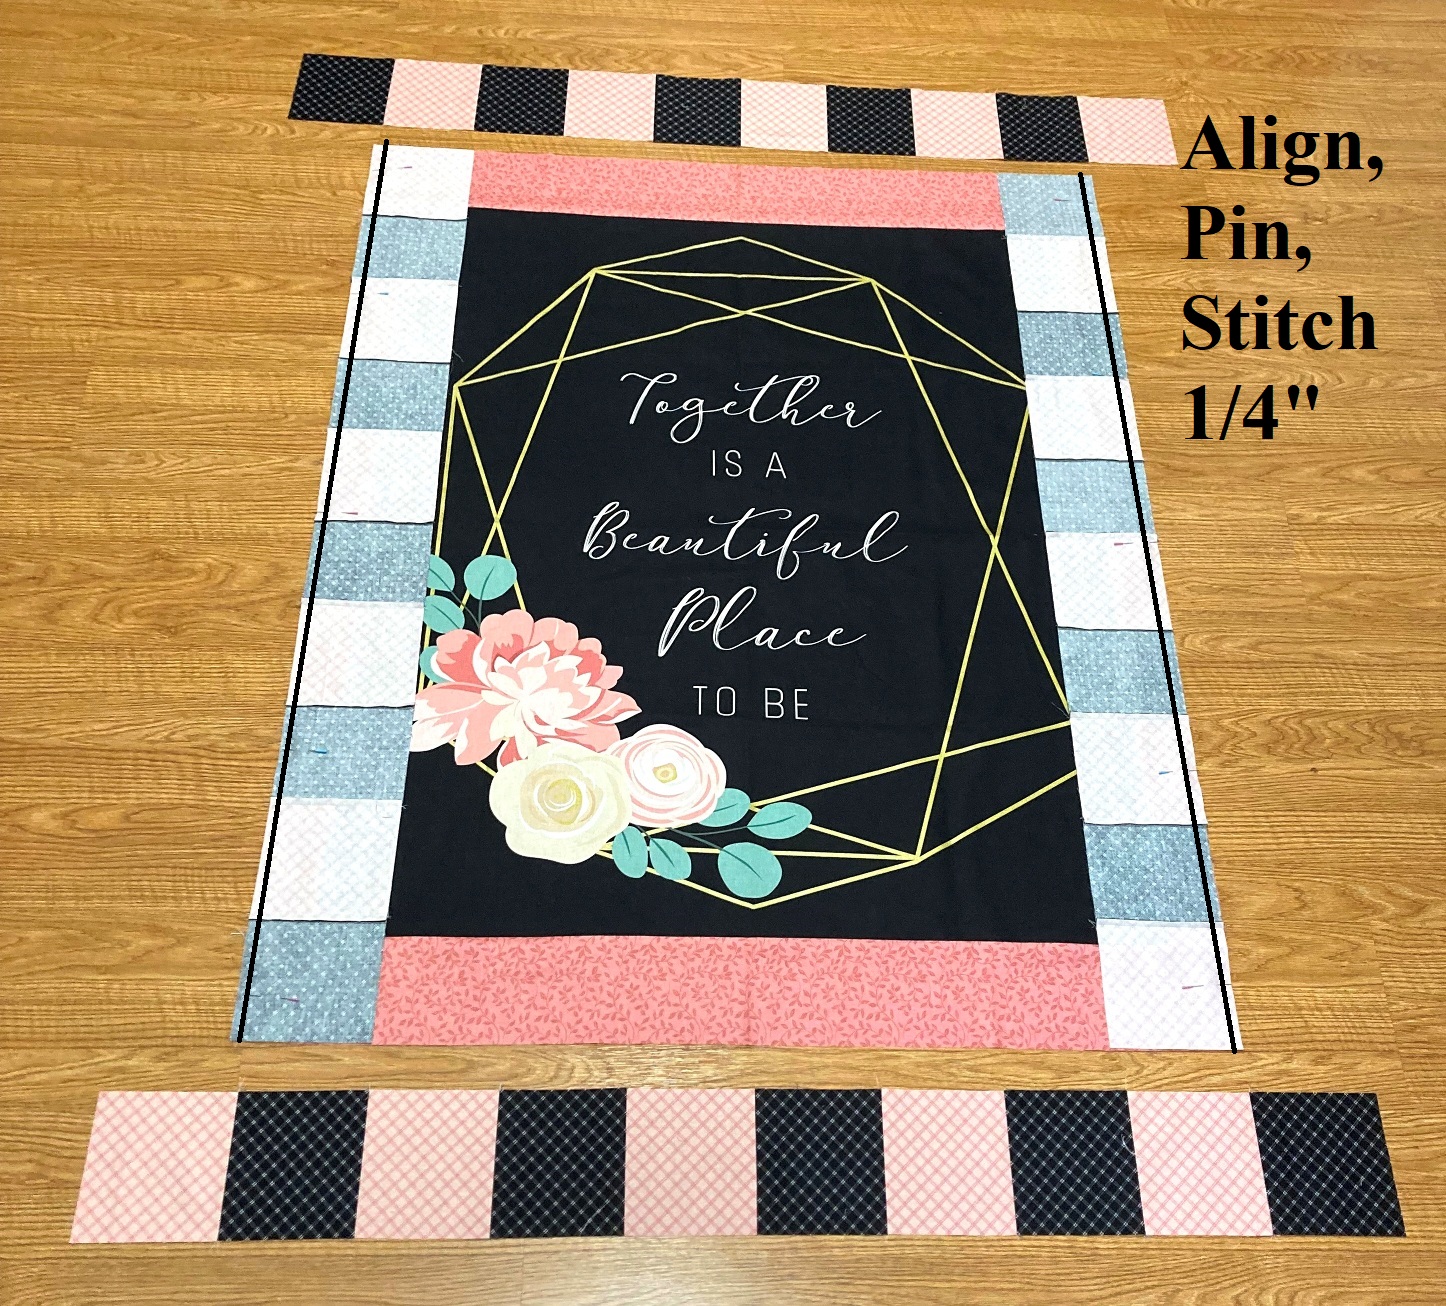
And with the cutting done, we are ready to do some stitching. Layout the Panel and the 4 Inner Border Coral Strips as shown below.
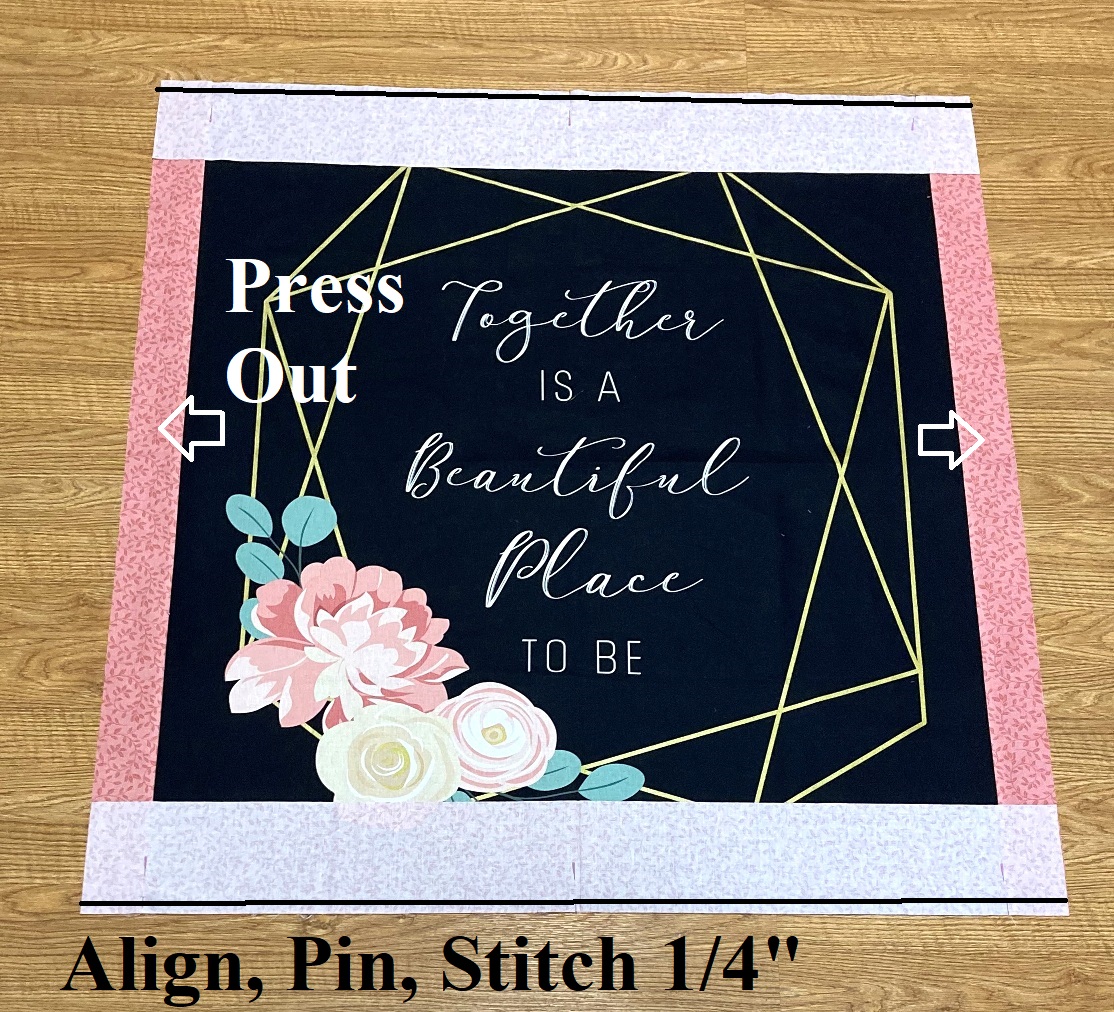
Place the side strips onto the sides of the Panel with right sides together. Align and pin the strips, and then stitch a 1/4" seam along the two edges.
Press the seams out towards the Coral strips. Place the top and bottom strips onto the top and bottom of the Panel with right sides together. Align and pin the strips, and then stitch a 1/4" seam along the two edges.
Press the seams out towards the Coral strips. You can now set the bordered panel aside for a minute while we make the patchwork border.
STEP 3 - ADDING THE PATCHWORK BORDER
Layout a Black Plaid and a Blush Plaid 5 1/2" square as shown below. Place the Blush square onto the Black square with right sides together and align the raw edges. Stitch a 1/4" seam along the edge. Press the seam towards the Black square. Repeat and Chain Stitch the pairs to make a total of 20 Two Patch Units.
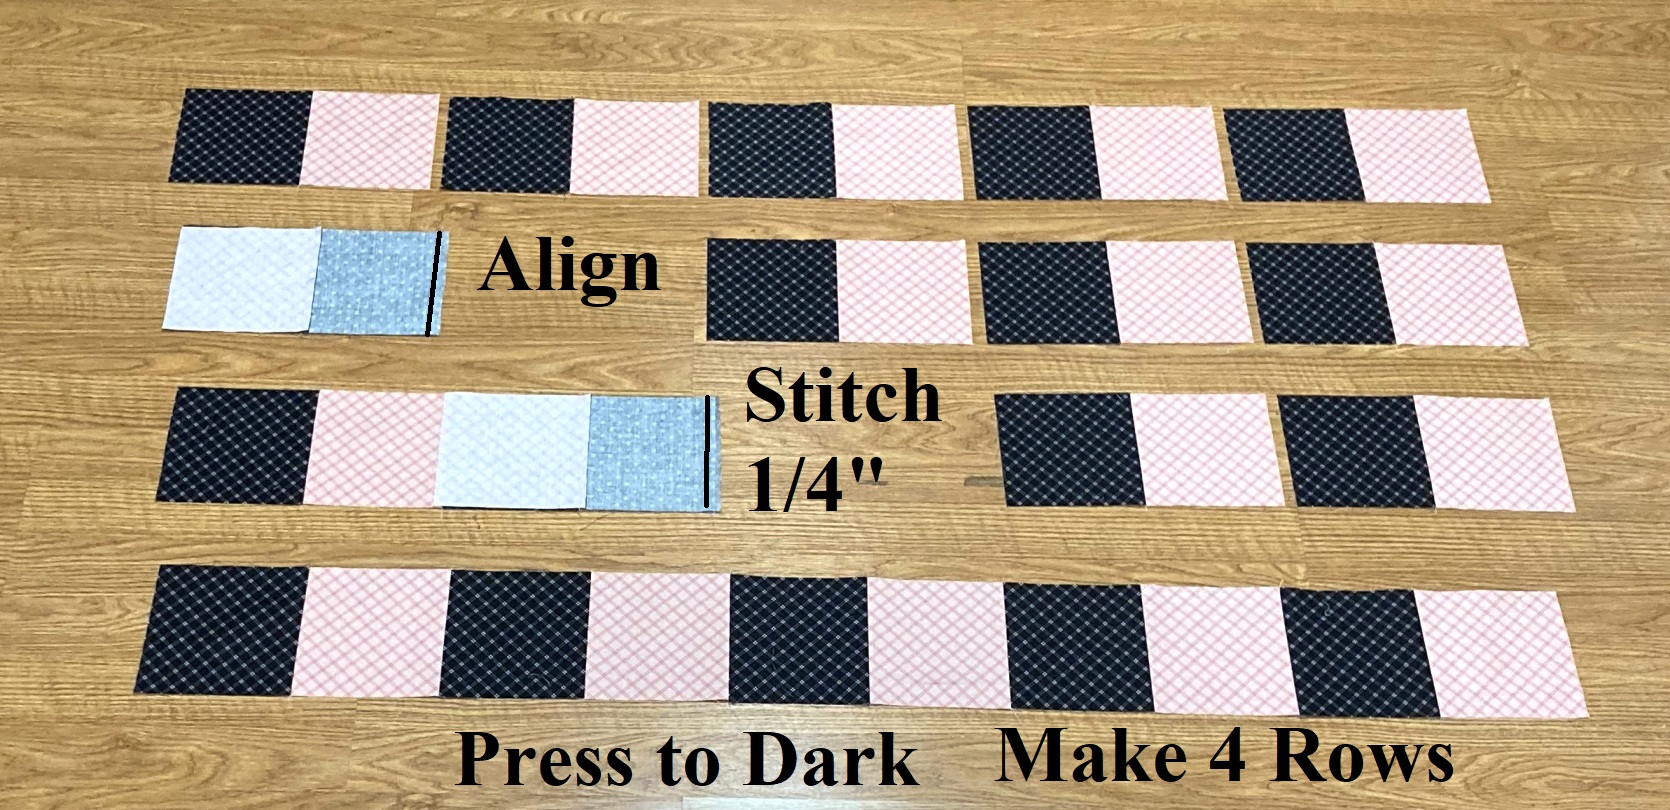
Layout 5 Two Patch Units in a row as shown below. Place the second Two Patch Unit in the row onto the first with right sides together and align the raw edges. Stitch a 1/4" seam along the pinned edge. Then place the third Two Patch Unit in the row onto the now sewn together first and second units, with right sides together. Align and stitch a 1/4" seam. Continue in this fashion until you have sewn all 5 Two Patch Units into a row. Press the seams towards the Black squares. Repeat and Chain Stitch to make 4 Patchwork Rows Total.
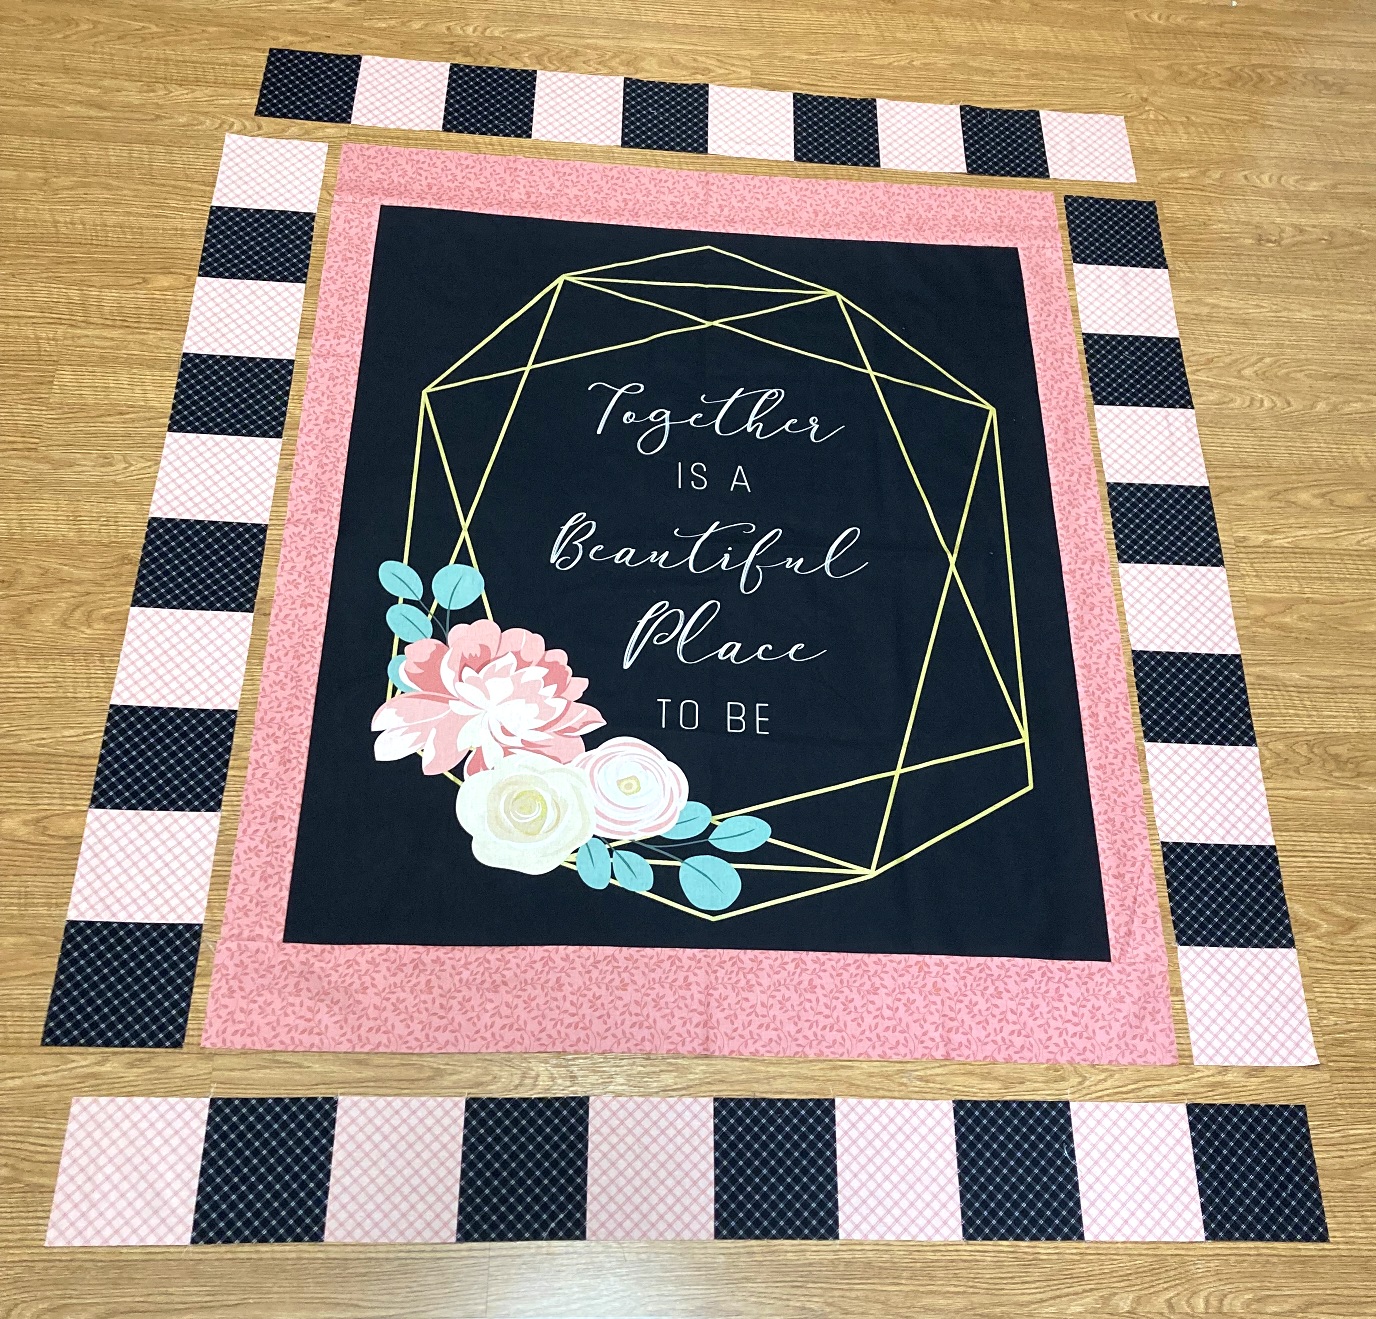
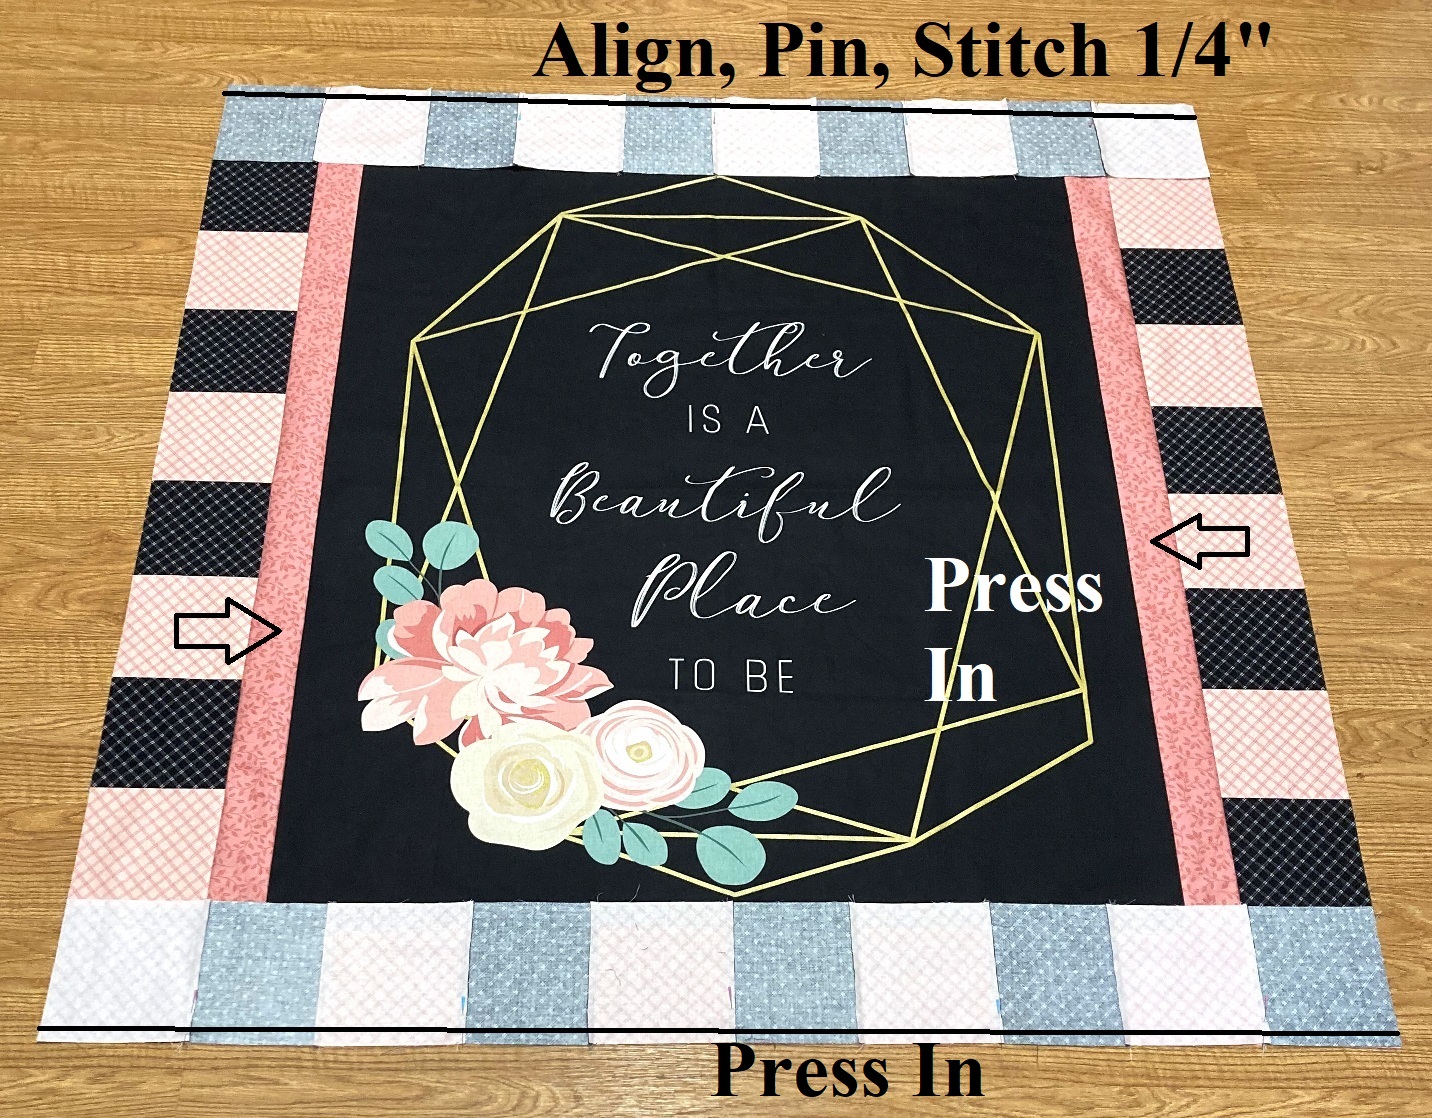
Layout the Bordered Panel and the 4 Patchwork Rows as shown below, taking note of the placement of the Blush and Black squares.
Place the side Patchwork Rows onto the sides of the Bordered Panel with right sides together. Align and pin the rows, and then stitch a 1/4" seam along the two edges.
Press the seams in towards the Coral strips. Place the top and bottom Patchwork rows onto the top and bottom of the Bordered Panel with right sides together. Align and pin the rows, and then stitch a 1/4" seam along the two edges. Once again, press the seam allowances in towards the Coral strips.
STEP 4 - ADDING THE OUTER BORDER
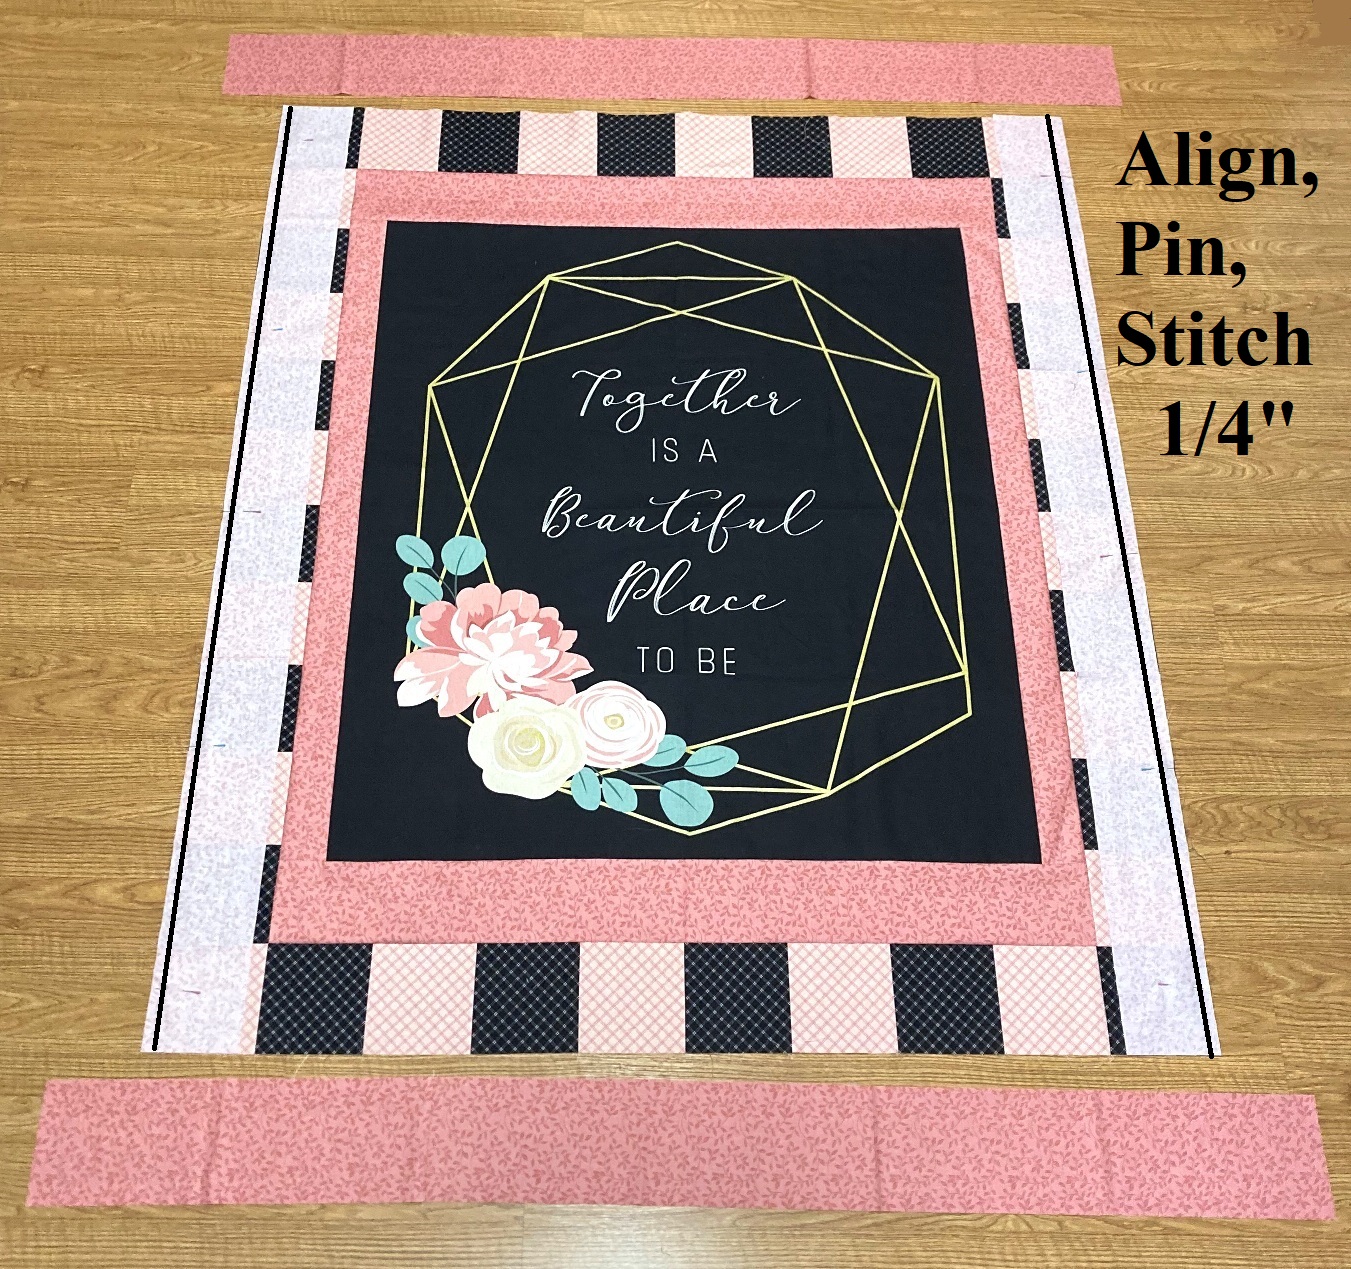
And now you are ready to add the final Outer Border. Layout the Double Bordered Panel and the 4 Outer Border Coral Strips as shown below.
Place the side strips onto the sides of the Double Bordered Panel with right sides together. Align and pin the strips, and then stitch a 1/4" seam along the two edges.
Press the seams out towards the Coral strips. Place the top and bottom strips onto the top and bottom of the Panel with right sides together. Align and pin the strips, and then stitch a 1/4" seam along the two edges. Once again, press the seams out towards the Coral strips.
And just like that, you have a beautiful 58 1/2" x 70 1/2" finished Simple Wedding Quilt Top!!!! So fun!!!!
Isn't it just so great how you can just add a few borders to a gorgeous panel and make such a striking quilt!!! Just so fast and so fun!!!
STEP 5 - FINISHING THE QUILT
Now all that is left is to finish the quilt!! Just Baste It, Quilt It, and Bind it!!!! Yup, three big things in one little sentence. If you are new to quilting and need some tips on how to Baste It, Quilt It, and Bind It, you can check out myFinishing Your Quilt Video Series. It will walk you through it all in step by step detail.
I quilted mine with an all over loose feather design that I just love to stitch. It is so relaxing and fun, and also very fast, perfect for this fast, go-to, quilt!!! I did change my threads for the Panel and the Borders. I used a Black thread on the panel and my favorite Pearl thread on the borders.
I hope you have enjoyed this tutorial and if you make your own Simple Wedding Panel Quilt I would love to see it!! You can email me a picture at happyquiltingmelissa@gmail.com, or post it to social media with #happyquiltingwithmc :) I can't wait to see your Simple Wedding Panel Quilts!!!


