So you might not remember, but my very first
Moda Bake Shop tutorial was this super adorable little baby girl quilt called Snuggly Squares made with the adorable Lily and Will line.
So when I heard that Bunny Hill Designs was coming out with a second Lily and Will line I knew immediately that I wanted to make a "fraternal twin boy" quilt for Snuggly Squares. Something similar but slightly more boyish :) So with that, I am super excited to introduce my newest
Moda Bake Shop tutorial Snuggly Squares II
I am so excited about this tutorial. It is super easy, goes together quickly, and just turns out adorable!!! I love the Lily & Will II line every bit as much as the original!!!
And now that this
Moda Bake Shop Tutorial has been published for a while, I can now post it here
on my blog for your convenience ;) So just follow along
below for the full step-by-step tutorial. And if you love it, you can get
the printer friendly version here :)
1 Layer Cake of Lily & Will II
1 1/4 yards of Backing
That's it, easy enough right? :)

Before we start, just a quick note. I try to make all my tutorials super beginner friendly but please remember, that should you have any questions along the way don't hesitate to email me at happyquiltingmelissa at gmail dot com. I am happy to help :) And when you are done with your project, please feel free to upload it to my Flickr page or send me an email with a picture attached. (happyquiltingmelissa at gmail dot com). I would love to highlight your work :)
STEP 1 - CUTTING
Okay, grab your layer cake and take off the packaging :) Isn't it just fun to see all of those amazing prints and colors!! Now gather up the 5 following white-ish pieces of cake, and the 8 following brown pieces of cake. (Ya, I call teh 10 x 10 square a piece of cake, I figure it fits :) Got em?? Great!!
Use the following cutting guide to cut the 13 aforementioned slices of cake up :) These will be parts of your blocks :) This is the most intricate cutting so we are getting it over with first :)
Now locate the following 2 prints. Got em?? These will be used for the border :)
Use this guide to slice up those 2 pieces of cake. They are a little easier to cut :) Make sure to cut the top first so that you have 1 larger piece of scrap instead of 4 little ones. Everyone likes bigger scraps.
Gather up 2 slices of bluish cake of each of the following 8 prints. You will have a total of 18 squares.
This time we are cutting up little 2 1/2" squares. Use the following guide to cut all 16 bluish prints :) No Scraps here :)
You should have 11 pieces of cake left :) The 2 repeat pieces of blue and white checks can be set into your scrap pile. So now you are cutting with 9 pieces of cake.
Use the following guide to cut your 9 pieces of cake. The last strip in each set can be set aside for scrap. (Except for the blue / white checked one, it will be used later) Gather your pieces in a pile and set aside. These will be used for your binding so you won't use them until the end :)
And that is all of the cutting. Just as a review, you should have the following pieces cut :)
STEP 2 - PIECING BABY SQUARES
Alright, it is time to start sewing. We are going to start with all of those 2 1/2" squares. Grab your pile and mix them up. I find the easiest way is to just throw them all in a baggie add some air, and shake :) If you really get into the shaking, you can get your daily workout as well :)
We are going to be turning all of those individual squares into 2 patch pieces. Grab 2 squares out of the bag (Check to make sure they are not the same print :) and place them right sides together.
Stitch a 1/4" seam along the edge. Doesn't matter which edge, any will do :) Once you have completed one, don't pull it out of your machine. You are going to chain stitch all of your squares. Keep feeding them through, one after another, until you have made all your squares into 2 patch pieces. You should have 128 sets.
Clip the threads between your sets and press your seams. I just press mine in one direction but if you like open seams, you are welcome to do it that way.
So now you have a large stack of 2 patch pieces. We are going to play with them some more. Next we are going to make 36 four patch rows. Grab 72 two patch pieces. Lay 2 sets right sides together and pin along the edge. Repeat for all 36 sets.
Chain stitch a 1/4" seam along your pinned edge on all 36 sets, clip your threads between sets, and press. This is what you should have :)
So now we are going to make 13 four patch squares. Grab 26 two patch pieces. Lay 2 sets right sides together and pin along the center edge. Make sure to nest your center seam. Repeat for all 13 sets.
Chain stitch a 1/4" seam along your pinned edge on all 13 sets, clip your threads between sets, and press. I pressed these open to help avoid bulk. This is what you should have :)
And last, but not least, you have some 2 patch pieces that will remain 2 patch pieces. Super easy. You should have 30 two patch pieces left. You will only need 24 so you can grab 6 sets and set them in your scrap pile. Yippee Skipee for scraps :)
STEP 3 - BUILDING BLOCKS
There are 2 different blocks for this quilt. We will start with what I call Block A. There will be 12 Block A's. Gather up your 4 rows and your 2 patch pieces, and your brown and whitish squares. You can go ahead and pull out the blue/white check square and set it in scrap. We only need 12 center blocks :)
This is the layout to start. We will be attaching a 2 patch piece two opposite sides of your center square.
Lay the first 2 patch piece on the center square with right sides together and pin. Repeat this process with all 12 of your sets. Chain stitch a 1/4" seam along your pinned edge of all 12 sets, clip your threads and press .
So now you are here. Onto attaching the second side. Same process. Lay your pieces for all 12 sets right sides together, pin, chain stitch a 1/4" seam, clip threads, and press.
With those 2 sides attached, you are ready to add the top and the bottom. Grab your 4 piece rows.
Lay the first row on top of your center piece. Make sure to match your 2 seams along the edge of the center square. Pin along the edge of all 12 sets. And once again, chain stitch your 1/4" seam, clip your threads, and press. When completed, repeat the process to attach the bottom row :)
You should have a stack of 12 blocks that now look like this!! Aren't they just adorable :)
Now, onto Block B. We will be making 13 of these :) Gather your 4 Patch Squares, and your brown and whitish sashings (those are the rectangles you cut in the first cutting step).
These are put together in the same manner as Block A so this should be cake :) The one difference now is to make sure that you are always adding the same print of sashing :) So grab 2 of your 2 1/2" x 4 1/2" rectangles in the same print and layout as follows.
Lay your first side onto your pieced center square and pin. Repeat with all 13 sets. Chain stitch a 1/4" seam, clip threads, and press.
Now onto the second side. Once again, double check that you are adding the same print to each set. Pin with right sides together, chain stitch your 1/4" seam, clip threads and press.
Now it is just adding the top and bottom. This is easy by now :) Grab your 2 1/2" x 8 1/2" rectangles that are matching prints. Do this for each of your 13 sets.
Lay your top along the top of your pieced center. Once again make sure you have the same print :) There are no seams to worry about matching up this time. Just pin, chain stitch a 1/4" seam, clip threads, and press. Turn and repeat for the bottom :)
And now you have 13 Block B's. Super adorable and super easy!!
STEP 3 - PUTTING THE BLOCKS TOGETHER
Alright, now that the 25 blocks are all pieced, we are ready to put them together. Start by laying out your blocks as follows. I love how the browns and whites "frame up" the blues :) I know it is kind of hard to see but you can click on the picture to get a bigger image :)
Once you have your blocks all laid out you are ready to start putting together your rows. Start with row 1. Lay Block 1 onto Block 2 and Block 3 onto Block 4 with right sides together. Go ahead and pin along the center edges. Sew a 1/4" seam along your pinned line (and remember to remove pins as you go, no sewing over pins :) Now go ahead and press your seams.
Now you are going to attach block 5 to your now sewn together block 3 and 4. So lay block 5 onto block 4 with right sides together. Pin along the edge. Sew your 1/4" seam and press.
Almost done with the row :) Lastly, lay your sewn together Block 1 and 2 onto your now sewn together Block 3, 4, and 5 with right sides together. Pin along the edge of Block 2 and 3 to create your final seam. Sew 1/4" seam along the pin line and press.
Your row is now pieced together. Go ahead and repeat this process for all 4 rows. I did this one row at a time so as not to change my layout on accident but you do what you are comfortable with :)
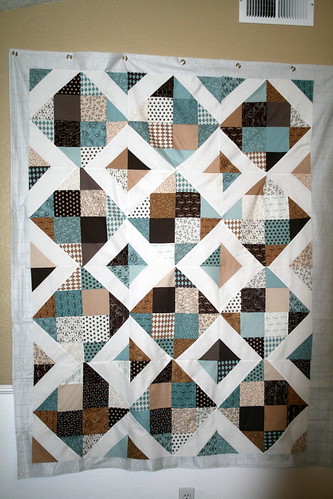
This is what your top should look like with all of your rows sewn.
Next you will take the rows and sew them together. This is just like before but on a longer and larger scale. Lay row 1 onto row 2 with right sides together. Lay row 3 onto row 4 with right sides together. Make sure to line up the seams. There are lots so use lots of pins. Sew your 1/4" seam along your two pinned lines and press. Now repeat the same process by first laying row 5 onto the now sewn together row 3 and 4 with right sides together. Line up your seams, pin, sew, and press. Then last but not least. Lay your now sewn together rows 1 and 2 onto your now sewn together rows 3, 4, and 5, pin, sew, and press.
You just have to add the border and you are done with the top :) Yippee Skipee!
STEP 5 - BORDERING THE BLOCKS
To start, we have one more cutting step. Sorry, I totally spaced this when I was cutting the first time. Remember that one scrap strip of blue and white checks that I told you to set aside? Well pull it out. Go ahead and cut it into (4) 2 1/2" x 2 1/2" squares.
Grab all the bits and pieces for your borders. It is pretty much what is left :) The 8 Whiteish strips that are 2 1/2" x 8 1/2" and 12 four patch rows, and your newly cut four 2 1/2" squares.
This is the layout for your border. You will be making 4 of these. Layout a 4 patch row followed by the first print of the white strips, followed by a 4 patch row, followed by the second print of the white strips, and ended with another 4 patch row.
Start on the end of the row and lay your first two pieces right sides together. Pin the edges and sew a 1/4" seam and press. Repeat for the other three rows. Now keep adding on pieces in this manner until the entire row is created. Make sure to repeat each piece of the row for all 4 rows :)
So now your rows are created and you are ready to add them to your quilt top. Lay a border piece along each side of your quilt top. Make sure to mix match your white border pieces from the block pieces so that they are opposite prints. (see the arrows)
Lay your border piece along the edge of your quilt with right sides together. Pin along the edge making sure to match up your seams. Once again, there will be lots so use plenty of pins. Repeat with the second side. You know what to do from here :) Sew your 1/4" seam along both edges and press :)
Now you are ready to add the top and bottom border. This is where those little 2 1/2" squares come in. We are going to add them to the ends :) Grab your remaining 2 border strips and lay a 2 1/2" blue/white check square on the last square of each end with right sides together. Pin, sew a 1/4" seam along all 4 ends, and press.
Now, to add them to the quilt top :) Almost done, are you just so excited ??? Lay your top and bottom borders along the top and bottom of your quilt top with right sides together. Once again, as you pin make sure to line up your seams :) And lastly, sew your 1/4" seam along both top and bottom and press.
And you have done it!!! One adorable top that is ready to be turned into one adorable Snuggly Squares baby quilt!
STEP 5 - FINISHING UP
So now it is time
to turn that finished quilt top into a finished Quilt ;) Time to
Baste It, Quilt It, and Bind It!!! Which is a whole lot in one
little sentence. If you are new to quilting, you can see my Finishing Your Quilt Series of video tutorials that will walk you through Basting,
Quilting, and Binding step by step ;)
And you are done!! Way to go! Don't you just love it!!!!

One adorable ready to be cuddled 42" x 42" Snuggly Squares II Baby Quilt!!!
I hope you have
enjoyed this tutorial and if you make your own Snuggly Squares II Quilt I would love to see
it!! You can email me a picture at happyquiltingmelissa@gmail.com,
post it to social media with #happyquiltingwithmc or or add it to
my flickr group here ;) I can't wait to see your Snuggly Squares II Quilts!!!


