Friday, April 6, 2012

Happy Easter - Corry Style

A few years back the Corry's (My husband's side of the family) created what came to be known as the Eggstravaganza".  Now, it is a yearly tradition loved and looked forward to by all.  Here's a peek into it :)

It starts out with a massive egg dying party.  We are talking dozens upon dozens of eggs.  Everyone gets to die 6 eggs each and make them as creative as they want.  This year, Jacob (I have ever mentioned my husband's name here before??) and I decided to show our true colors in our eggs.


He opted for his alma-mater, and of course, he is wearing the matching t-shirt.

I on the other hand, opted for my little passion.  One  "I love Quilting" egg, and one Mod-Podge-esk fabric flower egg.  That little egg has 7 different fabric lines on it :)  I thought it was just so cute, and actually quite fun to make ;)  

Once all the eggs are dyed we begin the Extravaganza .  Oh ya, did I mention that the Extravaganza is an egg spinning contest.  Good Times!!!! .  We break into the kids group and the adult group.  The kids started this year and we began with the Royal Rumble!!! (pictured below)  Everyone spins at the same time to be assigned seats for the official Double Elimination tournament.  With the seating assigned we move onto the tournament with head to head battles.  (which I did not get any pictures of because Josie was sad :).  In the end, one emerges victorious!!!

After the kids are done it's on to the adults.  Here are the eggs in the Adult Royal Rumble!!!  Can you spot my fabulous Fabric egg??

And here are all the adults down on hands and knees watching their eggs spin in the Royal Rumble.  Isn't it just awesome how we can be kids all over again!!  I love it!!!  I didn't go far in the Adult tournament but no matter, like we tell the kids, all that matters is that you have a good time :)  And we all had a great time!!!

The winners of the 2012 Corry Eggstravaganza!!!   From Left to Right - 1st Place Kids Division - Jessica (my daughter, I am so proud of her, tee hee hee :) 1st Place Adult Division - Uncle Mark 2nd Place Kids Division, Kamree (Uncle Mark's Daughter) 2nd Place Adult Division - Aunt Shaliece!!!

From our family to yours
 Here's Wishing you a Happy Easter Holiday 
Pin It!

Thursday, April 5, 2012

TNT Thursday get's Truckin!

So it's my month in the Beejeeber's bee group.  And I have asked my amazing bee mates to make me Semi-Truck blocks.  Ya a bit random.  You see, my Dad just started driving trucks again and I thought it would be so much fun to make him a quilt to go in his sleeper.  One with Semi's on it, of course :)  I just can't wait to see what my bee mates come up with.  They are so amazing!!!  (Seriously, you can check out some of their blocks here :)

And you see those cool grey "chains" holding the cargo down.  Well that is what I tried new this week.  I played with some of the decorative stitches on my machine.  I have used straight stitch, zig-zag, and blanket stitch on my machine.  Decorative is all new to me.  And it was so much fun!!!  And I just love the way it looks.  What great detail it adds :)

And since I played with some decorative embellishment stitches I am linking up to QED :)


So that's what I was up to.  How about you???

And before I  sign off, Thank you to everyone who continues to link up week after week.  I am so glad that this linky is encouraging you to Try New Things.  I'm just so glad to see TNT growing.  We had 19 last week and that is a new record!!!  Who knows, maybe we will break that record this week :)


Pin It!

Wednesday, April 4, 2012

Jocelyn's new Blanket

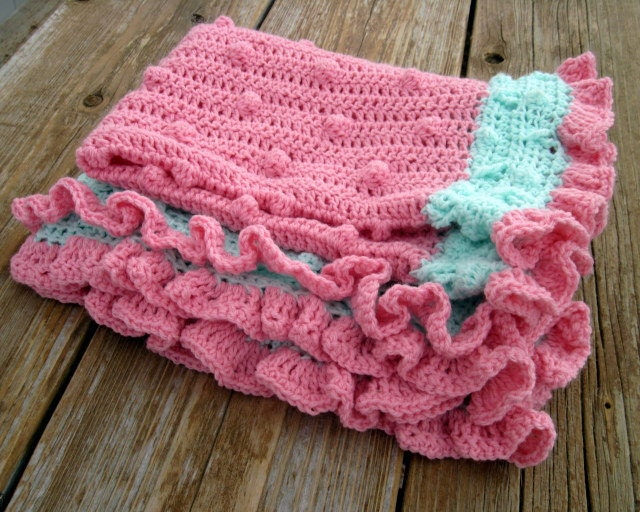
My Sister-In-Law has an amazing talent when it comes to crocheting.  In the past she has made me slippers, hats, sweaters, and blankets. (for all my kids, mind you :)   This last weekend she was down visiting and brought this beautiful blanket for Jocelyn. Isn't it just stunning!!!  She made it in Josie's nursery colors and I can't begin to express how much I love it!!!!


Now she doesn't know I am adding this next part, but it's my blog, so I'm doing it.  This particular blanket is rather cool because not only is it an awesome gift, but it also served as her tester for her very first pattern!!!!  Yup, Charlotte, my amazing Sister-In-Law, has created a  pattern on how to make this beautiful blanket and it is available for purchase here in her cute little etsy shop, Salutations :)  So, if you find yourself wanting to try out some crocheting, it might just be perfect for you :)


And of course I had to add a shot of Josie on her new blanket.  She just loves playing with all those puffy little dots!!!  Thanks Aunt Charlotte!!!  We love it!!!!!

Pin It!

Tuesday, April 3, 2012

Sewing Summit - Are you Going???

I just finished registering!!!!  I even managed to have quick enough fingers to get one of the first 50 spots equaling a $50.00 discount on my registration fee.  Yippee Skippee!!!  (Although it would still totally be worth it without, it is just icing on the cake :)  Sign up for classes isn't until August.  The anticipation might just do me in.  So are you going???? You can register here :)   I would so love to meet so many of you!!!!  And this year I don't have a 2 week old baby so I get to enjoy a little more of the Sewing Summit Night Life.  I can't wait!!!!!!
Pin It!

Monday, April 2, 2012

In Case you Missed It . . . Watercolors Tutorial

So I completely forgot to post yesterday. (Busy weekend, and I don't normally get online on Sunday)  However, I was guest posting over at Quilter in the Gap with a fun new tutorial.  So in case you missed it, I will post it again here.  And there is a bit of an announcement at the end of the tutorial that I am super excited about . . . Make sure to check it out :)

 As it is close to Easter, I thought it would be fun to do something in beautiful pastels.  So let me introduce you to Watercolors, A simple little quilt that goes together fast and would work perfect as a table topper, wall hanging, or baby blanket.


Let's get started.  To begin, you will need to get 8 fat quarters.  I choose to use 8 Fat quarters in pastels from the Dimples collection by Andover.  (I did swap out that red one though, it was just to bright.)  Now go ahead and lay out your fat quarter on your mat and cut a straight edge along the right and side and bottom of your fat quarter.  (You can also stack up your fat quarters and cut up to 4 at a time.)  From each of your 8 fat quarter cut (1) 7" x 17 1/2" rectangle, (2) 2 1/2" x 17 1/2" strips, and (2) 2 1/2" x 11" strips.

Select a 7" x 17 1/2" rectangle of one fabric and 2 2 1/2" x 17 1/2" strips in a different fabric.  Lay them out as follows.  With right sides together place the long strips onto your rectangles.  Pin along both edges.  Sew a 1/4" seam along both pinned edges, and remember to remove the pins as you go :)  Press towards the strips.   Repeat for the 7 other sets so you have 8 pieces like the last picture.

Now grab your 2 small strips that match the long strips.  Lay them out as follows.  With right sides together place the short strips onto the sides of your rectangles.  Pin along both edges.  Sew a 1/4" seam along both pinned edges.  Press towards the strips.   Repeat for the 7 other sets.  Now you have 8 framed squares.

Lay your squares out as follows.  Go ahead and play with the color arrangement until you like it.  Then either take a photo or mark your pieces so that you remember how they go back :)

Now well make sets of 2.  We'll start in the upper corner.  Place the first sashed rectangle onto the second with right sides together.  Pin along the edges, taking care to match up the seams.  Sew a 1/4" seam along the pinned edge.  Press either direction or open, it really doesn't matter.  Now you have a set of 2.  .

Repeat the last step with the other 3 sets to make 4 sets total  So your top should look a little something like this.  And now you are ready to finish up your top.

Lay your top 2 pieces onto the bottom 2 pieces with right sides together.  Once again, pin along the edges and sew a 1/4" seam along the pinned edge.  Press the 2 pieces in opposite directions.  Now lay the right hand piece onto the left hand piece with right sides together.  Pin along the edge taking care to match your center seam.  (It should nest nice and snug where you have pressed in opposite directions).  Sew a 1/4" seam along the pinned edge and press whichever way you like.  And it should look a little something like the last picture :)

And you are done!!!  A beautiful little quilt top finishing up at 34" x 34" .  This top whips together in no time at all so it is just in time for Easter :) Oh, and it is perfect for some sampler quilting :)  (More on that a little farther down :)


So that is the Watercolors quilt top :)  Hope you enjoyed the tutorial.  If you make one I would love it if you added it to my Happy Quilting Tutorials Flickr page :)

A few things before I sign off.

First, I hope you liked the background to the photo's.  I did it in a new software that I reviewed on my blog Friday.  If you want to check out the review and enter for a chance to win your own free copy you can go to this post :)

Second, I am sure you noticed that this tutorial was just for the quilt top and the quilt wasn't finished.  That is for a very special reason.  Thanks so that new software I mentioned in point 1, I now have the capability to do something that I have been working on for a few months.  Videos!!!!  So, over the next month of so I will be doing a series of videos.  They will include Preparing your Quilt to be free motion quilted, several Free Motion Quilting videos, and finally ending with a binding video.  And this quilt will be the demo quilt for those videos.  I am so super excited to be announcing this!!  (Now I will have to do them for sure :)
Pin It!