Monday, May 7, 2012

Hidden Zipper Pocket - A Tutorial

So have you seen these super neat little hidden zipper pockets in the lining of bags and purses and just wondered how they are made.  (I know I used to :) We'll I happened to be making one the other day for a separate tote tutorial and thought, Why not make a tutorial for this little technique along the way.  So . . . wonder no more . . . Let's make a Hidden Zipper Pocket!!


You will need the lining of your purse, bag, or tote.  2 rectangles (or squares) of fabric that are about 1/2" larger then the size pocket you would like to add.  And finally, a zipper the length or longer than your pocket size.


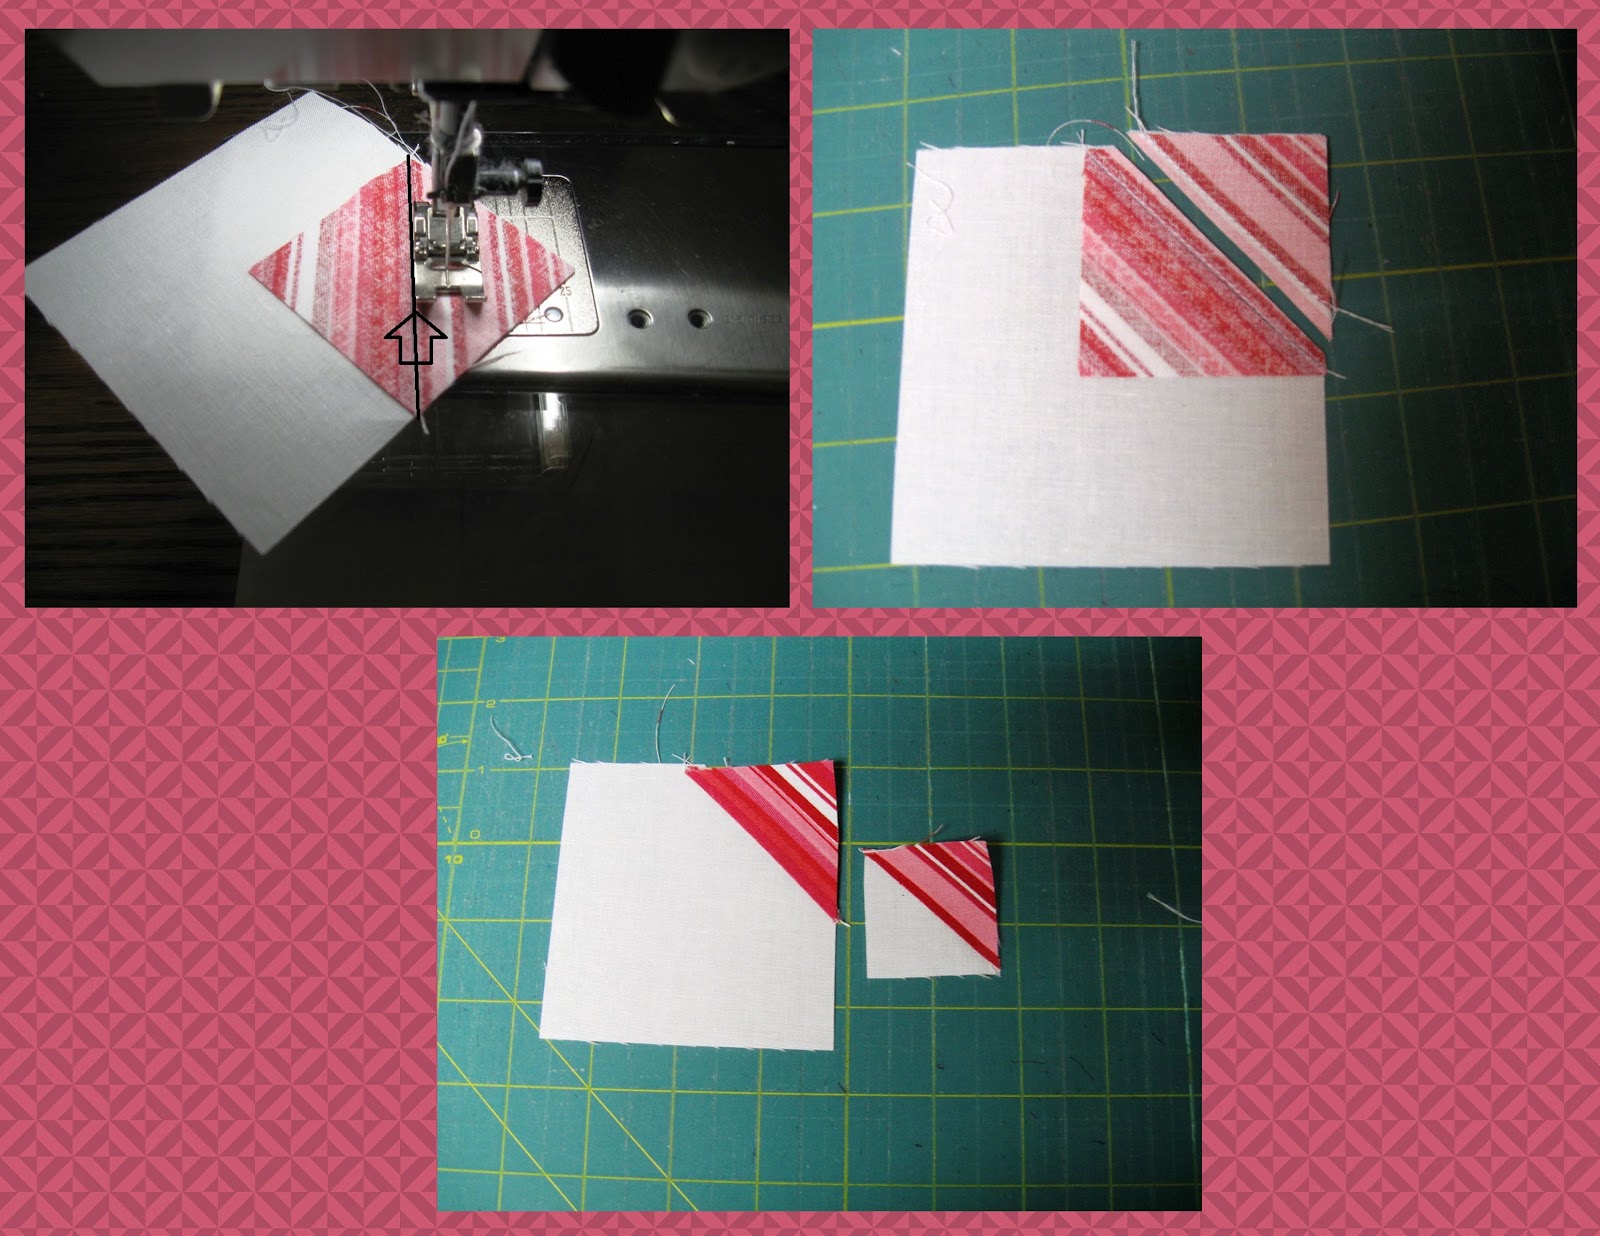
Start by getting one of your pocket rectangles (or squares) and on the wrong side draw a 1/2 thick rectangle.  Make sure your rectangle is drawn 1" down from the top of your fabric and 1" in from either side.  I found it fastest to use all my rulers to make the appropriate measurements so I could just draw it all at once.

Now, placed your marked rectangle of fabric onto your lining where you would like the pocket to be.  Most often, this will be a few inches down from the top of your lining and centered from side to side.  Once placed go ahead and pin all around your drawn rectangle.  This will become your zipper opening and will be referred to as that going forward.


Time to do some sewing.  Change your stitch length to a small setting.  Now stitch directly on your drawn line all the way around the zipper opening.


Cut a slit through the center of the zipper opening. (I found this easiest to do with my rotary cutter and ruler.)   On each end clip a Y shape with a small pair of scissors.  The goal here is to get as close to your sewn corners without clipping the threads.


Now go ahead and pull your rectangle of fabric through your zipper opening.


Then, press your fabric so the opening is nice and flat.  You have to work the corners a bit but they will lay nice and flat too.

Now grab that zipper and place it under your lining so that it pokes through the zipper opening and the zipper pull is at the end.  It is okay if your zipper is longer than the opening.  Go ahead and pin all around your zipper opening keeping the zipper in place and trying to keep your lining fabric smooth and flat. (You can pin your lining closer to the zipper if you like, I pinned this about 1/8" away because it is a family tote so my kids will be getting into it a lot and they tend to get fabric stuck in zippers rather easily :)


Once you are all pinned you are ready to stitch around your zipper opening.  Start stitching along the bottom about 2" away from your zipper pull moving away from it and remember to back-tack your start.   You can use a zipper foot for this (I would If I had one :) but I found my 1/4" foot worked great.  I aligned the edge of it with the zipper. When you get to the end just pivot and the corner and sew right overtop of the extra zipper.  Then pivot and head on back across the top of the zipper.


When you get to the end that has the zipper pull stop stitching leaving your needle in the down position.  Then lift your presser foot so that you can unzip the zipper past the presser foot and where you have already sewn.  Now you can go ahead and finish stitching around the zipper.  Moving the zipper pull makes for a much nicer stitch.


And now to deal with that extra zipper.  Easy enough.  Just measure about 1/2" away from  where you stitched over the zipper and clip :)


Now that the zipper is taken care of it is time to turn this into a pocket.  Grab your second rectangle and line it up with the first with right sides together.  Pin around all the edges making sure to only pin the two rectangles.  You don't want your lining attached.


Now go ahead and stitch (I used a 3/8" seam) around your rectangle taking care to move your lining piece out of the way.  You only want to be stitching your 2 pocket rectangles together.


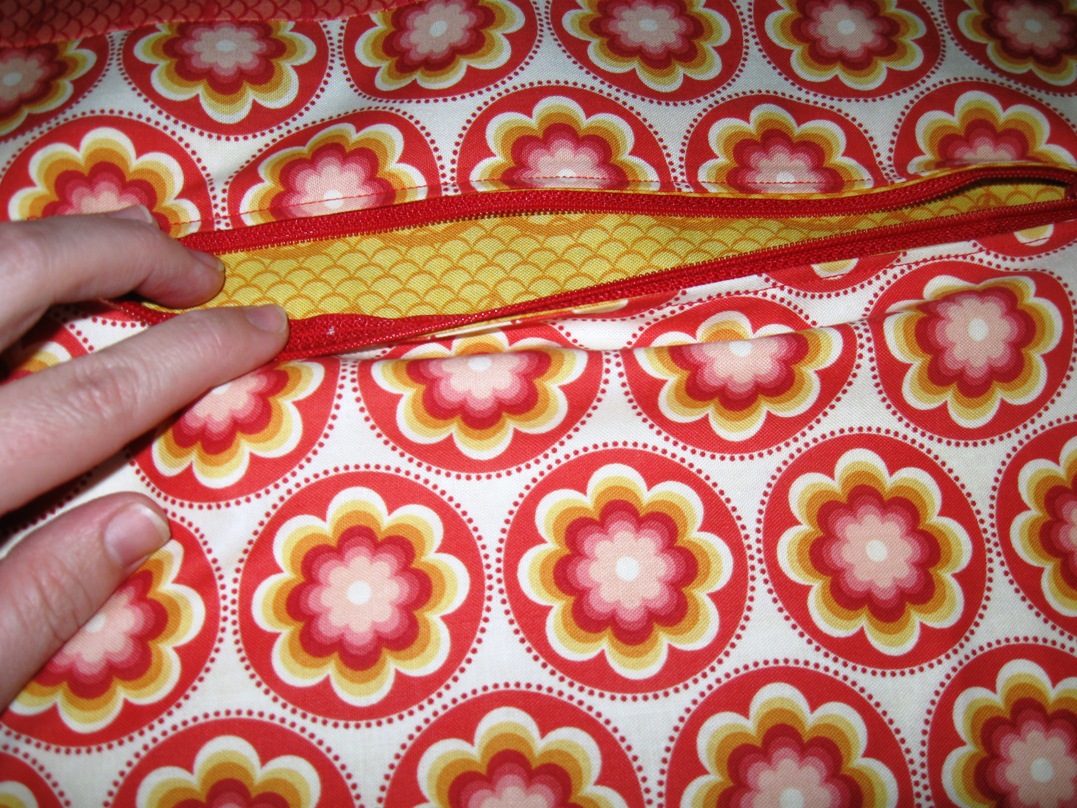
Now just flip over your lining and admire your handiwork!!!


One adorable hidden pocket ready to stash all kinds of goodies.  Now just finish up your purse, bag, or tote and get to using your pocket :)


Pin It!

Sunday, May 6, 2012

Winners!!!!

Okay, let's announce the winners of the 100 Blocks Magazines and the Patterns :)


#70 - Peach Rainbow

#224 - Marjorie's Busy Corner

#353 - CathyH

Congrats Ladies!!!  I have sent you an email for your addresses :)


Pin It!

Friday, May 4, 2012

Some Applique Fun


So my niece runs high school cross county and track.  After a few chilly meets she decided she wanted to have a quilt that she could wrap up in.  I suggested a few beginner patterns as she wanted to make it herself.  She decided she liked the look of this fellow High School quilt and started slicing up strips from Grandma's stash.  I was asked If I could do some cutout's with my Slice Machine for the Applique part.  This is what we came up with :)  Isn't it just so fun.  I can't believe I actually had a girl runner among my cartridges (she was on the Think Pink one :)  I can't wait for her to get it all done!!  It will just be so much fun!!


Pin It!

Thursday, May 3, 2012

Sew Red for Women - Block 4 (and TNT)


I am so excited to get to be part of the Sew Red for Women Blog Hop.  Leah from Burgundy Buttons organized this amazing hop (and blog) to draw attention to Heart Disease. This cause is close to Leah's heart and she is doing a phenomenal job raising awareness.  Check out the Sew Red for Women blog to learn more about what you can do to help prevent Heart Disease.  


So now it's my turn to Sew Red for Women!!  So let's get started on the tutorial!!


To start you will need the following squares of fabric:
     (8) 3 1/2" x 3 1/2" pink squares
     (8) 3 1/2" x 3 1/2" white squares
     (32) 2" x 2" assorted red/pink print squares


Start by drawing a diagonal line across the wrong side of all of your 2" squares.  Then line up your 2" square in the upper right hand corner of your 3 1/2" square.  Sew diagonally across your 2" square directly on the drawn line.  Continue to chain stitch all of your 16 blocks.

Clip the threads between your squares.  Align your ruler 1/4 over the sewn line then trim away the excess.  Press towards the print fabric.

So now you are here and ready to finish the other side.  Once again line up your 2" square but this time in the upper left hand corner of your 3 1/2" square.  Sew diagonally across your 2" square directly on the drawn line.  Continue to chain stitch all of your 16 blocks.  Clip your threads , trim, and press.

Optional Side Note***If you don't like to waste any fabric, you can always make some super fun tiny half square triangles by sewing 1/2" away from the already sewn line.  I use the edge of my presser foot as a guide and move over my needle to do this.  Once again, just chain stitch all of your squares.  Then trim down between your 2 sewn lines.  Then press open.  Yippee Skippee for baby HST's :)

So now with your squares all cornered up, go ahead and lay them out as follows.

Now you are going to sew your blocks into rows.  Just lay the second block over onto your first block.  Sew your seam making sure to sew across the center of  the X made by your diagonal seams.  This will give you prefect points!!  Keep adding on blocks until you have sewn your entire row.  Repeat for the other 3 rows.  Press your first and third rows to the left and your second and fourth row to the right. (this will allow your to nest your seams :)
With your rows sewn together you can now sew your rows into a block.  Take care to nest your seams and pin each one so you get nice points.  Press your rows open to avoid bulk.

And your done!!!  I hope your enjoy this block and have fun putting it together :)

And after you are done making your own version of Block 4 be sure to add it to the  Sew Red for Women Flickr Group

And if you are just joining the Hop here is a schedule of where it has been and where it is going :)  Yippee Skippee for being part of such an amazing group of quilters!!!

February 3
Leah of Burgundy Buttons
March 3
Fat Quarterly's Tacha of Hanies Quilts
April 3
Katie of Swim, Bike, Quilt
May 3
You are Here!!  Melissa of Happy Quilting
June 3
Charlie of Qubee Quilts
July 3
Jessica of Twin Fibers
August 3
Melissa of The Polkadot Chair
September 3
Amber of A Little Bit Biased
October 3
Amy of Diary of a Quilter
November 3
Amy of Amy's Creative Side
December 3
Sherri of A Quilting Life
January 3

Fat Quarterly's Lynne of Lily's Quilts

And now for a slight gear switch - It is Thursday so you know what that means.  TNT Thursday link up :)   I actually posted my TNT yesterday as I was posting this tutorial today.  You can find my TNT here :)


So what have you been up to???  You know what to do :)


Pin It!

Wednesday, May 2, 2012

Rocking it, Long Arm Style!!!

Note - If you are looking for the 100 blocks post you can find it here :)

So I am posting about my TNT today.  Yes, Yes, I know it isn't Thursday yet.  But I have a tutorial to post tomorrow for the Sew Red for Women Blog Hop and there was just no way I could wait a whole week to tell you the new thing I tried on Saturday.  So . . . I am posting a day early.  (Oh, and no worries, there will still be the regular TNT linky tomorrow, I will just be linking to this post :)

So Saturday morning I headed down the I-15 to beautiful sunny St. George.  But this trip wasn't to hang out on the beautiful red cliffs.  Nope, I had business to attend to.    I had an early appointment with a Long Arm Quilting Machine!!!!!!  Oh my goodness, oh my goodness!!!!!  In a word . . . . Awesome!!!!!

I started the morning getting to meet my good virtual Bee friend, and now good "I have actually met you before" friend Lindsay!!!  She was the one that made this opportunity known to me and what better than to Try Something New with a New Friend!!!!  Lindsay is a Total Doll!!!!  It was so much fun to get to hang out with her all morning and run back and forth between each other's machines.  I am pretty sure we did quite a few happy dances over our work, and it is always best to do a happy dance with someone else vs alone.  (Especially when you are in a public place, tee hee hee :)  Thanks Lindsay, you rock!!!!


So after the initial hugs and getting to know each other it was time to get to work.  First was "loading" the quilt on the machine.  And I got to say, this took longer than I thought it would.  I was just so excited (and a bit nervous) to get going, I didn't think about actually having to do the not so fun loading part.  It wasn't hard, just time consuming.  I compared it to pin basting a quilt :)  And it took about that long :)  But . . . Once you get through the sour it is on to the sweet.


So . . . Do all the long arm quilters stick their butt out when they quilt????  I think that is probably just me ;)    I decided that rather than using a pattern I would take a deep breath and jump into the deep end.  Yup, I went all out and did free motion, and I tried a new design!!!  And I have to say, quilting on these machines  . . .  So Fabulous!!!!!  You have so much freedom. You can do such a larger scale design then on a home machine.  And the fluid motion is so nice.  I was flying down the quilt in no time.  Ya basically,  I totally loved it!!!!

This is what I look like when I am concentrating.   Well that, or my tongue sticking out.  (Glad there wasn't a picture of that :)   So that is what I tried new!!!!  And it was so incredible!!!!  Looking forward to the next time :)

And now your saying, hey, wait, you didn't show us any pictures of your quilting.   And you would be right.  I didn't.  That's because I am saving the full reveal for the Blogger's Quilt Festival in a few weeks :)  But I will say I am so very happy with the results.  (As is my daughter who has been sleeping under it for the last few nights :)

Oh, and since it is Wednesday, and I just knocked a major huge WIP off my list, I figured I would include the rundown.  Things have been going gangbusters around here but as most of the completed projects have the word Secret before them I haven't been able to show much.   But look how much smaller those lists are getting!!!!!   Don't worry, I added 2 more quilts to the list, wouldn't want me getting to a stopping point :)


Designing Stage
  • King Size Serenity Quilt
  • Circle Meets Square Quilt
  • Christmas Strips Quilt
Piecing Stage
  • Jessi and Me Quilt 
  • Moda Bake Shop Take it All
  • DDD Baby Quilt
Quilting Stage
  • Solids Quilt for Free Motion
Completed Stage
  • Secret Project QQ
  • Stars Quilt-A-Long 
  • Secret Project 1B
  • Sew Red for Women Blocks - See Tomorrow for Tutorial!!!
  • Twister Toddler Twin Quilt - Salutations

  
Pin It!