Thursday, June 20, 2013

3-D Flower Applique Tutorial

I wanted to add some cute embellishments to the baby girl quilt I just finished.  I thought it would be fun to have a little something that the baby can grab on to and play with.  (Or more likely suck on :)  So I created some adorable little 3-D Flower appliques.  And I took some pictures along the way to share the process with all of you  :)


I used my Slice machine for this tutorial.  If you have been around here for a bit you know I love my Slice and use it for all of the applique in my quilts.  (which is a lot)  If you are wondering what a Slice is, you can read more on this guest tutorial I did a while back.   I also plan to do a Slice basics tutorial in the next few weeks (just need a few more hours each day :) so you can watch for that too :)  

Note - If you don't have a slice you can still do this tutorial, it just makes it a lot easier :)

To start, cut 4 1/2" squares from your desired material that you want your flowers out of.  Remember, you need a fabric for the front and the back, So you will be cutting 2 squares (can be different fabric) for each flower you want to create.  Then cut two 4 1/2" square of Fusible Web (I used the Fusible Web that Slice creates for their machine) for each flower you want to create.


Iron the fusible web squares to the wrong side of the fabric squares.  If you are using a Slice you can peel the paper backing off once it cools down.


To cut your designs out simply place your fabrics on your sticky glass mat and select a flower design you like from the Basics discs that comes with the machine and size it to 4".  Place the machine on the fabric and cut the design. (This is the first time I used the hand's free kit and I loved it!!!).   Be sure to cut the mirror image of your backing flowers so they will match up with wrong sides together.
 If you don't have a Slice, using a template trace a flower design on on the paper side of the web and cut it out using scissors, then remove the paper backing.  Again, be sure to use a mirror image of the backing.

Now, to have a cute squishy center you need some batting flowers.  Place a scrap of cotton batting on your sticky mat.  Select the same flower but size it to 3 1/2".  Place it on the scrap batting and cut the design.  It won't cut all the way through the batting (it's a little to thick) but it will give you enough of a guide and then you can go back and finish cutting all the way through with scissors.
If you are doing this without the slice, just trace a 1/2" smaller version of your template onto scrap batting and cut them out.

Now, you are going to make some mini flower quilt sandwiches.  Gather a top flower, a batting flower and a backing flower.  Layer them with right sides out and the batting in the middle and edges lined up.  Press.  The fusible web on the fabric will hold the three layers together!


Now, just to add a cute stitch around the edge.  You can use a satin stitch, zig-zag stitch, blanket stitch . . .  Whatever you like that will finish the edges and keep it securely together.  I choose to do a blanket stitch.  This can be a little tricky as you are sewing right on the edge, just be careful when lifting your presser foot to spin that you keep the fabric right next to your needle.


Stitch a button hole to the center of each of your flowers.  (I do button holes so infrequently, that I had to pull out my manual to figure out how to do it :)


Decide where you want to add the embellishments on your quilt.  Mark a dot through the button hole onto the quilt top as a reference.  Sew a button onto each dot.


And just button your adorable 3-D  appliques to the quilt top.  Done!!!  Now just sit back and enjoy watching a wee one play with those cute little appliques :)


I hope you enjoyed this tutorial.  If you decide to make your own 3-D Appliques I would love to see them.  You can add them to my Flickr group here :)

And for those wondering, I will be sharing this quilt tutorial tomorrow ;)  Until then, have a Happy Quilting Day!!!
Pin It!

Wednesday, June 19, 2013

Flower Quilting

So I am continually trying to stretch my quilting skills, especially with a long arm option that soon will be available.  I finished up a new baby girl quilt yesterday (tutorial coming soon :)  and wanted to quilt it with something new.  I opted for the Flower quilting pattern taught in Angela Walter's craftsy class and book.      Here's how it came out.  (And sorry, the threads really blend so it is a bit hard to see the design, but at least no one will see my mistakes :)


Now, this is a dense quilting pattern, which Anglea warned about on her video.  To quilt this baby quilt on my home machine, I used 12 bobbins of thread and 6 hours of quilting.  I don't think I quite knew what I was getting myself into.  It really does create a beautiful texture though, I started thinking of it as a type of girly pebbling.


In the end, I am back and forth on this design.  I haven't decided if I like the way the flowers all blend together so that you can't tell where one starts and one ends.  Sometimes I look and think cool because I just see all of that beautiful texture and other times I think man, you can hardly see all of those beautiful flowers I created.   I am sure I will do it again, because it is girly and creates amazing texture, which I love, but I think it will always stay a smaller quilt design :)
Pin It!

Tuesday, June 18, 2013

Quiltmaker Shuffle

Who knew that on top of all the mad quilting skills, that we could also dance!!!  While at Market in Portland, Barbara (my MIL) and I get our groove on with some of the 100 block designers and friends doing the Quiltmaker Shuffle.


This was so much fun!!!  Saturday morning, before the floor opened, we met with this little mob of friends.  We laughed, got super silly, danced with minimal stepping on toes, and then laughed a whole lot more. And as you tell by the video, we really had a great time!!

To find out more about the idea behind this and see the video on how to learn the Quiltmaker Shuffle pop on over to Quilty Pleasures.


Pin It!

Monday, June 17, 2013

More Starburst!!!

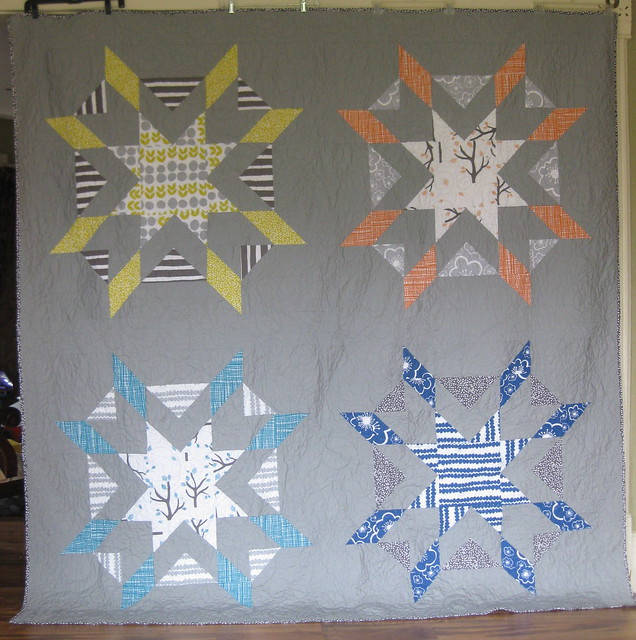
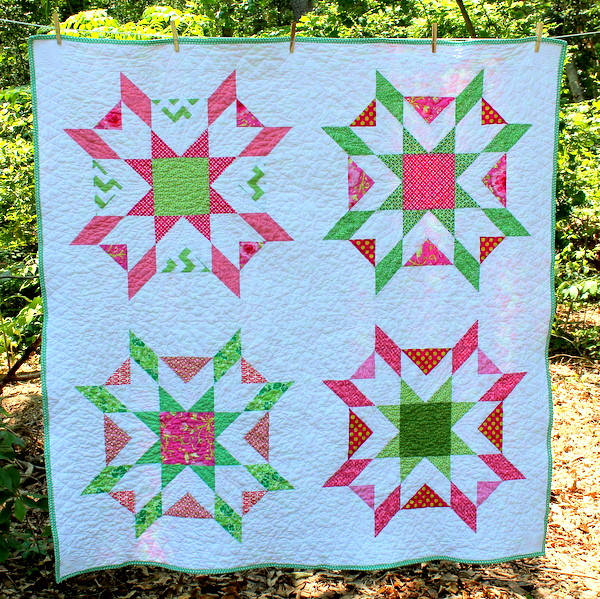
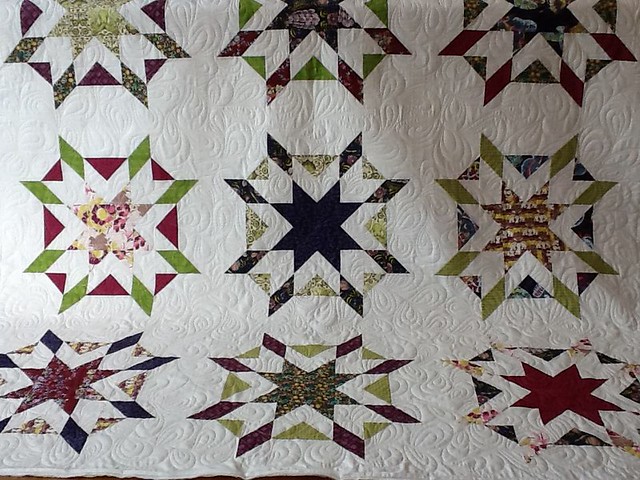
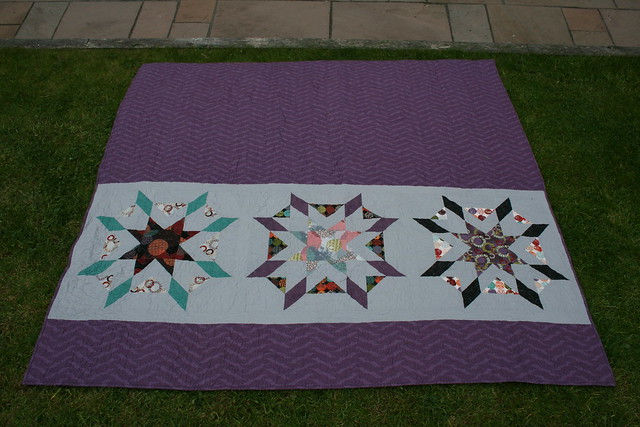
I love watching new finishes come into the Quilt-A-Long Flickr group.  It is so wonderful to see everyone's stunning creations.  So today I thought you might like to see some too.  These are the Starburst quilts that have been finished since the Parade.  I am so happy that these ladies stuck with it and finished their beautiful quilts.  Aren't they just beautiful!!


**Note - as these are taken from my flickr group I wasn't always able to find a real name to go with the quilt, so if one of these are yours and you want your actual name and location with it just email me :)  Also, all quilts are linked back to their creator's flicrkr photostream or blog, take a second and check em out :)  

Way to go ladies!!!  Your quilts are just stunning!!!

If you want to make your own Starbust Quilt you can find the Tutorial here and the Quilt-A-Long here :)

Have a Happy Quilting Day!!
Pin It!

Friday, June 14, 2013

Midnight Frost Table Runner - A Tutorial

So you might recall the row I showed on Monday for the Row along.  Well, since I didn't have time to do all the rows in the row along, I decided I best do something with this row so it didn't end up in a drawer somewhere.  So . . . I opted to turn it into a table runner.  And I even managed to finish it in the same week. Bonus!!!  I took some pictures along the way so I created a little tutorial for you all, enjoy!!


But before we get to the tutorial, let me tell you a bit about these fabrics.  These fabrics are from Modern Yardage, a fun new fabric company based out of Salt Lake.  The really neat thing about Modern Yardage is that they print their fabrics in-house when they are ordered.  Neat huh!  You can read more about the process here.  They have some amazing in-house designers and so many amazing prints to choose from.  And, you even get to pick the scale you would like your prints in, which makes for some great stash builders!!


I loved the feel of these fabrics!!!  They are slightly heavier but oh so soft. (reminds me of Art Gallery fabrics feel)  And, since they print the fabrics on a wider fabric, there is extra room for printing helpful information.  Like where you can find Modern Yardage.


And how you should care for your fabrics.  Isn't that just so fun!!  So take a minute and pop on over to check them out :)  


All right, on to the tutorial!!

**NOTE - For a simplified Printable PDF of this tutorial please follow the link where you can download it for free :)

FABRIC REQUIREMENTS
1/2 yard of Focal Fabric A
1/2 yard of Focal Fabric B
1/2 yard of Background Fabric

STEP 1 - CUTTING

From each of the 2 focal fabrics cut
     (3) 5 1/4" x 5 1/4" squares
     (18) 3" x 3" squares
     (3) 10" x 10" squares   (pieced backing)
         Note - cut your first strip at 10 1/2" then you can can cut your (3) 10" squares and (4) 5 1/4" squares from that strip.  Then cut 2 strips that are 3" wide.  That is 17" so you will have an inch for straightening up :)

From the background fabric cut
     (12) 3" x 3" squares
     (24) 2 7/8" x 2 7/8" squares
     (30 2 1/2" x WOF strips (binding)


STEP 2 - HALF SQUARE TRIANGLES

Gather all of the 3" squares.  Group them into the following pairs. 12 Focal A/Focal B pairs, 6 Focal A/Background pairs, 6 Focal B/Background pairs.   To save time be sure and repeat each of the sub-steps in an assembly line fashion.  On the wrong side of the darker fabric, using your ruler, draw a pen line diagonally from the top left corner to the bottom right corner.


Lay your darker square on your lighter square with rights sides together.  Pin both sides adjacent to that drawn line.  Make sure to put them out far enough that your presser foot won't hit them as you sew on by :)  Stitch a 1/4" seam along both sides of the drawn line (the black lines represent your stitching lines :)  You are doing these assembly line so go ahead and chain stitch all the sets on the right hand side of the line, and then go back and do all the sets on the left hand side.


Clip your threads and then align your ruler along the drawn center line.  Cut your pieces apart along that drawn line.


Now press towards your darker fabric.


And now you are ready to trim up your HST's.  You will trim them to 2 1/2" square.  Start by aligning the 45 degree line on your square ruler with the seam line on your half square triangle.  Make sure that the raw edges of the half square triangle are over the 2 1/2" line's on your ruler.  Trim the 2 sides along the edge of the ruler.


Now spin your block 180 degrees.  Once again, align the 45 degree line on your ruler with the seam line on your half square triangle.  Align the raw edges of the half square triangle under the ruler on the 2 1/2" lines on your ruler.  Trim the 2 sides along the edge of the ruler.


And now you have Perfect Half Square Triangles.  They take a bit to trim but are totally worth it for perfect points!!  You should have 48 Half Square Triangles total.


STEP 3 - FLYING GEESE

Gather all of the 5 1/4" focal fabric squares and the 2 7/8" background squares.  Group them into the piles of 1 local fabric square to 4 background squares. Once again, repeat each of the sub-steps in an assembly line fashion making an entire flock of geese rather than making 1 set of  geese at a time.

With right sides together, lay two background squares onto your focal fabric square as shown.  Using your ruler, draw a pen line diagonally from the top left corner to the bottom right corner.


Now pin both sides of each background square adjacent to that drawn line.  Make sure to put them out far enough that your presser foot won't hit them as you sew on by :)  Stitch a 1/4" seam along both sides of the drawn line (the black lines represent your stitching lines :)  Remember, you are doing these assembly line so go ahead and chain stitch all the sets on the right hand side of the line first, and then go back and do all the sets on the left hand side.


Clip your threads and then align your ruler along the drawn center line.  Cut your pieces apart along that drawn line.


Press your seam up towards your 2 little background triangles.


Now, take 2 more background squares and align them on your two stitched pieces as follows with right sides together.  Once again, draw a diagonal line on the wrong side of the little squares from corner to corner.


Pin each piece far enough out that your foot will go by and then once again, stitch a 1/4" seam along both sides of the drawn diagonal line.  (Remember to chain stitch to save time :)


Clip your threads and then using your ruler aligned along the drawn line cut your 2 separate pieces apart.


Press up toward the background triangles again.  Lastly, trim off the dog ears.


And you are done!!!  Perfectly precise flying geese blocks without throwing away any scraps and without sewing a single triangle.  Fabulous!!  You should have 24 Flying Geese total.


STEP 4 - SEWING BLOCK

Gather (4) Focal A/Focal B HST's, 4 Focal A/Background HST's and 4 Focal A Flying Geese units.  Lay the units out as follows.


We will being by stitching the center together.  Place the right hand unit onto the left with right sides together. Stitch a 1/4" seam along the edge of both pairs.  Press each pair in opposite directions.


Lay the top row onto the bottom with right sides together.  Nest the center seam and pin in place.  Sew a 1/4" seam along the pinned edge.  Press open.


Now you can sew the units into three rows.  Place the side units onto the center units of each row with right sides together.  Pin in place if needed.  Sew a 1/4" seam along the pinned edges.


 Press the center row in and the top and bottom row out.


Place the top row and bottom row onto the center row with right sides together.  Take care to nest the seams and pin them in place.  Stitch a 1/4" seam along both pinned edges.    Press.


And your block is complete.  It should measure 8 1/2" x 8 1/2" unfinished.


STEP 5 - SEWING THE ROW

Repeat Step 4 to make a total of 6 blocks, 3 of each color layout.

Lay the blocks out in a row, alternating the color layout.  Using a 1/4" seam, stitch the blocks into a row.


And the top is done.  Now just to finish it.


STEP 6 - FINISHING

Gather the 10" focal fabric squares and lay them in a row alternating colors.  Using a 1/2" seam stitch the blocks into a row to create the pieced backing.


Create a quilt sandwich and baste it as desired.  Quilt your table runner as desired.  I choose to do straight stitches in the star centers to emphasis the stars (shown in first block) and then a loopy background.


Lastly, simply create a binding strip from your 3 background WOF strips and bind the table runner.  Now just sit back and enjoy.  Almost makes me wish it were snowing, almost :)

I hope you enjoyed the tutorial.  If you make a Midnight Frost table runner I would love to see it.  You can add it to my Flickr group here :)  

Have a Happy Quilting Weekend!!

Linking up this fun little table runner finish to Amanda's and Sarah's :)


Pin It!