Friday, April 12, 2013

Ring Around MBS Tutorial and Bonus Car Seat Cover Tutorial

Today I get to share my newest Moda Bake Shop Tutorial,  Ring Around!!!  This is a super shabby, super scruffy, super modern baby quilt.  The fabric is Comma by Zen Chic and it is so incredibly fun to work with.  I mean, who wouldn't love these bold designs and colors!!


The quilt is made with raw edge applique and so it will get a scruffy look after each washing.  So fun!!!  And even though it looks a little complex, it is really beginner friendly and goes together quick.    It measures 38" x 38", the perfect size for the on the go mom.  


And now that this Moda Bake Shop Tutorial has been published for a while, I can now post it here on my blog for your convenience ;)   So just follow along below for the full step-by-step tutorial.  And if you love it, you can get the printer friendly version here :)  

And I also have a bonus tutorial today!!   So Be Sure to scroll down to find that!!!
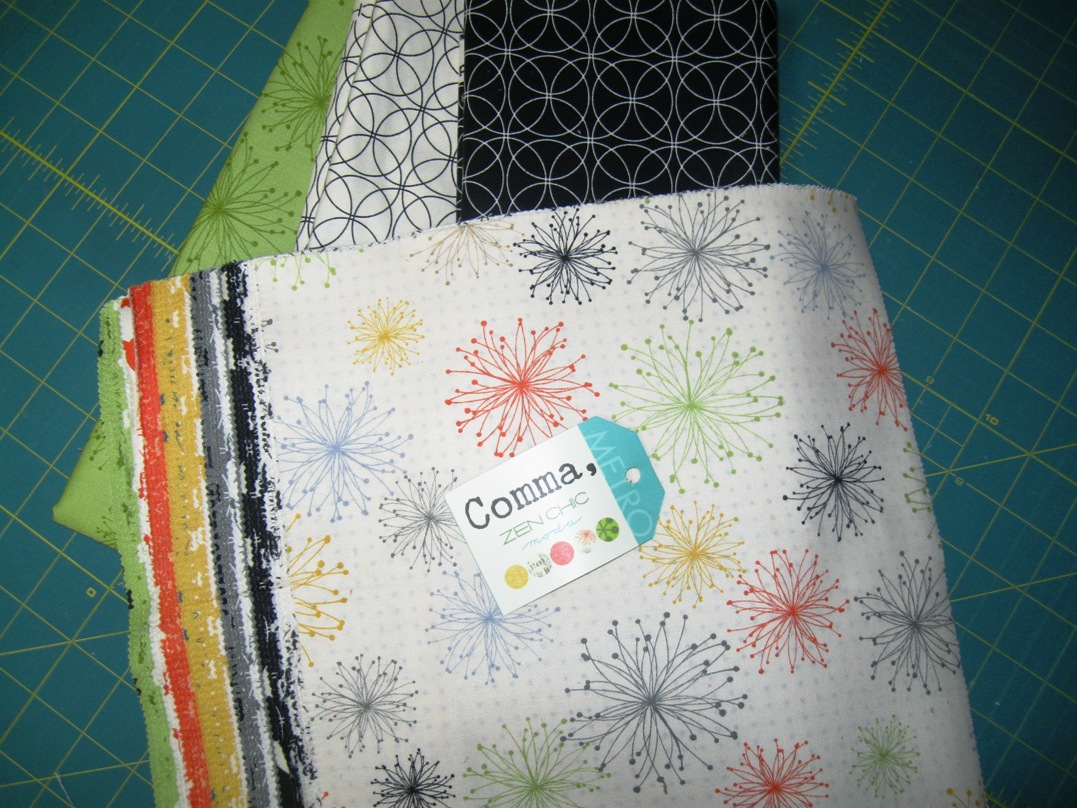


1 Comma Layer Cake
1 yard of favorite black print for pieced back, I used 1513 16
1/4 yard of favorite white print for pieced back, I used 1513 11
1/3 yard of favorite print for binding, I used 1512 20
Spray Baste


STEP 1 – PIECING THE QUILT TOP

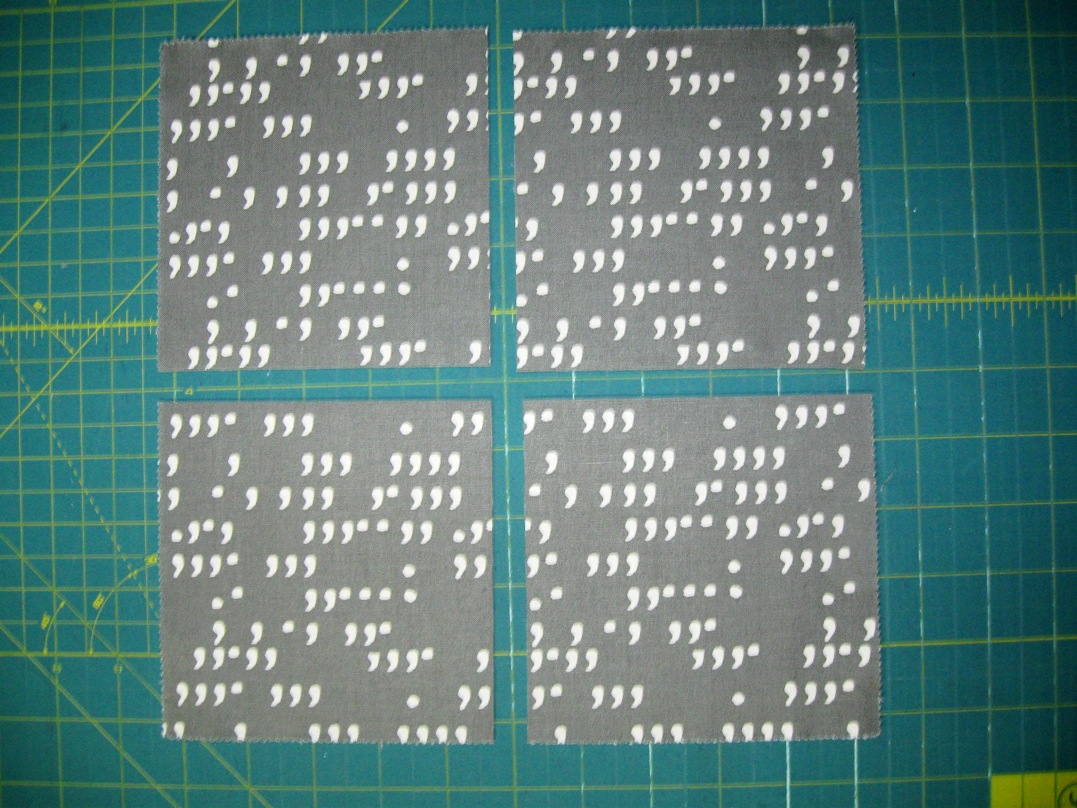
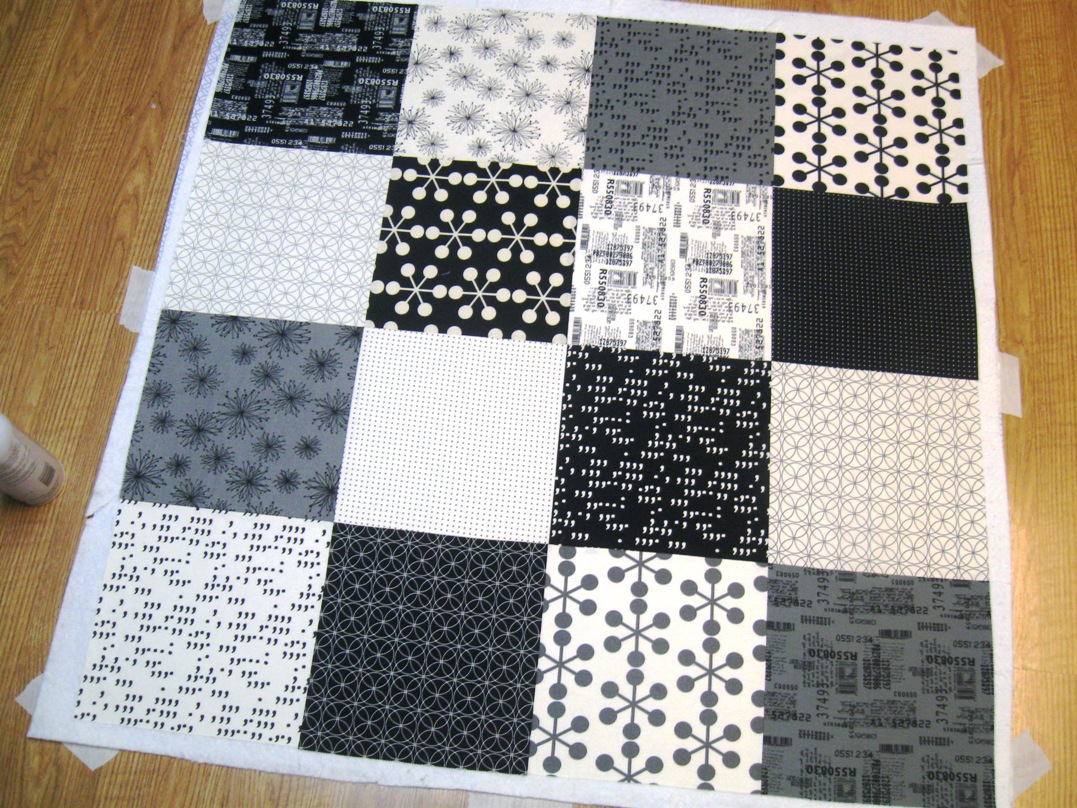
From your layer cake select the 5 black/white squares, the 3 grey/black squares, and the 8 white/black squares.  Lay them out in a 4 x 4 grid alternating black and white prints as shown.


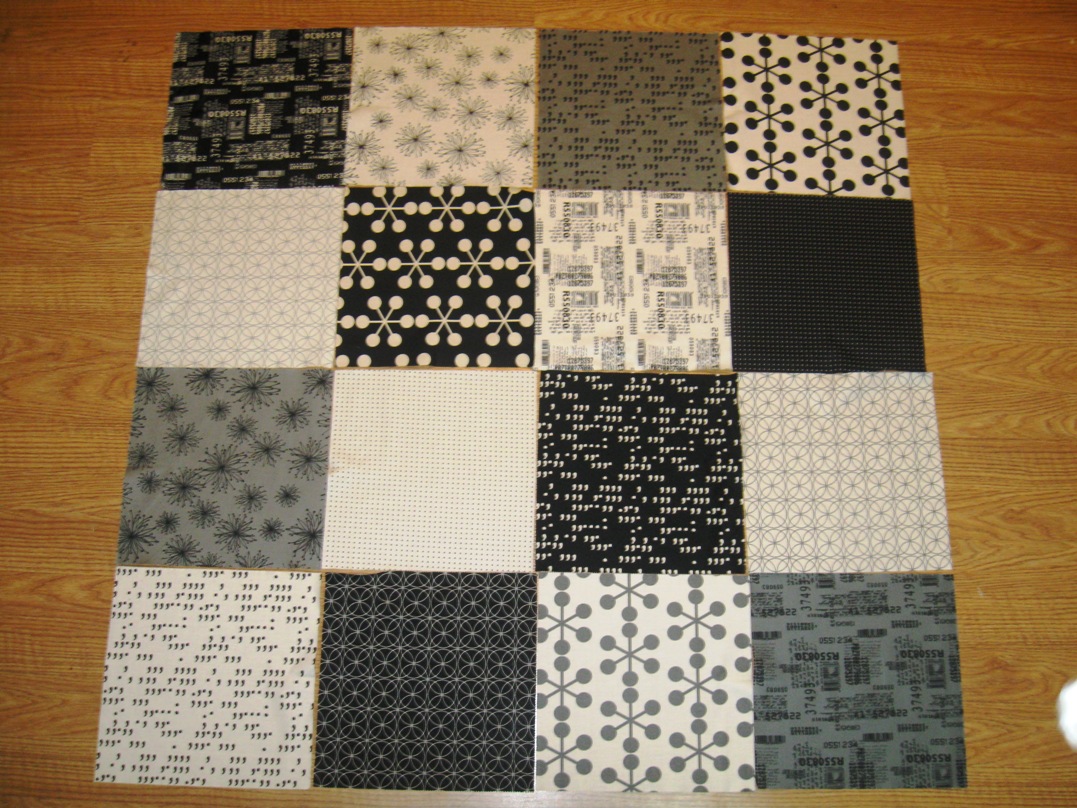
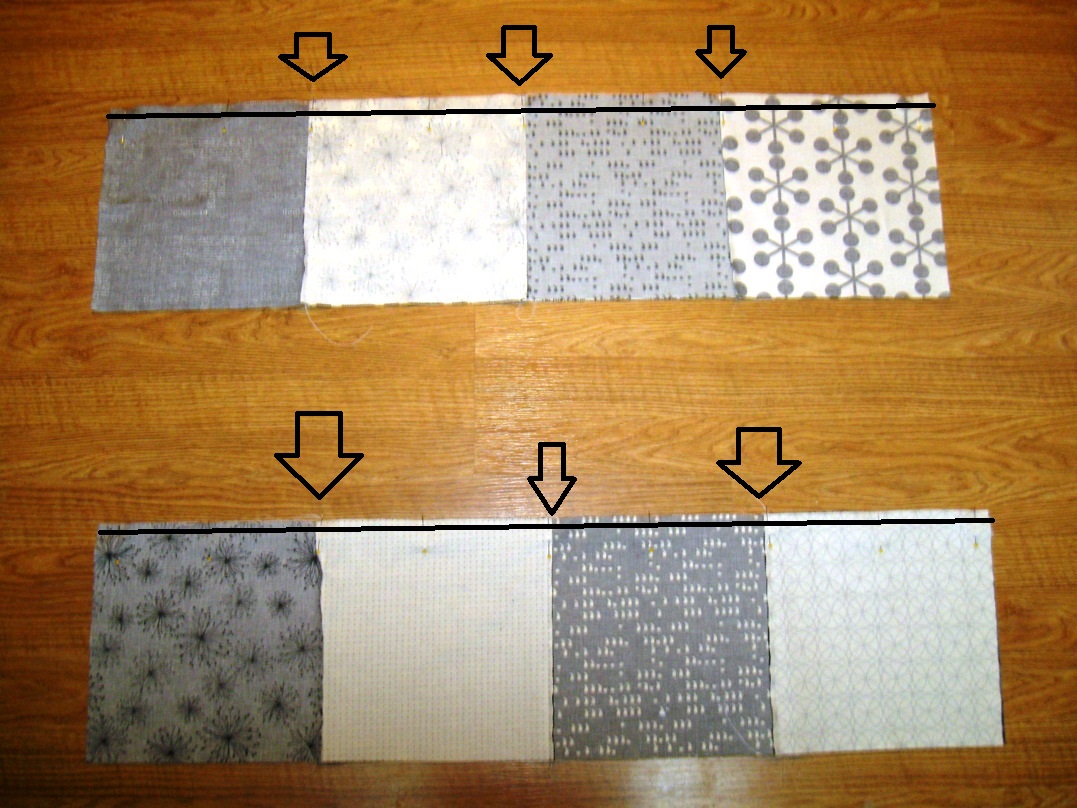
Sew the blocks into rows.   Place the second block onto the first with right sides together and sew a 1/4″ seam along the edge as shown in row 1.  I don’t pin these, I just align as I go.  Then place the third block onto the now sewn together 1st and 2nd blocks and sew a 1/4″ seam as shown in row 2.  Repeat process for the fourth block as shown in row 4.  Press towards the black/grey blocks.


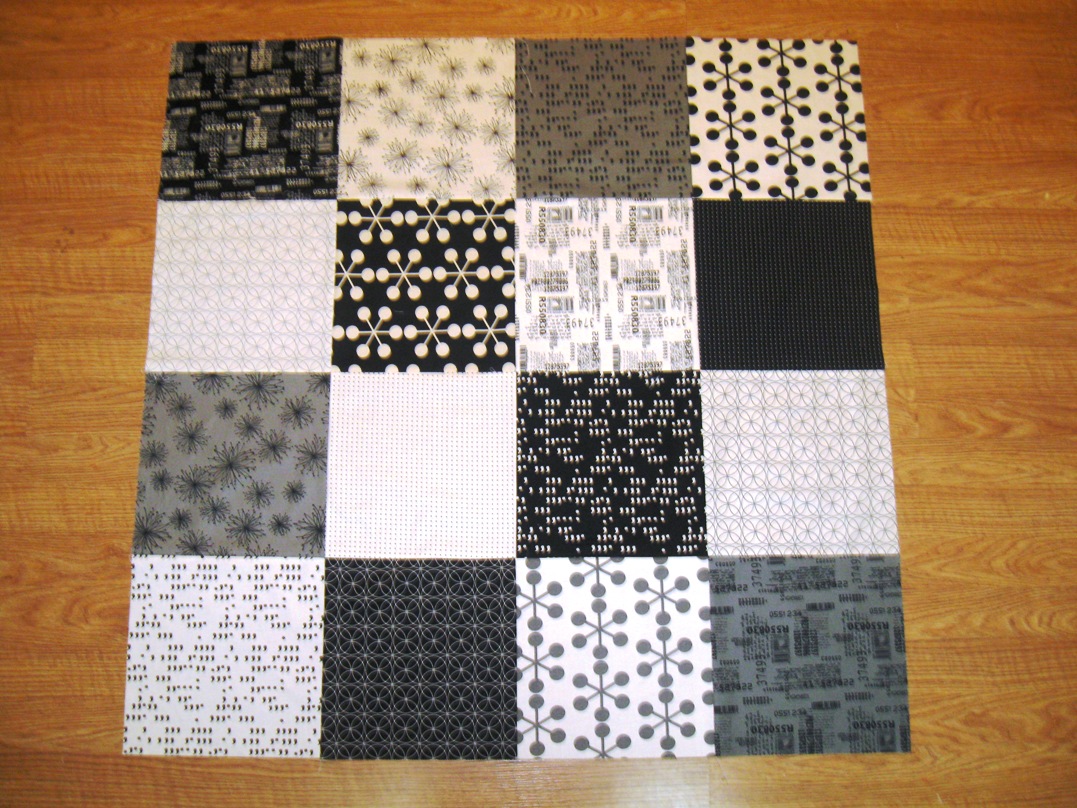
 Now you can sew the rows together.  Place Row 1 onto Row 2 and Row 3 onto Row 4 with right sides together.  Take care to nest your seams and pin in place.  Sew a 1/4″ seam along the pinned edges.  Repeat the same process to sew Row 1/2 and Row 3/4 together.


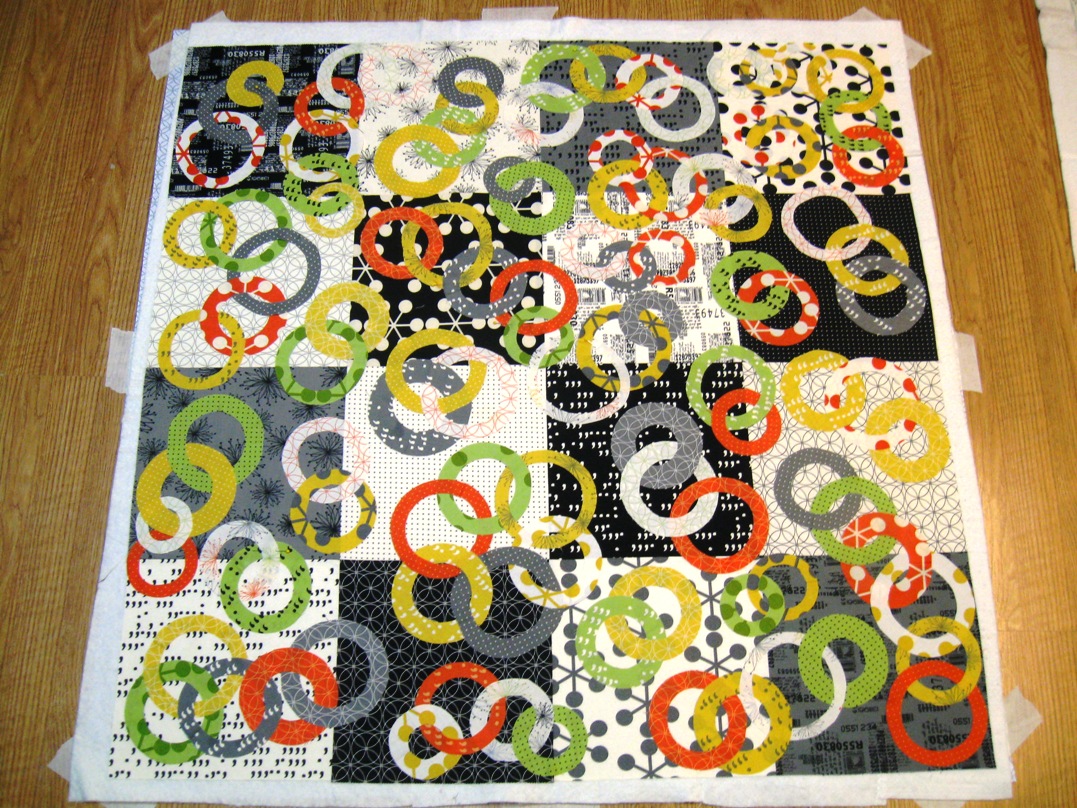
Press your rows.  Your quilt top will look something like this:)  Go ahead and set it aside for a bit.


STEP 2 – CUTTING THE APPLIQUE

Gather your remaining layer cake squares.  I set aside the 2 reprint squares and the square that matched my binding fabric to use on my Bonus Tutorial mentioned later.  Cut each of the remaining (21) 10″ squares into (4) 5″ squares.  For your applique, you can choose to cut perfect circles or wonky circles.


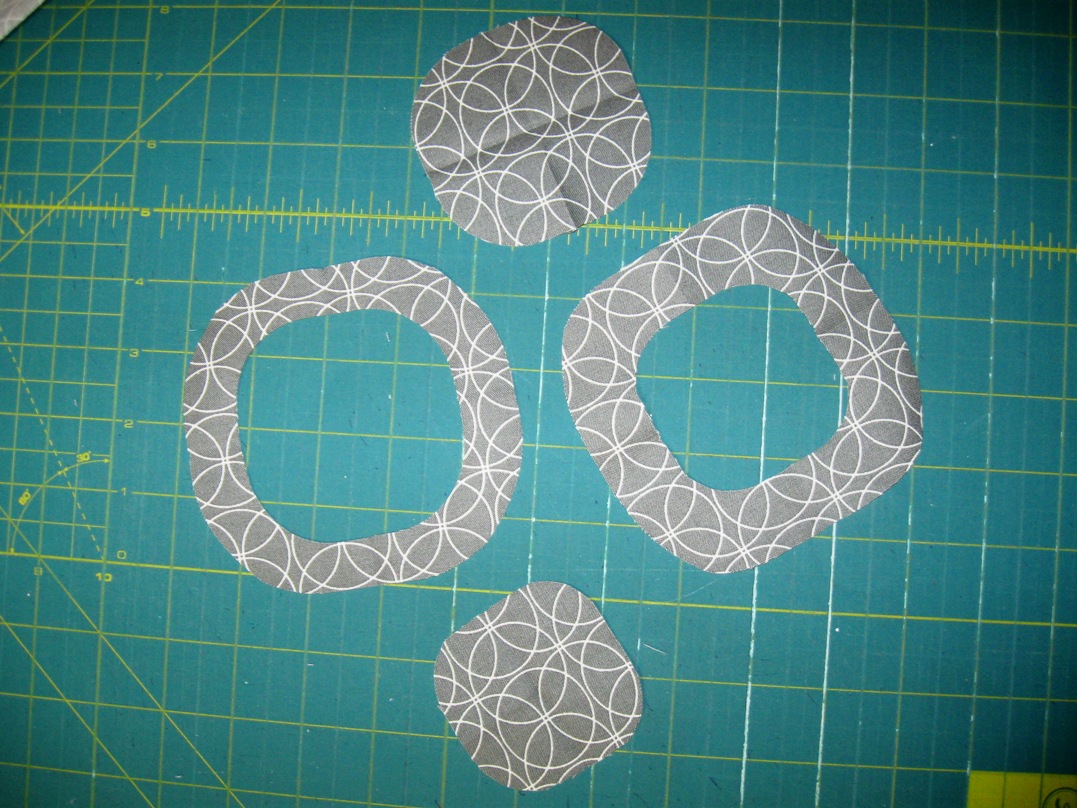
To make perfect circles . . . Fold your charm square in half with right sides together.  Then fold in half again the opposite direction.  Press the folds.  Using a compass, align the point on the folded center and draw a quarter circle.  Repeat for one to two more arcs.  Cut along the drawn lines.


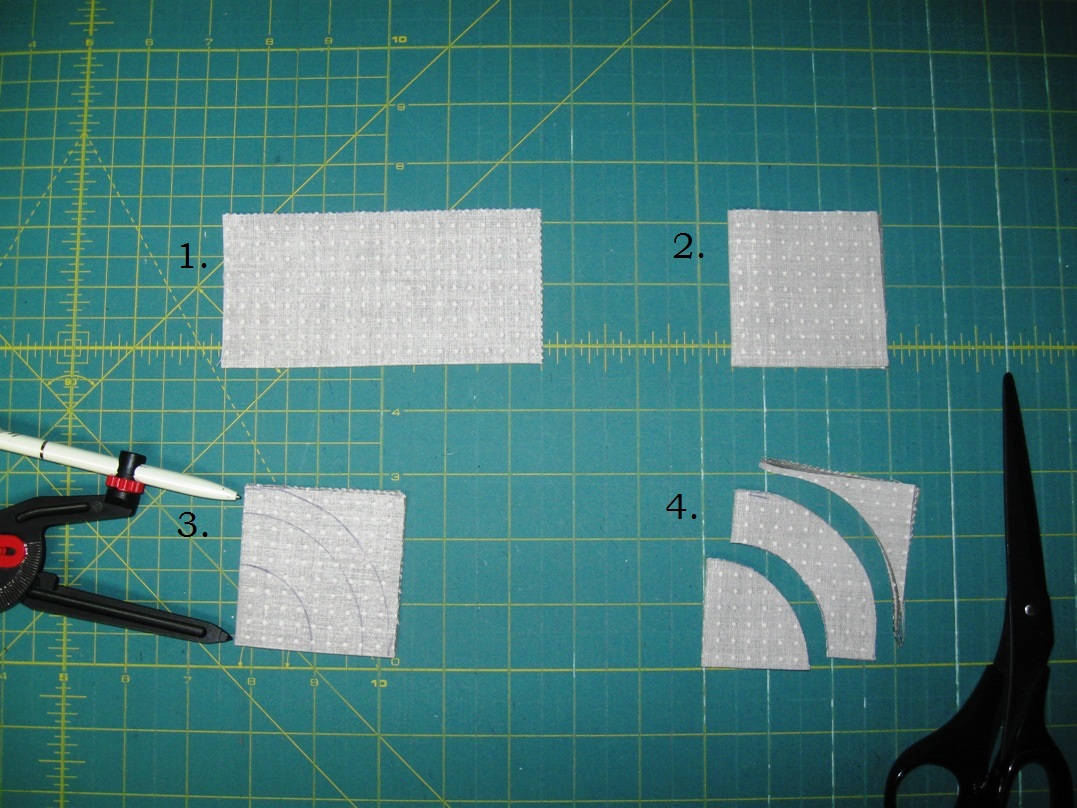
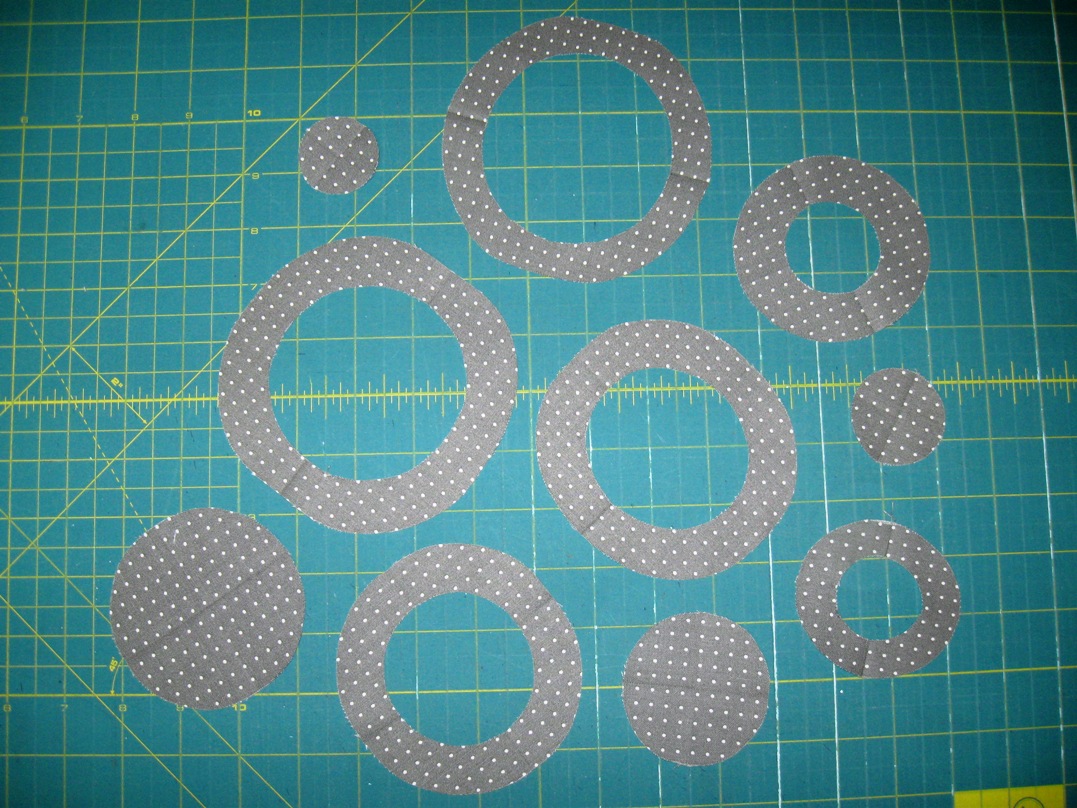
And you have a varied number of rings and circles.  Feel free to change the size and amount of arcs so that you get a lot of different size and widths of rings.


To make wonky circles . . . Fold your charm square in half with right sides together.  Then fold in half again the opposite direction.  Finger press the folds.  Cut an arced shape over the folded center   Repeat for one to two more arcs.


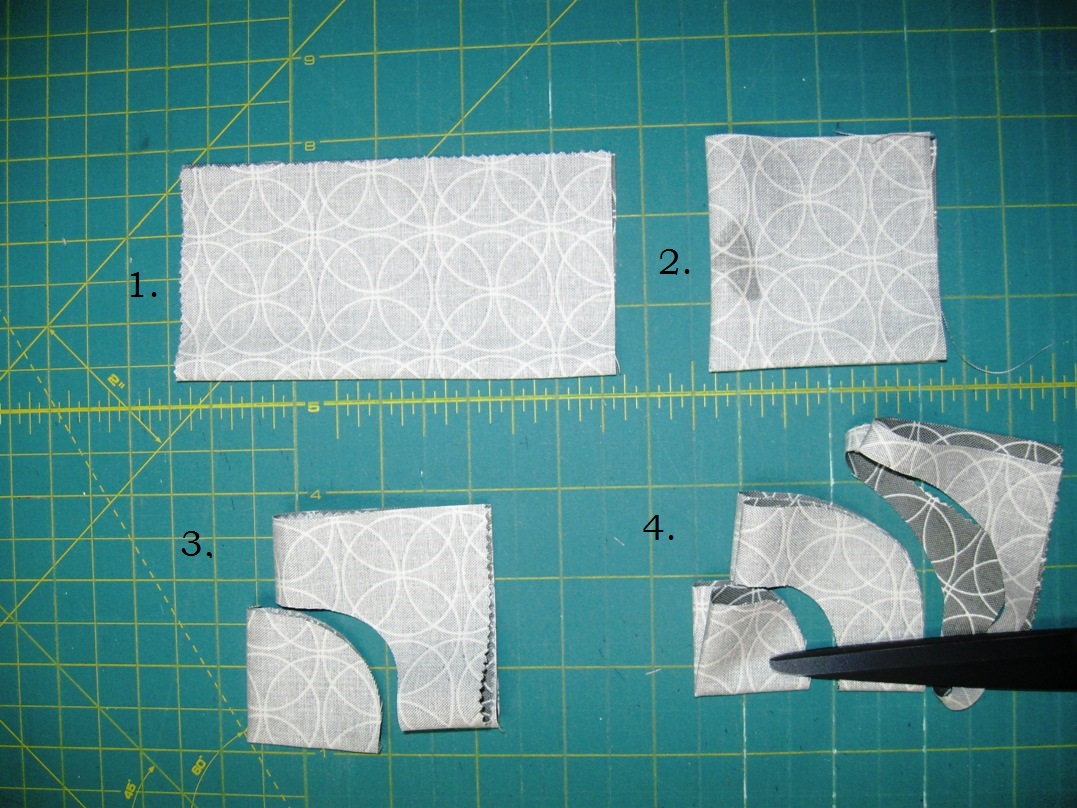
And you have a varied number of wonky rings and circles.  Feel free to change the size and amount of arcs so that you get a lot of different size and widths of rings.  And you can really play with the wonky factor here.


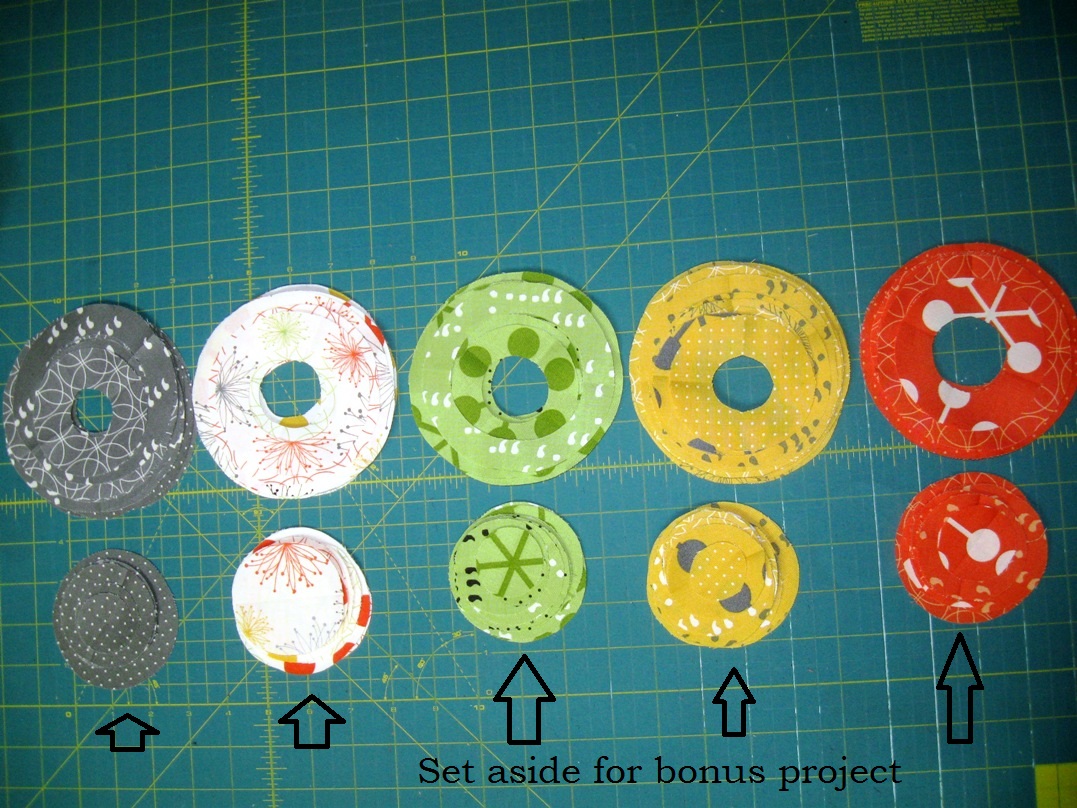
Repeat for all of your 5″ squares so you end up with a pile of rings and a pile of circles.  Set the circles aside as you wont be needing them.  (They can be used in the Bonus Tutorial.)


STEP 3 – ADDING APPLIQUE TO QUILT SANDWICH 

First, you need to piece the quilt back so you can make a quilt sandwich.  Cut your yard backing piece into 2 pieces measuring as follows.  Trim the selvages from your 1/4″ fabric.  Sew the three pieces together using a 1/2″ seams.  Press the seams to the darker print.  (Sorry, I forgot to take a picture so you get a graphic.)


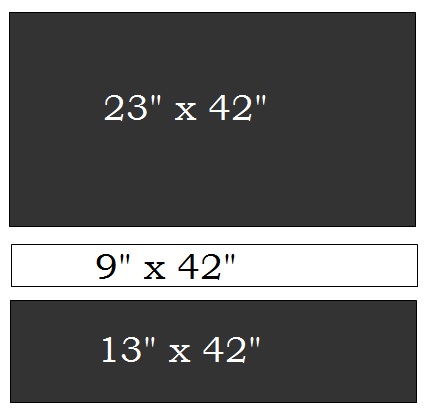
Create your quilt sandwich using spray baste.  The reason I suggest Spray Baste is because it will be difficult to add the applique with a whole bunch of pins in the way.  If you are new to using spray baste for creating a quilt sandwich you can see my video tutorial on how to do so.


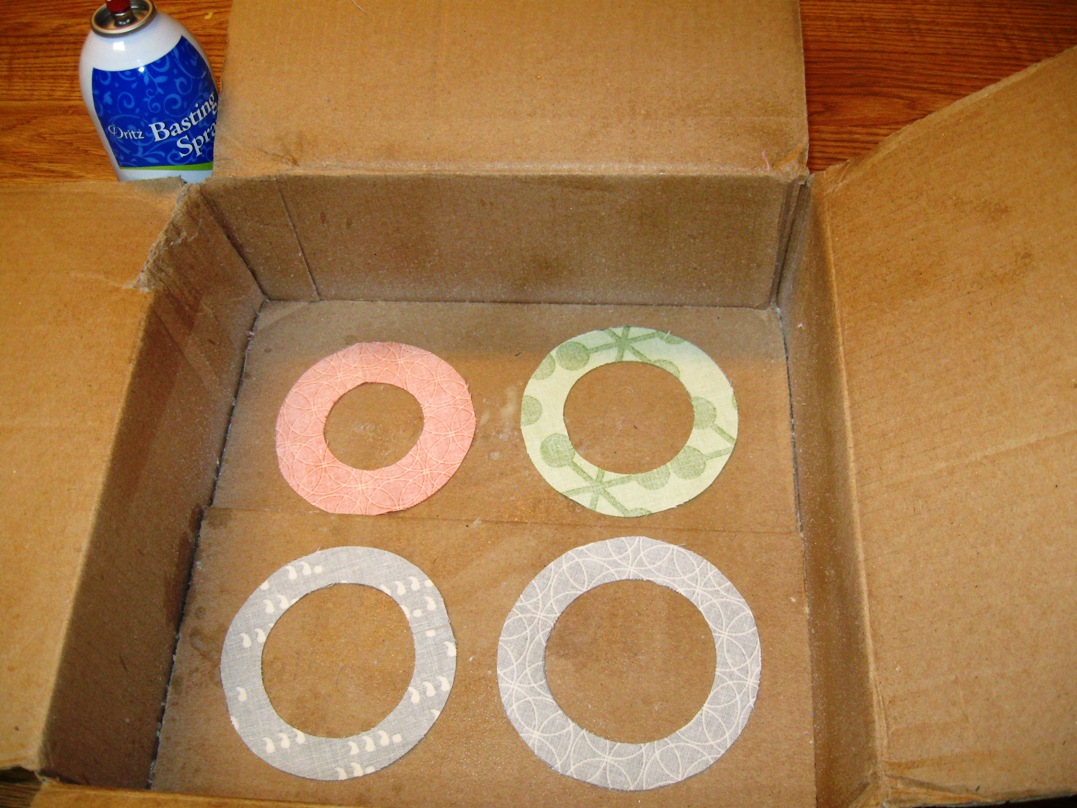
And now you are ready to add the rings :)  Place approximately 4 rings in a box an spray with a coating of spray baste.  You don’t want to work with much more than that at a time or the baste will start to dry out.


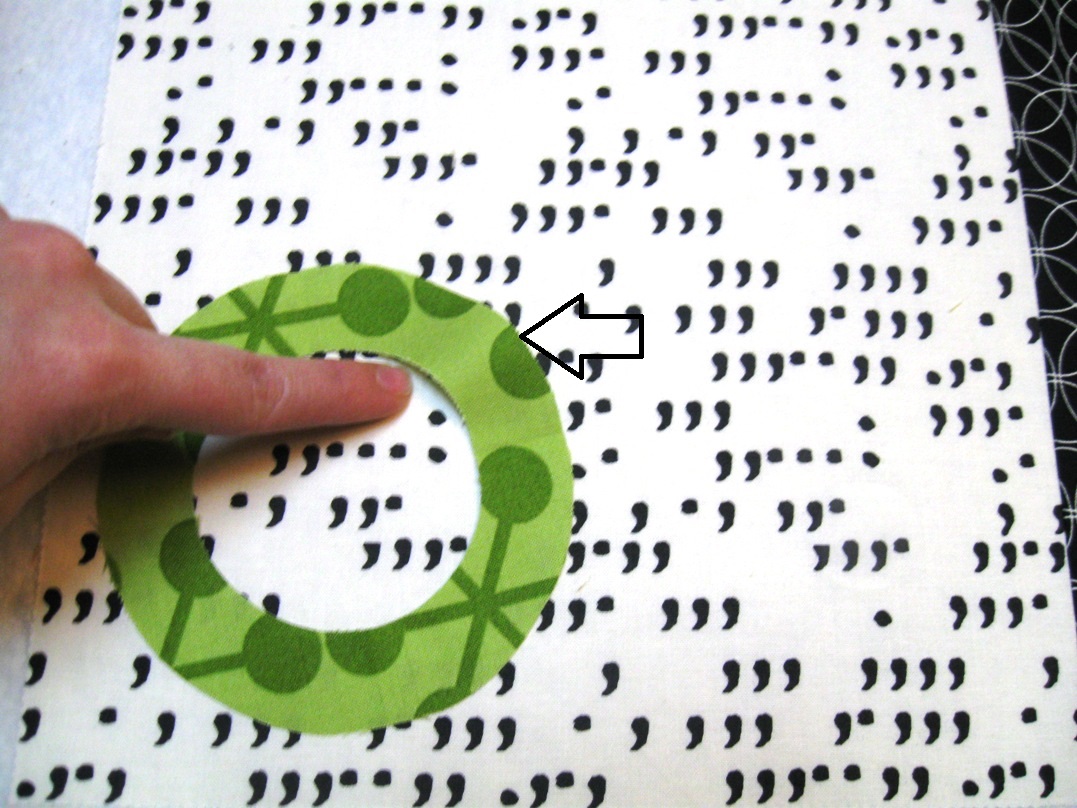
Place the first ring onto your quilt top leaving a bubble where you would like to add the next ring.


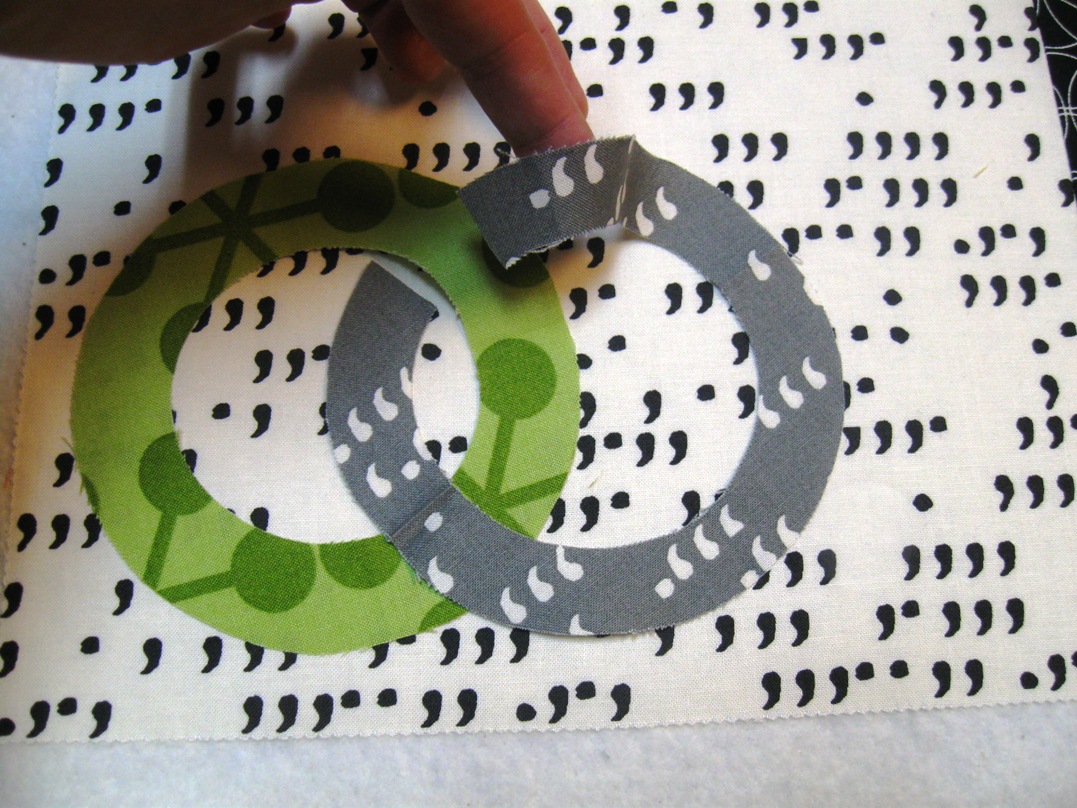
Place the next ring onto the quilt top so that it links with the first.  At one of the intersections of the two rings, cut the new ring as shown.


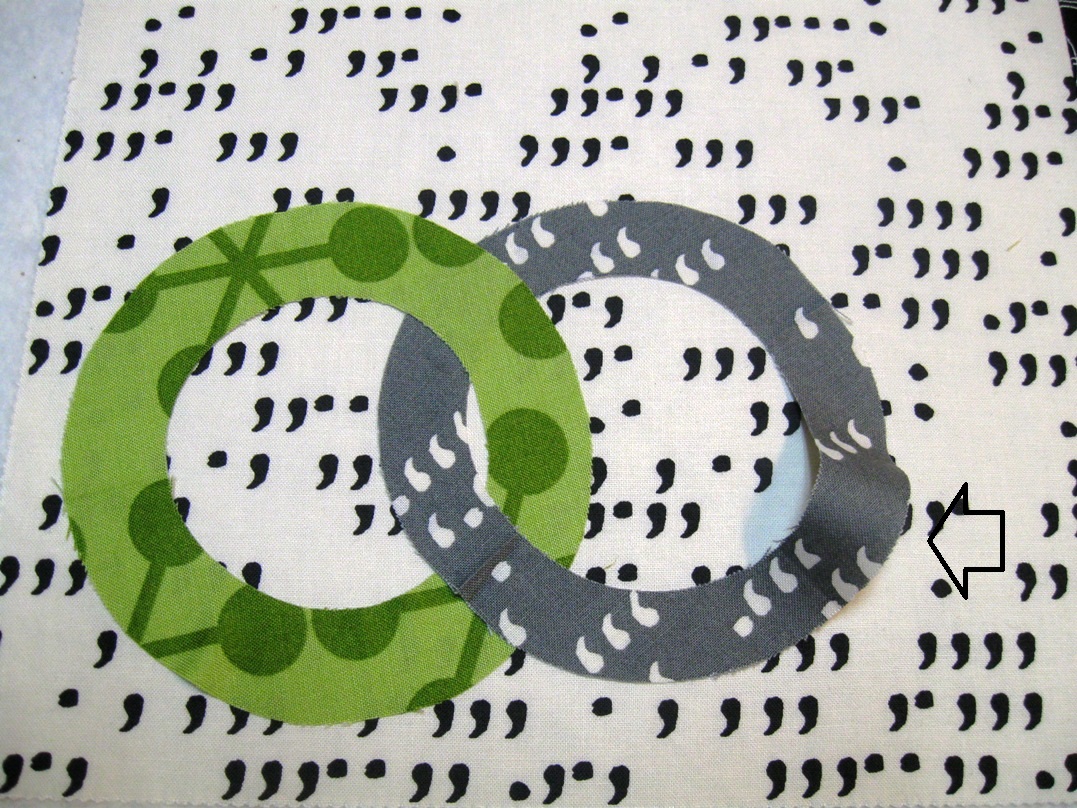
Slide the two cut edges under the bubble of the first ring.  Press the rings in place leaving a new bubble in the second ring to add a third ring.


Continue the process.  Start new groupings and vary the size and shape of each grouping.  Some of my groups have up to 6 rings and some only two.  The more variation the better.


Continue until you have covered the entire quilt.  I ended up with about 2 rings left over.


STEP 4 – FINISHING QUILT

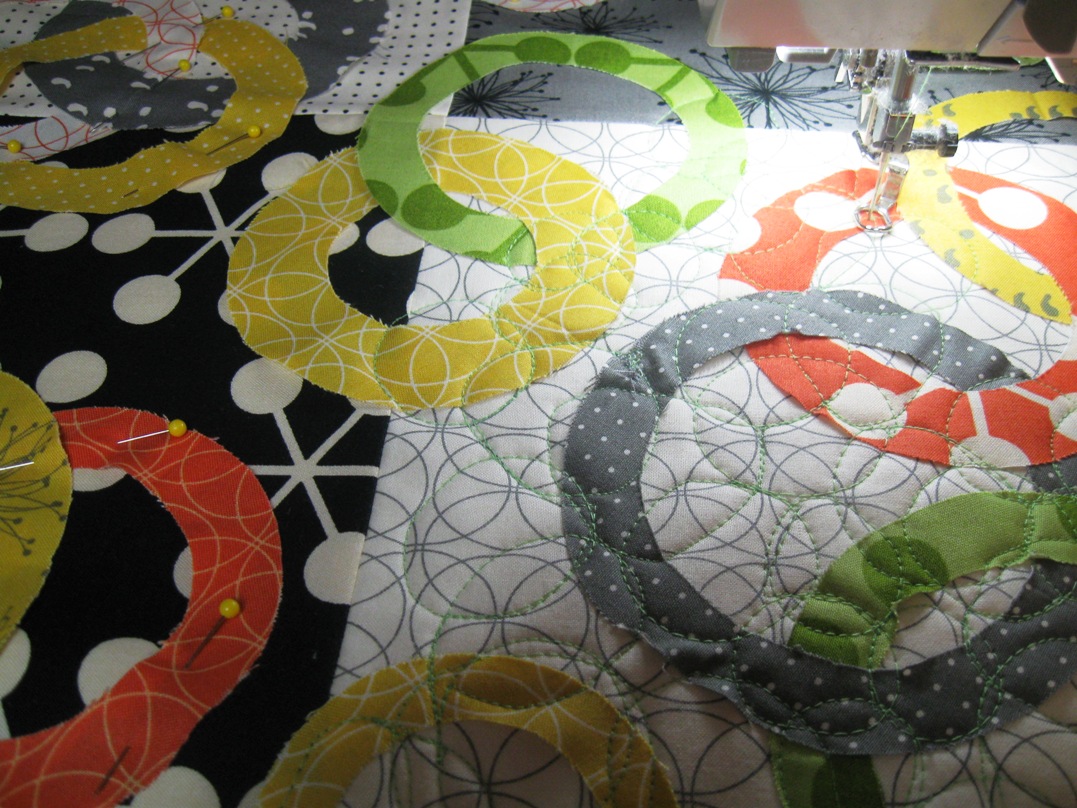
And now you are ready to finish the quilt.  Your quilt sandwich is already made so you can move right onto quilting.  You will want to quilt this with a rather dense FMQ design to ensure that all of those cut edges get stitched down.  I choose to do a Interlocking Circles FMQ design .  You will have to stop occasionally and lift your presser foot and then place it on top of the edge of the applique as sometimes it tends to pop up.  You will notice a few of my circles have been pinned.  Those were for the really stubborn ones that just didn’t want to stay in place.


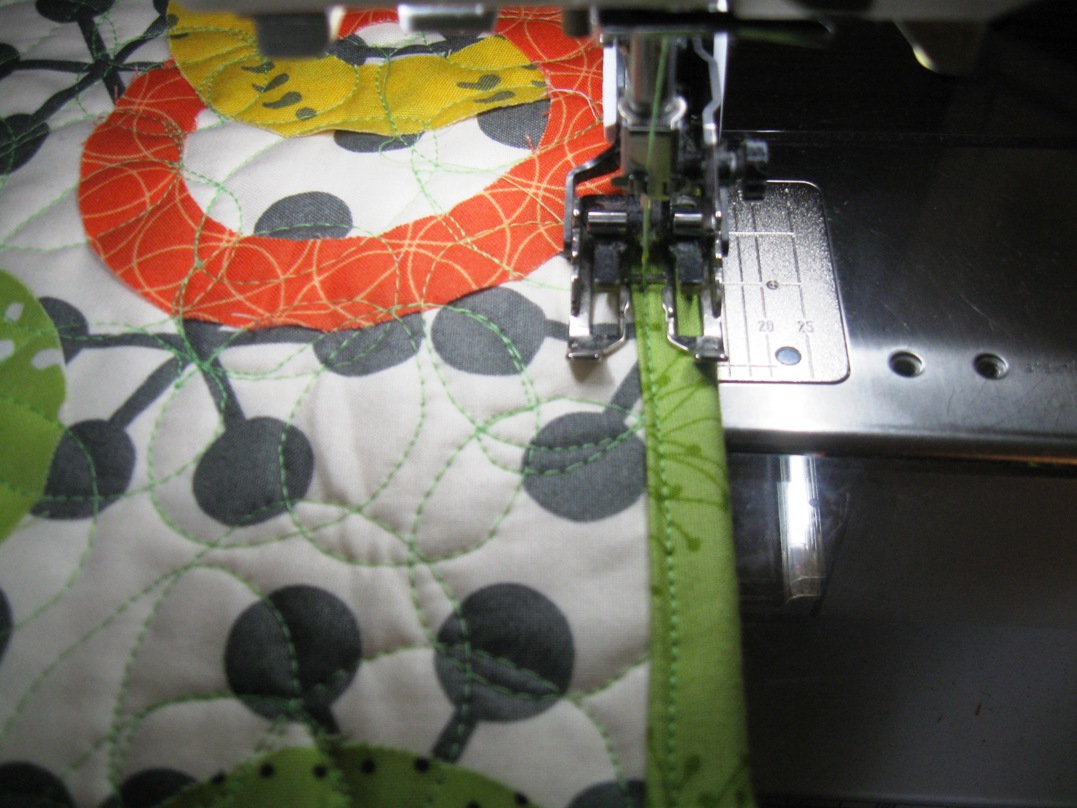
Once you are finished quilting all that remains is to bind it.  Cut your binding fabric into (4) 2 1/2 ” strips and bind your quilt.  I machine quilted this to add strength as it is a baby quilt.  If you are new to this you can see a video tutorial on binding here.


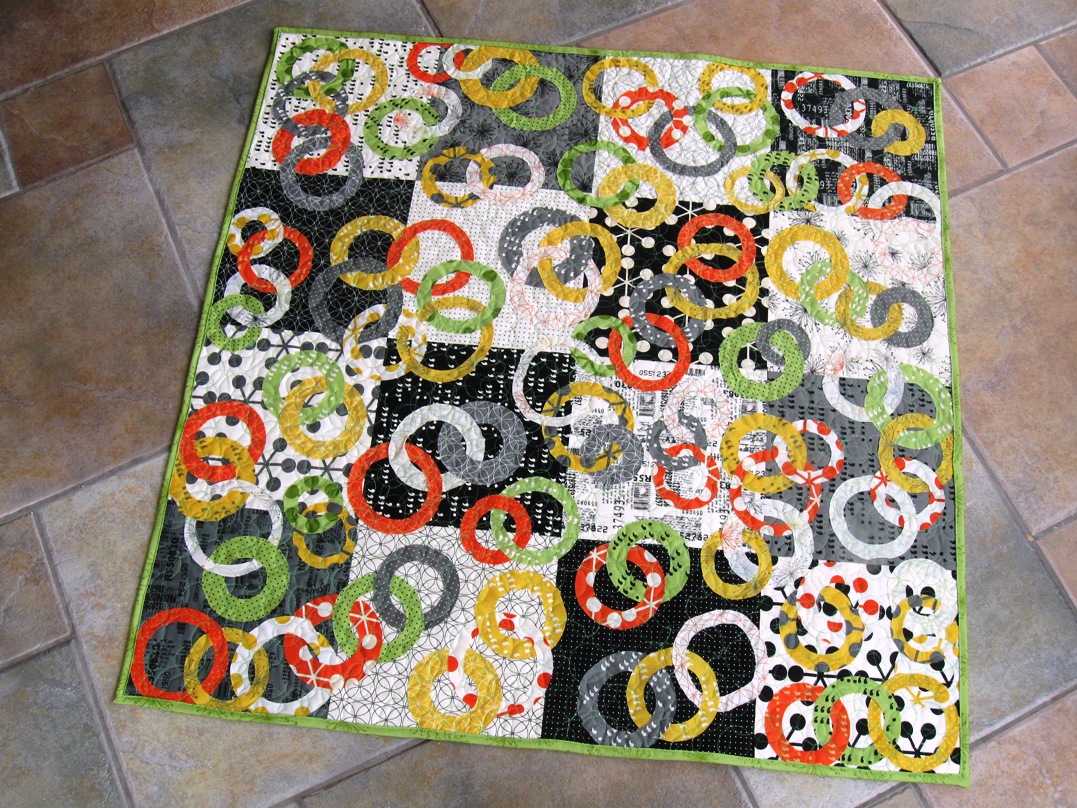
One adorably chic and modern Ring Around baby quilt measuring 38″ x 38″, a perfect gift for a special little one.


BONUS TUTORIAL!!!!

Every adorable blanket deserves a matching car seat cover!!!  And so I whipped up this little Chic Circles Quilted Car Seat Cover.  So fun, right :)  So let's get right to the tutorial.


MATERIALS NEEDED:

Leftover circles from Ring Around Quilt or 75 to 100 circles in varying sizes, prints, and colors
1 10" square of pop color fabric for handles (green print)
1 yard of focal fabric for quilted cover top (black print)
1/3 yard of contrasting fabric for quilted cover top (white print)
1 yard of matching fabric for cover lining 
1 yard of batting (low loft or cotton)
2 small pieces of velcro


STEP 1 - CUTTING

Cut your focal fabric into (4) 4" x 42" strips and (1) 15" x 42" strip.  Cut your contrasting fabric into (4) 2" x 42" strips.


Cut your remaining contrasting fabric into (2) 3 1/2" x 9" rectangles.  Scrap remains of strip.  Cut pop color fabric square into (2) 4 1/2" x 9" rectangles.  Scrap remains.


STEP 2 - PIECING AND ADDING BATTING

Lay your (9) 42" strips out as follows.


Piece the strips together using a 1/4" seam.  The easiest way is to just place your second strip onto the first with right sides together and sew a 1/4" seam along the edge, aligning as you go.  Then place the third strip onto the now sewn together first and second strips.  Sew a 1/4" seam along the edge again, aligning as you go.  Repeat for each strip until all are sewn together.  Press towards the darker fabric.


And now the top is all pieced, and should measure 35" x 42", and you are ready to add batting.  This is like making a partial quilt sandwich.  Place your batting on the floor and tape or pin it down so it has no bubbles and is taught.    Baste the pieced top to the batting piece.  I used spray baste but you can use pins as well.  If you are new to basting you can see a video tutorial here that goes over both methods.


STEP 3 - ADDING APPLIQUE 

And now you are ready to add the applique.  Gather your fabric circles.  I liked to keep mine dived by color just so I made sure they were distributed evenly.


You can attach your applique in two ways.  Either spray the back of the circles with spray baste and randomly place them onto your pieced top.


Or you can randomly place them on your top and pin them in place.


Either way you choose, just keep randomly placing the circles until you have a coverage of circles over the pieced top that is pleasing to the eye.


Now, to keep those circles all in place, you simply quilt your partial quilt sandwich.  I choose to use an all over pebbling FMQ design.  You can refer to this video if the quilting of Ring Around to get an idea of how quilting with raw edge applique will be.  Just be sure to use a dense design so that all of those circles are secured in place.


STEP 4- ADDING LINING

Once your pieced top is all quilted, you are ready to turn it into a cover by adding lining.  First, take a place and draw around the 4 edges of the quilt to give the cover nice curved edges.


Then go ahead and trim the excess batting and the curved corners you just drew.


Now, gather the fabric you choose for the lining of your cover. Give it a good pressing and the lay it flat with right side up.  Place your pieced and quilted top onto the lining with right side down so that both right sides are facing each other.  Pin around the edges of the top.


Sew a 1/4" seam (or if you walking foot is like mine, more like a 3/8" seam) around the entire top leaving a 5" hole at the bottom for turning.  Be sure to back stitch at the beginning and end of your stitching.


Trim the excess lining using your quilt top as a guide.  Now clip the corners to allow for easier turning.


Turn the cover right side out and then press the edges flat.  Take time here to make sure your pressing the seams nice and even.


Now, sew a 1/4" seam around the entire edge of the cover to keep the edges from rolling.


STEP 5- ADDING HANDLES

Last but not least, time to make some handles.  Gather your (4) 9" rectangles.  Place the smaller onto the larger with right sides together and stitch a 1/4" seam along the edge aligning as you go.  Repeat for the second handle.


Now align the other 2 raw edges together and pin.  The right side won't lay flat.  Sew a 1/4" seam along the pinned edge.  Turn the handle right side out and press flat so that 1/4" of your pop fabric is on either side of your contrasting fabric.  Repeat for the second handle.


Turn the top and bottom raw edges under 3/8"ish and pin in place.  Stitch a 1/4" seam along the top and bottom to secure in place.  If you like, you can stitch along the sides in the ditch for decorative purposes.  Repeat for the second handle.


Place the soft side of one piece of velcro onto the front top of the handle centering it and putting it down about 1/2", pin in place.  Place the scratchy side of the velcro onto the back bottom of the handle once again centering it and putting it up about 1/2", pin in place.  Stitch the velcro in place.  I like to stitch a rectangle and then 2 angled lines to make an x and really keep it in place.  Repeat for the second handle.


Finally, place the handles onto the cover.  You can either use your car seat to measure the best places for the handles, or I found it was pretty standard to center them at 19" from the top of the cover.  Place the handles 6" apart and use the contrasting lines to center them in the middle section.  Sitch the same pattern you did for the velcro at the center of each handle.

'

And now, attach the velcro straps around the handle bar of your infant car seat and stand back and enjoy your Chic Circles Quilted Car Seat Cover!!!


Don't they make a perfect pair!!!  I actually get to give this little handmade duo to my twin sister today!!!  She is expecting a little boy this summer and I am so excited for her!!!  Won't she just look super stylish sporting these beauties :)


I hope you have enjoyed both the Ring Around Baby Quilt Tutorial as well as the Matching Car Seat Cover tutorial and if you make either one or the other, or both I would love to see it!!  You can email me a picture at happyquiltingmelissa@gmail.com, post it to social media with #happyquiltingwithmc  or or add it to my flickr group here ;)  I can't wait to see your Ring Around projects!!!

Have a Happy Quilting Day!!!
Pin It!

Thursday, April 11, 2013

Interlocking Circles - A Free Motion Quilting Tutorial

Good morning all you free motion quilting enthusiast!  I have another little video for you today :)  This video walks you through the basics of creating an interlocking circles all over free motion quilt design.  It's sort of similar to pebbles with a twist.   Hope you enjoy :)  Oh, and it give you a little sneak peek at my the Moda Bake Shop tutorial I will be sharing tomorrow :)

Here is an example of the pattern :)


And here's the video :)


(Oh, and even though I say Feed Dogs Up in the video, I really mean Feed Dogs Down.  Oops.) 
Have a Happy Quilting Day!!!


Pin It!

Wednesday, April 10, 2013

Barn Block Finalist!!


This morning I was thrilled to find out that I am one of the Top 100 Finalists in the 2013 AccuQuilt Barn Quilt Design Contest!!!  This is my second year participating in the contest and it is just so much fun!!!  I was over the moon to find out that I had 3 block designs finish in the top 100.    Here they are!!


#9 - Star Surround
I have been playing around with this design for the last 6 months contemplating if I wanted to turn it into a quilt-a-long, or a pattern, or what have you.  So it was really fun to see it make a finalist :)  (On a side note, would you like a quilt-a-long with this design??)


#30 - Corkscrew
This block is another that I have been playing with for a little while with the same wondering on what to do with it :)  I really have fallen in love with it so I wouldn't be surprised if it shows up again sometime :)  


#39 - Due North
 This block was designed specifically for the Barn Block contest.  I love how it turned out.  Now, I just need to figure out how I could create it :)  


Voting takes place from today until Wednesday, April 18th.  So take a minute and pop on over to AccuQuilt Barn Contest and vote.  (And if you wanted to vote for 1, 2, or all 3 of my designs that would be just peachy :)  But most of all just vote :)
Pin It!

Tuesday, April 9, 2013

Refracted Rainbow Mini Top Done

Okay, I am having so much fun with this little mini!!  After finishing up the little rainbows I started framing them in white.  I love how the white serves to make the colors all the more crisp.


Then I played with the layout and sashed each of the framed rainbow blocks with some black.  The remind me of old slide projector slides.  So cool!!


I used the two remaining blocks to make a label for the back. I need to finish the back now so I can get to quilting it.


And speaking of quilting . . . This is my current quilting plan.  What do you think???  I would love your creative opinions!!


Linking up to Quilt Story
Pin It!

Monday, April 8, 2013

Mini Refracted Rainbows

Remember my plan to Remake Refracted in a Rainbow theme??  Well this weekend I got started on it.  And I am just freaking out over how stinking cute these little guys are.  They are 3" unfinished and will finish at 2 1/2". I am so excited with how this is coming together!!


Next step, framing each little rainbow in a 1/2" finished white border.  After that there will be some black sashing to tie it all together.  


I am just so happy to be working on this!!  It is so happy making to work with rainbows!!   The finish will go to my partner in the Fab Little Quilt Swap.  I hope she loves it, I know I sure do :)

Pin It!

Friday, April 5, 2013

Road Home Snuggler for Happy Chemo

Each year, Emily from Em's Scrapbag collects quilts to donate to the Happy Chemo project.  These quilts are given to individuals going through the throws of cancer.  I knew I would see Emily at Quilt Walk, where we are both teaching, and I wanted to have something special to give to her for this amazing cause.  And so I created the Road Home Snuggler.


I wanted to make something warm and cozy that had a feel of home.  So I whipped out my super soft, super snuggly, Wool and Needle Flannels Layer Cake sent to me by the lovely ladies at Moda.  This line will be available in July so it was a treat to get to work with it early,  thanks Moda!!  These beautiful rich colors just make me want to curl up in front of a fire :)    I took some pictures along the way  so that if you wanted to whip one up as well you could!!

 Here's What You Will Need:

(42) 10"x 10" squares.   I loved using the flannels!!  The finish feel is just fantastic!!

You will also need a 60 x 70 inch batting and backing.


Separate your 42 squares into 2 even piles.  I separated mine into lights and darks.


On the wrong side of the darker fabric using your ruler, draw a pen line diagonally from the top left corner to the bottom right corner.  Repeat for all of the squares in the dark fabric pile.


Lay a dark square on a light square with rights sides together.  Pin both sides of each square adjacent to that drawn line.  Make sure to put them out far enough that your presser foot won't hit them as you sew on by :)  Repeat until you have pinned 21 sets.

Now stitch a 1/4" seam along both sides of the drawn line (the black lines represent your stitching lines :)


Chain stitching will save you lots of time here.  So go ahead and stitch a 1/4" seam on on the right hand side of the line on each of the 21 sets, clip your threads between blocks, and then go back and stitch a 1/4" seam on the left hand side of the line for all 21 blocks.  Clip your threads between blocks.


 Cut your pieces apart by aligning your ruler along the drawn line and cutting along the edge of your ruler.  Cut all 21 sets creating 42 blocks.


Press your seams.  I normally press to the darker fabric, but if you are using flannels, I highly recommend pressing the seams open to reduce the extra bulk.


And now you are ready to trim up your Half Square Triangle blocks.  Simply lay a 9 1/2" square ruler onto your block aligning the seam with the diagonal degree line.  Trim around the block on all 4 sides.  There won't be a lot to trim :)  If you don't have a 9 1/2" ruler you can see this tutorial on how to trim HST's with other rulers :)


And your blocks are ready to lay your blocks out.  This is s much fun.  Without worrying about a pattern, simply lay the blocks in a 6 x 7 layout.  The more random the better.  Play around with the color's patterns, and such until you have a look that is pleasing to the eye.  


Once you have a layout you are ready to sew the top together.  Start with sewing the blocks into rows.  I find the easiest way to do this is to stack each row and place some sort of marker on the first block indicating what row it is.  This way you don't lose the layout you just created.


Then just start sewing the blocks together, one block adding to the next, and the next until you have sewn all 6 in the row.   Most of the time I just align as I go, but the flannels tended to want to shift so I recommend pinning if you are using flannels.    Repeat for all 6 rows.


Press your seams.  Normally, I press all my odd rows to the right and my even rows to the left.  But once again, I wanted the extra bulk of flannel to lay flat so I pressed my seams open.


 Sewing the rows together is just like creating them.  Lay the first row onto the second with right sides together.  Nest the seams and pin them and then along the rest of the edge.  Sew a 1/4" seam along the pinned edge.  Press open.  Then repeat adding the third row to the now sewn together first and second row and so on.

And before you know it, you have a beautiful super soft, super snuggly quilt top!!


And all that is left is to Baste it, Quilt it, and Bind It.  I know, I make it sound so easy.  If you are new to finishing your quilt, I have created a video tutorial series that goes over the basics of each of these three steps.  You can find it here :)   I quilted mine with a large loopy stitch as I didn't want to stitch it to much and take away from the soft top. You will need 7 WOF strips for the binding.  

And you are done, one beautiful  57" x 63 1/2" Road Home Snuggler.  Enjoy it for yourself of give it to someone special!!


One final note . . . I wanted to share my inspiration for this quilts name and design.

At the start of this quilt, I was staring at squares trying to decide how I wanted to turn it into a quilt.   I was pondering on Chemo, on family members I have seen go through it, and thinking about how many people struggle through it daily.  I kept coming back to the idea, that in the end, everyone wants to find a road home.  No path would lie straight ahead, it would likely require a lot of twisting and turning, maybe some backtracking here and there, but there would always be that journey to find the road home.  I love that each time I look at this quilt my eyes follow a different path.  They twist and turn, and sometimes backtrack, reminding me of those fighters journey.  I hope that whomever receives this quilt, can find peace and comfort as they struggle to move forward to find that Road Home.

Linking up to Amanda and Sarah :)


Pin It!

Thursday, April 4, 2013

I call it "Well Loved"

This morning, I pulled my Sunkissed in Spring quilt out of the dryer after it needed a little cleaning from bearing the brunt of my daughter's dinner revisited.   (As if it isn't bad enough that I have a cold, now we get sick wee ones too, Le Sigh)   This is like the 40th time since I made it for a MBS tutorial  2 years ago that it has been washed.  I remember the first time it took a crayon beating I cried.  I was so upset over how many hours I had spent making this quilt just to have it treated like a common coloring book.  

We'll, 2 years later, and a lot of washing's later,  I am happy to say that I don't cry anymore.  I mean, it goes on a 3 year old's bed, what do I expect??  When something goes amiss I spray it, toss it in the machine, and tell myself it is "Well Loved".


I know, it looks practically perfect from a distance, right.  But get close up :)  You will find at least 10 of these little Nail Polish blobs on it.


And there are a few of these pen streaks that I can't get out for the life of me.  I have gotten ink out before but apparently this particular pen has more stubborn ink.


And almost all of the flower centers are coming unraveled.  I did a zig-zag stitch around the centers so it would secure both pieces of fabric at the same time.  If I were to do it over again, I would take the extra time and just do a blanket stitch twice, one in each direction.


So sure, it doesn't look like it did the first day I shared it, but it is "Well Loved".


Now, I don't want you all to think that this I just sit back and laugh and smile every time one of my quilts get's stained.  Quite the contrary.  This whole "Well Loved" idea has been a process for me.  It get's easier once a quilt is stained repeatedly to see it as a good thing, but, when a new quilt is stained for the first time, I'm not gonna lie, it's hard to be okay and not shed some tears.  I mean after all, there is a lot of yourself put into each one.   I could go on and on with personal experience and examples, some good, and some not so good that I have learned from along the way.  But after the up's and down's, the personal reflection and pondering, I have come to the conclusion that someday, when I look back on my quilting journey  I am pretty sure that I would prefer my quilts to be "Well Loved" rather than Well Seen.  (If only I could process all of that in the moment I find that first stain ;)  


Pin It!

Wednesday, April 3, 2013

A Cold and Comma

First off, thank you to all of those that responded yesterday with your favorite color combo's.  It truly helped to brighten my day.  I awoke this morning with a not so nice cold, so at least I know now why my brain was scrambled :)  Here's hoping it comes and goes quickly :)

I realized that I haven't done a WIP post in some time. (like over a month). Which is kind of fun to wait a while because it really shakes the list up :)  And the more moving around the better, right :)

So here's a few of the things from the list that  I am working on right now :)

The last two days I have been playing with the fabulous Comma by Zen Chic for Moda.  These are some fantastic prints to work with.  So bold and fun!!!  I am working on whipping up a fun, chic, baby blanket for the MBS April Showers month :)  So yup, tutorial coming soon!!


I am also working on pulling out this little WIP.  I have had the whole cloth done for some time and then it kind of got buried by some secret projects.  I am at a point with lots of pinning, so the plan is to do a little pinning each night, while the husband and I have a Harry Potter Marathon.


And of course, there are lots of other projects in stages of finish, but well just leave it at the thing that keeps me sain,  The Master WIP list ;)


Designing Stage
  • Circle Meets Square Quilt 
  • Midnight Stars
  • Boxed In and Out
  • Jen's Baby Blanket
  • Mini Refracted
Piecing Stage
  • Jessi and Me Quilt 
  • SD
  • Block of the Month - Lucky Stars
  • Virtual Bee Block
  • Scrappy Stars
  • Scrunchy Strips - For Kami
Quilting Stage
  • Solids Quilt for Free Motion
  • Ring Around
  • Starburst Quilt-A-Long (I need to schedule to go rent time on a long arm)
  • Manly Snuggler
Completed Stage
  • Read with Me
  • Hugs Before Kisses
  • KS
  • DD 

Now I am off to start basting my Comma top.  (and I suppose I should throw in a load of laundry as well.)  Have a Happy Quilting Day!!


Pin It!

Tuesday, April 2, 2013

Ho Hum, so a Color Question

Okay, keeping it real here.  I have started and stopped like 5 other posts.  My mind is all over the place this morning.  I have so much that I should be doing (that's what happens when you go out of town for a weekend)  and all I want to do is curl up on the couch and take a nap.  It appears it's going to be one of those Ho Hum type of days that you just have to manage to push through.

So . . . since I can't focus any of my thoughts . . . I thought maybe I would pick your thoughts today.  So, tell me, what is your favorite color combo's??  2 color, 3 color, 4 color, whatever.  What colors do you tend to put together over and over again and always love them??


I am excited to see what your fav's are!!  And maybe I can play with some fabric in your favorite colors to help turn my day around.  Nothing makes me smile like playing with fabric :)

Pin It!

Monday, April 1, 2013

HMQS

Wow!!!  Thank you so much for all of the incredible sweet comments on my  Read With Me Quilt and Tutorial.  You all sure know how to make a gal feel fantastic!! In fact, I felt so fantastic about this quilt thanks to all of your wonderful compliments, that this weekend . . . 


I added a cute little label to the back . . . 


And added a quilt sleeve . . . 

And entered it into the Salt Lake Home Machine Quilting Show!!!!!   I am so excited.  Honestly, I wasn't planning on this at all.  But we were going to Salt Lake this weekend and my mom has agreed to drop it off and pick it up and the show is May 9-11 so she is bringing it right back to me before I leave for Market as she is watching the kids, so basically no shipping involved.  And then all of your wonderful comments kept coming in and bolstering my confidence and basically, I just ran out of excuses why not to.  


So we will see how it goes.  I don't have any big expectations, but I figured, I might as well give it a go.  Can't hurt to try, right??


Pin It!

Sunday, March 31, 2013

Happy Easter


Happy Easter, from our house to yours!!

Here's hoping we don't have any belly aches by the end of the day :)


Easter Bunting Tutorial found here :)

Pin It!

Thursday, March 28, 2013

Have You Seen Any Naughty Kittens??

Because it appear's that I have their mittens :)  Laura asked us to make some mittens using Lori Holt's wonderful tutorial for the March Beejeebers block.  She plans to use them in a wonderful "I Spy" quilt where you lay them all out in a mixed up order and then try to find the mates.  Super cute, huh!!!


Oh, and if anyone needs any extra thumbs . . . gotta keep it real ya know :)  I managed to cut my first set of thumbs 3/4" to short.  I guess that happens when you are reading a tutorial, listening to a book, and trying to sort out an argument over which movie the kids get to watch, all at the same time. Sure, we mom's can multi-task, you just don't always like the results you get from doing it :)


Pin It!