Showing posts sorted by date for query charming totes. Sort by relevance Show all posts

Saturday, March 16, 2024

More Charming Totes from More Charming Young Women

 So I was going through my camera roll the other day and realized I missed posting some very important finishes!!!!   Way back in 2017 I posted some adorable Charming Totes made by some adorable Young Women in our church :)  And when I was going through my film roll, I realized I never posted the next group of girls and their finishes from last year.  So today I am going to share them!!    One night a month, for several months, I taught these amazing girls how to make Charming Totes.    Each girl (including 2 of my own) picked their own charm pack and then cut, stitched and quilted!  For a few of them, it was their first time using a sewing machine, and they all did great!!!  So lets see their finishes!!! 


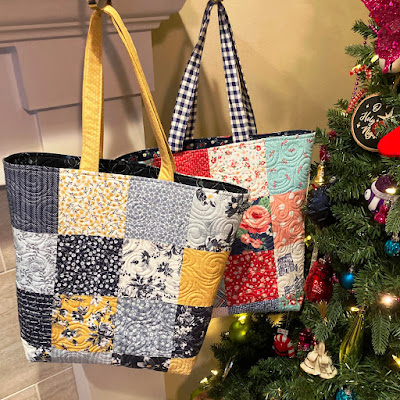
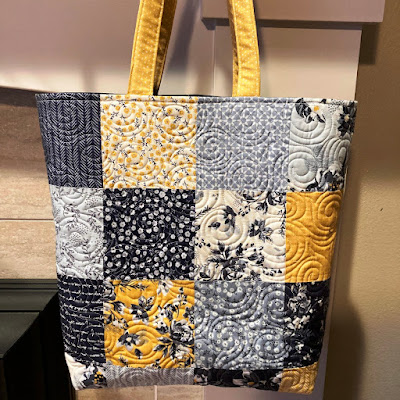
Jocelyn (my baby girl)  used Mama's Cottage by April Rosenthal for Moda Fabrics


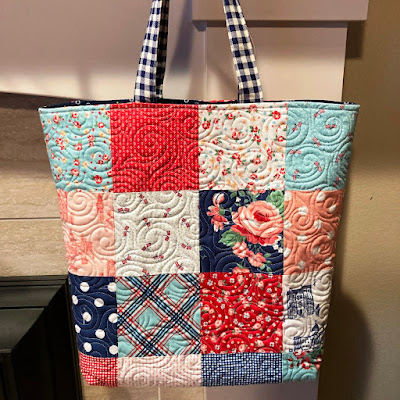
Kamryn (my girl who just got her learner's permit!!) used Seaside by Tasha Noel for Riley Blake.


Maren used Just Another Walk in the Woods by Stacy Iest Hsu for Moda


Bristol used all of the extra charms from everyone's totes and made a scrappy one, so cute!! 


Sierra used Badda Bing by Me and My Sister Designs for Moda


Addy used Fairy Edith by Amanda Castor for Riley Blake Designs


Rosie used Flora and Fawn by Amanda Herring for Riley Blake Designs.  


Emmy used Harmony by Sweetwater for Moda


Didn't they all do such a great job!!!  I just love them, and it really was so fun to see them grow in confidence in front of a sewing machine.   To the point where they were super excited to try the long arm, so great!!!    Way to go girls!!!

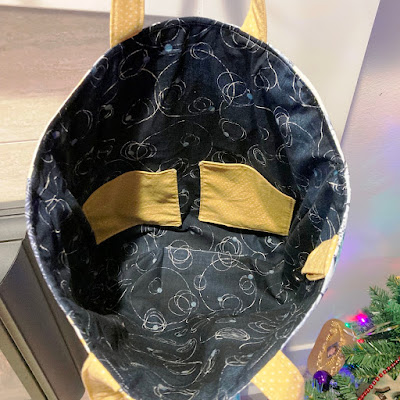
And just FYI,  if you want to make your own Charming Tote, I have a free Step by Step tutorial right over here ;)  You just need a Charm Pack and 2/3 yard of fabric to start!!  They are so much fun to make and are wonderful Christmas presents.  But I am warning you, you can't stop at making just 1 :)  


I hope you all have a very Happy Quilting Weekend!!!

Pin It!

Friday, December 10, 2021

2 Charming Totes for Christmas!!

 Charming Tote's just make the cutest Christmas Presents!!!   So excited to get these 2 totes in the mail for two very special people :)   I just love whipping up these totes, and have totally lost track of how many I have made to this point.  If you haven't made one yet, you can pop over here for the free step by step tutorial to whip one up yourself ;)  All you need is a Charm Pack and 2/3 Yard of a coordinating print.  But seriously, grab a few charms, because you can't make just one ;)  


The first  Charming Tote is in Gingham Foundry by My Mind's Eye for my Twin Sister.   When she was last visiting she mentioned how handy my tote was, so of course, I instantly figured I needed to make her one.   And I love the sophistication of this line, making it perfect for work for her.  


The second  Charming Tote is for my Mom ;)    I choose to make it in Notting Hill by Amy Smart, because she was born in England and lived there as a young child.  So of course, the cabbage roses, vintage drawings of English landmarks, and tiny British flags are just perfect for her!!   

And since these are for "super special people", I made them Deluxe :)  I added in some pockets in the lining, a small key chain holder, and put a strip of batting in the handles for extra comfort.  It only takes a second to add in these little features and I know they will be so super helpful to them both :)  

Now to get these in the mail :)   Homemade Merry Christmas is always so fun!!!

So do you have someone special you want to make a Charming Tote for??  Pop over here for the free step by step tutorial 

I hope you all have a very Happy Quilting (and Merry and Charming) Weekend!!! 

Pin It!

Thursday, December 2, 2021

Simple Sewing

 It's been a crazy few days, but I have managed to squeeze in a little simple sewing!!!  And nothing is more simple then sewing strips!!   Remember those Jelly Rolls from back here . . . I got them all sewn into blocks and here is a little sneak peek :)  I can't wait to see this one come together.  I just love the Fat Quarter Shop Short-cut Quilts, they are so fun and fast!!  I will be sharing more of this one in January ;)  


But first . . . Christmas!!!  After Jessi finished up her Charming Tote  I thought they would make a wonderful Christmas Present for some special people.  So I ordered 2 special Charm Packs to fit just right.   And they came the other day and I couldn't wait to whip up the Charming Tote sides ;)    The first one is in Notting Hill by Amy Smart.


And the second one is in Gingham Foundry by My Mind's Eye.   I just love both and I just picked out the lining fabric this morning so I am hoping to get these finished up soon and in the mail :)


So I am off to go cut some linings.

Hope you are all having a very Happy Quilting Day!!!

P.S. . . . I am sure by know, you all know these are like my favorite Tote to make and there is a free tutorial for Charming Totes over here . . . but just in case you don't . . . . there is a free Charming Tote tutorial here :)   

Pin It!

Wednesday, February 3, 2021

Just a few Bags :)

 Well, I am all packed up and ready to head out to the Quilty Friends Retreat!!  I am so excited to get away and sew for a few days, and I am just thrilled to get to teach again!!!   But I have to laugh, because I never cease to be blown away at how many bags it takes to go to a retreat.      And I don't even have my personal clothes bag in this picture ;)  Guess it's been a little while, I just kept finding more bags and totes to pack this all into, including,  my new Bonnie and Camille Quilt Bee tote, isn't that just to cute!!!  

About half of the bags are for teaching :)   I am teaching 2 classes of my Wishes Pattern and 1 class of my Scraptastic Stars Pattern.  And we even have a square swap planned for our Scraptastic Stars class which should be a whole lot of fun.   I am also taking a class as well.  It is going to be crazy busy, but oh so much fun!!!   I am just so excited :)  


And come Friday night, after all the classes, I get to unpack the rest of the bags for a Charming Baby quilts Trunk Show!!!   EEEkkk, I can't wait!!! That's what the two giant suit cases are for.  I am just so thrilled that I get to share all of the Charming Baby Quilts and the Charming Baby Quilt Remix's :)   


And I have to say, I am so glad that  I was at a retreat with Jen Kingwell a few years back, who taught me to roll my quilts to transport them in suitcases.  Otherwise I don't think there would have been a chance to get all 21 of these in 2 suit cases.   And then the super fun part, trying to get them all back in afterwards ;)


I am going to try to remember to grab someone to take some pictures during the trunk show so I can share them afterwards.   I am just thrilled to be "retreating" again.  See you all when I get back.  

Oh, but before them, I will be sharing a Secret Finish so be sure to pop back in on Friday :)

Until then, Happy Quilting!!


Pin It!

Wednesday, August 12, 2020

More Mask Making

 Last night was spent making more Masks, only this time, I was teaching the amazing Young Women in my church how to make their own masks.   School is a few weeks out and they all need masks.   It was fun to see the different personalities come though in their picks of fabric.  A lot just wanted simple black, (it goes with everything!!!)  but some also picked some fun and funky ones :)


They all did such an amazing job!!!  For quite a few, this was their first introduction to a sewing machine and they really did great :)   The other young ladies got introduced to a sewing machine when I taught them how to make Charming Totes a few years back ;)    I just love that this allows me to pass sewing on to a new generation.    Thank heavens there are so many of us that know how to sew right now, I can't even begin to imagine how many homemade masks have been sewn in the last few months by all of you amazing sewers!!!  


Oh, and just in case you missed it, I added the link for this pattern on my Monday post, and will also share it here.   Link to the PDF Templates.   I have found this to be an awesome pattern for fit.   I just used 4 of the Part A Pattern and don't do the fitter pocket.  And I love using old T-shirt 1" strips that have been stretched and made into loops for the ears, it is so much softer than elastic.  And today, My plan is to make some masks for me ;)  

I hope you all have a very Happy Quilting Day!!!

Pin It!

Thursday, June 4, 2020

Tutorial Throwback Thursday - Charming Tote

I am so excited that this week the library has been opened again, and my kiddo's have been able to start up their piano lessons as well.   This is huge with summer being in full swing as I love having a set time for reading and a set time for practicing piano each day.  It helps to fill up those wonderfully long summer days ;) And that also means, my kids are using their Charming Totes again, so I thought it would be great for today's Throwback Thursday!!!! 


These Charming Totes are so much fun to make and super simple as well.   And you can use them for everything from piano totes, to library totes, to church totes, and I have even had a friend text me that she uses hers for a grocery tote!!!   They finish at 18" x 16" x 4" so they really are a great size for toting just about whatever needs to be toted ;)  And all you need is 1 Charm Pack and 2/3 of coordinating fabric to whip one up ;)   And wouldn't it be fun to make a Charming Tote to tote around your Charming Baby Quilts!!!   Eeek, I just love Charm Packs!!!   


And truly, you can't make just one Charming Tote!!!   They are actually super fast to make assembly line, and make for wonderful birthday and Christmas gifts ;)    I have made so many over the years.  Here are links to totes I made in 2014, and some in early 2015 and late 2015, and some in 2016 and one in early 2018 and then some in late 2018.  Like I said, you can't just make one!!!!    And these are perfect for beginners and experts alike.  In fact, in 2017, I taught all of the amazing young women in my church how to make their own Charming Totes !!!   For a lot of them, this was their first time making a project on a sewing machine.  I was so proud of them and they all made such beautiful totes!!!     


And speaking of church, I just got word that we get to go back to a "social distance" style church in a week!!!  I am so excited, and it means I get to take my Church Charming Tote along with me ;)  And I even added key rings and pockets in the lining of this bag so it is super functional for me!!!   I just love it!!!   You can totally customize this tote any way that works great for you!!!  


And that is my Charming Tote!!!     I hope you have enjoyed today's Tutorial Throwback Thursday as much as I have!!!      To make your own Charming Tote  just click on any of the project name links for the free step by step tutorial.    And when you are done,  I would love to see your Totes!!  You can email me a picture at happyquiltingmelissa@gmail.com or post it to social media with #happyquiltingwithmc  :)   I can't wait to see your Charming Totes!!


Thanks for popping in today and sharing this throwback with me!!! 

  I hope you all have a very Happy Quilting Day!!!!
Pin It!

Thursday, January 3, 2019

December Sew Sampler Box!!!

So ya, I got a little behind :)  I meant to post this last week, but honestly.  That week between Christmas and New Years is pretty much a blur right.  Does anyone get anything done in that week or is that just me :)  So, here it is, a few day's late but still just as awesome,  my December Sew Sampler box !!!      The theme for the box is Winter with You and it is just all kinds of quilty goodness that has me wanting to stay inside from the the cold and quilt ;)


For starters, there is an entire kit for making this super cute Avondale Tote Bag!!!  Ya'll know I love making Charming Totes, and I think this one will have to squeak in the next time I need a tote.   The Woodland Rose fabrics are so pretty and will make such a soft tote ;)   And how sweet is it that I have everything I need to make it up!!!   I especially love the patchwork handles!!!


And I always love unpacking the notions :)  It's just so fun to see what fun little goodies Fat Quarter Shop sends.  This month has some super cute Cherry Gingham Heart Snips :)   How adorable are those!!!  And I am happy to say, that mine have already been used a ton.  My SIL was visiting this last week and she does amazing crochet, and was working on it while we chatted and I noticed the scissors she was using were super dull.   So I gave her these, and she just loves them, and that makes me smile :)   And I was totally geeking out over the Tula Pink Tweezers.  Ya, I am a Tula Fan, and I have loved the cool rainbow sheen of her hardware, so I am so excited to have my first piece.    And it was also a great reminder to clean my machine, tee hee hee ;)     And last but not least, you can never have enough Aurifil Thread, and this will make up the tote perfectly :)


And of course, with a new box, there is a new Barn Block!!!  And this month's block had a bit more piecing in it, and I actually redid a block from earlier in the eyar with similar piecing, so I was working on this for a bit.   But I love the look of it, so fun!!!  Only 2 more blocks to go in this Barn Raising ;) 


And that's my December Sew Sampler Box!!!    And I can't wait to see what the New Year brings in my next little Aqua Box ;)

I hope you all have a very Happy Quilting Day!!!

** This post contains affiliate links. 

Pin It!

Monday, October 8, 2018

3 New Charming Totes

So along with the quilt that was auctioned off for a church fundraiser that I shared back here, I decided to make a few new Charming Totes as well to help in the cause.  These are so much fun to make and are the perfect size tote for just about everything.  The only hard part was deciding on which Charm packs to use ;) 

The first tote I decided on a Flower Mill Charm Pack by Corey Yoder for Moda Fabrics.   I love these happy prints and beautiful colors and I opted for a little more free motion quilting on the totes this time around and did a lovely loose feather.  I love the little extra it adds to the tote ;)  I also decided to fold the lining over just slightly on the top to add a little "faux binding" on the top of the bag.  I like it, but it did make the handles a bit shorter as they had to be stitched down as well.  So if I did that again, I would add an inch to the handles ;)


For the second tote for auction, I used an Into the Garden Pack by Amanda Herring for Riley Blake Designs.   I have been saving this one for a bit, and it was just perfect for this little tote.   And I added some more flower whimsy with a feathered swirl free motion quilting design.   Both totes were a big hit at the auction and I have already seen them being toted along with the ladies who won them.  Which, of course,  just makes me smile ;)


And while I was in the tote making assembly line process, I decided that I needed a new tote for Church as well.  And I was so excited to find that Deanna Rutter's Heart and Soul Charm Pack for Riley Blake Designs had a text print that listed the Young Women values.  Since I work with the Young Women each week, it couldn't have been more perfect!!!


And this tote got a little extra love, since I was so needing these little extra features in my old tote.   Padded Handles, Pockets, and most importantly, key rings!!!!  No more digging around in the bottom of my bag to find where my keys have gone ;)   So loving it!!!


And if you find yourself needing a Charming Tote, you can find the tutorial to make your own right over here.   They really are so much fun to make, and trust me, you won't be able to make just one.   But I am telling you, the hardest part is just picking which Charm Pack to use ;)

Happy Quilting!!!

** This post contains affiliate links. 

Pin It!

Friday, September 28, 2018

Giant Patchwork Quilt

Sometimes simple patchwork is just the best and oh so much fun!!!  And this quilt is extra special because I had a whole lot of help making it!!!    You might recall last year when I shared all of the Charming Totes that I taught the Young Women in my church to make.   Well, several of the girls wanted to try their hand at a larger scale patchwork. 


So we went to pick some layer cakes.    The fabrics chosen were Creekside and Desert Bloom by Sherri and Chelsi for Moda Fabrics.  I love all of  Sherri and Chelsi fabrics because they designs them to read one color.  This makes them perfect for patchwork, as every block stands out and none of them blend into the block next to them.  (or into the background when doing more piecing).  So fun!!!   And don't the two lines just play so nice together.  I love when designers do that!!!


And then the fun began.  We just used the Layer Cake squares as is, so no cutting was necessary to get started.  It was absolutely wonderful to watch them methodically think over where each square should be placed.   They worked on that placement until it was just perfect!!!    And then, time to piece it together.  Same exact way you make the Charming totes, only on a much larger scale :)  So fun!!!!

 This weekend those same girls are hosting a Spaghetti Dinner and silent auction to raise funds for their camps and such.  And of course, the Giant Patchwork quilt that was their special project will be featured in that auction.   Isn't that just so awesome!!! 


So it was time to get it quilted up ;)  I decided to quilt it with an overall loose feathers design.    I have so much fun quilting these, I can't believe that the feathers used to scare me.   This way is so fun and relaxing and it quilts up real quick, which was important as it had to be done by Saturday :)  Sometimes I wonder if the only way to get my quilts out of the to be quilted pile is for them to have a deadline, tee hee hee ;)


And I also love the loose feathers because it creates the coolest texture!!!  Doesn't that just make you want to cuddle up with this queen size beauty!!!   It measures 95"x 95" so it will be perfect for someones new bedspread ;)


And that is the Giant Patchwork quilt!!!  I had so much fun working with the girls on this!!!   And seriously, I want to do some more simple patchwork in the very near future.   2 Layer Cakes and a  5" border and you can whip up a queen size quilt that really makes a bold statement in no time at all.   Oh so much fun and you all know, I have enough layer cakes stashed to make a whole lot of Giant Patchwork Quilts!!!


How about you???  Have you every made a Giant Patchwork Quilt???   If not, do you totally want to make one now???


Linking up this finish to Sarah's and Myra's :)

** This post contains affiliate links. 
Pin It!

Wednesday, February 28, 2018

February Sew Sampler Box!!

Wow, it's the last day of February!!  I know February is a shorter month, but still, that just flew by!!   The best thing though, about another month come and gone is that my February Sew Sampler box showed up in my mailbox ;)    This month's theme is Home Sweet Cottage and I am just thrilled with all of it's quilty goodies!!!


It's no secret that I absolutely love Charm Packs!!! And I totally squealed when I saw that this month's fabric included not one, but two of  April's new Mama's Cottage Charm Packs!!!  I just love the super happy and bright colors of this line and the prints are just so fun and whimsical.  Wouldn't these just make the cutest Charming Totes!!!  I think I might have to just earmark one of these Charm Packs for just that :)


And I just love this month's pattern by Lissa Alexander. I totally want to make this pattern a la super scrappy, which seems fitting as it is in conjunction with Lisa's new book Oh, Scrap!  (which I will be sharing more about soon, it's awesome!!! ;)   And I am excited to try out Doug Leko's new Simple Folded Corners Ruler.  It makes is so you don't have to draw the line on your stitch and flip corners.  I haven't drawn my lines for a while now as I use the Clearly Perfect Angles on my sewing table which I absolutely love!!!!  (and it works for HST's too)    So I will have to try out this ruler and see which option I like better for stitch and flip corners ;)  Or, maybe it will go with my traveling machine as I don't take my sewing table when I travel which makes it so I can't use the CPA cling.  There's an idea ;)


And the last few goodies out of the box included a Triangles on a Roll for 2" Finished HST's  and some Aurifil Thread, which we all know, you can never have to much of ;)     I am not much for Paper Piecing my HST's as I can make them super fast as I don't have to draw my lines and I love my Bloc-Loc's for trimming them, but this will be the perfect little gift for a Paper Piecing friend ;)  


And of course, I can't finish up a Sew Sampler box post without this month's Basket Block!!!   Block 11 and I have to say, I just love that background fabric,it's just so fun!!!  .Only one more month and this will be ready to be sewn up, my my how a year flies by!!!


And that is my February Sew Sampler Box  . . . and it just makes me want to stay Home Sweet Home all day and sew!!!  I know I say it every month, but Thanks again Fat Quarter Shop for always sending an amazing box of Quilty Goodness!!!

And now I am off to work on a project for an upcoming tutorial in a few months,  and hey, I just thought, it has stitch and flip corners, so looks like I will be trying out that new ruler today!!!

Have a Happy Quilting Day!!!


** This post contains affiliate links. 
Pin It!

Wednesday, January 3, 2018

I Think She's Got the Quilting Bug!!!

So remember when I shared how I was helping the amazing Young Women in my church to make Charming Totes . . .Well one of those amazing Young Women is my daughter.  This is her with her Charming Tote (which there happens to be a tutorial for right over here ;)  Jessica (shes 12 yrs old)  has done some sewing and piecing before, but only when I have asked if she wanted to make something or with her grandma, and even then, we needed to kind of stay on her to finish her project.   But I think this experience of making this little Tote might have been just the right project for the Quilting Bug to bite her ;)


As soon as school ended for the Christmas Break she asked if she could finish up the quilt that she had been working on for a friend for the last 2 years.   She added the borders, pressed it all, made a backing and then promptly asked if she could quilt it on the long arm.  


And let me tell you, this girl is a natural on the long arm!!!  She wasn't scared one bit.   I helped her load the quilt and gave her a few suggestions on how she might light to quilt it, and she was off.   I was able to work on my own project as she quilted away and  only came and get me to help her change the bobbin or roll the quilt, which she had down by the end of the quilt ;)  Ya, totally a proud moment for this mama!!!


And the best thing was, she absolutely loved it.  Every time I checked on her she was grinning from ear to ear, excited with what she was doing ;)  Yippee!!!  And I was so glad she wasn't scared, because she picked yellow thread, which blended great in the border, but made a super fun pop in the squares.   And she just rocked it!!!


She quilted loops and stars in the border, and alternated between wavy criss cross lines on an angel and wavy criss cross lines perpendicular on the squares.  I helped her with the name at the bottom, but besides that, she did all the quilting on her own.  And just look at all that awesome texture!!!  I know I am a bit bias, but I think she did amazing :)  What a beautiful and fun finish!!!   And of course, her friend just loved the quilt and it made for a wonderful Christmas Present ;)


And then the day after Christmas, Jessica asked if she could start another project!!!!   The quilting mom in me was so excited, I dropped everything I was doing and ran her down to the quilt room to decide on a project before she could change her mind ;)   She opted for the Neverland fabric that I had and wanted to do another simple patchwork with a border, but she wanted a whole lot more squares.   So I helped her with some cutting and gave her a little bit of instruction  (mostly, it's just like piecing the tote but on a larger scale) and she was on her way.


She laid out the patchwork and played for a few days with the placement.  Then when she got it just the way she liked she collected it all back into rows and started sewing.  She has already sewn up the first 6 rows ;)   And she is doing it completely independently!!!   I am so impressed with how she has just taken off with this!!  She is keeping her project neat and organize (so glad I bought the Good Measure Clothespins Set at Black Friday,  they are perfect for her to keep her rows stacked and together :)   so there is room for us both to sew together and that is a dream come true!!! 


I can see sharing a lot of Jessi's finishes this year because that girl is totally "jump into the deep end of the pool" excited about quilting!!!!  Best Day Ever!!!!   


Pin It!