Friday, October 14, 2022

Keystone Corners - Fast & Fun Lap Quilts

 It's Week 2 of my Fast & Fun Lap Quilts Book Tour and today I am sharing a second version of the Keystone Corners quilt! It's always fun to see how different a quilt can look by changing things up.    


 For this version of Keystones Corners, I decided on a neutral theme background.  My goal with this version was to show how amazing a neutral layout looks, they have truly become my recent favorite.  I used Black and White prints for the piecing and a nice Tan Linen background.  Yes, you don't always have to use cotton, Linen has such a pretty hand and gives another texture.   


This version of Keystone Corners was made using Flue Noire fabrics by My Mind's Eye for Riley Blake Designs.  All the quilts in Fast and Fun Lap Quilts are made with 1 Layer Cake/10" Stacker and a background fabric.  Fluer Noire was the perfect print for an all Neutral look.   I always love a good Black and White Line!  And of course, a black and white stripe binding is the perfect finish.   The quilt finishes at 60 1/2" x 60 1/2".  

Since I custom quilted all the quilts in the Fast & Fun Lap Quilts  I thought it would be fun to do all over designs for these second versions.   For this Keystone Corners quilt, I quilted L and E across the quilt.   This design is perfect for this quilt, as the pieced squares being perfectly lined up help me keep the L and E lines nice and straight.   And 403 (a slightly darker thread than 402) was perfect for this tan lined background, just so fun! 


And that is another Keystone Corner quilt, the second lap quilt in my new Fast & Fun Lap Quilts book !  You can find the Fast & Fun Lap Quilts book in your local or online quilt shops,  C&T Publishing, or if you would like a personalized signed copy, you can order from my Etsy shop.  And if you make your own Keystone Corner quilt, I would love to see it!!  You can share your quilts with me on social media using hashtag #happyquiltingwithmc and #fastandfunlapquilts and tag me @happyquiltingmc or you can email me a picture at happyquiltingmelissa@gmail.com.   


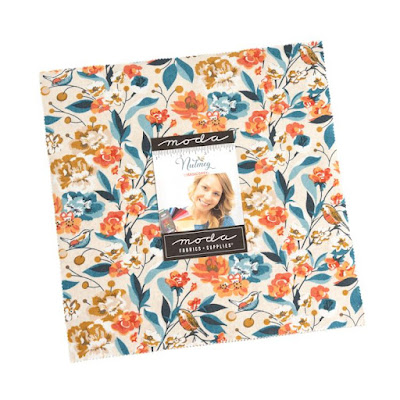
Thanks so much for popping in for another Fast & Fun Lap Quilts book day of fun.    And if you haven't had a chance to enter Kristina's Fast & Fun Lap Quilts Giveaway for some beautiful Nutmeg fabric that she used to make her own Keystone Corners Quilt, be sure and pop on over and enter.  

I hope you all have a very Happy Quilting Day! 

Pin It!

Wednesday, October 12, 2022

Keystone Corners - Fast & Fun Lap Quilts Book Tour

 It's Week 2 of my Fast & Fun Lap Quilts Book Tour and today I am sharing the Keystone Corners quilt! This quilt looks a little complex, but it really goes together super easy.  It uses no-waste flying geese to create the blocks with a snowballed center.  The no-waste method of flying geese is my favorite method.  Not only is it super fast, making 4 geese at a time, it also has no waste, as the name would suggest.  


Here is the introduction I wrote about Keystone Corners in the Fast & Fun Lap Quilts Book.  "Inspiration truly comes from everywhere.  This beauty was inspired by a garden path at a flower nursery, which had an amazing stonework design.  I quickly snapped a picture, thinking it would be a wonderful quilt.   And yes, I snap pictures of everything, including bathroom tiles!  Keystone Corners is made with two simple units, so it's quick to piece.  And it can also easily have a more masculine feel, depending on your fabric choices."


When writting this book, I tried to give you all of the tips and trick that I would share if I were teaching a quilting class.  This is my favorite tip from the Keystone Corners quilt.  Have you used the Fabric V?  This is such a great little guide for making sure all of your points stay perfect.  Once you get used to seeing it, you will look for it in all of your quilts to keep your points spot on.   


Keystone Corners was made using Meander fabrics by Anneela Hoey for Moda Fabrics.  All the quilts in Fast and Fun Lap Quilts are made with 1 Layer Cake/10" Stacker and a background fabric.  You will use 35 of the 10" squares for this quilt, and the Plan Ahead tip will help you divide your fabrics, I like using the larger scale prints in the snowball centers.  This quilt finishes at 60 1/2" x 60 1/2", a nice square lap size.  

I had so much fun custom quilting each of the quilts in Fast & Fun Lap Quilts .  For this Keystone Corners quilt, I quilted straight lines in the arrows, swirls in the centers, and loops and cobblestones in the background.  Again, I used my favorite 402 So Fine thread to blend perfectly into the white background and all of the prints.   The cobblestones reminded me of the inspiration behind the quilt, so it seemed fitting for the quilting.     


And that is Keystone Corners, the second lap quilt in my new Fast & Fun Lap Quilts book !  You can find the Fast & Fun Lap Quilts book in your local or online quilt shops,  C&T Publishing, or if you would like a personalized signed copy, you can order from my Etsy shop.  And if you make your own Keystone Corners quilt, I would love to see it!!  You can share your quilts with me on social media using hashtag #happyquiltingwithmc and #fastandfunlapquilts and tag me @happyquiltingmc or you can email me a picture at happyquiltingmelissa@gmail.com.   


And speaking of making a Keystone Corners quilt, my good friend, Kristina Brinkerhoff has made her own Keystone Corners Quilts.  Isn't that just so amazing!  Kristina used a Nutmeg Layer Cake to make her project, and it is just stunning.  It has such a perfect look for Fall!   You can see all of the details of her project on her Instagram at CenterStreetQuilts.  


And while you are visiting CenterStreetQuilts, be sure to enter her Nutmeg Giveaway!!!   You can win the fabric to make a Keystone Corner Quilt just like Kristina's.  So fun!!!
And that is it for today, thanks for popping in for Week 2 of the Fast & Fun Lap Quilts book!

I am just so happy to share this Keystone Corner quilt and be sure to pop back in on Friday when I will share a second version of the quilt :)  

I hope you all have a very Happy Quilting Day!


Pin It!

Tuesday, October 11, 2022

Terrific Tuesday Giveaway Day!

   It's Terrific Tuesday Giveaway Day!! Let's have some fun :)

First, we are not going to announce the winners of last week's Terrific Tuesday Giveaway today!!  
I am currently in International Waters so I will pick a winner next week when I am home :)   Which gives you another week to enter.  


And on to today's

Today's Terrific Tuesday Giveaway is being sponsored by Green Fairy Quilts.  Green Fairy Quilts is your home for pre-cut goodness and they always have amazing sales going on every weekend on a selected pre-cut or notion!!!   And did you know that Green Fairy Quilts has a Deal of The Day, I just love these!!!     Also, Green Fairy Quilts has just added lots and lots of new pre-cuts to their 50% off Page, you won't want to miss these!!! 

 In Celebration of the release of my Fast & Fun Lap Quilts book , for today's Terrific Tuesday Giveaway, Green Fairy Quilts will be giving one lucky reader a beautiful Daffodils and Dragonflies Layer Cake by Kansas Troubles for Moda.  Just so pretty, think of all the Layer Cake Lap Quilts you could make!!!!  

You have two entry chances here on the blog, and please leave a separate comment for each.  All Entries are welcome, including International Entries.   Please just be sure to leave an email address if you are a no-reply blogger ;)  

ENTRY 1 - Simply leave a comment that tells me Do you name your Sewing Machines?? 

 ENTRY 2 - Show your Green Fairy Quilts love.   You can Sign up for their Newsletter which I highly recommend as it will ensure you catch all of their amazing sales!!  You can follow them on Instagram or Facebook,  or you can visit the Shop and then share a favorite item ;)   Just be sure to leave a comment of how you showed your Green Fairy Quilt Love!!!

And that's it ;)  The giveaway will be open until next Tuesday, October 18th, when I will announce a winner at the beginning of next weeks Terrific Tuesday Giveaway Post :)

You can also pop over to my Instagram and/or Facebook to enter there as well :)  

Good Luck and Have a Happy Quilting Day!!!

Pin It!

Friday, October 7, 2022

Three In A Row - Fast & Fun Lap Quilts

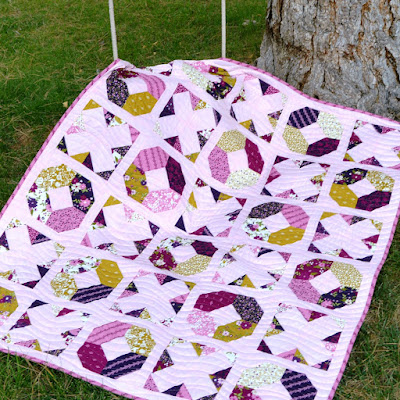
It's Week 1 of my Fast & Fun Lap Quilts Book Tour and today I am sharing a second version of the Three In A Row quilt! The quilts in the book all are done with a white/cream background, so I wanted to make a second version to show you how fun it can be to change things up.  


 For this version of Three In A Row, I opted for a colored background.  My goal with this version was to show how you can make a quilt lean toward all girl or all boy by simply changing the color of the background.  We tend to lean to white backgrounds, but choosing a background color that matches with the prints, but isn't the exact same color of the prints, really adds an extra flair to your quilt. 


This version of Three In A Row was made using Wild Meadow fabrics by Sweetfire Road for Moda Fabrics.  All the quilts in Fast and Fun Lap Quilts are made with 1 Layer Cake/10" Stacker and a background fabric.  I am sure it is no surprise that I was drawn to this fabric, with all of it's beautiful hues of purple.    And the pops of gold are pretty fun as well!   The quilt finishes at 54 1/2" x 65".  

Since I custom quilted all the quilts in the Fast & Fun Lap Quilts  I thought it would be fun to do all over designs for these second versions, just to show how it can be finished custom or all over and still look amazing.  For this Three in a Row quilt, I quilted wavy lines across the quilt.   I liked the idea of the wavy lines, because it reminded me of my kids slashing their three in a row line across their X's or O's when they win ;)  And I used a nice soft pink thread, so it blended very nicely.    


And that is another Three In A Row quilt, the first lap quilt in my new Fast & Fun Lap Quilts book !  You can find the Fast & Fun Lap Quilts book in your local or online quilt shops,  C&T Publishing, or if you would like a personalized signed copy, you can order from my Etsy shop.  And if you make your own Three In A Row quilt, I would love to see it!!  You can share your quilts with me on social media using hashtag #happyquiltingwithmc and #fastandfunlapquilts and tag me @happyquiltingmc or you can email me a picture at happyquiltingmelissa@gmail.com.   


Thanks so much for popping in for another Fast & Fun Lap Quilts book day of fun.  

I hope you all have a very Happy Quilting Day! 

Pin It!

Thursday, October 6, 2022

BOHO Heart Block of the Month - Month 5

  It's Month 5 with my good friends at Stitchin' Heaven  doing their BOHO Heart Monthly Block of the Month program and that means another month of fun tutorials!!

Month 1                Month 2               Month 3             Month 4            Month 5               Month 6

Month 7                Month 8               Month 9            Month 10           Month 11              Month 12

And since each month has Lots and Lots of Tutorials in them . . . Here is a list to jump right to the tutorial you need for this month 5:  

Pinwheel Block                Small Framed Square Block                Grandmother's Flower Garden Block

Present Block                    Four Links Block                                Small Framed Dresden Plate Block

                         8" Courthouse Steps Block                10" Courthouse Steps Block

Sewing Section 3           Sewing Section 4               Sewing Section 5           Sewing Sections 3-5


So you have your Month 5 BOHO Heart Packet . . .  Lets get started!!! 


We'll start with our first block, and it's one we have already done, the . . .


From your Month #5, Pinwheel bag, cut the fabrics according to page 1 of the supplemental cutting list.    I cut my squares 3" instead of the 2.875" and will trim.   


Using the cut squares and the Pinwheel Block Directions from Month 1 make your 2 blocks.   The Pinwheel Blocks measuring 4 1/2" x 4 1/2" unfinished.  


And now we can move onto another familiar block , the . . .


From your Month #5, Small Framed Square bag, cut the fabrics according to page 1 of the supplemental cutting list. 


Using the cut pieces and the Mini Framed Square Block Directions from Month 2 make your block.  It is made the same way, just on a slightly larger scale.  The Small Framed Square Block should be measuring 4 1/2" x 4 1/2" unfinished.   


And with that done, we will move onto a final familiar block , the . . .


From your Month #5, Grandmother's Flower Garden Bag, cut the fabrics according to page 2 of the supplemental cutting list.   Also, cut at least 7 stiff paper templates of the Hexagon shape.  


Using the cut pieces and the Grandmother's Flower Garden Block Directions from Month 4 make your block.    The Grandmother's Flower Garden Block should be measuring 6 1/2" x 6 1/2" unfinished.   


And now we get to move onto some new blocks, starting with the . . . 


From your Month #5, Present bag, cut the fabrics according to page 1 of the supplemental cutting list. 


Start by making 4 two patch units.  To do this, simply place a yellow square onto a teal square with right sides together and stitch 1/4" seam.  Press the seams open.   


Now, draw a diagonal line on the wrong side of 4 Yellow squares.   Place a Marked Square onto each of the 4 multicolored Fabric rectangles with right sides together as shown and pin them in place.   Sew a seam directly on the drawn line.  Trim 1/4" over the stitched line and scrap the excess.   Press the seam allowances upwards towards the Yellow Triangle.  


Now we repeat on the opposite side.  Draw a diagonal line on the wrong side of 4 Teal squares.   Place a Marked Square onto the opposite end of the 4 multicolored Fabric rectangles with right sides together as shown and pin them in place.   Sew a seam directly on the drawn line.  Trim 1/4" over the stitched line and scrap the excess.   Press the seam allowances upwards towards the Teal Triangle.  


Layout the two units you have made as shown.  Place the top row units onto the bottom row units with right sides together.   Align and pin.   Stitch a 1/4" seam along the edge of all the 4 units.  Press the seams open.


Layout the 4 Present Units as shown.


Place the right hand column units onto the center right hand column units with right sides together.   Align and pin.   Stitch a 1/4" seam along the edge of both units. 


Press the seams open. 


Place the top row onto the bottom row with right sides together.   Align and pin/nest the seams and you can use the Pin Trick for the center seam.   Stitch a 1/4" seam along the pinned edge, stitching through the base if the Fabric V at the center.    Press the seams open.  


And just like that, you have a Present Block with perfect points that should be measuring 6 1/2" x 6 1/2" unfinished.  


And now we get to move onto another fun new block, the  . . . 


From your Month #5, Four Links bag, cut the fabrics according to page 1 of the supplemental cutting list. 


Pair each of the Print Squares with a Background Square.  Also pair each Print small rectangle with the matching background rectangle.  


Place the Print pieces onto the Background pieces with right sides together.  Stitch a 1/4" along the edge of each pairing.  


Press the seams towards the Print Fabrics.  Layout the 8 units you just sewed matching the prints as shown. 


Place the Bottom row pieces onto the top row pieces with right sides together for each of the 4 pairings.  Stitch a 1/4" along the edge of each pairing.  


Press the seams towards the Print Fabric rectangle.  Layout the large rectangle matching the prints as shown below.  


Place each large rectangle onto the 4 pieced units with right sides together.  Stitch a 1/4" along the edge of each of the 4 pairings.  


Press the seams towards the Large rectangles.  Layout the four 4 Links Units as shown so the prints "link".  


Place the right hand column pieces onto the left hand column pieces with right sides together.   Align and pin.   Stitch a 1/4" seam along the edge of all the units.  


Press the seams open. 


Place the top row onto the bottom row with right sides together.   Align and pin.   Stitch a 1/4" seam along the edge of all the units.  Press the seam open.


And now you have made a Four Links Block that should be measuring 6 1/2" x 6 1/2" unfinished.  


So now it is time for one of my favorite blocks,  the  . . . 


From your Month #5, Dresden Plate bag, cut the fabrics according to page 1 of the supplemental cutting list.   You will need to use the small 1 1/4" Circle Template and the Small Dresden Plate Template.  


Now you are ready to start making your Dresden plates.  Fold each plate in half with right sides together and stitch a 1/4" seam along the widest top edge.  Chain stitch all 12 plates along the widest edge.  Then clip the threads between  all of your Dresden plates.


Finger press the seams open.  If you desire, you can clip away a little of the excess fabric at the point to help it lay flat, but just be very cautions not to clip your seam.  Turn the wedge right side out so that the seams are now hidden on the inside.  You can use a turning tool to help press out your points so they are nice and crisp.  Then press the edges.  


When pressing, take care to keep the seam centered in the plate.    They may want to shift on you a bit.  Try to make sure the seams are lined up :)


And now that the plates are all sewn and you are ready to start sewing them together.  We will sew the plates into 4 quadrants. Layout your plates as shown below.  


Lay the first plate onto the second plate with right sides together in each of the four quadrants.  Be sure to line up your folded edges along the top.  Sew a 1/4" seam along the 4 side edges. 


Then place the third plate onto the second plate with right sides together in each of the four quadrants.  Again, take care to line up your folded edges along the top.  Sew a 1/4" seam along the 4 side edges. 


Now you want to press the seams.  I like to press the seams open, but you can also press them to one side, just make sure to press them all in the same direction.  


Now place the right hand quadrants onto the left hand quadrants with right sides together.   Align and pin.   Stitch a 1/4" seam along the edge of the two units.  


Press the seams in the same manner you pressed the previous seams.  


Place the top quadrants onto the bottom quadrants with right sides together.   Align and pin.   Stitch a 1/4" seam along the edge taking care to clip the threads between the two seams so it doesn't pull on the second seam.  Press the seams in the same manner you pressed the previous seams.  


And now, we are going to add our Dresden Plate into a block.  Fold your Gold square in half twice and finger press the crease.   Align the creases in the Gold Square with the points of the Dresden Plate.   Pin the Dresden Plate in place, I like to pin around the center of the plate so the pins won't get in the way when I secure stitch.   


Align the Center applique circle on the center of the Dresden plate.   Dab some applique glue or just use a little glue stick or a pin to secure the Circle Applique in place.  


And all that is left is to secure stitch your applique to your block.   I start with the center circle applique.  I used a grey neutral thread so it would match with all of the colors.   And as always, you can hand stitch or machine stitch using your favorite stitch.


When secure stitching around the Dresden Plate, you only need to stitch around the outside of the plate.  you do not need to secure stitch down the side seams. 


Almost there, we are just going to frame it now.  Layout the center Dresden square and the 4 purple rectangles as shown below.   


Place the small rectangles onto the top and bottom of the center square with right sides together.   Align and stitch a 1/4" seam along the edges.  


 Press the seams outwards towards the black rectangles.   Place the longer rectangles onto the sides of the center square with right sides together.   Align and stitch a 1/4" seam along the edges.    Press the seams outwards towards the black rectangles.    Press the seams outward again.  


And now you have a beautiful Small Framed Dresden Plate Block that should be measuring 8 1/2" x 8 1/2" unfinished.  


And so now, it's time to move onto the . . . 


From your Month #5, 8" Courthouse Steps bag, cut the fabrics according to page 1 of the supplemental cutting list.  


 Layout the center square and the 4 smallest (yellow) rectangles as shown below.   


Place the 2 short rectangles onto the sides of the center square with right sides together.   Align and stitch a 1/4" seam along the edges.  


Press the seams outwards towards the rectangles.


Place the 2 longer rectangles onto the top and bottom of the center square with right sides together.   Align and stitch a 1/4" seam along the edges.  


Press the seams outwards towards the rectangles.  Now layout, the 4 medium size (white)  rectangles.   


Place the 2 short rectangles onto the sides of the pieced center square with right sides together.   Align and stitch a 1/4" seam along the edges.  


Press the seams outwards.  Place the 2 longer rectangles onto the top and bottom of the pieced center square with right sides together.   Align and stitch a 1/4" seam along the edges.    


Press the seams outwards.  Now layout, the 4 large size (purple) rectangles. 


Place the 2 short rectangles onto the sides of the pieced center square with right sides together.   Align and stitch a 1/4" seam along the edges.  


Press the seams outwards.  Place the 2 longer rectangles onto the top and bottom of the pieced center square with right sides together.   Align and stitch a 1/4" seam along the edges.    Press the seams outwards.


And now you have made a Courthouse Steps Block that should be measuring 8 1/2" x 8 1/2" unfinished.  


And now the next block is easy because it is the same only it is a  . . . 


From your Month #5, 10" Courthouse Steps bag, cut the fabrics according to page 2 of the supplemental cutting list.  


Using the above 8" Courthouse Steps Block tutorial and the below picture for a fabric reference, stitch the Center Courthouse Steps Unit.   Layout the remaining 4 Black rectangles as shown.


Place the 2 short rectangles onto the sides of the pieced center square with right sides together.   Align and stitch a 1/4" seam along the edges.  


Press the seams outwards.  Place the 2 longer rectangles onto the top and bottom of the pieced center square with right sides together.   Align and stitch a 1/4" seam along the edges.    Press the seams outwards.


And now you have finished the final block for this month and your Courthouse Steps Block that should be measuring 10 1/2" x 10 1/2" unfinished.  


And now you are ready to start sewing the blocks into sections.  We will start with . . . 


Layout the Small Framed Dresden Plate Block and the 8" Courthouse Steps Block as shown.  


Place the Courthouse Steps Block onto the Dresden Block with right sides together.  Align, pin, and stitch a 1/4" seam along the edge.   Press the seam open.  


And your Group 2 - Section 3 is complete.  It should measure 16 1/2" wide by 8 1/2" high.


So now, we can move onto  . . . 

Sewing Section 4


We will start by sewing the Strip Sets together.   Press the seam allowances to the Larger Number fabric.   

From Fabric 25, 26, 27, and 28,sew a 2 1/2" Strip Set together as shown. 
       (or cut out a 2 1/2" x 4 1/2" Gold Fabric Filler)


Now we will sew the Block to the Strip Set.   Press the Seams Open.   

Sew the Small Framed Square Block and the  25/26/27/28 Strip Set together as shown.


And now to finish Section 4

Sew the Present Block, the Sashed Square Unit, and the Four Links Block together as shown.

Press the Seams Open. 


And your Group 2 - Section 4 is complete.  It should measure 16 1/2" wide by 6 1/2" high.


So now, we can move onto  . . . 


Once again, we will start by sewing the Strip Sets together.   Press the seam allowances to the Larger Number fabric.   

From Fabric 19 and 20 sew a 4 1/2" Strip Set together as shown. 


Now we will begin to sew the Blocks to the Strip Set.   Press the Seams Open.   

Sew the 19/20 Strip Set and the Pinwheel Block together as shown.


Now, Sew the Grandmother's Flower Garden Block and the Sashed Pinwheel Unit  together as shown.

Press the seam Open.


And finally, Sew the Grandmother's Pinwheel Unit and the 10" Courthouse Step Block together as shown.

Press the Seams Open. 


And your Group 2 - Section 5 is complete.  It should measure 16 1/2" wide by 10 1/2" high.


And there is only one thing left . . . 


Layout Section 3, Section 4, and Section 5 as shown below.  


Place Section 4 onto Section 3 with right sides together.  Align, pin, and stitch a 1/4" seam along the edge.   Press the seam open.  


Place Section 5 onto Section 4 with right sides together.  Align, pin, and stitch a 1/4" seam along the edge.   Press the seam open.  


And your Group 2 - Section 3, 4, and 5 is complete.  It should measure 16 1/2" wide by 24 1/2" high.


And that is it for BOHO Heart Block of the Month, Month 5 :) 

If you have any questions on this tutorial, please don't hesitate to email me at happyquiltingmelissa@gmail.com or leave a comment.  

Hope you have so much fun making all of this months blocks and then sewing them all together:)

 Looking forward to Next Month!!


Pin It!