Wednesday, February 12, 2014

Star Light Star Bright - Half Square Triangles

**  NOTE  - This post is part of a series of posts for the Star Light Star Bright Quilt-A-Long.  If you would like to join (and have a chance to win one of 4 of the $75.00 Gift Certificate grand prizes sponsored by The Intrepid Thread and Fat Quarter Shop ) you can find a list of the post links here :)  Here is the schedule


Feb12 - Half Square Triangles
Feb 19 - Building Block Centers
Feb 26 - Building Block Sides
Mar 5 - Building Block Corners
Mar 12 - Piecing Top and Grand Prize Linky
April 2- Star Light Star Bright Parade and Grand Prize Winners


Before we get to this weeks assignment, we need to pick a winner for the Flying Geese Assignment.   And great job to everyone on finishing that assignment, I am so glad so many of you found this method of making flying geese to be enjoyable ;)

The cutting  assignment winner who gets a $25.00 Gift Certificate to Cotton Bliss is . . .
                                                            #66 - Malia!!! - Congrats :)


So now, onto this weeks assignment ;)  If you are just finding this QAL, it's never to late to join in the fun :)  You don't have to sign up or anything, just start following along with the weekly assignments ;)

THIS WEEKS ASSIGNMENT - HALF SQUARE TRIANGLES

Half Square triangles are fun and fast and probably the most versatile building block in all of the piecing units you can make.  (At least in my opinion :)

Start by gathering all your squares for the HST's.  These are the second cut or red highlighted squares from the cutting assignment.  As the sizes are different I will lay it out by block size :)    You will have squares of your print fabrics as well as well as a big old stack of background fabrics.

16" Block - 3" squares
20" Block - 3 1/2" squares
24" Block - 4" squares
28" Block - 4 1/2" squares
32" Block - 5" squares
40" Block - 6" squares
48" Block - 7" squares
72" Block - 10" squares

Now, for each block you have in your quilt you will need 32 squares matched into the following 16 pairs.  (2) Star Fabric 1/Diamond Fabric pairs, (2) Star Fabric 2 / Diamond Fabric pairs, (2) Star Fabric 1/Background Fabric pairs, (2) Star Fabric 2 / Background Fabric pairs,and (8) Diamond Fabric/Background Fabric pairs.


Which means, we have come to the point where you need to make some layout decisions.  just as clarification, the "Star" fabrics are the 2 you will choose to make the center star in the block and the "Diamond" fabric is the one you will choose to make the diamond that surrounds the center star.

If you are doing a 1 block project then you have already made your layout decisions.  In the cutting chart the "Main" color is what the Diamond and the 2 "Star" fabrics are the Star 1 and Star 2 in this layout.

EDIT - I know, trying to figure out this layout can be a little tuff.  I am adding this image to try and help.  Each red highlighted box is a half square triangle.  And from each pairing of squares you make, you get 2 Half Square Triangles.  So to do the top corner, you need to make a pair of the blue star fabric and the grey diamond fabric.  Does that make sense??  Hopefull this helps :)


If you have not already decided on the layout of each of the blocks in your quilt, I have made some "coloring sheets" that you might find helpful.  Just save the image and print it out and then color in your fabrics where you want them ;)


So go ahead and group 16 pairs for each of the blocks in your project and place them with right sides together in piles for each block.   You will want to keep your squares grouped in these pairs throughout the entire sewing process.  One last note on grouping - You will have the same print fabric in 3 different piles, (2 star layouts and 1 diamond layout) so don't stress when you put your first grouping together and have leftovers of each fabric :)


And now with your piles all made, you are ready to start making your Half Square Triangles.  To save time, I like to do each of these steps in assembly line fashion keeping a break between each block grouping, however, most of the pictures will just show one or two pair at a time being done.

On the wrong side of the darker fabric square in your pair, using your ruler, draw a pen line diagonally from the top left corner to the bottom right corner.   Like mentioned, draw all of the lines for all the squares but still keep the pairs grouped in block sets.


Lay your print square on your background square (or your two print squares) with rights sides together.  Pin both sides adjacent to that drawn line, be sure to place them far enough out to leave room for your presser foot to stitch on by.  Depending on the size of the square will determine how many pins you want to use. (if you use any at all :)   Stitch a seam 1/4" from EITHER side of the drawn line (the black lines represent your stitching lines :)


The easiest way to assembly line stitch is to chain stitch the 1/4" seam on the right hand side of the line first.  I liked to chain stitch these in block groupings, but feel free to do them how you like, 2 blocks at a time, 4 blocks at a time, all of them at once . . . just make sure you keep track of which squares go in which blocks.


  Then clip the threads between the squares.  Now, go ahead stitch the 1/4" seam on the left hand side of your sets.  And now you have some super long square snakes :)  Clip the remaining threads between the squares and place your squares back in their block groupings.


Next, align your ruler along the drawn center line.  Cut your pieces apart along that drawn line, creating the 1/4" seam on both sets of triangles.  Once again, once you have cut, put your pieces back in block groupings.  (do you get the feeling that keeping them in block groupings is important ;)


Now Press.  Take care when pressing that the edges of your fabrics don't get creased, they tend to want to fold in on themselves.  I press my HST's towards the darker fabric.  And recently I found I prefer to press them from the front rather than the back.  Do what is comfortable for you :)


And now the fun part, trimming.  You will be trimming your blocks to 1/2" smaller than their original size.  So that means trim to the following sizes :

16" Block - 2 1/2"" squares
20" Block - 3" squares
24" Block - 3 1/2" squares
28" Block - 4" squares
32" Block - 4 1/2" squares
40" Block - 5 1/2" squares
48" Block - 6 1/2" squares
72" Block - 9 1/2" squares

 This example has 4 1/2" HST's that are being trimmed to 4" square.  Start by aligning the 45 degree line on your square ruler with the seam line on your half square triangle.  Make sure that the raw edges of the half square triangle are over the 4" line's on your ruler.  Trim the 2 sides along the edge of the ruler.  There won't be a whole lot to trim.


Now spin your block 180 degrees.  Once again, align the 45 degree line on your ruler with the seam line on your half square triangle.  Align the raw edges of the half square triangle under the ruler on the 4" lines on your ruler.  Trim the 2 sides along the edge of the ruler.


And you have perfectly square Half Square Triangles.  They are just so pretty!


Now, when I trim, I like to do some massive assembly trimming.  So I lay out as many blocks from 1 block grouping as I can fit on my large cutting mat.  I whip out my trusty Bloc Loc HST ruler (My favorite!!)  and trim the first two sides on all of my HST's.


Then, I rotate them all 180 degrees, not worrying about all of the previous trims, they can be picked up later.  Now I trim the remaining 2 sides on all  the HST's.  Now just shake them off, and stack them up in a block grouping.


It took me two sets of trimming to finish each block grouping, laying out 16 at a time.  Once you are finished you should have 32 beautiful HST's for each block grouping :) 


And that is how it is done!!!  A pile of 32 HST's for each block in your project.   Now, I want to throw in a quick note here.  I know just how much trimming this is, a ton!!!  Especially if you are doing the 3 x 3  or 4 x 4 layouts.  So if your piles for linking look a little like this  (aka not trimmed) that is totally okay.  You can continue to trim over the coming weeks as you need your HST's for piecing.  Don't go making your hand unusable for 5 days because you trimmed all at once.  And please link up your untrimmed blocks if you cant finish your trimming.   Linked untrimmed piles are just as perfect as linked trimmed piles.  


Oh, and in case you don't have a square ruler you can see the end of this tutorial on how to square up your HST's using a rectangle ruler.  It takes a second longer but still works :)

And that's it!!    And now you can enter to win the weekly prize :)

The Weekly Prize is sponsored by The Scarlet Thread Quilt Co.   and a huge thanks goes out to them for their support of the Star Light Star Bright Quilt-A-Long.

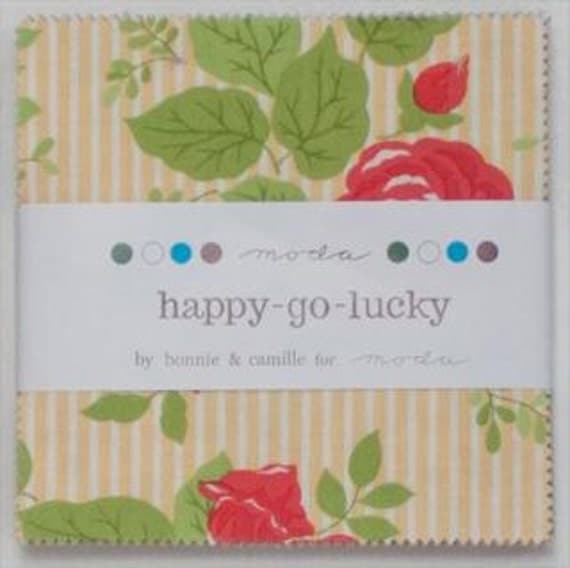
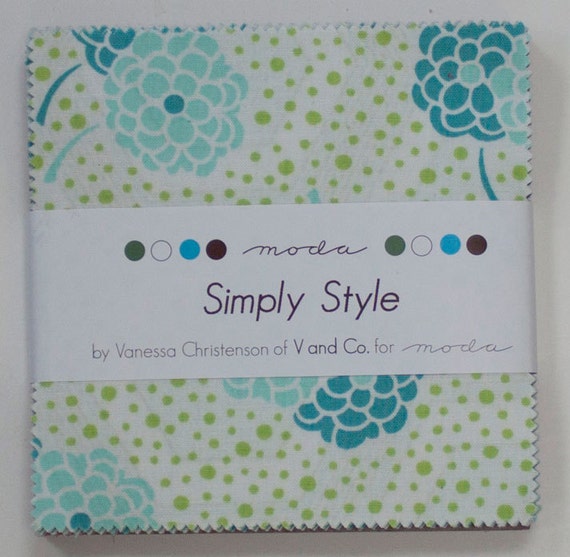
This weeks prize is 2 charm packs, 1 Happy Go Lucky and 1 Simply Style.  Don't you just love charm packs, they are so much fun!!!


So what do you have to do for a chance to win the charm packs?  Simple . . . Just link up your stacks of HST's :)  You can link to a blog post or a flickr picture, or whatever.  Just make sure to link up by next Wednesday morning as I will be announcing a winner in next weeks post :)

If you don't get your HST's done (trimmed or untrimmed)  by next week you can still link it up :) (just not in time for the prize :) The linky will remain open until the end of the Quilt-A-Long.  So if your out of town, or just had a busy week, no worries!!!  Just link up when you can :)

And don't forget to add your Flock to the Happy Quilting Quilt-A-Long Flickr group!!!  I can't wait to see them all ;)

So let's get sewing and trimming!!  Oh, and if you have questions, don't hesitate to email me at happyquiltingmelissa@gmail.com.  Have a Happy Quilting Day!!


Pin It!

Monday, February 10, 2014

Cedar Chest Retreat!!

   The first weekend of the month was the Cedar Chest Quilt Guild Annual Retreat!!  This is Cedar's 8th annual retreat and it just continues to get bigger and bigger each year.  And it is so fun to see friends returning from previous years!!   I took one class, and taught 2 classes.  (Summer Breeze and Starburst)  The ladies in my class were just amazing!!  Yup, once again I was reminded that quilters are just some of the nicest people in the world :)  All of the ladies worked so hard and made some beautiful blocks!!


I know I have said it before, but I will say it again.  I just love teaching!!  Love it, Love it, Love it!!!  And teaching in my little home town has the benefit of going home each night and seeing my kiddo's and sleeping in my own bed,  Bonus :)  I have already had requests for certain classes next year and I am so looking forward to it.  Only 350 some odd days to go :)

Have a Happy Quilting Day!!!
Pin It!

Friday, February 7, 2014

Kitchen Stitches Apron and Giveaway!!

As part of the Kitchen Stitches Blog Hop we were asked to make another designers project and add some Valentine's flair to it.  So that got me to thinking, Valentines is all about love.  Well what our family loves to do more than anything is camping.  (The dirty faces attest to the joy here ;)


And one of our family's favorite thing about camping is camp food.  (Well, maybe not the kids favorite but it is mine for sure :)  And when we camp we go all out on the cooking.  We have even made dutch oven pies before, yummy!!


One of the big reasons I love camp cooking (besides the fact that it is delicious!)  is that I am not the cook!  I do a lot of the preparation but this guy is the cook.  And so what could be better than making a project for the guy I love to use while camp cooking with the family we love.


So I pulled out one of Jacob's flannel camp shirts  (I bet when he sees this I will be buying him a new one :)  and whipped it up into this super fun Shirt Tales Apron. Isn't it so fun!!!  It was super easy to make.  I think I spent more time ironing out the wrinkles before starting then I actually did making the apron :)   


The original Shirt Tales Apron was designed and made by Linda Turner Griepentrog and can be found in Kitchen Stitches.  What a great design!!


And now, I just can't wait to go camping so Jacob can give his new Apron a try ;)  Now he can be the master camp chef and look the part!!!


Oh, and one last little surprise.  Jacob isn't much for embellishments on his clothing so I didn't add the ric rac under the buttons, but I couldn't help but add a little hidden heart lining in the pocket.  It will be so much fun when he finally finds it ;)  I love that guy!!


And before I sign off, I believe I mentioned a giveaway!!!  I have a copy of Kitchen Stitches up for grabs.  Just leave a comment here telling me what your family loves to do together and you will be entered to win.  One comment per person please and all comments are welcome :)


I will draw a winner on Feb 13 one lucky reader will get a little Valentine's Day treat :)  Good Luck to everyone ;)

And be sure to check out all the other stops on the Kitchen Stitches tour.  There will be great projects and more opportunities to win :)

2/3  Heather at The Sewing Loft 
2/4  Becky at the Patchwork Posse and  Kim at My Go-Go life
2/5   Amy at FormWork Designs and  Deby at So Sew Easy
2/6  Rebecca at Ruby Blue Quilts  and Jackie at Jabot Quilts
2/7  Melissa at Happy Melissa Quilting
2/8  Kari at Fresh Cut Quilts

Have a Happy Quilting Weekend!!!

I am linking this happy little apron finish up to Sarah's, Amanda's, and Fort Worth Fabric Studio.

Pin It!

Wednesday, February 5, 2014

Star Light Star Bright Quilt-A-Long - Flying Geese

**  NOTE  - This post is part of a series of posts for the Star Light Star Bright Quilt-A-Long.  If you would like to join (and have a chance to win one of 4 of the $75.00 Gift Certificate grand prizes sponsored by The Intrepid Thread and Fat Quarter Shop ) you can find a list of the post links here :)  Here is the schedule


 Feb 5 - Flying Geese
Feb12 - Half Square Triangles
Feb 19 - Building Block Centers
Feb 26 - Building Block Sides
Mar 5 - Building Block Corners
Mar 12 - Piecing Top and Grand Prize Linky
April 2- Star Light Star Bright Parade and Grand Prize Winners


Now, first off for this week, we need to pick a winner for the Cutting Assignment.   And great job to everyone on finishing that assignment, I can tell already that this is going to be a great group to quilt-a-long with :)

The cutting  assignment winner who gets a $20.00 Gift Certificate to Fort Worth Fabric Studio is . . .
#10 - Susan!!! - Congrats :)


So here we are, a new month and a new assignment , so let's get right to it :)  If you are just finding this QAL, it's never to late to join in the fun :)

THIS WEEKS ASSIGNMENT - FLYING GEESE

I use the No-Waste method to make flying geese.   The great thing about making flying geese this way is that, obviously, you don't waste any fabric and you never have to sew a triangle.  Double bonus!!  If you have never made them this way you are in for a treat.   So, let's get to it :)

We will start by gathering all of our squares to make the flying geese.  These were the first and third cuts in your print fabrics (ie . the purple ones) and will also have matching background ones.  So basically, grab all of your large Number 1/4" squares (i.e. one of these sizes - 5 1/4", 6 1/4", 7 1/4", 8 1/4", 9 1/4", 11 1/4", 13 1/4", or 19 1/4") and all of your Number 7/8" or 3/8" squares (i.e. 2 7/8", 3 3/8", 3 7/8", 4 3/8", 4 7/8", 5 7/8", 6 7/8", 9 7/8").  You will have squares of your print fabrics as well as your background fabrics in both the large and small sizes.   Separate the fabrics into 2 piles with the small background squares matched with the large print squares and the large background squares matched with the small print squares.


Now you don't have to keep track of where these will be going in your block or anything, just be sure to use the same 4 little squares on each unit and you will be great.  And now you are ready to start making your Flying Geese.  To save time, I like to do each of these steps in assembly line fashion, however, the pictures will just show a Flying Geese unit of each variation (opposite fabric layout) which results in 4 Flying Geese total per unit being worked on.

With right sides together, lay two small squares onto your large square as shown.  Using your ruler, draw a line diagonally from the top left corner to the bottom right corner.   (If you like, you can start by just drawing lines on the back of all your background squares, it takes a little bit but it is nice to have it done, but if you don't like doing that, just draw them on as you get to them :)


Now pin both sides of each square adjacent to that drawn line.  Make sure to put them out far enough that your presser foot won't hit them as you sew on by :)  Stitch a 1/4" seam along EITHER side of the drawn line (the black lines represent your stitching lines :)  


The easiest way to assembly line stitch is to chain stitch the 1/4" seam on the right hand side of the line first.  I just chain stitched through the entire pile and it went so fast :)  For those who are new to this, Chain stitching is where you don't clip the thread between each block sewn, just keep feeding units through the machine until you have stitched your entire pile.     (I forgot to take a picture of these chain stitching steps, so I borrowed two from the last QAL, different fabric same concept :)


Now, clip the threads between the squares.   Then, go ahead stitch the 1/4" seam on the left hand side of your sets.  You'll  have some super long square snakes :)  Clip the remaining threads between the squares and make a large pile ready for cutting.


Align your ruler along the drawn center line.  Cut along the edge of the ruler creating 2 large triangles.


Press the seams up towards the 2 little triangles.


Now it's like starting over. We repeat all the same steps, it's just smaller and more units.  Take 2 more little squares and align them on your two stitched pieces as follows with right sides together. (make sure your little print squares match)  Once again, draw a diagonal line on the wrong side of the little squares from corner to corner. (unless you did all of the drawing lines at the start, then you can just lay them in place :) 

Now pin each piece far enough to leave room for the presser foot, then once again, stitch a 1/4" seam along EITHER side of the drawn diagonal line.  (Remember to chain stitch all the left and then all the right sides :)


Clip your threads and then using your ruler aligned along the drawn line cut your 2 pieces in half to create 4 pieces.  And then there were 4 flying geese.


Press your seams up to match the other seam.  Lastly, trim off the little dog ear corners at either side and the top of your unit.  Just trim the dog ears, don't trim the tops to where the point is, you will need that 1/4" overlap for your seam allowance.  


And you are done!!!  Perfectly precise flying geese blocks without throwing away any scraps and without sewing a single triangle.  Fabulous!!  


 For those of you that are new to this method of No Waste Flying Geese,  I wrote a previous tutorial on  No Waste Flying Geese that also goes over the math of making them so you can make any size Flying Geese you like.  Thought you might like it :)

 And that's it!!  Here is my Flock of geese all ready to fly away :)  In total, you should have however many number of blocks you are making, times 8 geese, 4 with the sky as print fabric, and 4 with the the sky as background fabric.  So for me, 9 blocks equals 72 total geese,  36 with the sky as print fabric and 36 with sky as background fabric.    So now it's your turn, get your Geese made and your assignment is complete!!!  And then you can enter to win the weekly prize :)


The Weekly Prize is sponsored by Cotton Bliss and a huge thanks goes out to them for their support of the Star Light Star Bright Quilt-A-Long.

This weeks prize is a $25.00 Gift Certificate to Cotton Bliss.  Stefanie has added an extra bonus by throwing in a coupon code for all of you!!!  Use the code STARLIGHT to receive 15% off your cart.  And all U.S. orders over $150.00 can get free shipping as well.  The coupon code will be good during this whole weeks assignment.  It will expire 02/15.


So what do you have to do for a chance to win the gift certificate?  Simple . . . Just link up your Flock of Flying Geese at the end of this post :)  You can link to a blog post or a flickr picture, or whatever.  Just make sure to link up by next Wednesday morning as I will be announcing a winner in next weeks post :)

If you don't get your Flying Geese done by next week you can still link it up :) (just not in time for the prize :) The linky will remain open until the end of the Quilt-A-Long.  So if your out of town, or just had a busy week, no worries!!!  Just link up when you can :)

And don't forget to add your Flock to the Happy Quilting Quilt-A-Long Flickr group!!!  I can't wait to see them all ;)

So let's get sewing!!!  Yippee for getting all the cutting behind us and moving on to sewing!!! Oh, and if you have questions, don't hesitate to email me at happyquiltingmelissa@gmail.com.  Have a Happy Quilting Day!!

Pin It!