
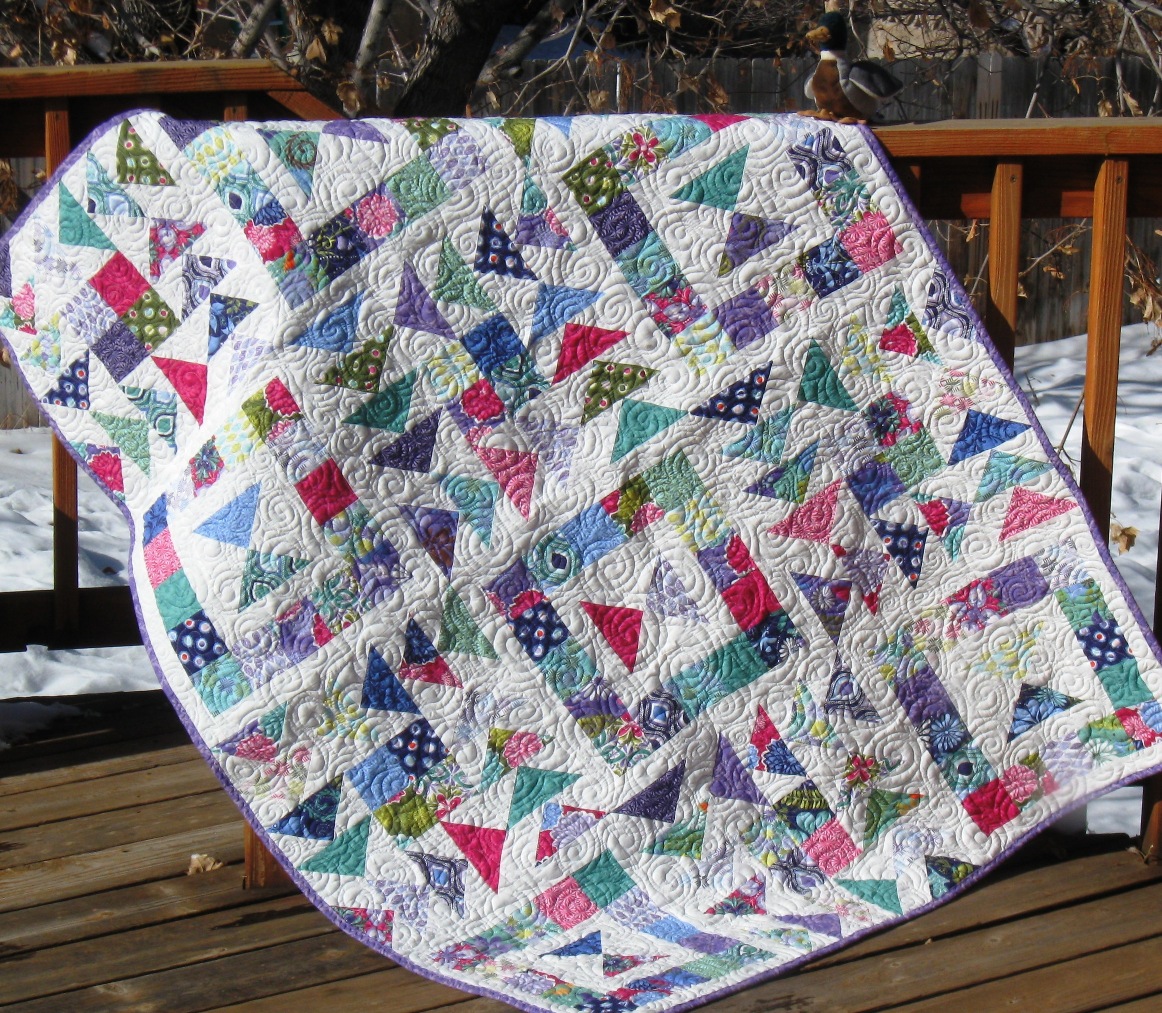
Today's the day!!! I am so excited to release the Flying in Squares quilt Tutorial at the Moda Bake Shop . I hope you love it as much as I do :)

I just love the way the quilt has so much movement. And I had so much fun trying a new swirl in the quilting. I think it really adds to the overall effect :)

And now that this
Moda Bake Shop Tutorial has been published for a while, I can now post it here
on my blog for your convenience ;) So just follow along
below for the full step-by-step tutorial. And if you love it, you can get
the printer friendly version here :)

To make this quilt you will need:
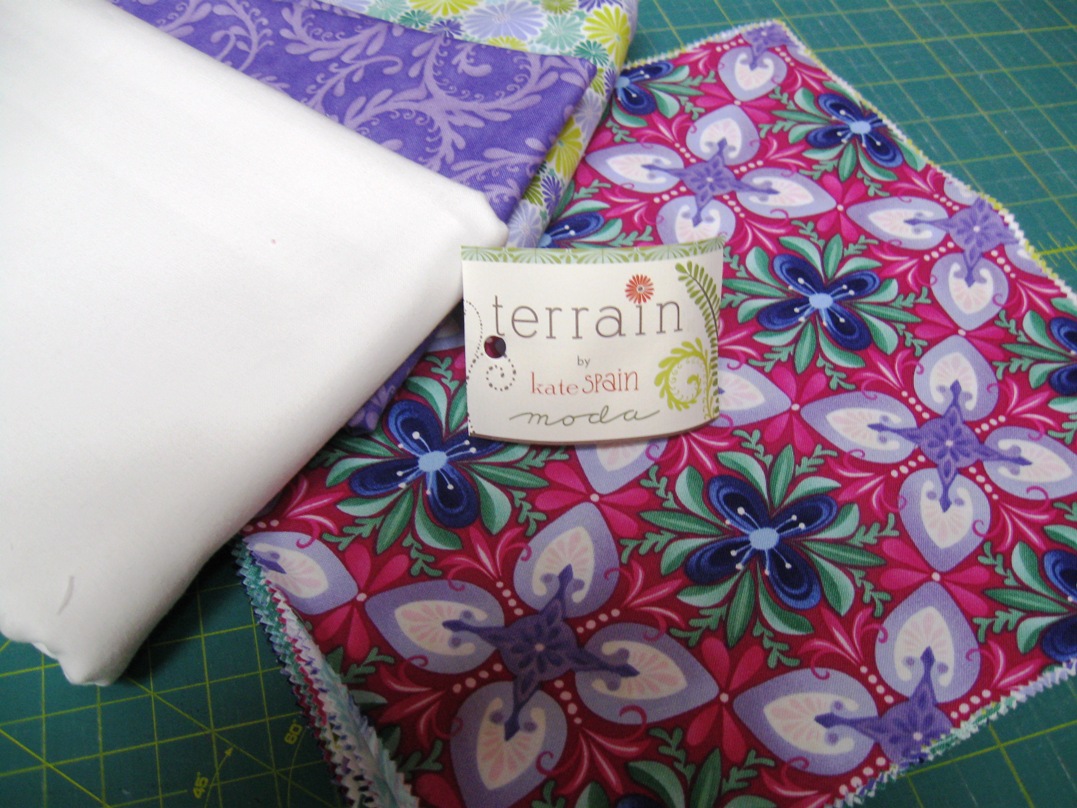
27 Squares from your Layer Cake – I used mostly the cool colored prints 
1 1/2 Yards of Bella Solids White
2 Yards for Backing
1/2 Yard for Binding
1 1/2 Yards of Bella Solids White
2 Yards for Backing
1/2 Yard for Binding

STEP 1 – CUTTING
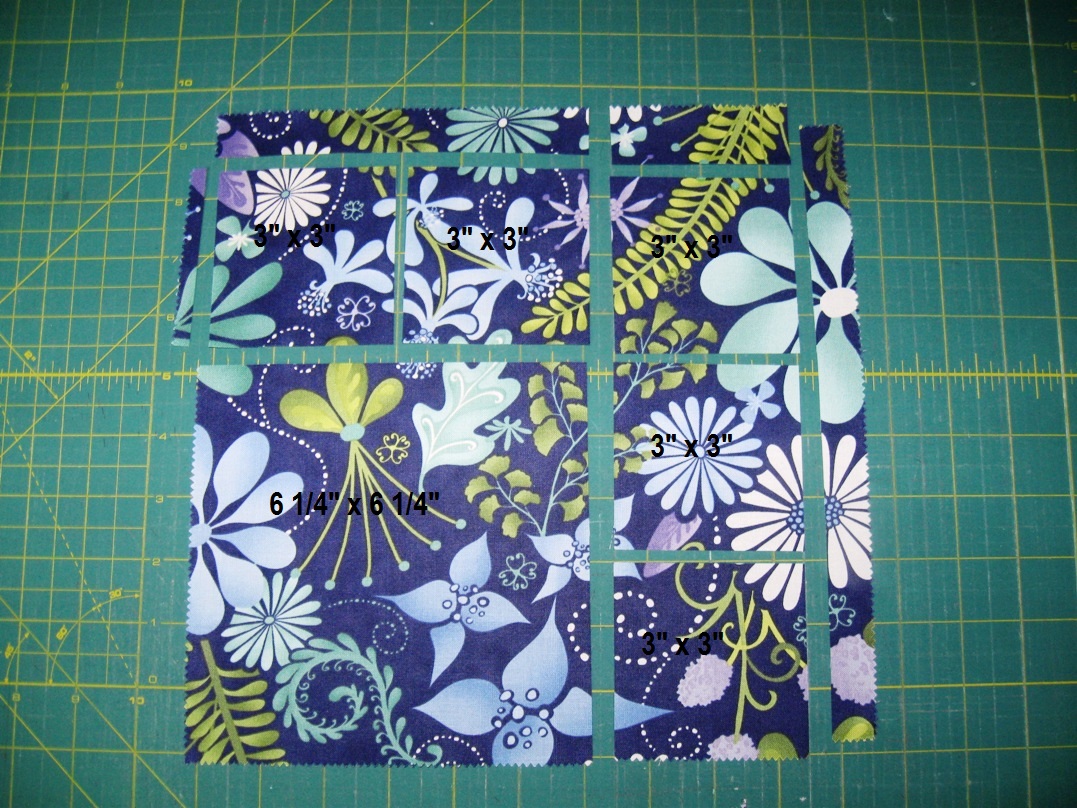
Start with your 27 layer squares. From each square cut (1) 6 1/4″ x 6 1/4″ square and (5) 3″ x 3″ squares. You will have a little bit of scraps left.
Start with your 27 layer squares. From each square cut (1) 6 1/4″ x 6 1/4″ square and (5) 3″ x 3″ squares. You will have a little bit of scraps left.
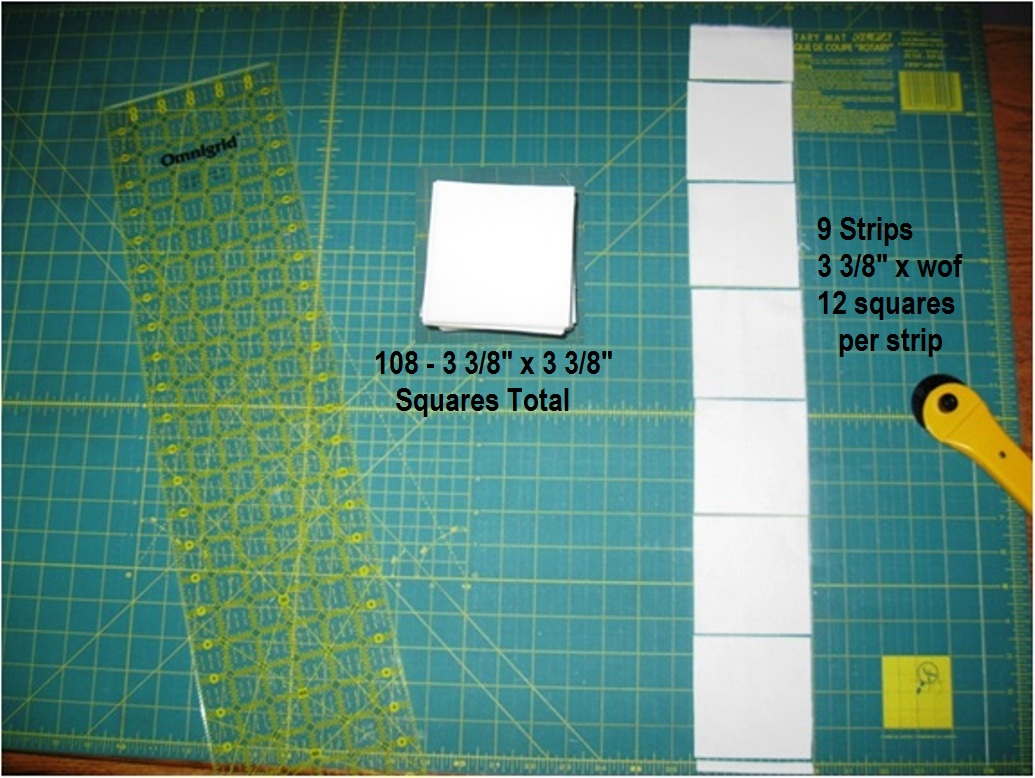
Now let’s move on to your white yardage. Iron your yardage first to remove any wrinkles. Align your fabric on your mat and cut a straight edge. Then cut 9 strips measuring 3 3/8″ x the WOF (Width of Fabric). From each of the 9 strips cut 12 3 3/8″ x 3 3/8″ squares for a total of 108 squares.
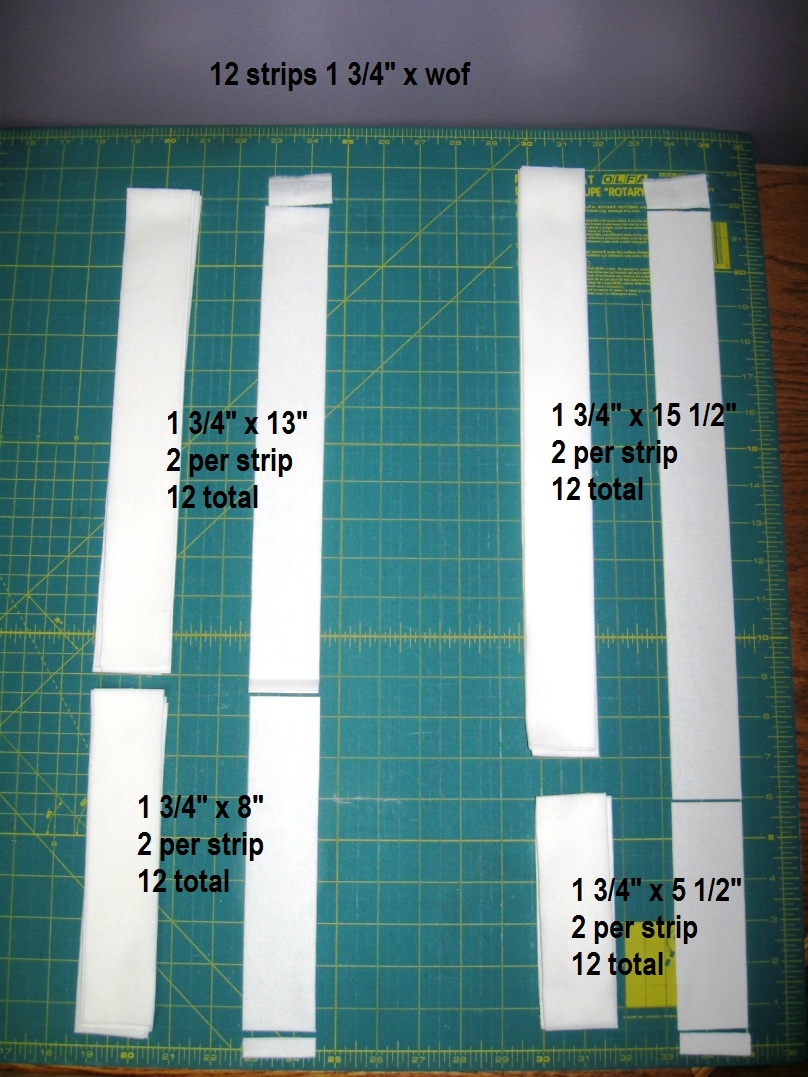
Once again, align your fabric on your mat and cut a straight edge. Then cut 12 strips measuring 1 3/4″ x the WOF. From 6 of the strips cut (12) 1 3/4″ x 13″ strips and (12) 1 3/4″ x 8″ strips. From the remaining 6 strips cut (12) 1 3/4″ x 15 1/2″ strips and (12) 1 3/4″ x 5 1/2″ strips.
STEP 2 – MAKING A FLOCK OF GEESE
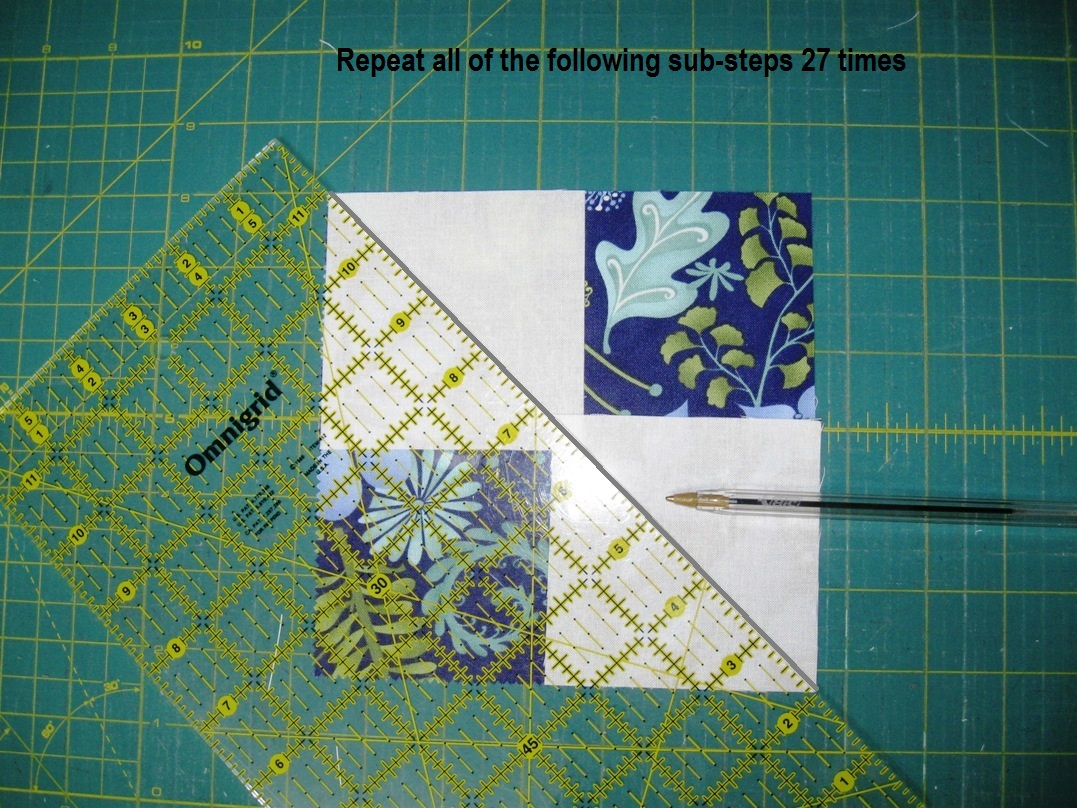
Now we are ready to start making some geese. This is a great method of making Flying Geese that have no waste. You also aren’t sewing any triangles on along the bias which helps to keep everything nice and straight. To save time be sure and repeat each of the sub-steps 27 times making your geese in an assembly line fashion rather than making 4 geese at a time.
With right sides together, lay two white squares onto your large print square as shown. Using your ruler, draw a pen line diagonally from the top left corner to the bottom right corner.
Now go ahead and pin both sides of each square adjacent to that drawn line. Make sure to put them out far enough that your presser foot won’t hit them as you sew on by Now stitch a 1/4″ seam along both sides of the drawn line (the black lines represent your stitching lines Remember, you are doing these assembly line so go ahead and chain stitch all 27 sets on the right hand side of the line, and then go back and do all 27 sets on the left hand side.
Now stitch a 1/4″ seam along both sides of the drawn line (the black lines represent your stitching lines Remember, you are doing these assembly line so go ahead and chain stitch all 27 sets on the right hand side of the line, and then go back and do all 27 sets on the left hand side.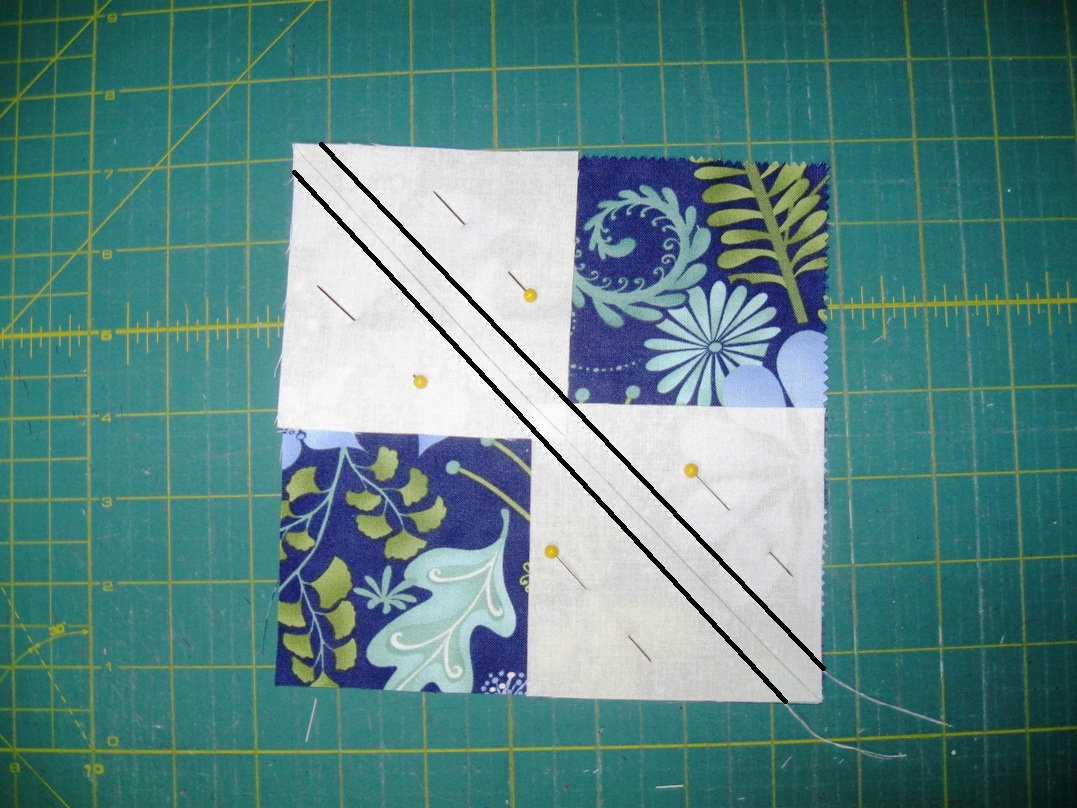
Go ahead and clip your threads and then align your ruler along the drawn centerline. Cut your pieces apart along that drawn line.
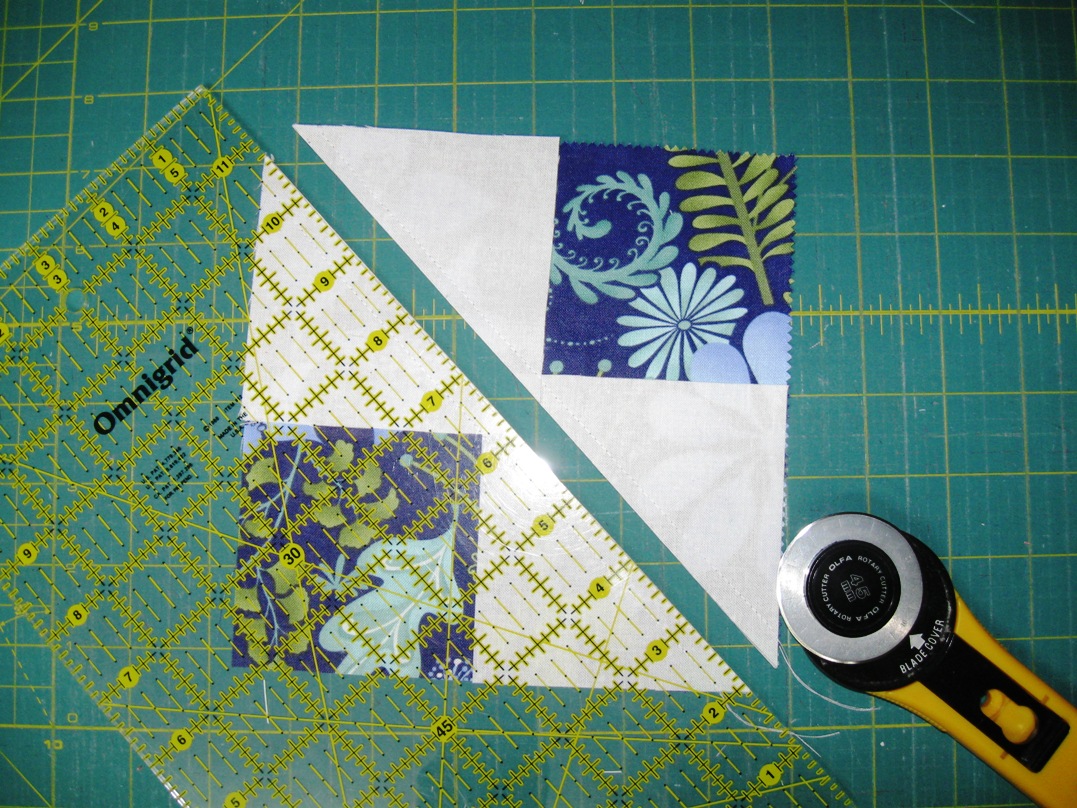
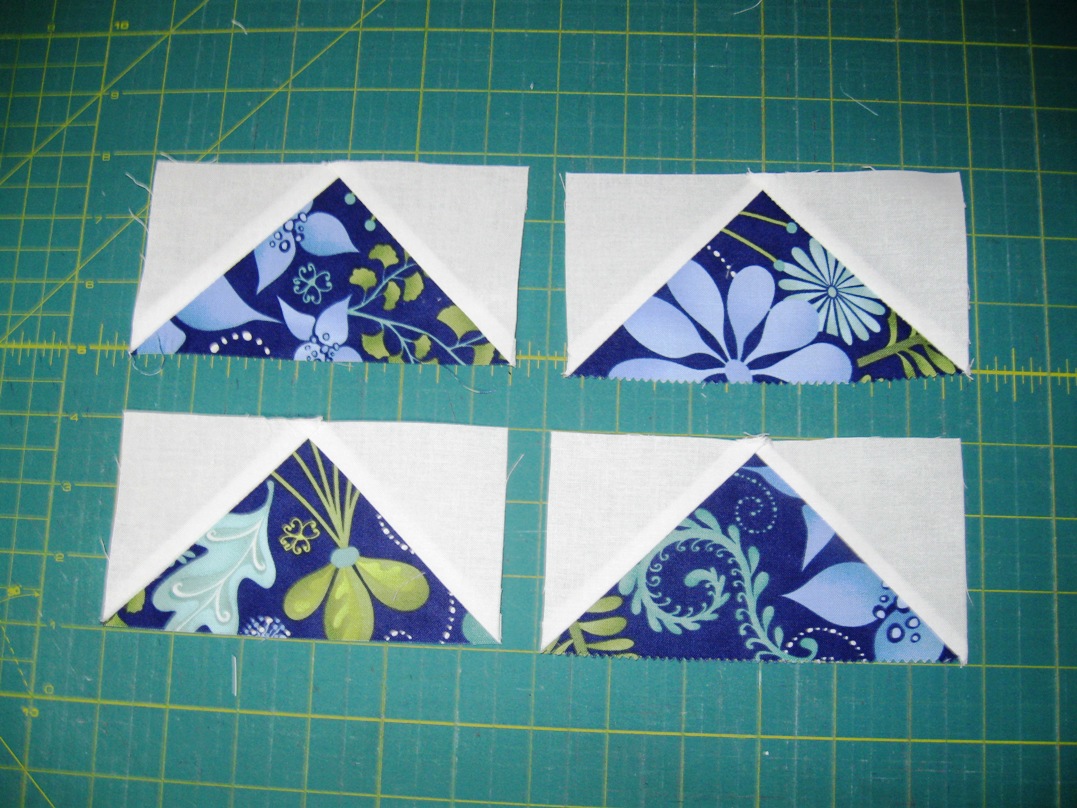
Now you will want to press your seam up towards your white fabric. Don’t these look like cute little hearts :)
Now, take 2 more white squares and align them on your two stitched pieces as follows with right sides together. Once again, draw a diagonal line on the wrong side of the white squares from corner to corner.
Now pin each piece far enough out that your foot will go by and then once again, stitch a 1/4″ seam along both sides of the drawn diagonal line. (Remember to chain stitch to save time)
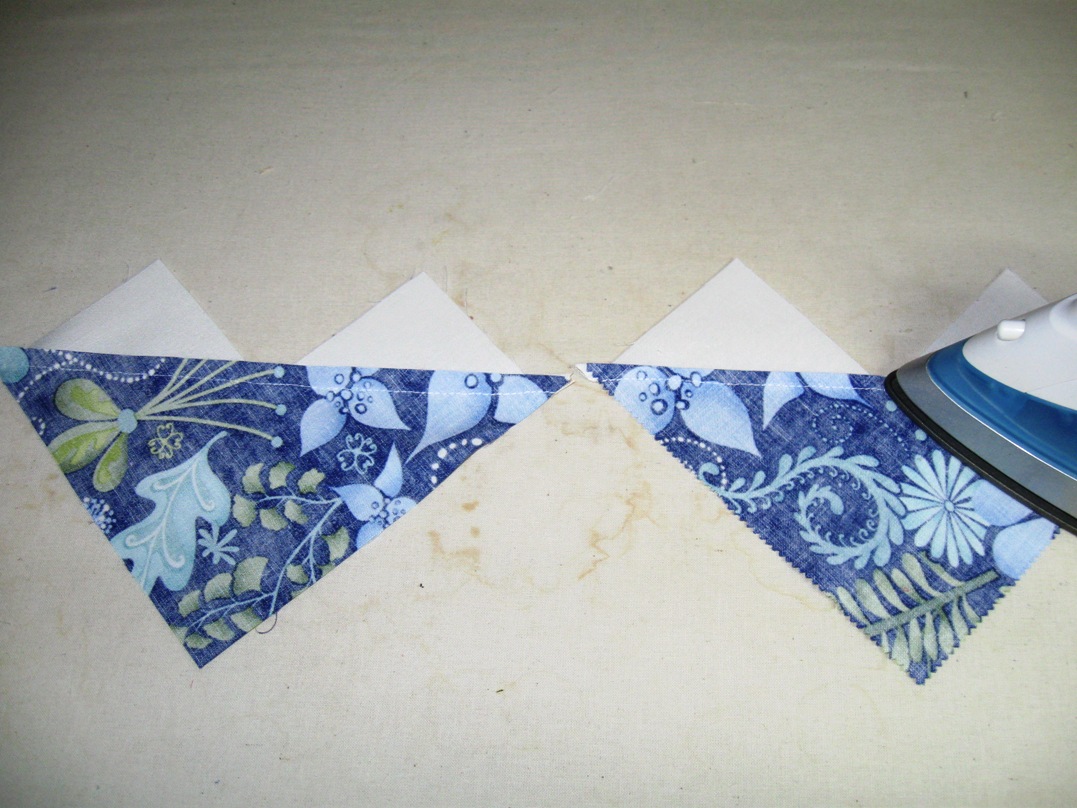
Clip your threads and then using your ruler aligned along the drawn line, once again, cut your 2 separate pieces apart.
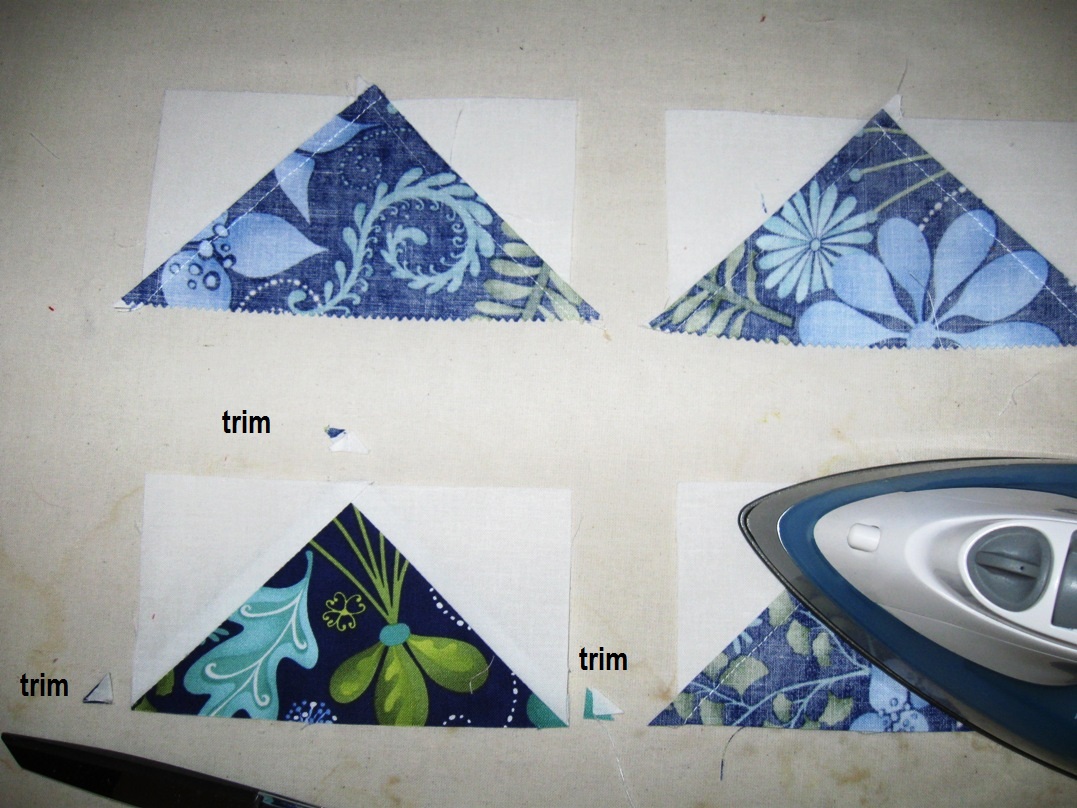
Press toward the white again. Lastly, trim off the little corners.
And you are done!!! You should have a whole flock of geese (108) that are precisely perfect and ready to get flying!!
STEP 3 – ASSEMBLING THE FLYING BLOCK
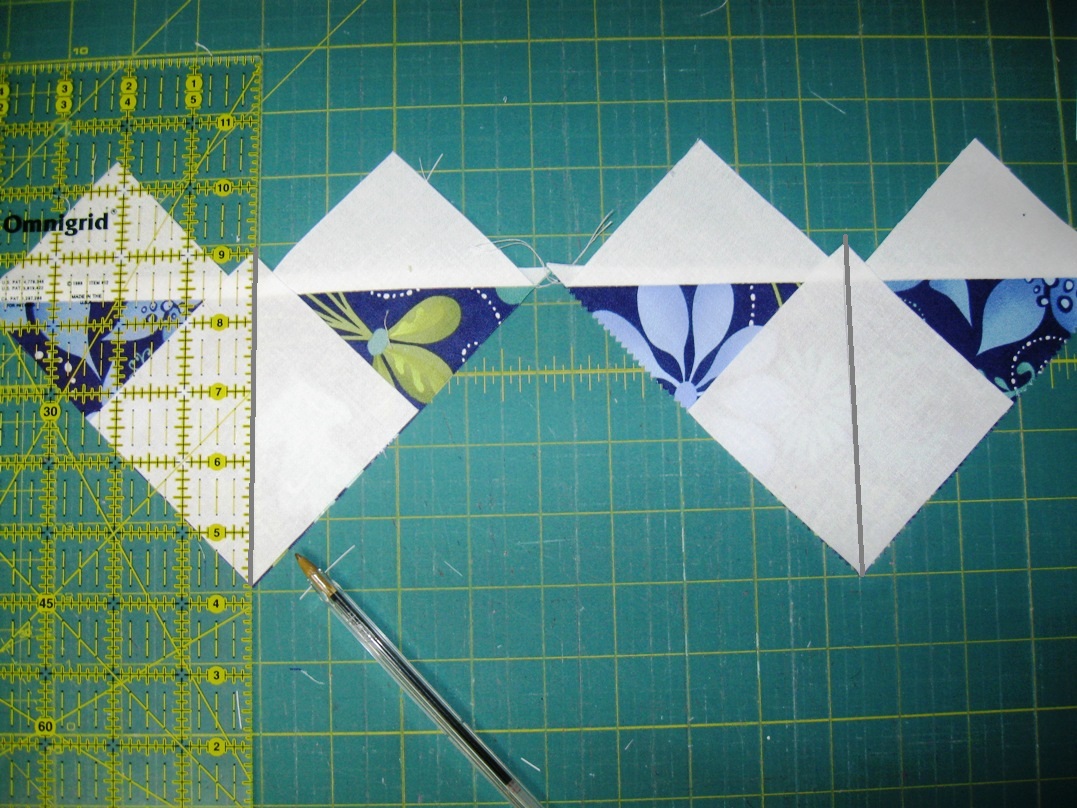
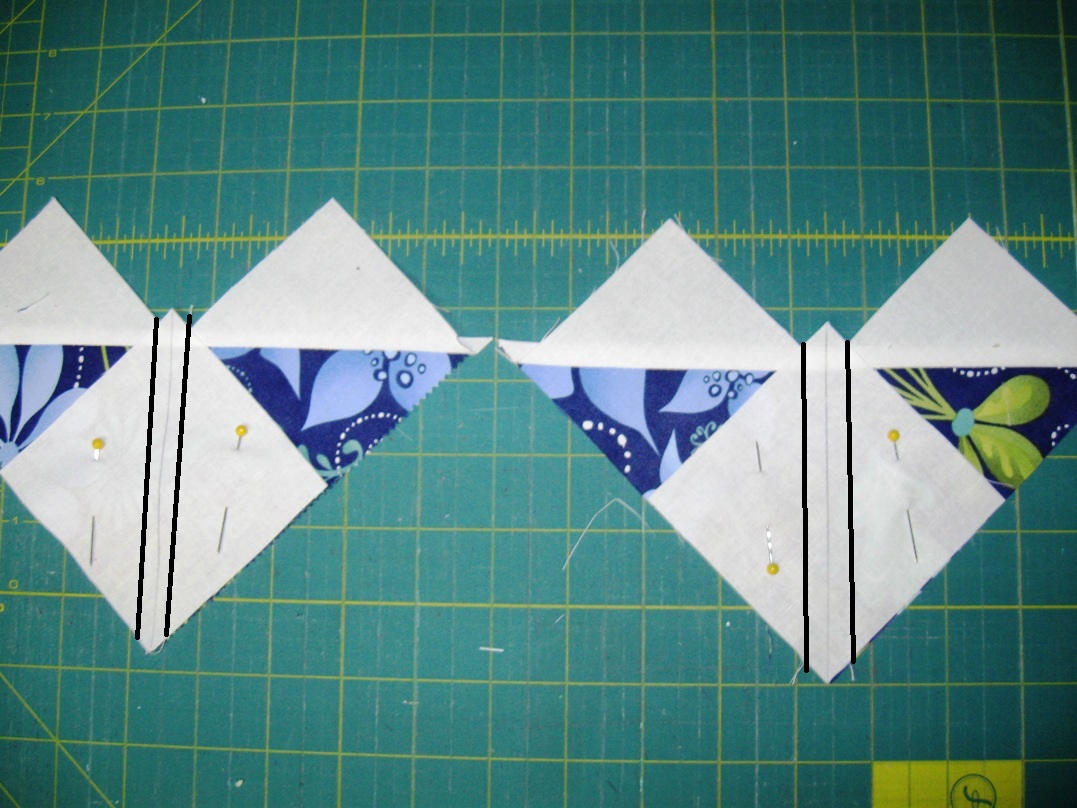
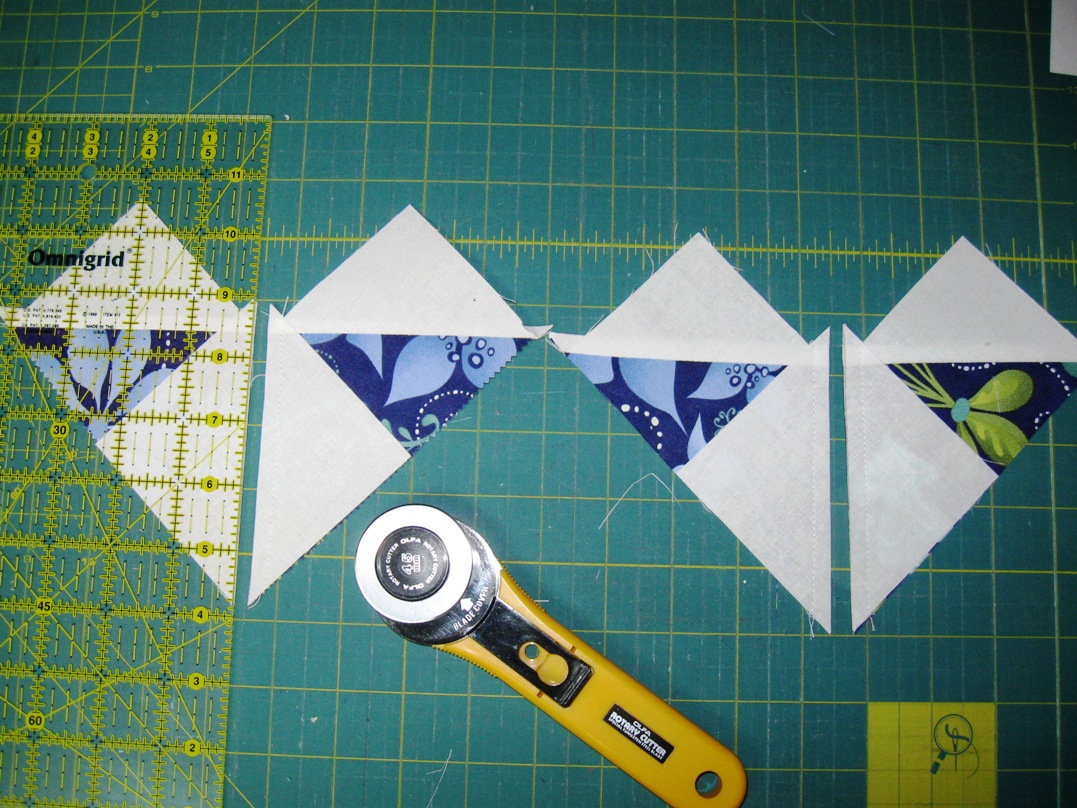
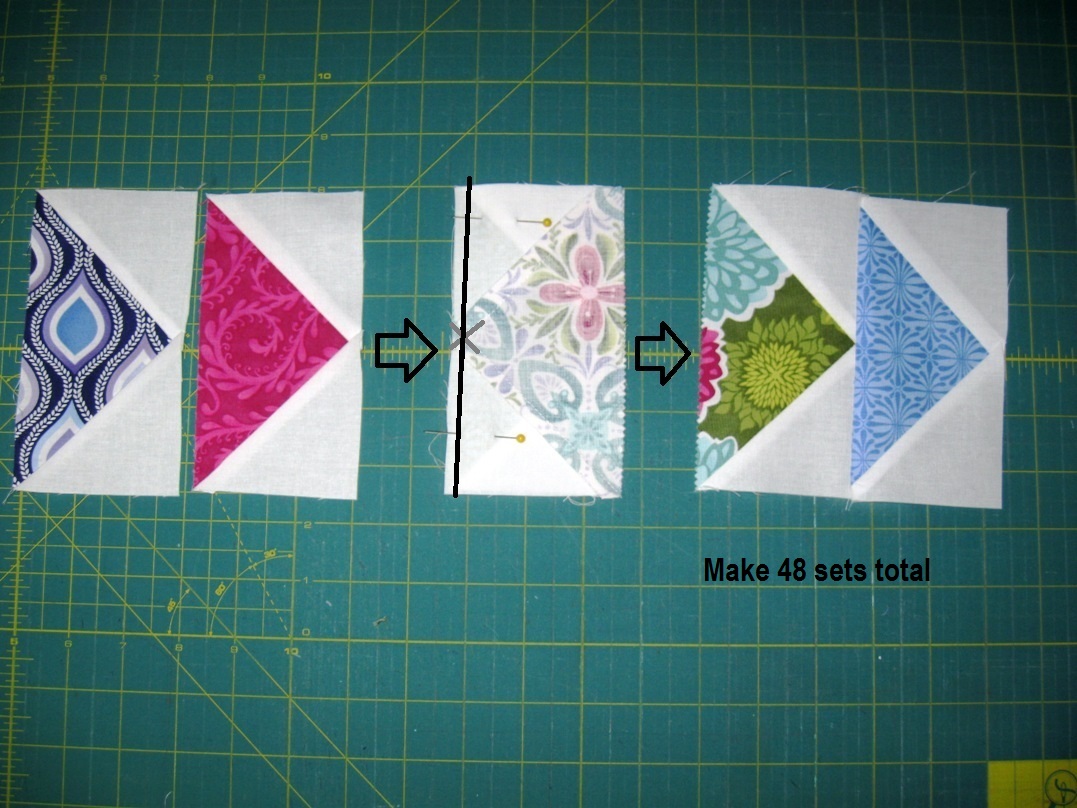
So now we are going to start sewing those geese together. Start by laying out 2 geese as follows. Lay the first geese onto the second and with rights sides together pin along the edge. Pin 48 sets. Sew a 1/4″ seam along the pinned edge. ** Hint -If you try to make sure that you sew directly over where the triangle intersects (where the 2 grey lines cross on the picture), you will get much crisper points. Once you have finished the first set, don’t clip your threads. Just keep feeding all 48 sets through. This is called chain stitching and it saves tons of time. Now go ahead and clip your threads and press. You now should have 48 sets of double geese and 12 single geese remaining.
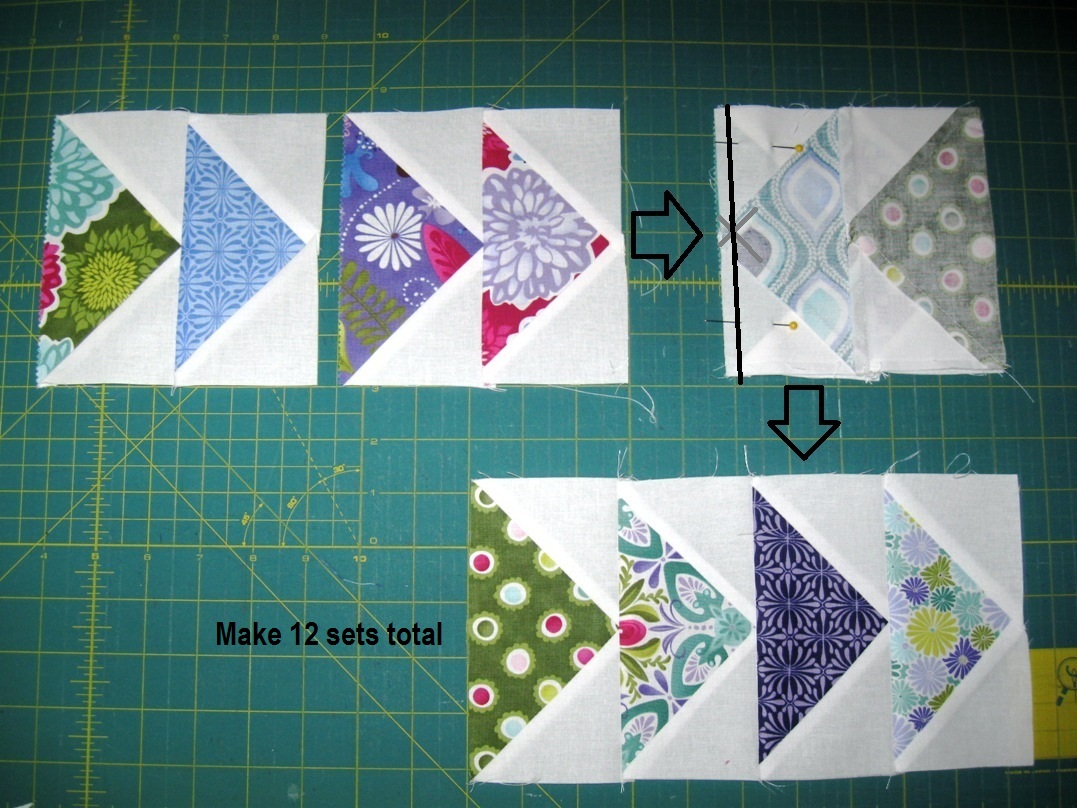
Now we are going to use the same process to make rows of 4 geese. Lay your first set of 2 geese onto your second with right sides together, make 12 sets like this. Pin your edges of all 12 sets and chain stitch a 1/4″ seam along the pinned edges, once again, making sure to cross directly over the intersection point. Press your seams. ( Just as clarification – you will have some leftover sets of 2 geese.)
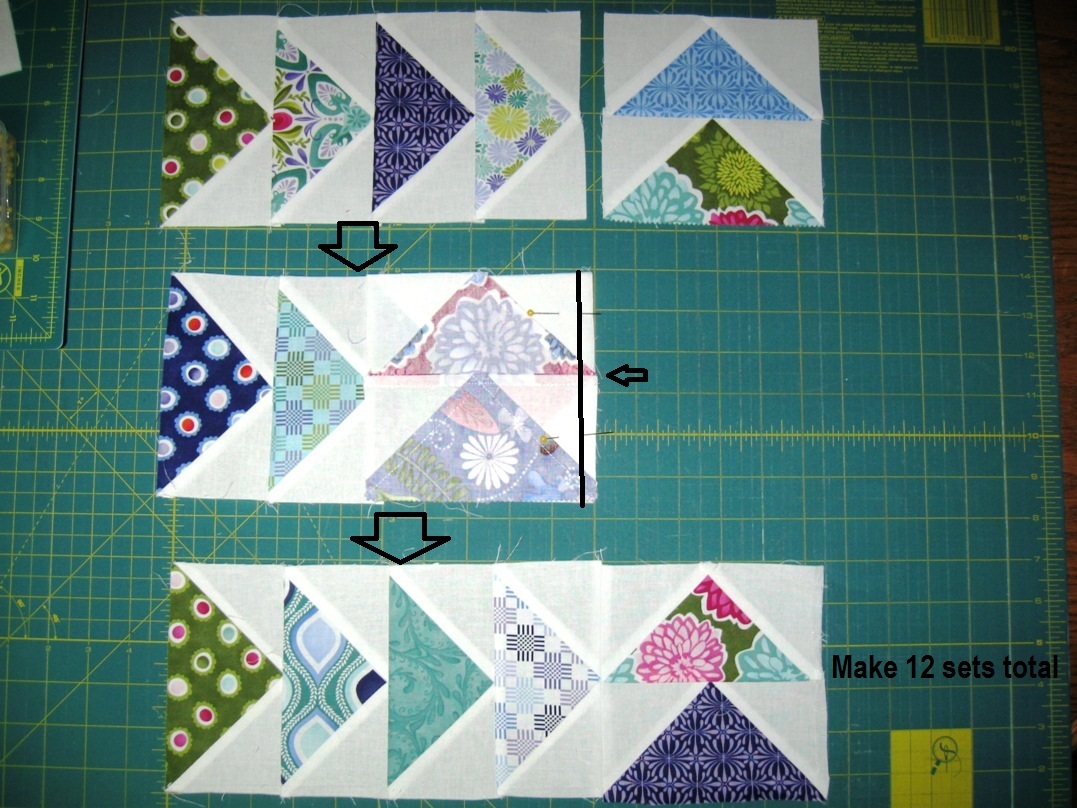
Now, grab your 12 sets of 4 flying geese you just made and 12 leftover sets of 2 and lay them out as follows. (Really pay attention to the directional orientation; I had to do some unpicking when I was only half focusing on what I was doing) Lay the 2 flying geese onto the 4 with right sides together. Take care to match up the center seam of the 2 with the point of the 4th goose. Pin along the seam and the edges. Chain stitch a 1/4″ seam along the pinned edges, clip your threads, and press. These will be your top and bottom rows and you can set these aside for a minute.
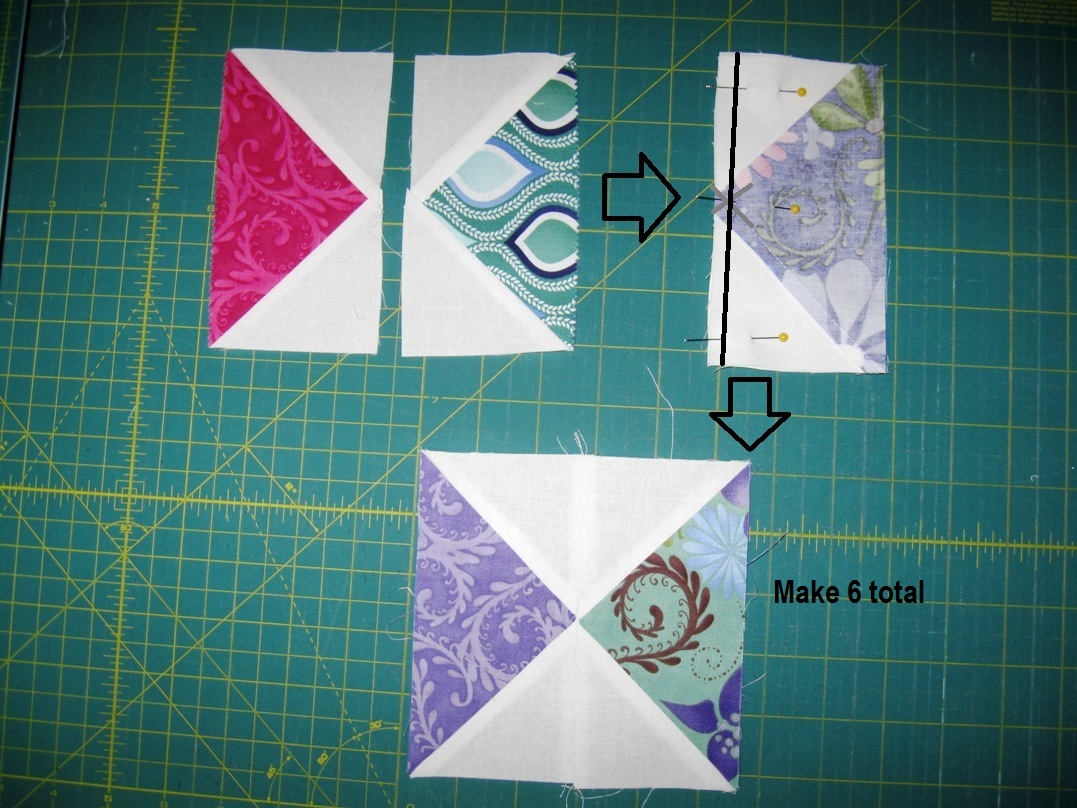
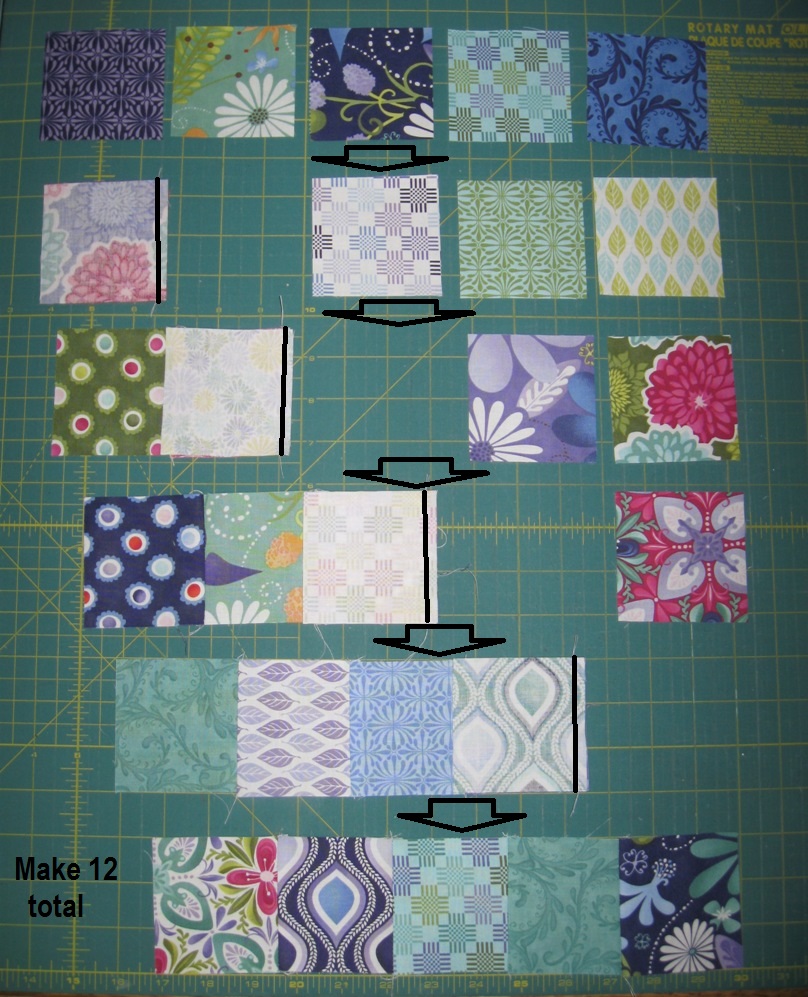
Now we need some four patches for the center of our blocks. Start by grabbing a stack of those 3″ squares. Layout 6 sets of 4 as follows. Now lay the sets of 2 with right sides together as follows. Chain stitch a 1/4″ seam along all 12 sets of 2, clip your threads and press. Now you can take the sets of 2 and lay them with right sides together to make 6 sets. Pin along the edge taking care to match the center seam. Chain stitch a 1/4″ seam along the pinned edge, clip your threads and press.
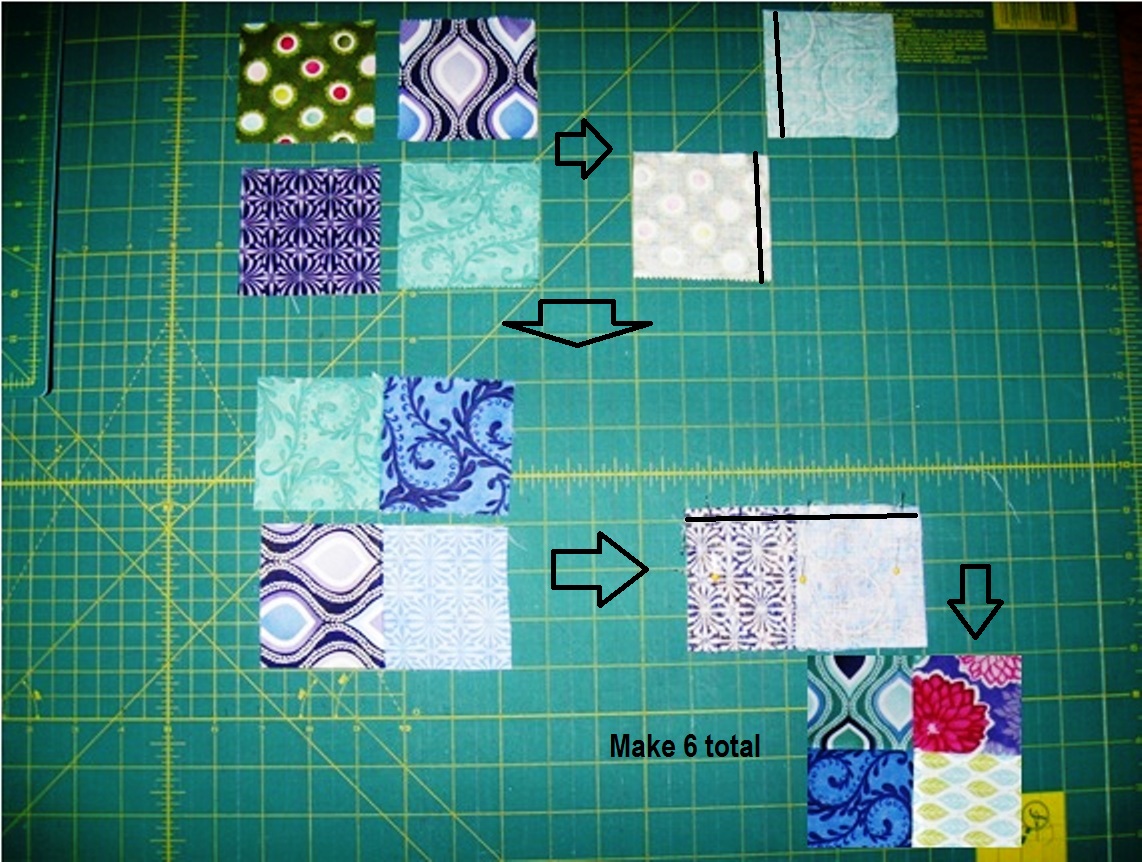
Now take the 6 four patches your just made and the remaining 12 sets of 2 geese and lay them out as follows making 6 sets. (Once again, really focus on the directional orientation.) Lay the right hand set of geese onto the 4 patch with right sides together. Take care to match the center seams. Chain stitch a 1/4″ seam along all 6 sets. Clip your threads and press. Now repeat the same process with the left hand set of geese. You will now have 6 sets of center rows.
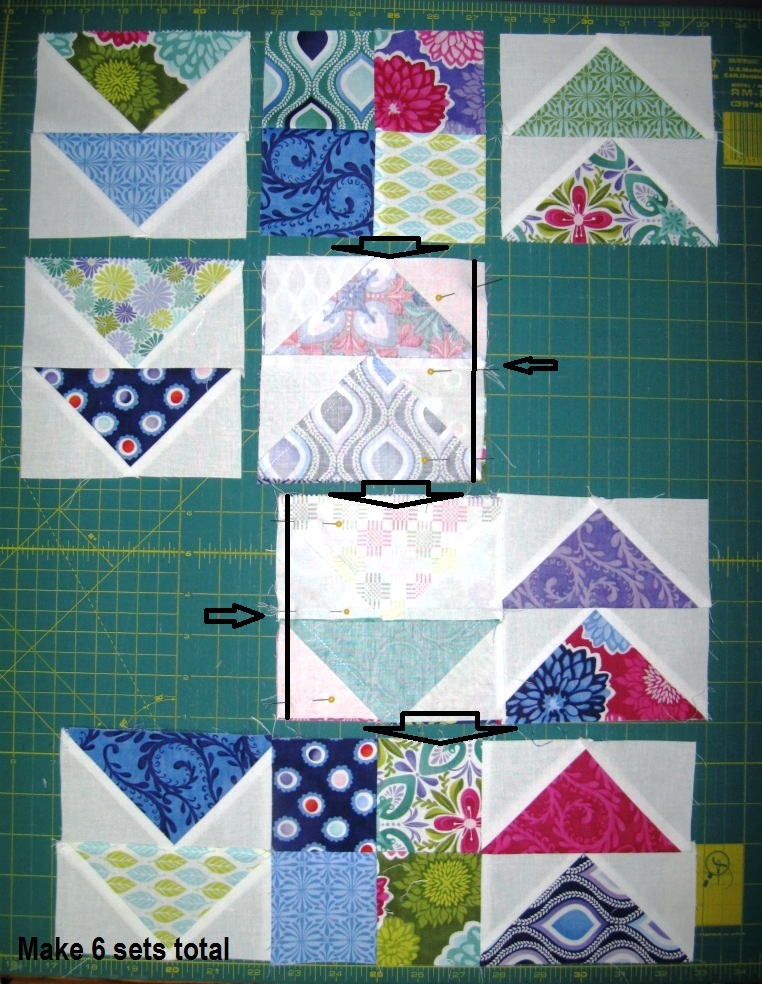
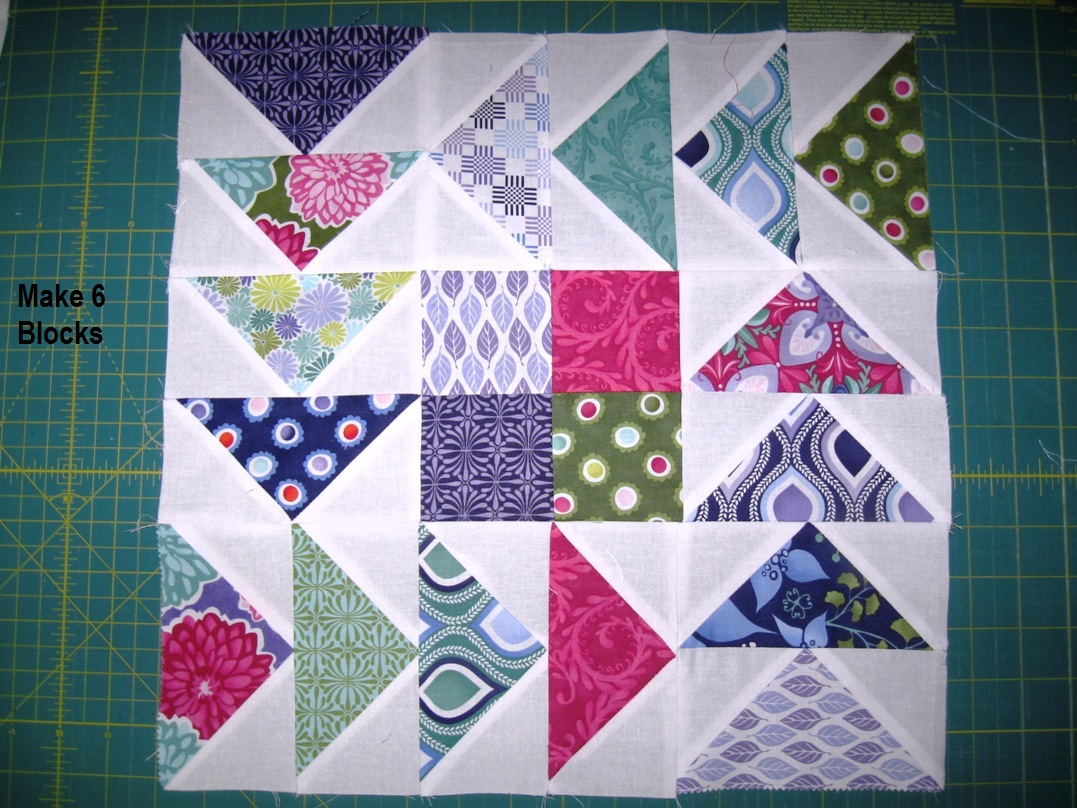
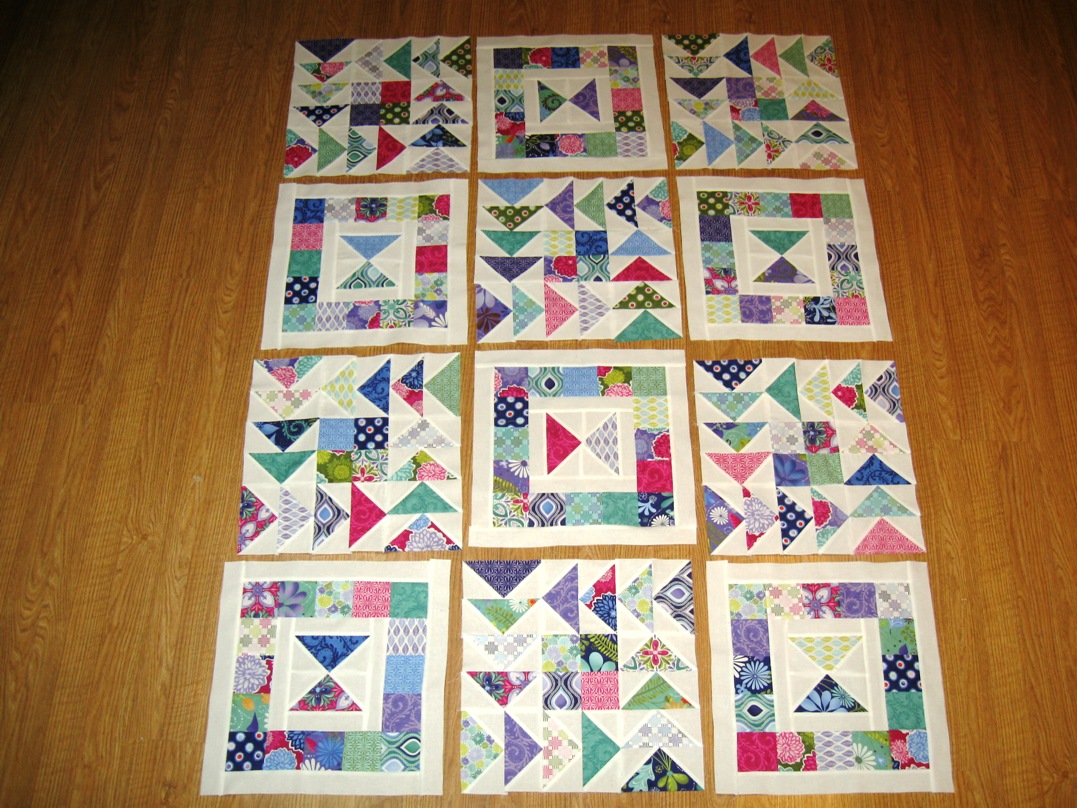
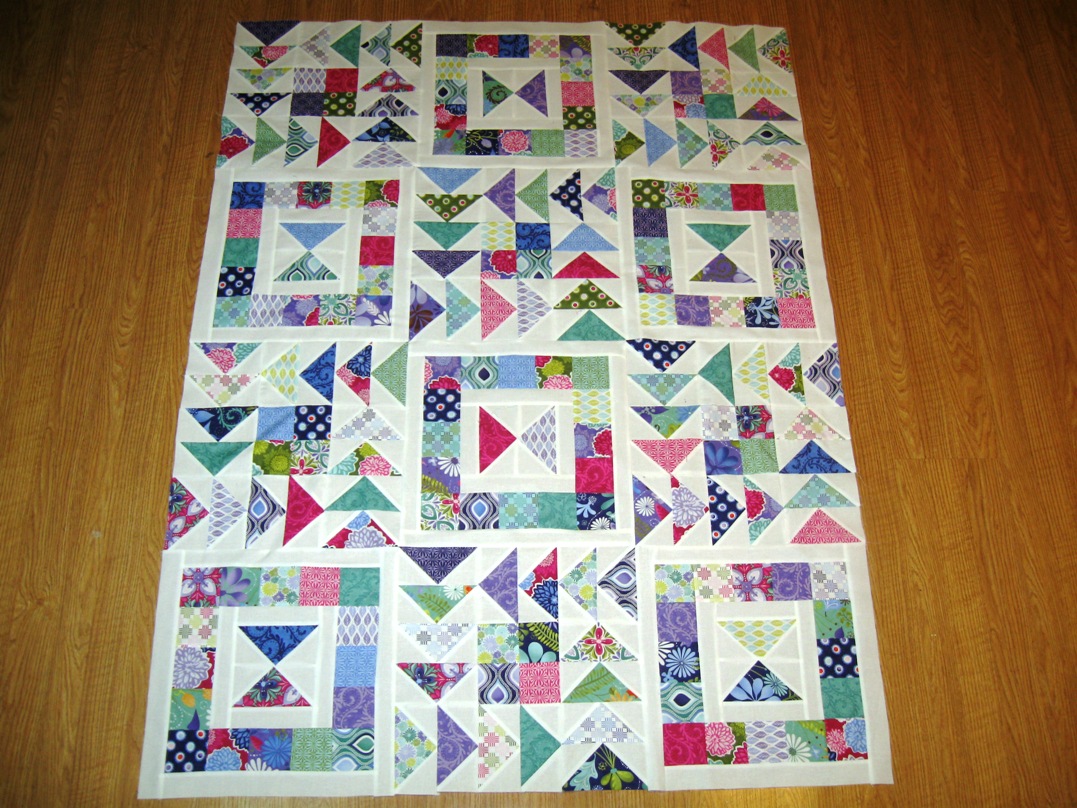
Now your block rows are complete and you are ready to sew your blocks together. Lay 6 blocks out as follows. I like to layout all 6 at first so I can play with the orientation of colors and get everything the way I like it before I sew.
Lay the top row onto the center row of each of the 6 sets. Pin, taking care to match up all of the seams. Chain Stitch a 1/4″ seam along the pinned edge and then clip your threads and press. Repeat the same process for the bottom row.
And you now have 6 beautiful Flying Blocks!!
STEP 4 – ASSEMBLING THE SQUARE BLOCK
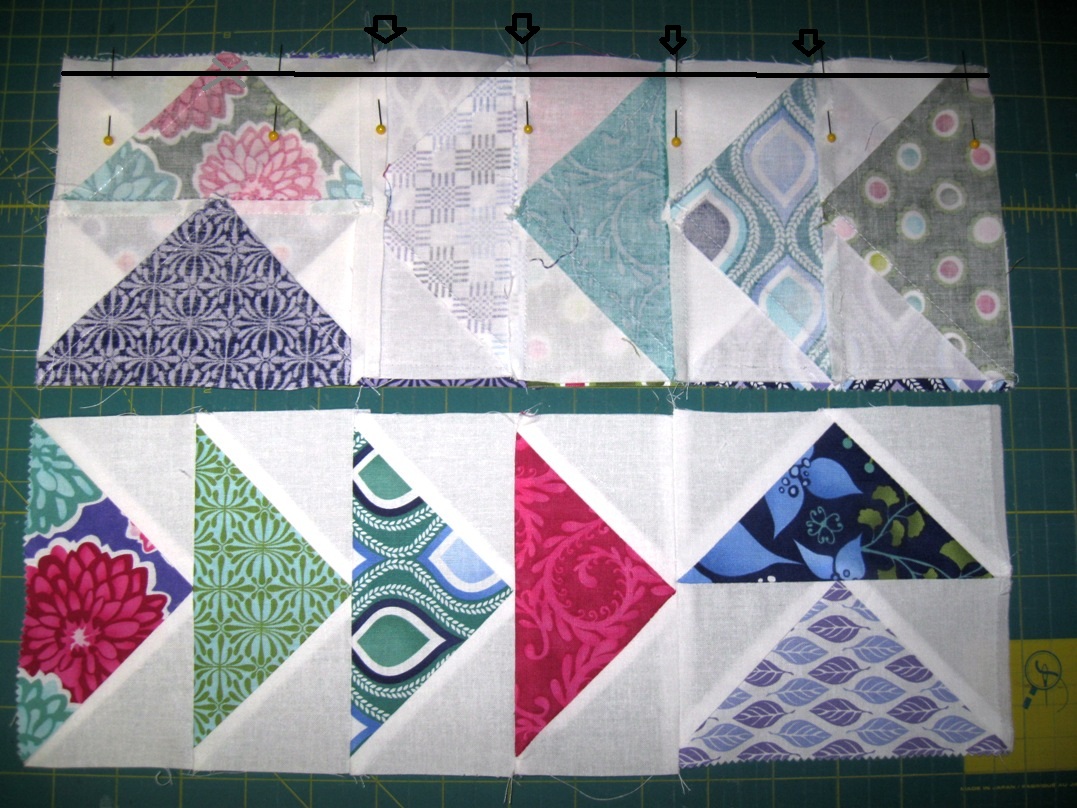
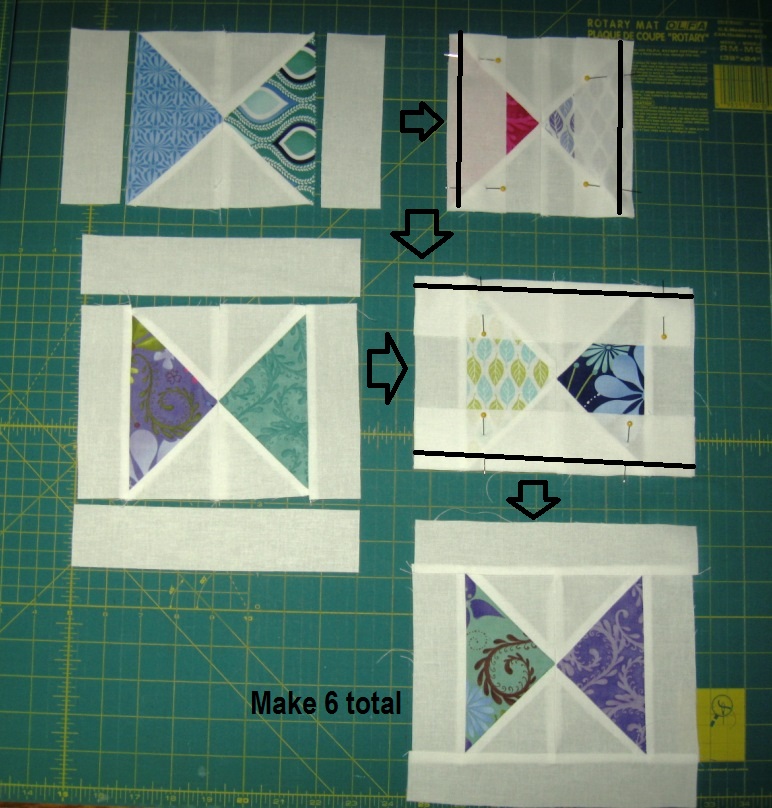
Remember those remaining 12 geese? Now is the time to use them. Take 2 geese blocks and lay them out as follows. Lay the first geese block onto the second with right sides together and pin along the edge. Repeat this to make 6 sets. Chain stitch a 1/4″ seam along the pinned edge, being sure to cross over the intersecting seams. Clip your threads and press.
Now take those 6 centers you just made and you are going to add some sashing. Start with the 5 1/2″ strips and lay them with right sides together along the sides of your center. Chain stitch a 1/4″ seam along the left hand side of the 6 centers. Clip your threads. Now chain stitch a 1/4″ seam along the right hand side of the 6 centers. Clip your threads and press both sets of seams on the 6 centers. Then repeat the same process but on the top and bottom using the 8″ sashings. Go ahead and set the 6 sashed centers aside.
Now grab your pile of 3″ print squares. You will be making 12 rows of 3. Start by taking 2 squares and with right sides together sew a 1/4″ seam along any edge. (you won’t need pins) Repeat this 12 times chain stitching to save time. Clip your threads between the 12 sets. Open your sets of 2. Now lay another 3″ square with right sides together along the edge and chain stitch a 1/4″ seam along all 12 sets to make 12 rows of 3. Clip your threads and press.
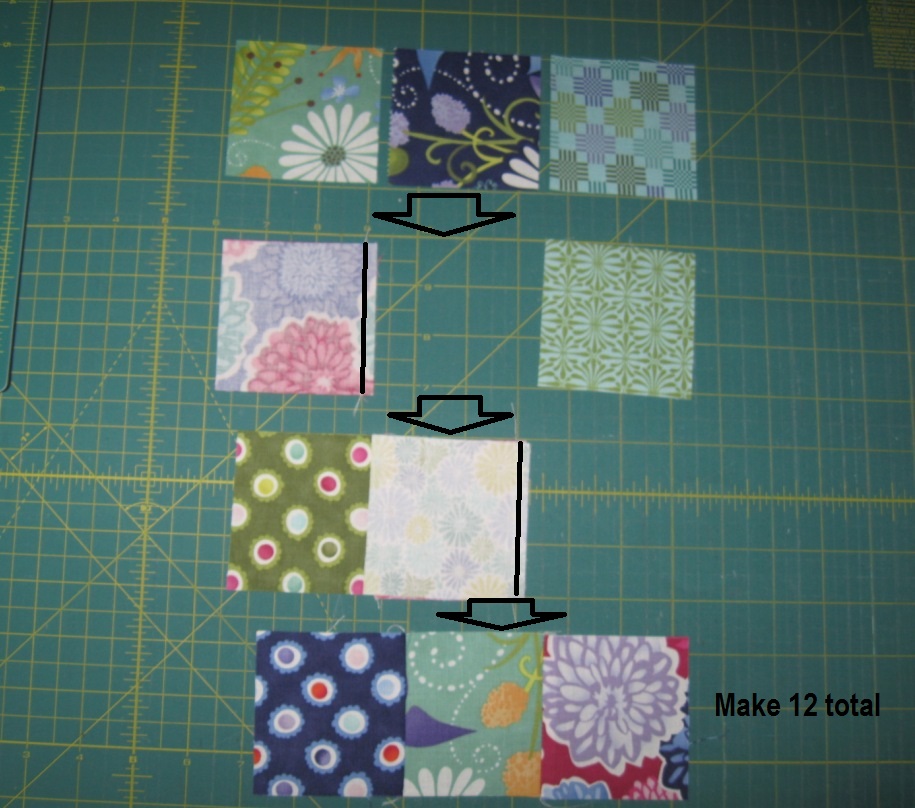
Now you will be doing the same process as above by making 12 rows of 5. Once again, start by making 12 sets of 2 squares and with right sides together and chain stitch a 1/4″ seam along any edge. Clip your threads. Now add a third square to each of the 12 sets, followed by a fourth square and then a fifth square. Clip your threads and press.
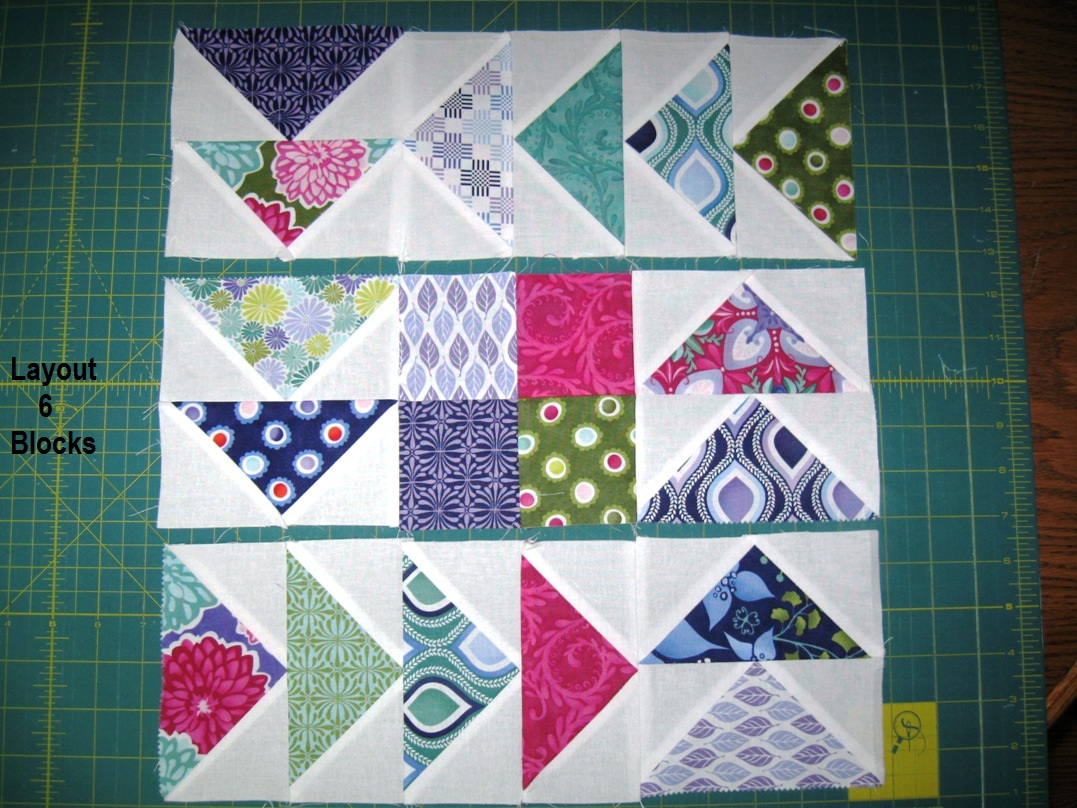
Now get your sashed centers again and your rows of 3 and 5 squares. This process is the same as sashing before we are just using pieced sashes instead. Lay out 6 blocks as follows. (Once again, I like to lay them all out so I can determine orientation of color :)
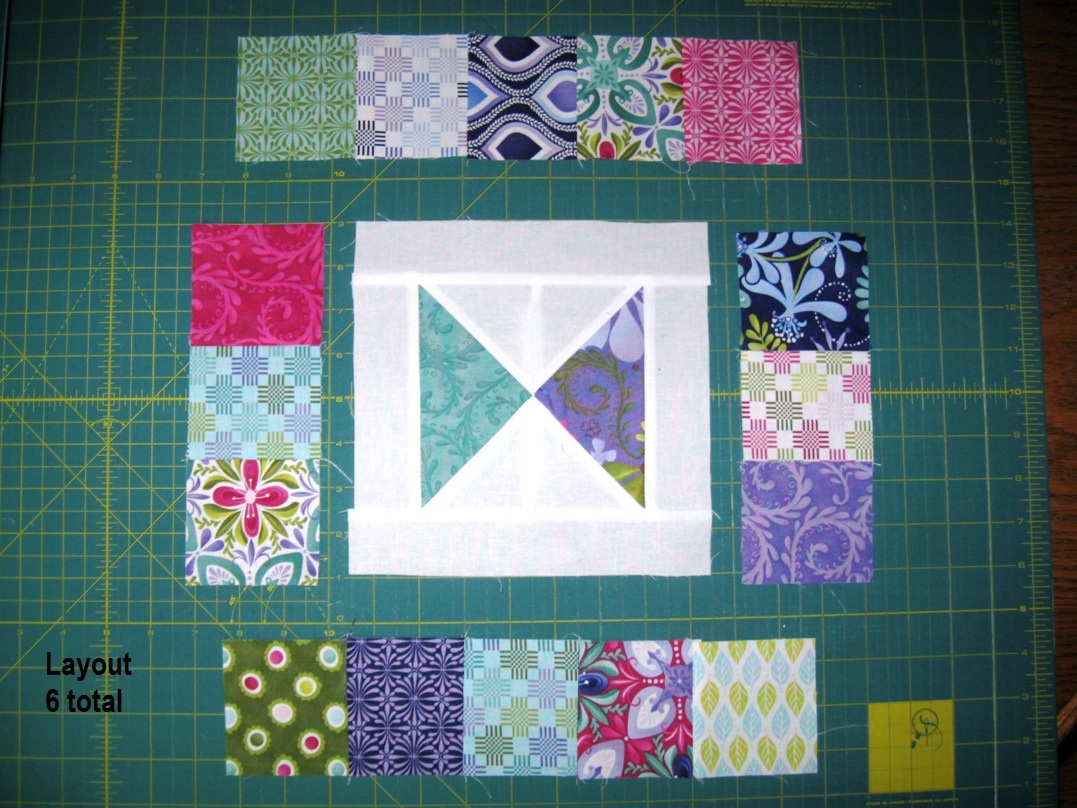
Place the pieced rows of 3 onto the sides of the centers of all 6 sets and pin the edges. Chain stitch a 1/4″ seam along the pinned edges of the right hand sides and then clip your threads and repeat chain stitching a 1/4″ seam along the pinned edges of the left hand side. Clip your threads and press.

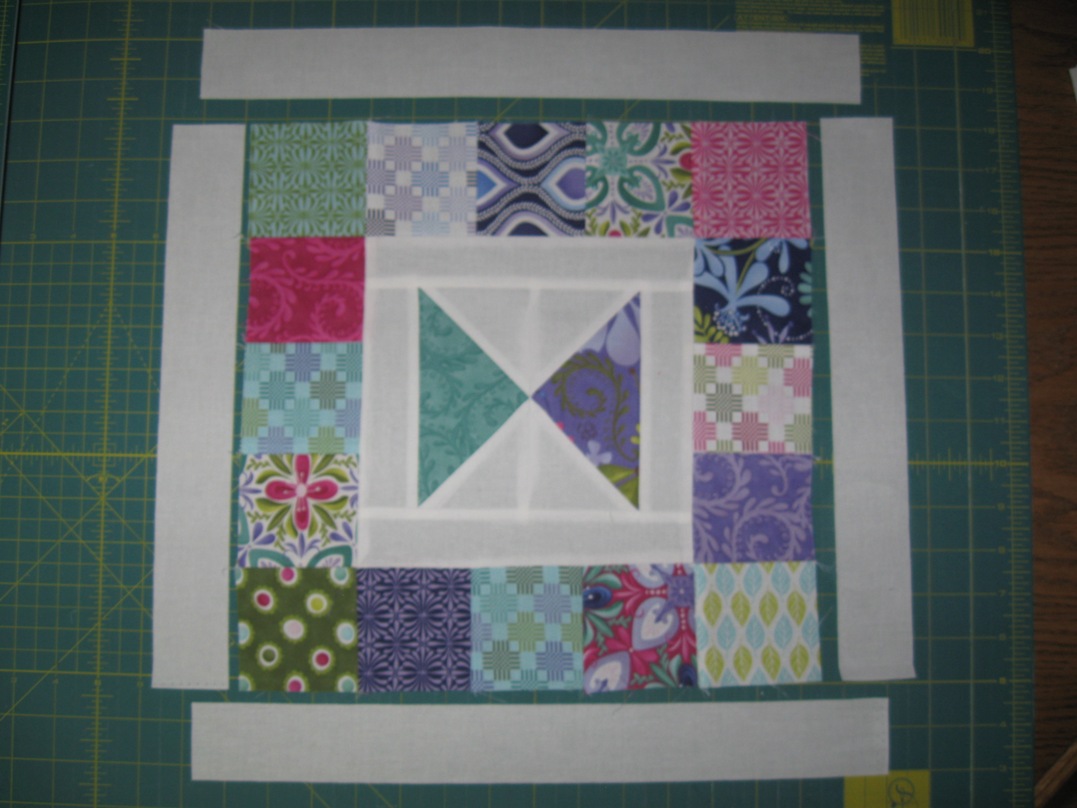
Now just repeat the same process for the top and bottom. Take care when pinning to make sure to align the seams of the center block and the pieced rows. Chain stitch your 1/4″ seams, clip your threads and press.

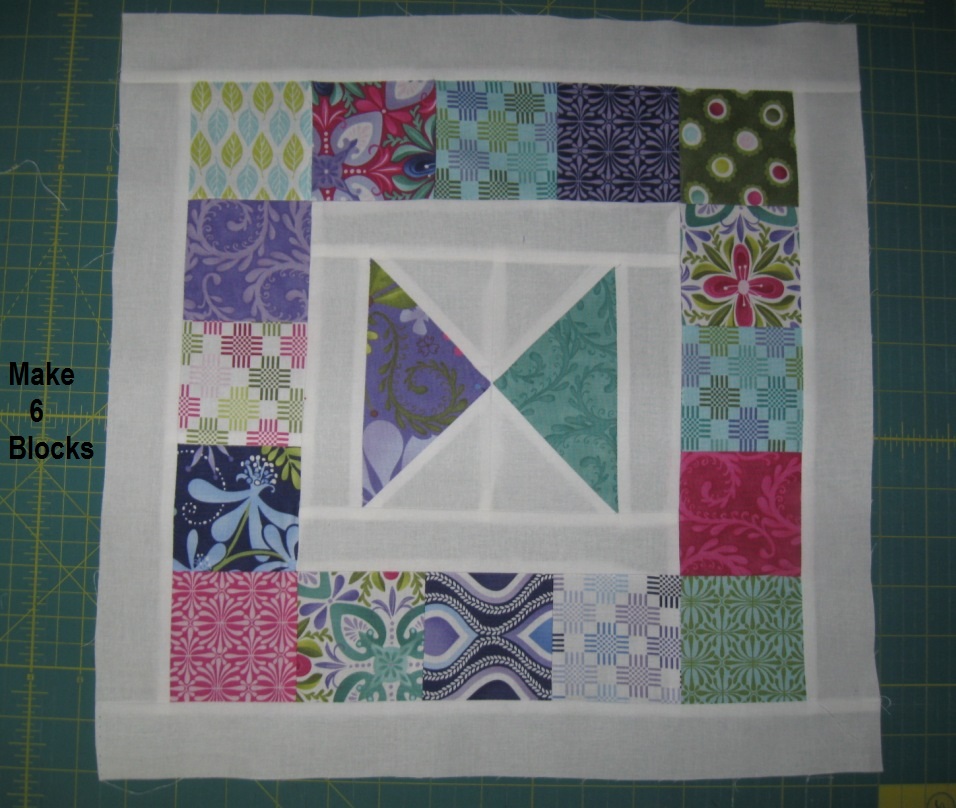
And now your blocks are ready for the final sashings. Repeat the same process. You got this!! Attach your 13″ sashings to the sides of your block and your 15 1/2″ sashings to the top and bottom of your block.
And now you are done with your 6 Square blocks!! Excellent!!!
STEP 5 – ASSEMBLING THE QUILT TOP
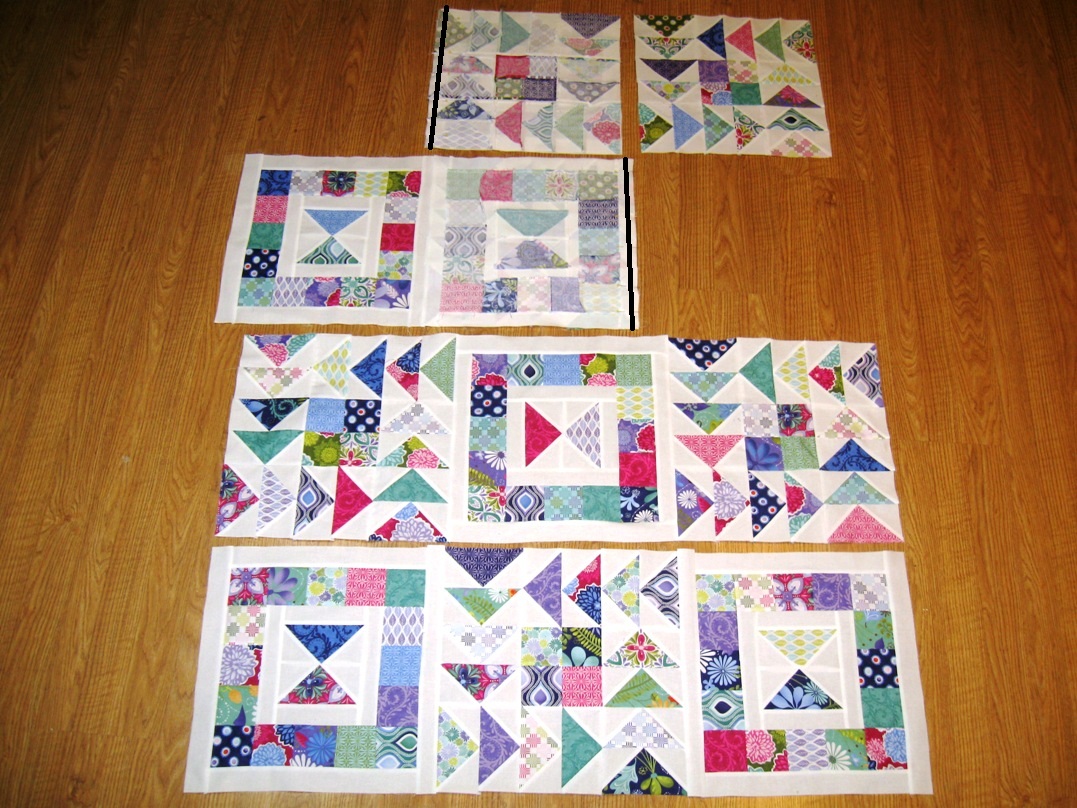
Now it is on to the super fun part and it goes really quick!! Lay out your blocks as follows. Notice, I changed the orientation of some of my square blocks. You don’t have to, I just like the way it looks. I find it helps to take a picture of my layout so I can refer back to it :)
And now we can make some rows. Start by laying the first block in each row onto the second block with right sides together. Pin along the edge. You won’t have to worry about matching seams because of the sashing :) Sew a 1/4″ seam along the pinned edges of the 4 sets. Now just lay the third block in each row onto the now pieced together first and second block with right sides together. Once again pin along the edge and then sew a 1/4″ seam along the pinned edge of each set. Clip your threads and press. Now you have 4 rows!!!
Lay the first row onto the second row with right sides together and then lay the third row onto the fourth row with right sides together. Pin along the edge taking care to match up the seams where the blocks meet. Sew a 1/4″ seam along the pinned edge of each set. Clip your threads and press.
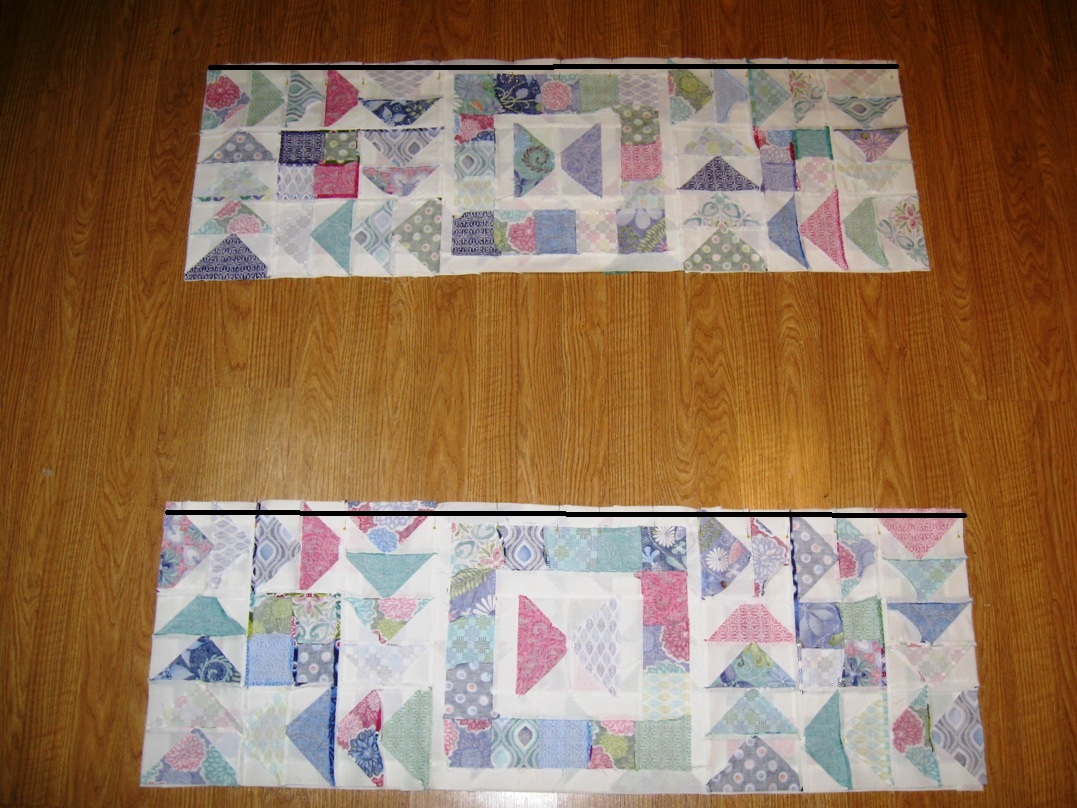
Now just one more seam to sew!! Lay your now sewn together row 1 and 2 onto your row 3 and 4. Pin along the edge once again taking care to match up your seams. Sew a 1/4″ seam along the pinned edge, clip your threads and press.
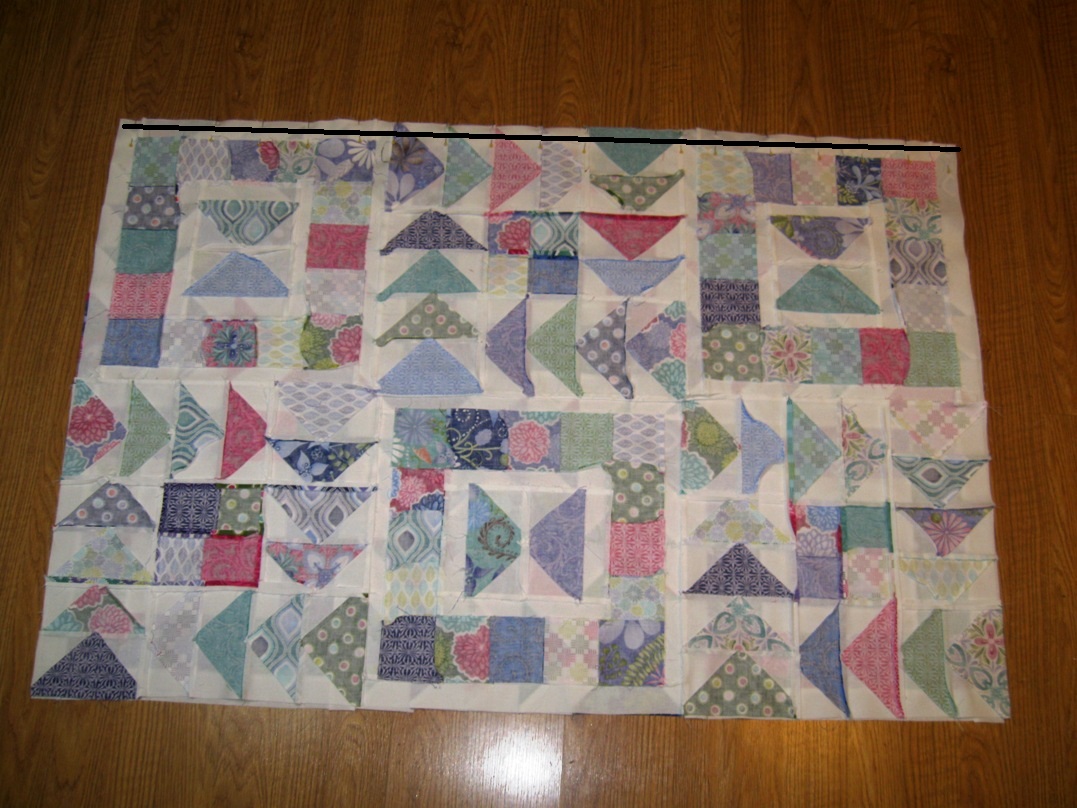
And there you have it!!! Your Flying in Squares quilt top is finished!!!
STEP 6 – FINISH THE QUILT
So now it is time
to turn that finished quilt top into a finished Quilt ;) Time to
Baste It, Quilt It, and Bind It!!! Which is a whole lot in one
little sentence. If you are new to quilting, you can see my Finishing Your Quilt Series of video tutorials that will walk you through Basting,
Quilting, and Binding step by step ;)

One super fun “Flying in Squares” quilt measuring 45″ x 60″
I hope you have
enjoyed this tutorial and if you make your own Flying in Squares Quilt I would love to see
it!! You can email me a picture at happyquiltingmelissa@gmail.com,
post it to social media with #happyquiltingwithmc or or add it to
my flickr group here ;) I can't wait to see your Flying in Squares Quilts!!!


This is gorgeous - absolutely gorgeous!!! Love it!!!
ReplyDeleteThis is beautiful! I love this quilt.
ReplyDeleteI really do love this! I am just a fan of flying geese and this quilt looks so beautiful. Great quilting too! Thanks so much!
ReplyDeleteThis quilt is awesome. I love flying geese. This quilt pattern is going on my to make list. Thank you for sharing your talents with us.
ReplyDeleteYour quilt rocks!
ReplyDeleteOh that is so beautiful and refreshingly different! I am definitely going to make it!
ReplyDeleteLOVE the look! But I have a not so very nice name for flying geese!! LOL they are not yet my friends! I think they fly over me and drop things down upon me and not a single darn one comes out like it should! I have tried three different methods and I guess as I get better they will get better as well! But till then I think I have to stay away from this flock!! hehe!
ReplyDeleteVery pretty. I love the movement too.
ReplyDeleteLove this pattern and I can't wait to try it. Thanks for sharing!
ReplyDeletegreat job! Will have to go check it out!
ReplyDeleteThat's adorable Melissa! So cute!
ReplyDeleteAnother fabulous quilt! When do you find the time with 5 little ones running around? Impressive!
ReplyDeleteThis is just gorgeous! Fab pattern, thanks for sharing :-)
ReplyDeleteIts a fabulous quilt!
ReplyDeleteMelissa, your quilt (and quilting) is beautiful! So much motion in both. I love how you focused your color palette, too. Great job! Hope you and your family had a wonderful holiday. Can't wait to see more creative projects from you in the New Year! xok
ReplyDeleteThe quilt is amazing. You are so talented. Was the quilted swirl free hand? Love, love, love it!
ReplyDeleteYay. Congratulations Melissa. Love it
ReplyDeleteVery cute!
ReplyDeleteI love the pattern. There is something about delving into the Bake Shop and finding that perfect pattern.
ReplyDeleteI still have Terrain at www.nicoleannes.com
ReplyDeleteI do love it. Completely. Awesome quilt and tutorial!!!
ReplyDeleteOh, I love this! Absolutely gotta make one...
ReplyDeleteI loved your tutorial and pinned it for 2012!
ReplyDeleteHugs,
Pam
Beautiful quilt! Great tutorial, I've bookmarked it :)
ReplyDeleteLove the spirals on this one! :) I usually do smaller, hadn't thought of doing them this big - v effective :)
ReplyDelete