I am super excited to be sharing a new
Moda Bake Shop Tutorial today as part of their Summer of Solids!!! It's called
Double Take and I have to say, I so just love it!!!!
Double Take is all about bold colors and a strong graphic design. This is because it will be used for my Alma Mater's Homecoming celebration
(once I add a custom layered applied logo to it) and so I wanted to make sure it would appeal to college kids. And I just love the way it turned out.
Double Take might look a little complex, but trust me, you are going to be amazed at how easy it is to put together!!! Using lots of strip piecing and then a lattice template to trim, this quilt top goes together in a jiffy!!! And it is so fun and easy to make!!!!
And now that this
Moda Bake Shop Tutorial has been published for a while, I can now post it here
on my blog for your convenience ;) So just follow along
below for the full step-by-step tutorial. And if you love it, you can get
the printer friendly version here :)
This quilt finishes at 80" x 80".. So let's get right to it.
Here is what you will need:
1 Bella Solids White Layer Cake
1 Bella Solids Red Jelly Roll
1 Bella Solids Black Jelly Roll
2 1/4 Yards Bella Solids Red
1 1/2 Yards Bella Solids Black
5 Yards of Backing Fabric
**Of course you can use other color combos, just switch the colors you want in the desired locations. And be sure to check out the end of the post to see how just changing the position of the light and dark colors in the quilt can really change the overall appearance ;)
STEP 1 - CUTTING
From your Red Bella Solids Yardage cut (17) 4 1/2" x Width of Fabric Strips.
From your Black Bella Solids Yardage cut (34) 1 1/2" x Width of Fabric Strips.
No need to worry about trimming the selvages or anything. Just be sure to press the yardage first so it is nice and flat with no creases. Then just make a straight edge and cut your strips.
From your White Bella Solid Layer Cake get 25 Layer Cake Squares. Stack them up about 3-4 in a stack (depending on how sharp your blade is) Without moving your squares throughout all of the cutting, First, cut the squares in half top to bottom, and then left to right, to make 4 squares, Second, cut the squares in half diagonally both directions as shown below. Now you can move your fabrics stacking up 8 triangles per Layer Cake Square. When you are finished cutting all 25 squares, you will have a total of 200 Triangles.
STEP 2 - STRIP PIECING
And now the cutting is done. Not to tuff right!!! And with that, we are moving on to some fun strip piecing!!! Strip piecing is a great time saver!! We will be making 17 strip sets and we will start by strip piecing a 2 1/2" x WOF Red Strip and a 2 1/2" x WOF Black Strip together. Place the Red and Black strips with right sides together and stitch a 1/4" seam along the edge aligning as you stitch. And if the ends don't line up perfectly, no worries. It will all be trimmed down the line.
As you come to the end of your first strip, simply grab another set of strips and feed them into the machine without clipping your threads. This is called chain stitching and is a huge time, and thread saver. We will be chain stitching most everything in this quilt ;) Continue chain stitching the strip sets until you have stitched all 17 Strip Sets. Clip the threads between each strip set.
Now, we are going to add a second 2 1/2" x WOF Black Strip to the raw edge side of the Red strip. Place the Black strip onto the Red Strip with right sides together and stitch a 1/4" seam along the edge aligning as you go. Continue to chain stitch all 17 strip sets this way.
And when you are finished stitching, clip the threads between each strip set. Press the seams outwards towards the black strips. Take care when pressing not to stretch the fabric, this can be easy to do when pressing such long strips. Now go ahead and set these strips aside for a moment.
Now, it's back to more strip piecing. Once again, we will be making 17 strip sets and we will start by strip piecing a 4 1/2" x WOF Red Strip and a 1 1/2" x WOF Black Strip together. Place the Black Strips onto the Red Strip with right sides together and stitch a 1/4" seam along the edge aligning as you stitch. And again, don't worry about aligning the ends.
Continue chain stitching the strip sets until you have stitched all 17 Strip Sets. Clip the threads between each strip set.
Now, we are going to add a second 1 1/2" x WOF Black Strip to the raw edge side of the Red strip. Place the Black strip onto the Red Strip with right sides together and stitch a 1/4" seam along the edge aligning as you go. Continue to chain stitch all 17 strip sets this way.
And again, when you are finished stitching, clip the threads between each strip set and press the seams outwards towards the black strips taking care not to stretch the fabric.
STEP 3 - SUB-CUTTING UNITS
With your strips all pressed and neat, you are ready to cut them into our Strip Units. Start by folding your Strip Set in half and lying on your cutting mat aligned with a horizontal line. Once again, it is okay if the ends of the strip don't line up perfectly. Trim a Straight edge along the left hand side of the strip. Measure in 13 1/2" and cut along the side of your ruler. This one cut creates 3 Strip Set Units. The folded unit will be a little longer but no worries ;)
Repeat this process for all 17 Strip Sets of both of your 2 varying Strip Types.
In the end, you will have 51 Strip Set Units of the 2 1/2" Red Strip Sets and 51 Strip Set Units of the 4 1/2" Red Strip Sets. You will only be needing 50 of each so set 1 from each of the 2 different Strip Set Units in scrap.
STEP 4 - ADDING TRIANGLES
And with the cutting done, we are once again moving onto some chain stitching, his time, adding on the white triangles we cut earlier. Start by finger pressing your Strip Set Unit in half. You just need to be able to see the crease. Align a White Triangle with right sides together on the strip set matching the finger crease with the point of the triangle. Stitch a 1/4" seam along the side of the strip set.
Once again, Chain Stitching here is going to save you a lot of time. So even though that means you will be stitching along the edge of your strip set where there is no white triangle on the top and bottom of each unit, it is still faster than stopping and starting each unit, and uses about the same amount of thread. Continue stitching a triangle onto all 100 Strip Set Units, 50 of each kind. When you are finished, clip the threads between each Strip Set Unit.
Now, it's time to do the other side. Once again, place a triangle on the opposite side of the Strip Set Unit with right sides together, aligning the point of the triangle with the already stitched point of the triangle. They should just overlap. And once again, Stitch a 1/4" seam along the edge, chain piecing all 100 units.
When you are finished stitching, press the seams outwards towards the white triangles. Somehow I lost this picture, I am sorry. You can see what the units should look like in the trimming pictures below ;)
STEP 5 - TRIMMING UNITS
And with your units all pieced now, you are ready to trim them into nice and neat squares. To do this, print the
Trimming Template that can be found here. Be sure to print it to Actual Size, not shrunk. Your printer won't be able to print right to the edges but no worries. Place any square ruler, 8 1/2" or larger, on the Trimming template, aligning the 8 1/2" grids of your ruler with the edges of the paper and the top and bottom lines. With masking tape, mark the 8 1/2" side and bottom lines (if your ruler is larger than 8 1/2") and then mark the diagonal lines, aligning the edge of the tape with the diagonal line on the template. Trim any excess tape hanging over the edge of the ruler.
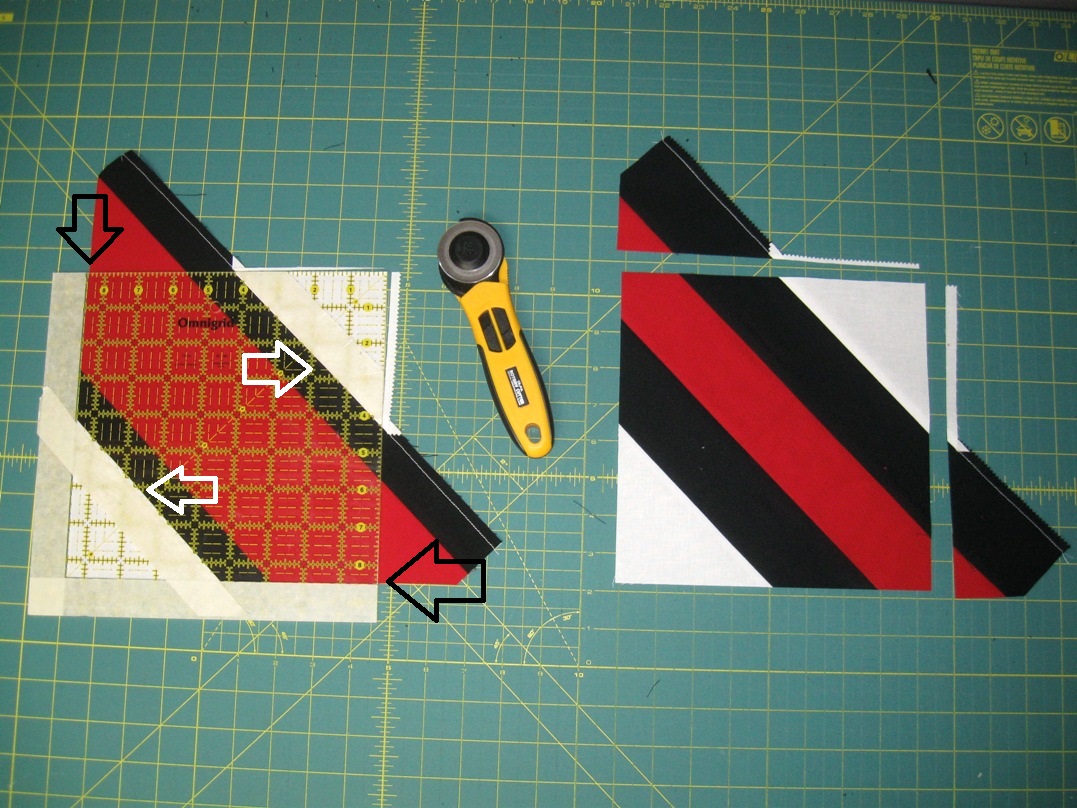
Now, place your marked ruler on your first Strip Set Unit. The same template will work for both units. Align the taped diagonal lines with the White/Black seam. Make sure that the ruler is shifted up or down, while keeping it aligned on the seam, to have a little bit of overhang of the unit along all 4 sides of the ruler. Trim the right hand side and top along the edge of the ruler.
Now, rotate the unit 180 degrees, and once again, align the White/Black seam with the diagonal tape lines. Move the ruler up and down, keeping it aligned on the diagonal, until you have also aligned the raw edges of your trimmed unit with the 8 1/2" marked edges of your ruler. Trim the right hand side and top along the edge of the ruler again to create a perfectly centered trimmed 8 1/2" x 8 1/2" Unit.
Repeat for all 100 Strip Piece Units to create 50 of each of your two types of trimmed Strip Piece Units all measuring 8 1/2" x 8 1/2" square.
STEP 6 - MAKING BLOCKS
And now, we can make our block!!! We will be making 25 blocks total, and once again, I highly recommend doing each of these next steps in assembly fashion, chain stitch all 25 units each time to save time and thread. Layout 4 Trimmed Units as shown below, 2 of each type making an X.
Place the right hand Trimmed Units onto the left with right sides together. Align and pin your seams. They should lay on top of each other perfectly. If they are a little off, align the seam, pin them in place, ad then ease in the rest of the block, pinning the easing in the top and bottom. Stitch a 1/4" seam along the edge. (pin all 25 sets and then stitch all 25 sets ;)
Press the seams open to avoid bulk where the seams meet. (note, the top row is reversed as it is showing the back. When it is flipped over, it will once again have the different units on opposite sides ;)
Now, place your top row onto your bottom row with right sides together. Again, align and pin your seams, easing in any little bubbles. Stitch a 1/4" seam along the pinned edge. (stitch all 25 ) Then Clip your threads and press the seams open.
And just like that, you have 25 beautiful X blocks all measuring 16 1/2" x 16 1/2" and you are ready to put your quilt top together!!!
STEP 7 - SEWING QUILT TOP
Layout your 25 blocks as shown below in an alternating 5 x 5 layout. The alt reading layout is what gives it the cool optical illusion and makes you want to keep making a Double Take.
Now, it's time to sew the rows together. Place the first block onto the second with right sides together. Align and pin the seams and then stitch a 1/4" seam along the edge. (shown in the first row, chain stitch all 5 rows) Then, place the third block onto the now sewn together first and second blocks with right sides together. Align and pin the seams and then stitch a 1/4" seam along the edge. Continue in this fashion until all 5 blocks have been stitched together in a row in all 5 rows. Press the seams open.
Now, stitching the rows together is the same, just in a longer fashion. Place the first row onto the second row with right sides together. Align and Pin all of your seams. Sew a 1/4" seam along the edge. Then, place the third row onto the now sewn together first and second row, with right sides together. Align and Pin all of the seams. Sew a 1/4" seam along the edge. Continue in this fashion until all of your rows are sewn together. Press the seams open ;)
And just like that, you have a beautiful 80 1/2" x 80 1/2" finished Double Take Quilt Top!!!! So fun!!!!
STEP 8 - FINISHING QUILT
And all that is left is to just Baste It, Quilt It, and Bind it!!!! Yup, three big things in one little sentence. If you are new to quilting and need some tips on how to Baste It, Quilt It, and Bind It, you can check out my
Finishing Your Quilt Video Series. It will walk you through it all in step by step detail. I quilted mine with horizontal and vertical straight lines in varying widths to add to that optical illusion.
STEP 9 - ENJOY
And you have a super striking, modern geometric Double Take Quilt that will be sure to be getting lots of second glances!!! And at 80" x 80" there is plenty of quilt to go around!!!
This quilt will make an awesome School Rally quilt as well, perfect for taking to the game ;) And if you want to give it that little finishing touch by adding a school logo, as I will be doing, you can see my
Layered Applique Tutorial here to show you just how easy it can be.
Oh, and like I said at the beginning, you can really change up the overall look of the quilt by just changing the placement of the light and dark colors. Here are a few ideas ;)
I hope you have
enjoyed this tutorial and if you make your own Double Take Quilt I would love to see
it!! You can email me a picture at happyquiltingmelissa@gmail.com, or post it to social media with #happyquiltingwithmc :) I can't wait to see your Double Take Quilts!!!
Thanks for popping in today!!! Have a Happy Quilting Day!!!!


Brilliant.
ReplyDeleteQuiltShopGal
www.quiltshopgal.com
Love it!! I know college kids will too!
ReplyDeletethis is gorgeous. thanks for the pattern
ReplyDeleteMelissa, this is a fabulous quilt! It made me think of a couple older nephews who have not received a quilt from me because I just have never found the pattern that would work for them. Yipppeeee......they will love this pattern! Thank you so much for using your talents and creating patterns, quilts, tutorials and sharing so much of your talents! I hope that you have a fabulous creative day!
ReplyDeleteThat is beautiful.
ReplyDeleteBrilliant quilt, Melissa. I love patterns like this - looks like loads of work, but actually quite simple.
ReplyDeleteI love your quilt pattern and the quilt you made is beautiful.
ReplyDeleteLove how bold and beautiful this quilt is! Great job. Love it!
ReplyDeleteWill definitely make it Love the simplesity ,yet beautiful
ReplyDeleteThank you so much