Monday, November 7, 2022

BOHO Heart Block of the Month - Month 6

 It's Month 6 with my good friends at Stitchin' Heaven  doing their BOHO Heart Monthly Block of the Month program and that means another month of fun tutorials!!

Month 1                Month 2               Month 3             Month 4            Month 5               Month 6

Month 7                Month 8               Month 9            Month 10           Month 11              Month 12

And since each month has Lots and Lots of Tutorials in them . . . Here is a list to jump right to the tutorial you need for this month 6:  

Half Square Triangle Block               Square In A Square Block                        Four Patch Block

Little Checkerboard Block             Sashed Half Square Triangle Block            Four Links Block

                              Courthouse Steps Block                    Framed Ohio Star Block                     

   Sewing Section 6                            Sewing Section 7                           Sewing Section 6 & 7       

                                   Sewing Group 2                         Sewing Group 1 & 2


So you have your Month 6 BOHO Heart Packet . . .  Lets get started!!! 


We'll start with our first block, and it's one we have already done, the . . .


From your Month #6, Half Square Triangle bag, cut the fabrics according to page 1 of the supplemental cutting list.    I cut my squares 3" instead of the 2.875" and will trim.   


Using the cut squares and the Half Square Triangle Block Directions from Month 1 make your 2 blocks.   The Half Square Triangle Block will be measuring 2 1/2" x 2 1/2" unfinished.    And save the second Half Square Triangle Block, we won't use it today, but we will use it in Group 3 Section 5 to form the bottom of the heart ;) 


And now we can move onto another familiar block , the . . .


From your Month #6, Square in a Square bag, cut the fabrics according to page 1 of the supplemental cutting list. 


Using the cut pieces and the Square in a Square Block Directions from Month 1 make your block.   The Square in a Square Block should be measuring 2 1/2" x 2 1/2" unfinished.   


And with that done, we will move onto a final familiar block , the . . .


From your Month #6, Four Patch Bag, cut the fabrics according to page 1 of the supplemental cutting list.   Also, if you are using the "Gold Fillers" instead of the patchwork fillers, cut your Gold Filler.    But please note - The gold filler should be cut at 2 1/2" x 8 1/2", even though the cutting directions say 8", be sure to add that extra 1/2" ;)  


Using the cut pieces and the Four Patch Block Directions from Month 2 make your block.    The Four Patch Blocks should be measuring 2 1/2" x 2 1/2" unfinished.   


And now we get to move onto a new block, the . . . 


From your Month #6, Little Checkerboard bag, cut the fabrics according to page 1 of the supplemental cutting list. 


We will start with Strip Piecing some 2 Patch units.  Place the Black and Yellow strips with right sides together.  Align the raw edges and stitch a 1/4" seam along the long edge.  Press the seam towards the dark fabric.  


Now, place your strip set onto the cutting mat aligning the horizontal lines with the top and bottom of the strip set.  Cut a straight edge.   Then continue to measure in 1 1/2" and sub-cut 1 1/2" x 2 1/2" two patches.  Cut 8 Two Patches total.


Now we are going to make 4 Four Patch units.  To do this, simply place a Two Patch Unit onto a second Two Patch Unit with Opposite squares aligning and right sides together.  Align and Pin/Nest the center seam and stitch 1/4" seam.  Press the seams open.  Repeat to make 4 Four Patch Units total.  
  

Layout the 4 Four Patch Units as shown below, taking note of the color placement. 


Place the Units in the right hand column onto the Units on the left hand column with right sides together.  Align and pin the seams and then stitch a 1/4" along the pinned edges.  


Press the seams open.  


Place the top row onto the bottom row with right sides together.  Align and pin the seams.  Stitch a 1/4" seam along the pinned edge.  Press the seam open.  


And just like that, you have an adorable Little Checkerboard Block  that should be measuring 4 1/2" x 4 1/2" unfinished.  


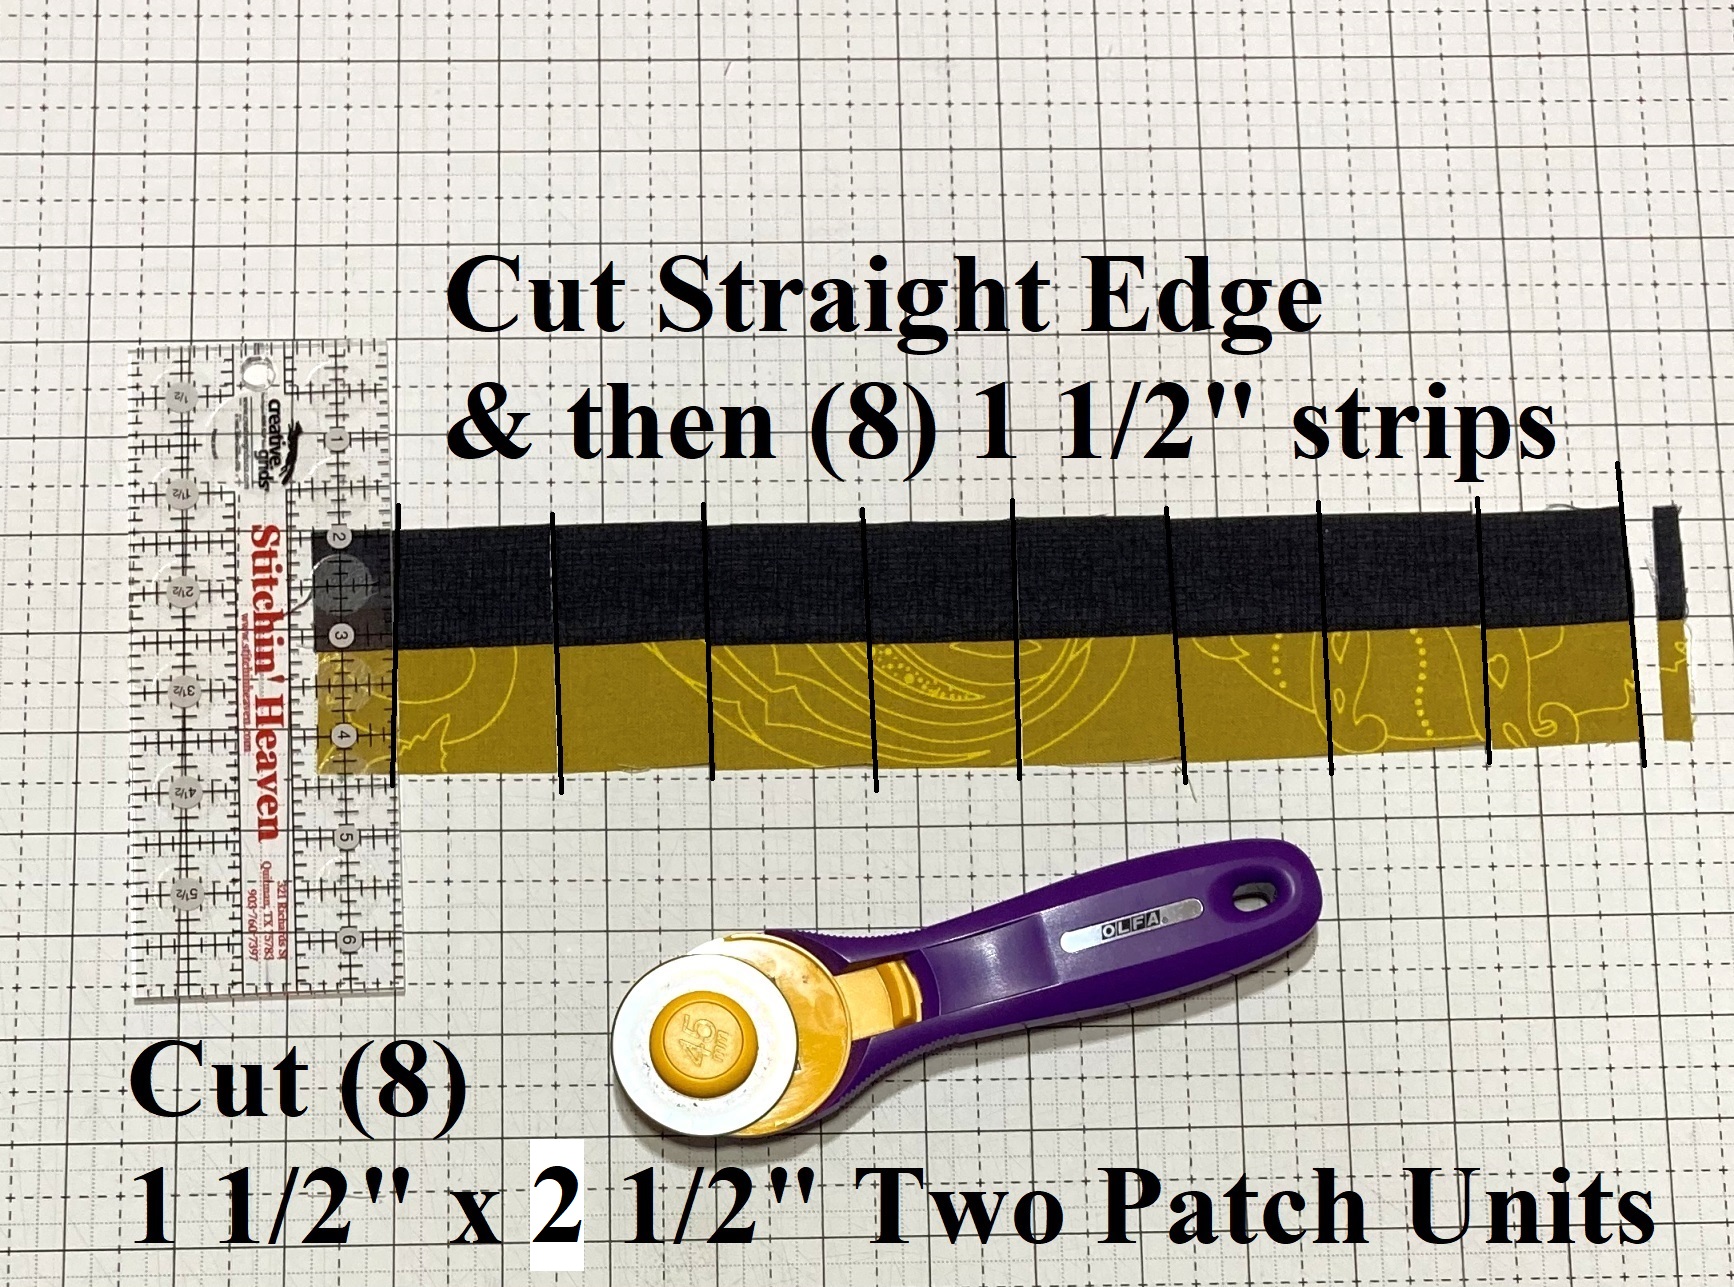
And now we get to move onto another familiar block, the  . . . 


From your Month #6, Sashed HST Bag, cut the fabrics according to page 1 of the supplemental cutting list.   I cut my squares 3" instead of the 2.875" and will plan to trim the HST's.  


Using the cut pieces and the Sashed HST Block Directions from Month 2 make your block.    The Sashed HST Block should be measuring 5 1/2" x 5 1/2" unfinished.   


And now, we get to make another familiar block, the  . . . 


From your Month #6, Four Links bag, cut the fabrics according to page 1 of the supplemental cutting list. 


Using the cut pieces and the Four Links Block Directions from Month 5, and taking care to watch the color placement, make your block.    The Four Links Block should be measuring 6 1/2" x 6 1/2" unfinished.   


And now one last Familiar block,  the  . . . 


From your Month #6, Courthouse Steps bag, cut the fabrics according to page 1 of the supplemental cutting list. 


Using the cut pieces and the Courthouse Steps Block Directions from Month 5, and taking care to watch the color placement, make your block.    The Courthouse Steps Block should be measuring 8 1/2" x 8 1/2" unfinished.   


And now one last new block,  the  . . . 


From your Month #6, Framed Ohio Star bag, cut the fabrics according to page 1 of the supplemental cutting list taking into account the following changes.   Note - There are a Few Changes to the cutting, but no worries, you will still have plenty of Fabric :)  From the Gold Print, cut (4) 2 1/2" x 2 1/2" squares and (1) 3 1/2" x 3 1/2" square.   From the Blue print cut (1) 2 1/2" x 2 1/2" square.  The Dark Print and Light Print are cut the same as listed.  


 Gather 2 Black 3 1/2" squares, a Light 3 1/2" square and a Gold 3 1/2" square.  Pair them into two groups as shown below. 


Using the paired Squares and the Half Square Triangle Directions from Month 1 make 4 Half Square Triangles but do not trim them.    


We will now turn the HST's into Quarter Square Triangles.  Align two different HST's with the black triangles opposite as shown below.  Place the Light HST onto the Gold HST with right sides together.  Align and Nest the center seam.  The Black Triangles should be on opposite sides.   Draw a line diagonally from corner to corner on the opposite side of the seam.  Sew a 1/4" seam on either side of the drawn line.  Repeat for both sets of HST's .  


Now cut on the drawn line of both sets.  Press the seams open to create 4 Quarter Square Triangles.  Using a 2 1/2" Square ruler, align the diagonal on the ruler with the diagonal seam and the center circle of the ruler with the center of the block.   Trim the block to 2 1/2" square. Trim all 4 Quarter Square Triangle units.  


Layout the 4 Quarter Square Triangle units, 4 Gold 2 1/2" squares, and the 1 Blue Center square as shown below.  


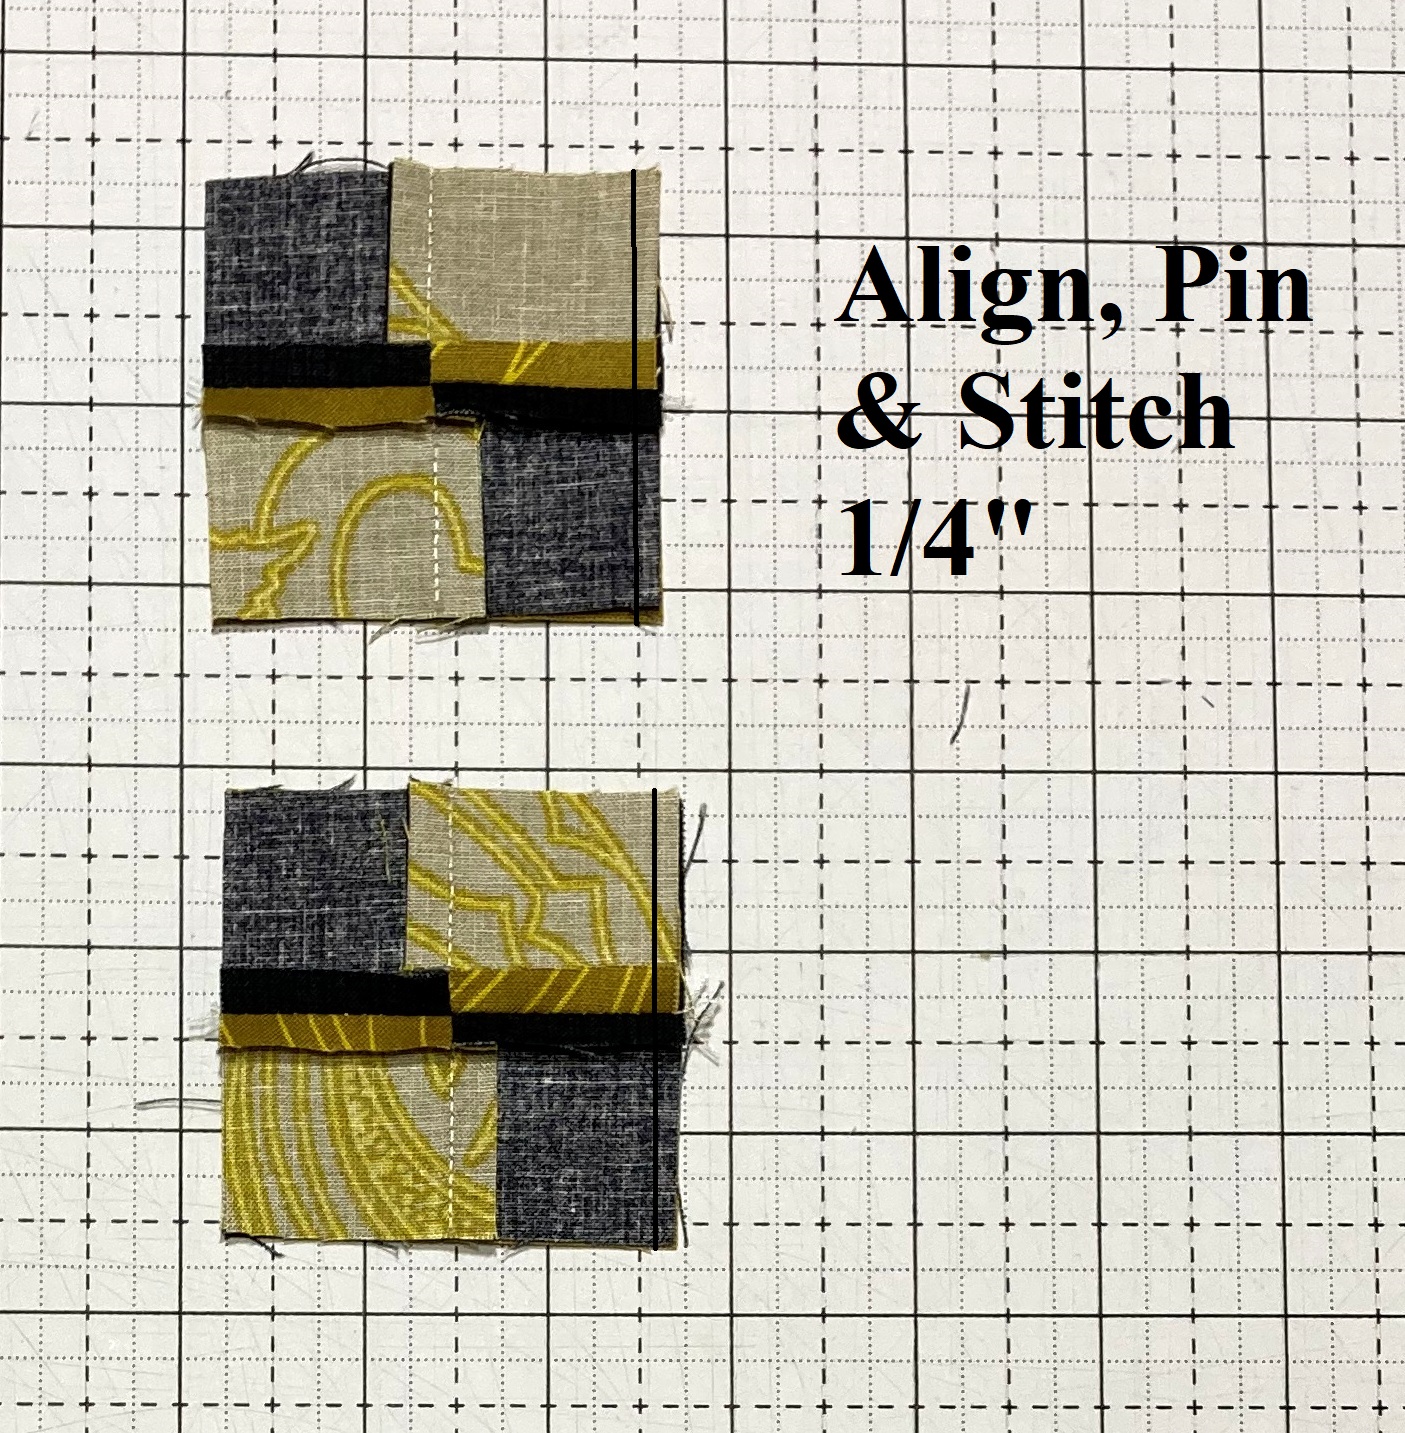
Place the units in the center column onto the units in the first column with right sides together.  Align and Pin and then stitch a 1/4" seam along the 3 pinned edges. 


Then, place the units in the last column onto the units in the center column with right sides together.  Align and Pin and then stitch a 1/4" seam along the 3 pinned edges. 


Press the seams in the first and third row out towards the Gold squares.  Press the seams in the second row in towards the Blue square.  


Now, place the First Row onto the Second Row with right sides together.  Align and Pin the seams and then stitch a 1/4" seam along the pinned edge.  When stitching, be sure to stitch directly along the bottom of the thread V's to give you perfect points.  


And now, place the Third Row onto the Second Row with right sides together.  Align and Pin the seams and then stitch a 1/4" seam along the pinned edge catching the points of your thread V's.    Press the last 2 seams open.  


Now layout, the 4 light rectangles around the Ohio Star Unit as shown. 


Place the 2 short rectangles onto the sides of the Ohio Star Unit with right sides together.   Align and stitch a 1/4" seam along the edges.  


Press the seams outwards.  Place the 2 longer rectangles onto the top and bottom of the pieced center square with right sides together.   Align and stitch a 1/4" seam along the edges.     Once again, Press the seams outwards.  


And now you have made a Framed Ohio Star Block that should be measuring 8 1/2" x 8 1/2" unfinished.  


And now you are ready to start sewing the blocks into sections.  We will start with . . . 


We will start by sewing the Strip Sets together.   Press the seam allowances to the Larger Number fabric.   

From Fabric 21, 22, 23, and 24, sew a 2 1/2" Strip Set together as shown. 
From Fabric 33 and 34, sew a 8 1/2" Strip Set together as shown.  
       (or cut out a 2 1/2" x 8 1/2" Gold Fabric Filler)


Now we will sew the Block to the Strip Set.   Press the Seams Open.   

Sew the Pink Four Patch Block and the 21/22/23/24 Strip Set together as shown.


Sew the Four Patch Unit and the Four Links Block  together as shown.

Sew the Courthouse Steps Block and the 33/34 Strip Set together as shown. 


And now to finish Section 6

Sew the Four Patch Four Links Unit and the Sashed Courthouse Steps Unit together as shown.

Press the Seam Open. 


And your Group 2 - Section 6 is complete.  It should measure 16 1/2" wide by 8 1/2" high.


So now, we can move onto . . .


Once again, we will start by sewing the Strip Sets together and there are a lot of them for this section.    Press the seam allowances to the Larger Number fabric.   

From Fabric 19. 20, and 21 sew a 24 1/2" Strip Set together as shown. 
From Fabric 22, 23, 24, 25 and 26 sew a 19 1/2" Strip Set together as shown.
From Fabric 27 and 28 sew a 12 1/2" Strip Set together as shown.
From Fabric 27 and 28 sew a 2 1/2" Strip Set together as shown.
From Fabric 29 and 30 sew a 14 1/2" Strip Set together as shown.
From Fabric 31 and 32 sew a 12 1/2" Strip Set together as shown.
From Fabric 33 and 34 sew a 10 1/2" Strip Set together as shown.


Now we will begin to sew the Blocks to the Strip Set.   Press the Seams Open.   

Sew the HST Sashed Block and the 22/23/24/25/26 Strip Set together as shown.
Sew the 27/28 12 1/2" Strip Set, the Blue Four Patch Block and the 27/28 2 1/2" Strip Set together as shown.  
Sew the Square in a Square Block and the 29/30 Strip Set together as shown.
Sew the HST Block and the 33/34 Strip Set together as shown.


Sew the Four Patch Unit and the Square in a Square Unit together as shown.
Sew the 31/32 Strip Set and the Half Square Triangle Unit together as shown.


Sew the Sashed Half Square Triangle Unit and the Little Checkerboard Block together as shown.


Sew the Four Patch Square Unit and the Sashed HST Checker Unit together as shown.


Sew the 19/20/21 Strip Set and the Sashed HST Unit together as shown.
Sew the Four Square HST Checker Unit and the Sashed Ohio Star Block together as shown.


And finally, Sew the Sashed HST Sashed Unit and the Four Square HST Checker Star Unit together as shown.

Press the Seam Open. 


And your Group 2 - Section 7 is complete.  It should measure 16 1/2" wide by 24 1/2" high.


And now, we can move onto   . . . 


Layout Section 6  and Section 7 as shown below.  


Place Section 6 onto Section 7 with right sides together.  Align, pin, and stitch a 1/4" seam along the edge.   Press the seam open.  


And your Group 2 - 6 and 7 is complete.  It should measure 16 1/2" wide by 32 1/2" high.


And now, all of the sections are done in Group 2 so we can now get to   . . . 


Layout Sections 1-7 as shown below in the 3 groupings they are sewn into.  


Place Section 1&2 onto the top of Section 3,4,&5 with right sides together.  Align, pin, and stitch a 1/4" seam along the edge.  Then Place Section 6&7 onto the bottom of Section 3,4,&5 with right sides together.  Align, pin, and stitch a 1/4" seam along the edge.  Press the seams open.


And your Group 2  is complete.  It should measure 16 1/2" wide by 83 1/2" high.


And now, we get to sew half of the quilt top!!!  Let's get to    . . . 


Layout Group 1 and Group 2 as shown below.  


Place Section Group 2 onto Group 1 with right sides together.  Align, pin, and stitch a 1/4" seam along the edge.  Press the seams open.


And Half of your Quilt Top is Complete!!!  So Exciting!!!
It should measure 34 1/2" wide by 83 1/2" high.


And that is it for BOHO Heart Block of the Month, Month 6 :) 

If you have any questions on this tutorial, please don't hesitate to email me at happyquiltingmelissa@gmail.com or leave a comment.  

Hope you have so much fun making all of this months blocks and then sewing them all together:)

 Looking forward to Next Month!!


Pin It!

6 comments:

  1. You are absolutely amazing!!!!!

    ReplyDelete
  2. The gold filler cutting directions for this month indicate to cut the fabric 2 1/2“ x 8“. I liked that fabric this month and hoped to use it, but when you get to the sewing instructions you realize this piece must be 8 1/2 inches long not 8 inches. Therefore the gold filler fabric if you have followed The cutting instructions is useless. Was disappointed 😔

    ReplyDelete
    Replies
    1. Thanks for letting me know. I will note this in the tutorial for the future. And you can always sew a 1" x 2 1/2" piece onto the end to make it large enough :)

      Delete
  3. Hi there. I need help. I’ve completely lost control of my strips. The first batch I put in baggies and numbered them. The second set I put clips on and lettered them. I’m using the second set for month 6 following the instructions. But I have a bunch of the first batch. Am I just supposed to keep those for further down the line?? I am definitely struggling with the strips

    ReplyDelete
    Replies
    1. Those from the first batch become scraps. You will get new strips in month 7 to be used for month 7, 8, and 9 and so after you are done month 6 the second set of strips become scraps as well ;)

      Delete
  4. Suggestion, remove, “cut the fabrics according to page 1 of the supplemental cutting list” on the 8” Framed Ohio Star.

    ReplyDelete

Thank you so much for your sweet comments. I just love hearing from you!!
Have a Happy Quilting Day :)

Melissa