Thursday, December 15, 2022

Stepping Out Quilt and Free PDF Pattern

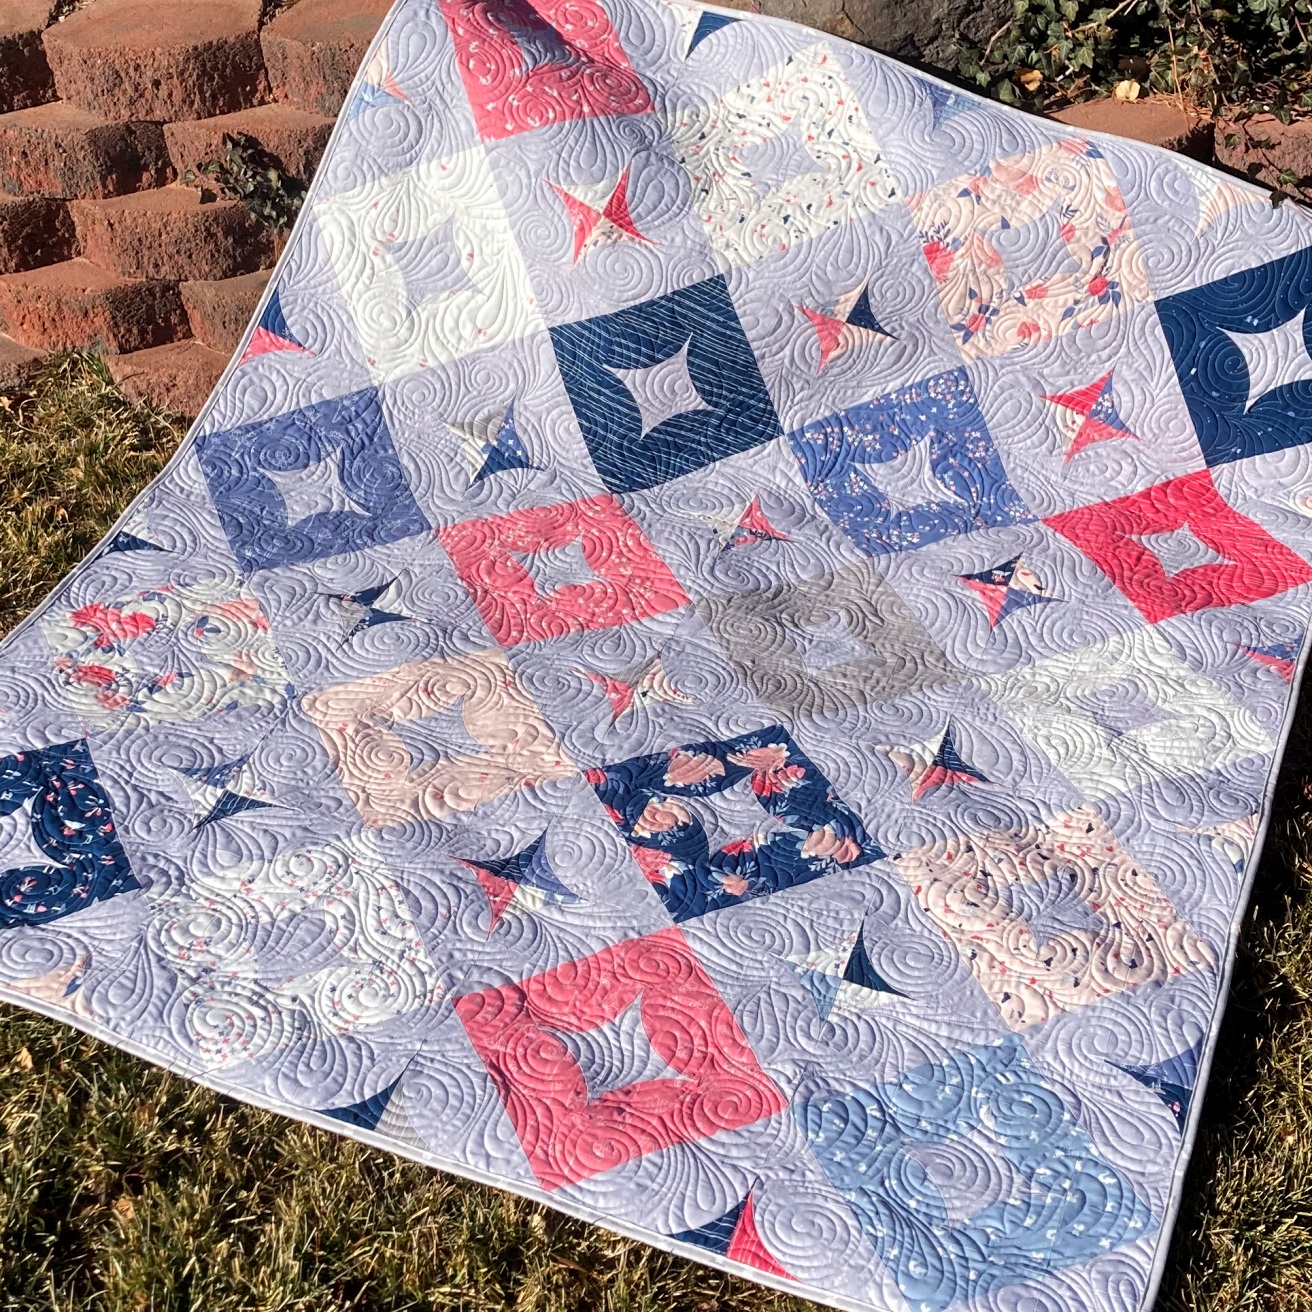
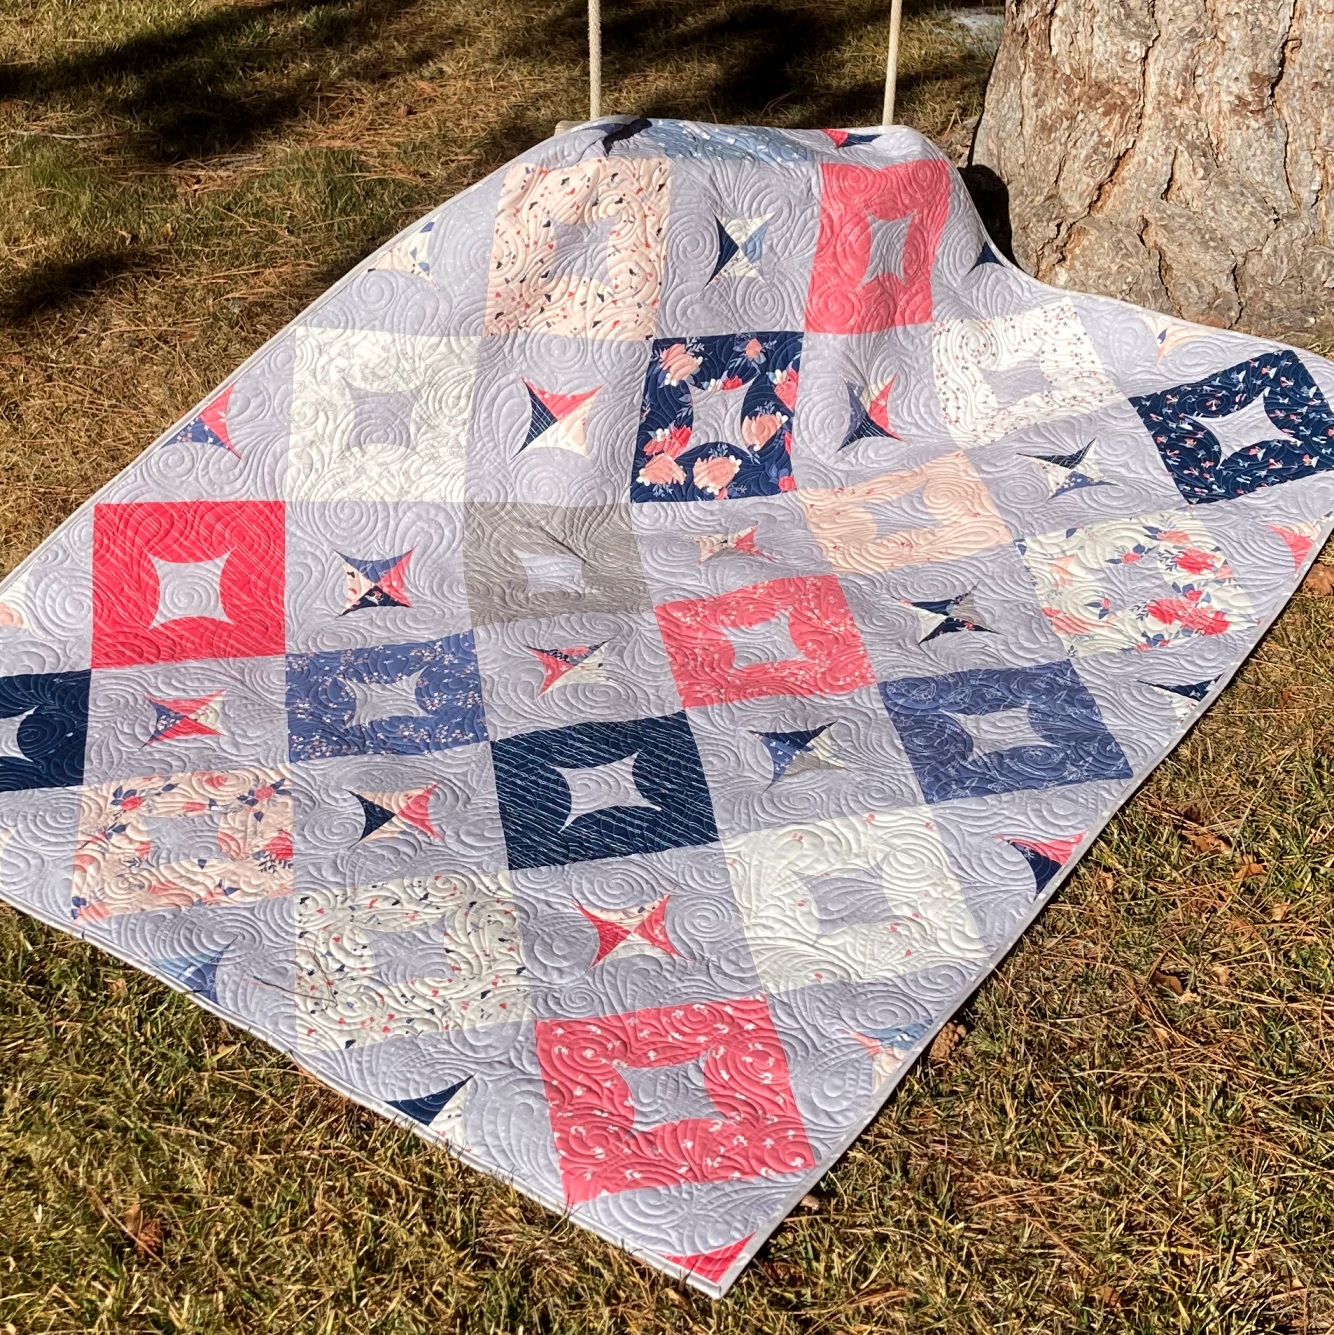
Today, I am thrilled to be sharing this brand new Stepping Out quilt as well as a Free PDF Pattern for it!!! This quilt features South Hill Fabrics by Fran Gulick. I just love piecing curves, and this is a great quilt to start learning them if curves are brand new to you!!! It's perfect for beginners and experts alike :)

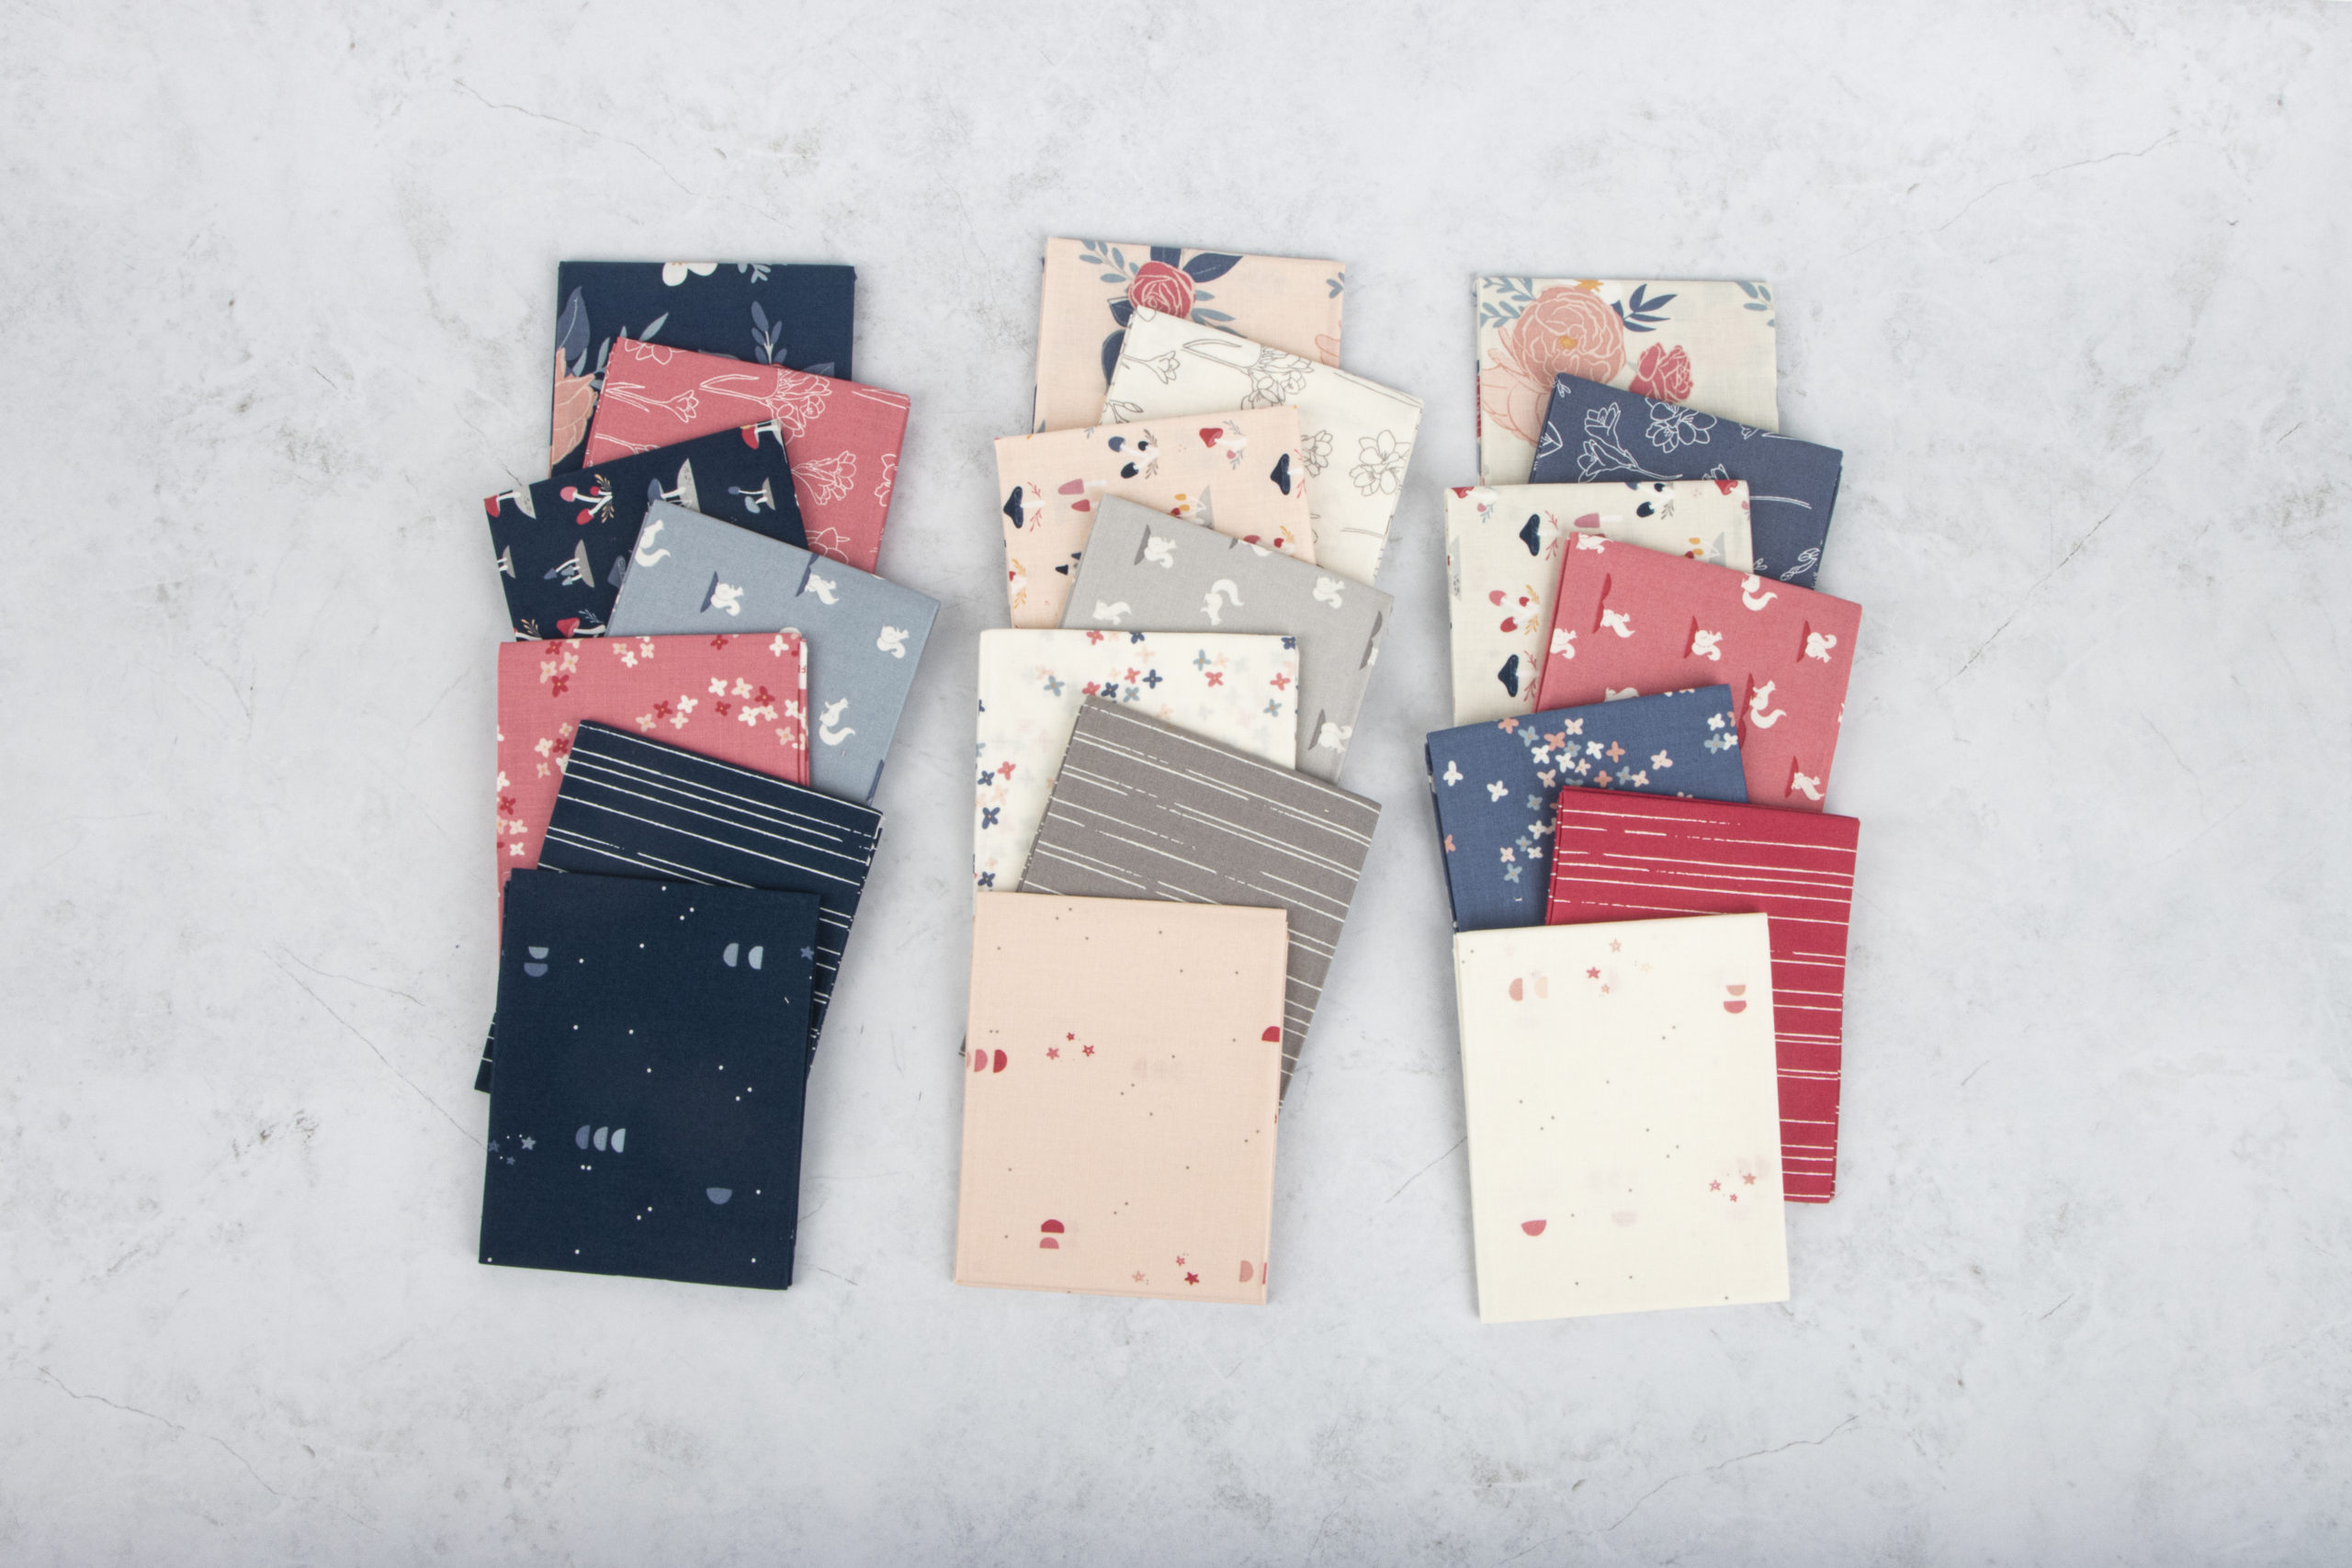
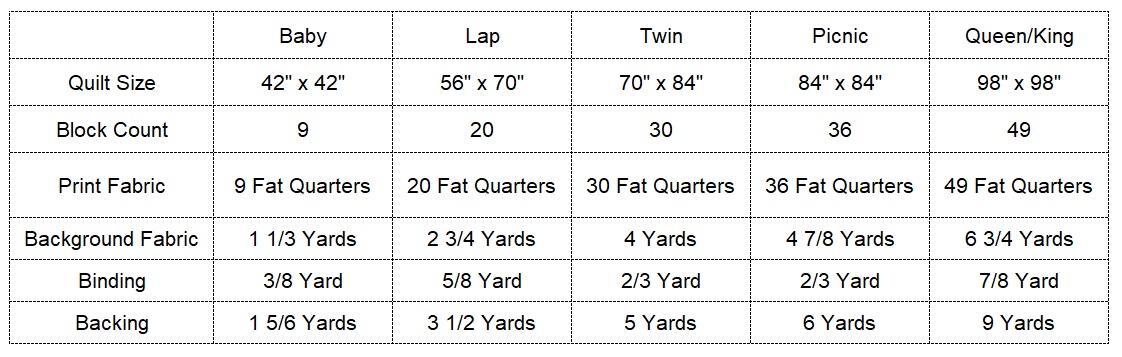
  Stepping Out is a Fat Quarter Friendly quilt. I have added multiple size options to the Free PDF Pattern, so you can make the quilt that fits just perfect for you. All you need is a stack of Fat Quarters, and some background fabric and you are ready to get stitching. I just love these beautiful South Hill fabrics!!! The prints and colors are just marvelous, and they just pop on the Silver Blossom background. And I pulled the adorable "friends" squirrel print from the bundle to use as the binding, so cute!!

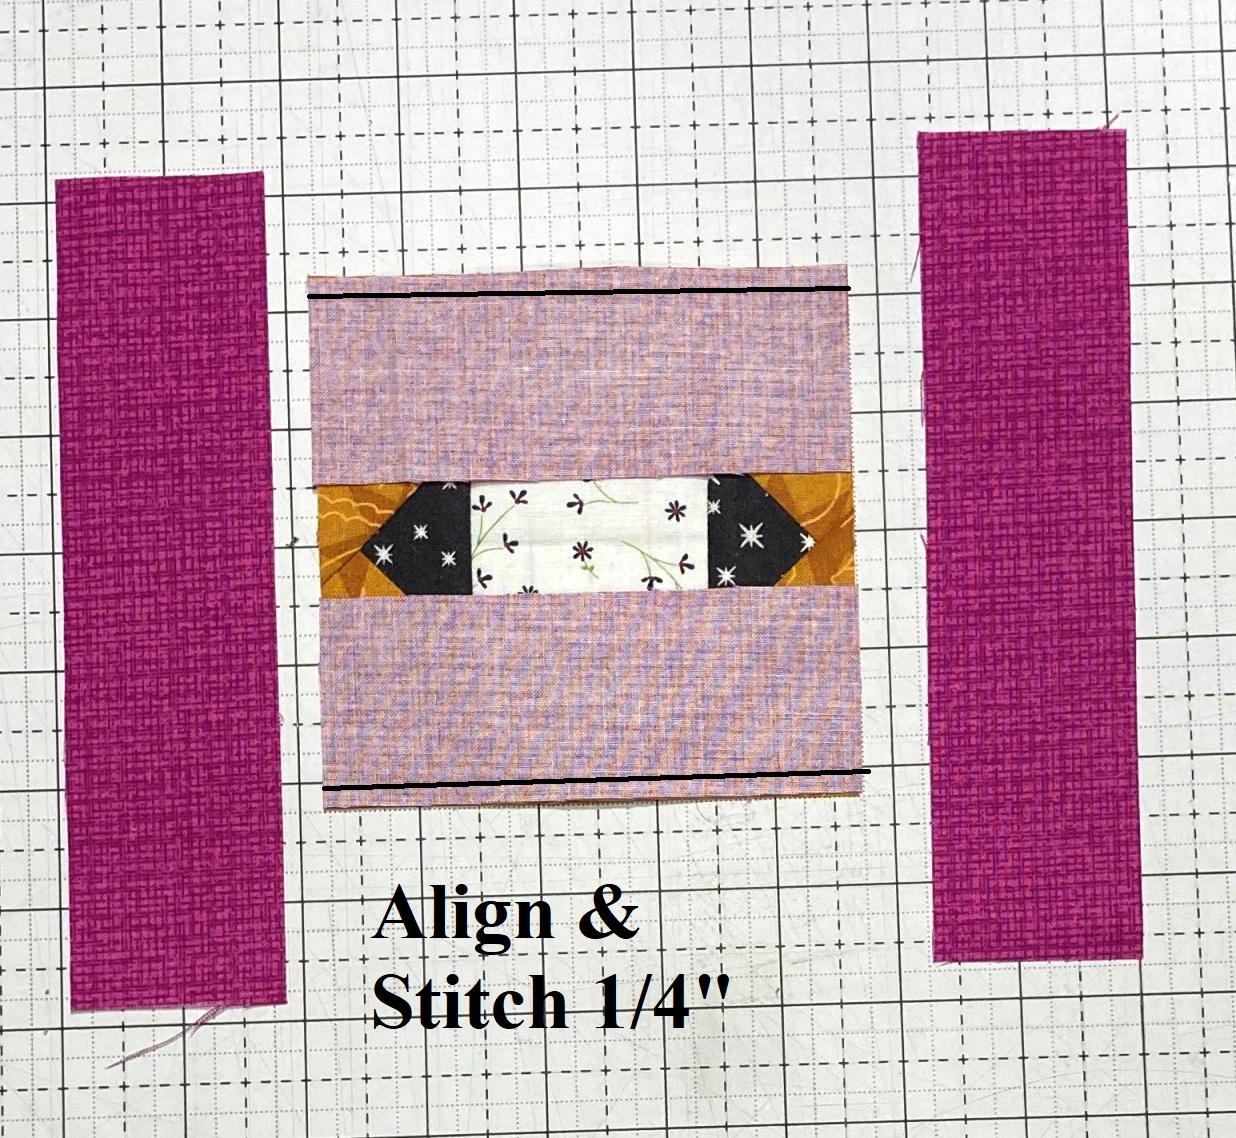
This Stepping Out Quilt  is made with Modified Drunkards Path Units and No Waste Flying Geese.   I love using my Modified Drunkards Path Templates to make cutting the curves a breeze!!   (I have actually done several patterns and tutorials with these, and they will all work with the one set of templates :)   And if you are new to curved piecing, or just need a refresher course, there is a step by step tutorial right here on cutting and sewing the curved units :)   So great!!!    Oh, and there is also a No Waste Flying Geese Step by Step tutorial as well :) 

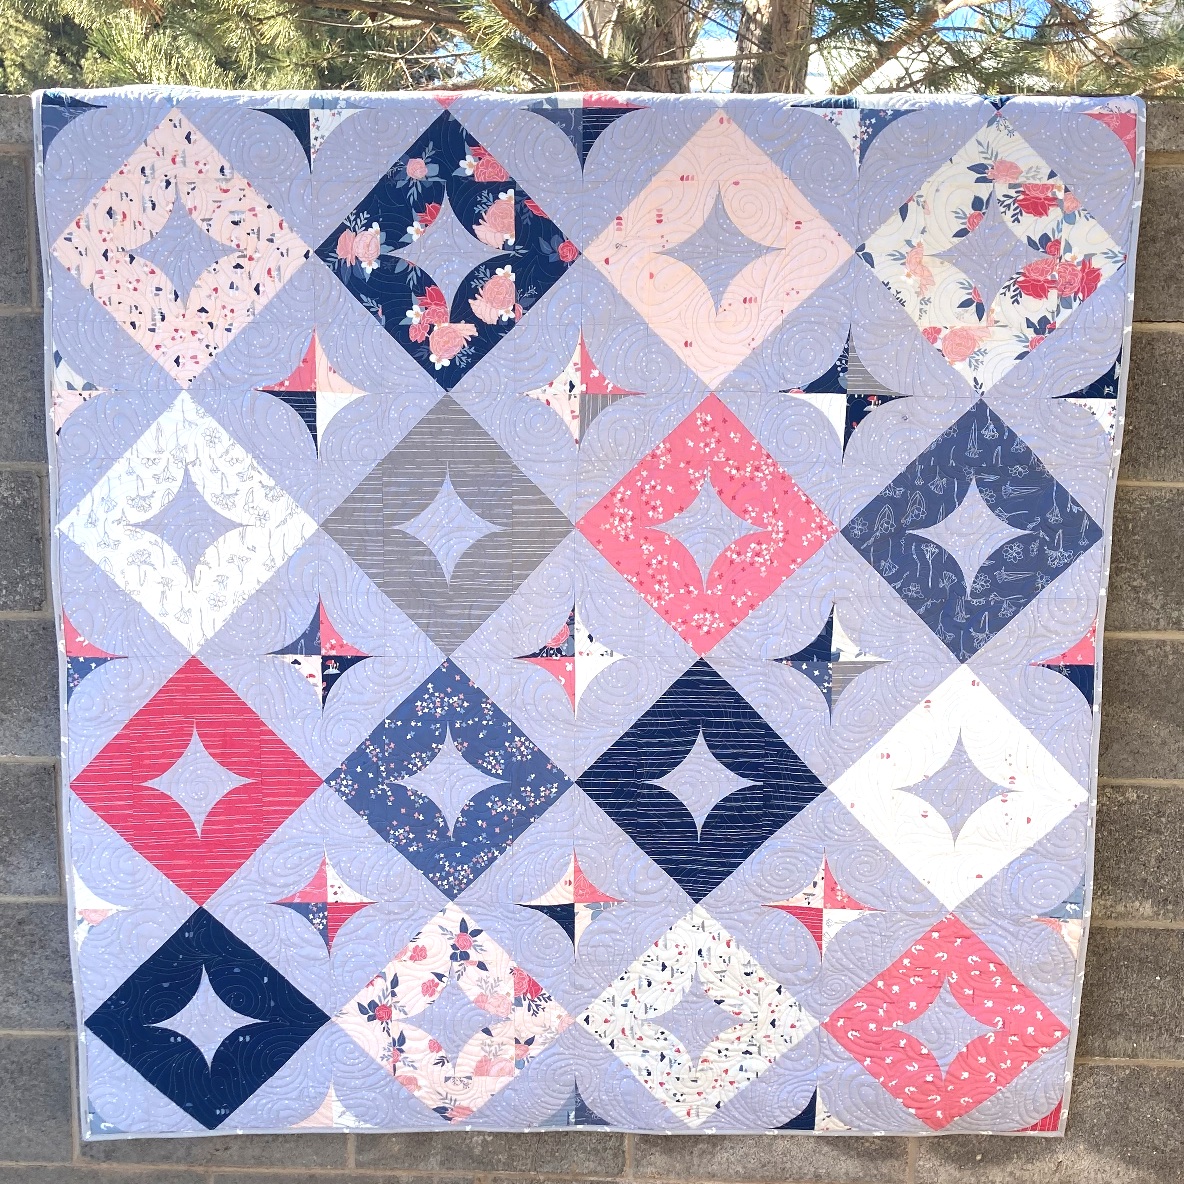
I just love the way this design matches the prints together into one big block, really allowing each print to just shine!!! And you can't help but shine with all of those stars popping from the background and prints. I made the Lap Size version, that finishes at 56" x 70" so it a a great size to snuggle up in.

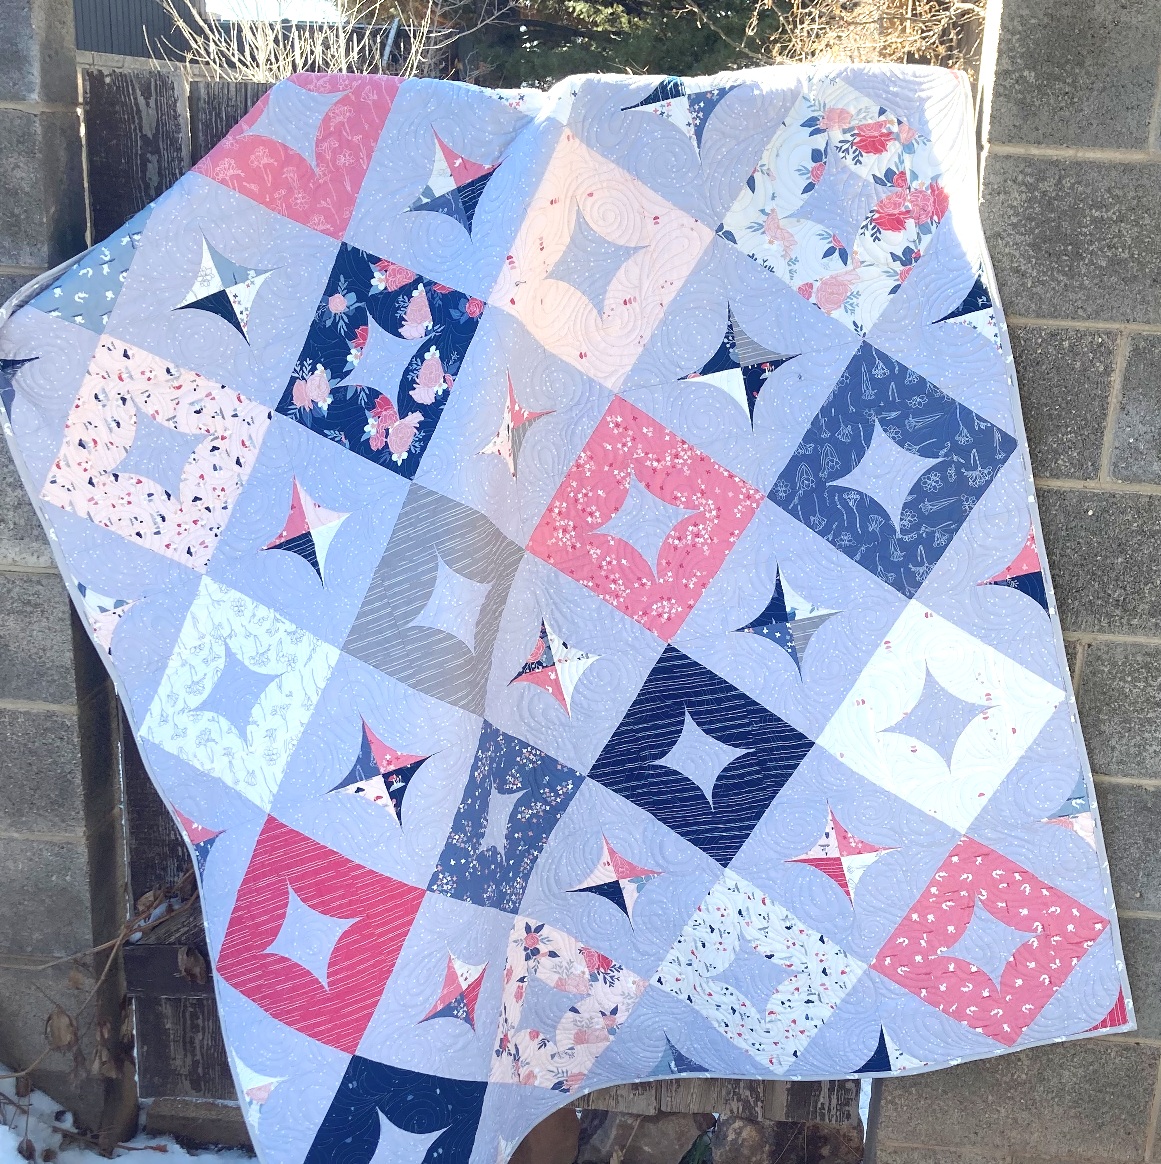
But like I said, there are multiple size options in the Free PDF Pattern , so you can pick the size project that is just right for you. To get the FREE PDF Stepping Out Pattern Download, so you can make your own, just click here and download it there.

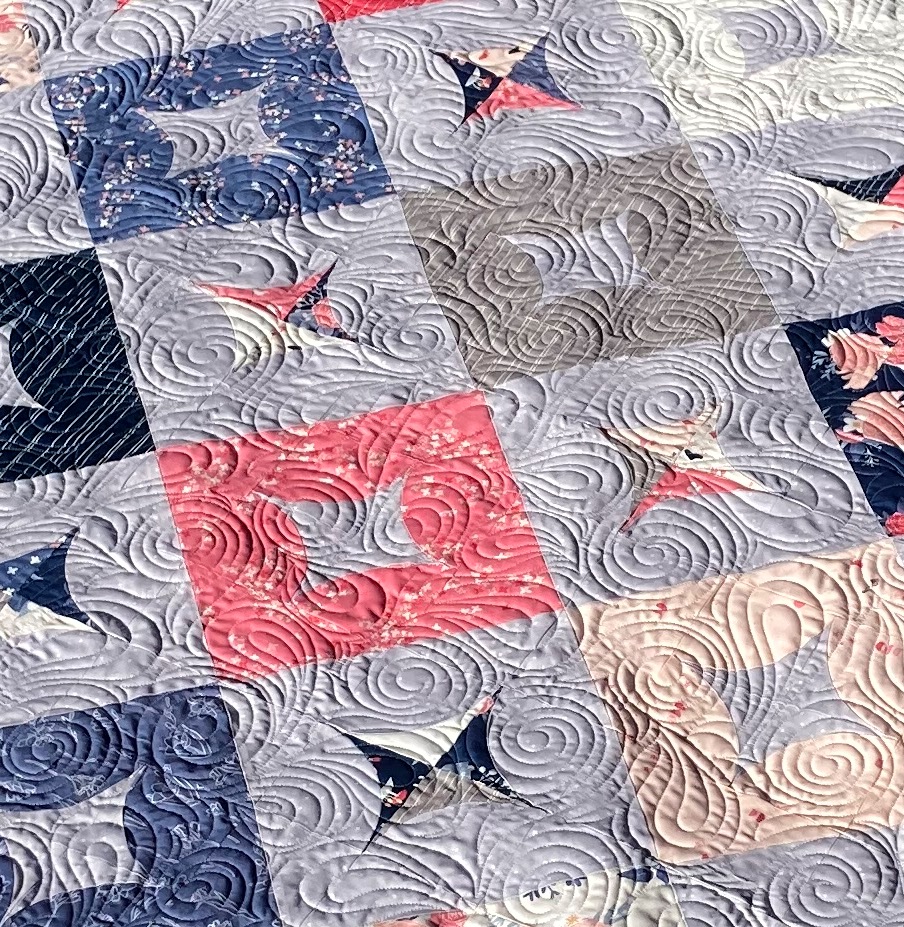
When it came time to quilt mine, I decided on an all over combination of echoed paisleys and swirls. I just love how it adds so much curvy goodness in the quilting to go with the curvy goodness of the piecing. And the texture is so yummy, lots of quilting, but still great for snuggling up in.

And that is my Stepping Out Quilt quilt!!! I hope you have enjoyed this post. Oh, and if you make your own Stepping Out quilts, I would love to see them! You can share your quilts with me on social media using hashtags  #happyquiltingwithmc and #steppingoutquilt and tagging @happyquiltingmc or email me a picture at happyquiltingmelissa@gmail.com. I can't wait to see your Stepping Out Quilts!!

And that is all for today :)  

I hope you have a very Happy Quilting Day!!!

Pin It!

Tuesday, December 13, 2022

Terrific Tuesday Giveaway Day

  It's Terrific Tuesday Giveaway Day!! Let's have some fun :)

First, we are going to announce the winners of last week's Terrific Tuesday Giveaway!!  

The winner of the Dwell Fat Quarter Bundle from Green Fairy Quilts  is . . . #603  . . . Congrats to brandylfarmer!!!  I have messaged you :)


And on to today's

Today's Terrific Tuesday Giveaway is being sponsored by  Lou Lou's Fabric Shop .    Did you know that Jamie makes a new Lou Lou Bundle every Tuesday . . . a Lou Lou Bundle is 8 fat quarters curated by Jamie and they are always gorgeous! She has added 3 new Christmas Bundles today and I just love this Winter Wonderland bundle!!!     And be sure to also check out all of Lou Lou's Christmas Fabric Sale,  as all the Christmas Fabrics have been marked down 25% or more!!!    Such Fun Shopping :)  


Today's Terrific Tuesday Giveaway is for some shopping goodness!!  Lou Lou's Fabric Shop is offering one lucky reader a $25.00 Gift Certificate perfect to use on anything in the store, including the awesome Lou Lou Bundle pictured above!!  Just perfect!!!!


You have two entry chances here on the blog, and please leave a separate comment for each.  All Entries are welcome, including International Entries.   Please just be sure to leave an email address if you are a no-reply blogger ;)  

ENTRY 1 - Simply leave a comment that tells me your favorite activity to do in a Winter Wonderland??  

 ENTRY 2 - Lets show Lou Lou's Fabric Shop some Love!!!!   You can follow them on   FacebookTwitterPinterest, or Instagram.  Or you can follow their blog or  visit The Shop and then share a favorite item ;)   Just be sure to leave a comment of how you showed your Lou Lou's Fabric Shop Love!!!

And that's it ;)  The giveaway will be open until next Tuesday, December 20th, when I will announce a winner at the beginning of next weeks Terrific Tuesday Giveaway Post :)

You can also pop over to my Instagram and/or Facebook to enter there as well :)  

Good Luck and Have a Happy Quilting Day!!!
Pin It!

Monday, December 12, 2022

Squirrel! Three More Quilts

 So on Friday I finally got around to putting away my "Black Friday Finds".  Which ultimately led to needing to reorganize a few things in the Pre-cut section of my stash so everything would fit nice and neat.  While doing this rearranging, I came across three "junior jelly rolls" that had been stuffed to the back of my pre-cut stash.  And well, lets just say they were looking a little shabby.  These were "homemade" junior jelly rolls that I had put together from scraps from this project in 2010 (that I actually just did a free pdf of) , this project in 2016, and this project in 2012.  Wow!!!   No wonder they were a little shabby, they had been hidden away for some time!!!

We'll I just bring myself to stuff them to the back again.  So I grabbed my Moda Bake Shop Rollin Along book, and flipped through the pages casually and the Crossroads Quilt by Lisa Jo Girodat just jumped out at me!!  And wouldn't you know, I had a Jelly Roll and a Half of Cream Solid left over from another ancient project.   I made my plans (you only need 18 print strips to make a baby size Crossroads which is exactly how many strips I had left of each roll :)  that evening and started cutting Saturday morning.

And I couldn't stop.  I pieced half of Saturday and this Morning and afternoon and wham!!!  Three more Crossroads quilts to add to the "To Be Quilted" pile that I just finished up with during the quilt marathon :)   So the goal is to get these quilted asap!!!   In fact, I think  I will go work on some quilt backs right now :)


I hope you all are having a very Happy Quilting Day!!!

I sure know I am ;) 

Pin It!

Thursday, December 8, 2022

BOHO Heart Block of the Month - Month 7

  It's Month 7 with my good friends at Stitchin' Heaven  doing their BOHO Heart Monthly Block of the Month program and that means another month of fun tutorials!!

Month 1                Month 2               Month 3             Month 4            Month 5               Month 6

Month 7                Month 8               Month 9            Month 10           Month 11              Month 12

And since each month has Lots and Lots of Tutorials in them . . . Here is a list to jump right to the tutorial you need for this month 7:  

Mini Heart Block                            Small Framed Square Blocks                Square in a Square Block

Gardenvale Block                          Cutting Background Strips                     Sewing Section 1


So you have your Month 7 BOHO Heart Packet . . .  Lets get started!!! 


We'll start with our first block, and it's more applique with the . . .


From your Month #7, Mini Heart bag, cut the fabrics according to page 1 of the supplemental cutting list. 


Using the cut pieces and the Mini Heart Block Directions from Month 3 make your Mini Heart Block.  The Mini Heart Block will be measuring 3 1/2" x 3 1/2" unfinished. 


And now we can move onto another set of familiar blocks, the . . .

Small Framed Square Block – 2 Blocks

From your Month #7, Small Framed Square bag, cut the fabrics according to page 1 of the supplemental cutting list.    


Using the cut pieces and the Mini Framed Square Block Directions from Month 2 make your block.  It is made the same way, just on a slightly larger scale.  Each of the Small Framed Square Block will be measuring 4 1/2" x 4 1/2" unfinished.  

And now we can move onto a new block, the . . .

Square In A Square Block


From your Month #7, Square In A Square bag, cut the fabrics according to page 1 of the supplemental cutting list. 


 We will start with the White center square and 4 small Black triangles.  Finger crease each triangle in half once and the center white square in half twice. 

Place the side Black triangles onto the center White square with right sides together as shown aligning the finger creases.   Stitch a 1/4" seam along both edges.  

Press the seam allowance outwards to the Black triangles. 


Place the top and bottom Black triangles onto the center White square with right sides together as shown aligning the finger creases.   Trim the ears remaining from the previous step.  Stitch a 1/4" seam along both edges.  Press the seam allowance outwards to the Black triangles. 


And now we need to trim the square to 3 1/4" square.  To do this, align the 1/4" and 3" lines with the seam allowances of the 4 points.  Trim along the 2 edges.  


Now, rotate your block 180 degrees.  Align the newly cut edges with the 3 1/4" markings on your ruler.  Trim the remaining 2 edges so the unit is now 3 1/4" x 3 1/4".  


 Now we will add the Gold triangles in the same fashion.   Finger crease each triangle in half once and the Center Unit in half twice. 


Place the top and bottom Gold triangles onto the Center Unit with right sides together as shown aligning the finger creases.    Stitch a 1/4" seam along both edges.  Press the seam allowance outwards to the Gold triangles. 


Place the side Gold triangles onto the Center Unit with right sides together as shown aligning the finger creases.  Trim the ears remaining from the previous step.  Stitch a 1/4" seam along both edges.  Press the seam allowance outwards to the Gold triangles. 
 

Now, just like you trimmed before, trim this new unit to 4" square.   NOTE - The book says to trim to 4 1/2" square, but that is a misprint.  You should trim the Unit to 4" square, aligning the point seam allowances with the 3 3/4" and 1/4" marks on your ruler.  


Now we just frame the Square in a Square unit.  Layout the 4 Pink rectangles as shown. 


Place the top and bottom Pink rectangles onto the Center Unit as shown, aligning the raw edges with right sides together.   Sew a 1/4" seam along both edges.  


Press the seam allowances outwards to the Pink rectangles.  Now finally, place the side Pink rectangles onto the Center Unit as shown, aligning the raw edges with right sides together.   Sew a 1/4" seam along both edges.  Press the seam allowances outwards to the Pink rectangles.  


And just like that, you have a Square in a Square Block  that should measure 6 1/2" x 6 1/2" unfinished.

And that leaves us with our last block, and again, it is a familiar one as we are making the . . .


From your Month #7, Gardenvale bag, cut the fabrics according to page 1 of the supplemental cutting list. 
  

Using the cut pieces and the Gardenvale Block Directions from Month 1 make your Gardenvale Block that will be measuring 10 1/2" x 10 1/2" unfinished. 


And now all your Blocks are made and that means it is time to start putting them together, but first, we are going to need some more of those Low Volume Background strips!!

Cutting Background Strips

Start by pressing all of your Low Volume Background pieces.  I like to stack up 3 strips on top of one another, trim the selvages, and then cut as many 1 1/2" strips as I can.  If you cut super straight, you can get 2 strips from each fabric pieces.  


From the Low Volume Strips sent with your Month #7 package, cut the fabrics according to page 2 of the supplemental cutting list.  
Just like Month 1 & Month 4, There is no right or wrong order to number your strips, you can do your low volume strips in any order you like.
Also, most importantly, once you have cut all the pieces from one fabric, take care to keep them together and marked with the Number of that vertical row/fabric.  You are cutting the strips for Month 7, 8 and 9 so you will be keeping these grouped and marked for some time.  


Background Strips for Grey Holes -  And some more cutting.  Here is what you need to cut and group with the fabrics above to continue "piecing" the Grey Holes from the low volume strips like we did in Month 1-3 and Month 4-6.

Fabric 43 - (1) 1 1/2" x 2 1/2"
Fabric 44 - (1) 1 1/2" x 2 1/2"
Fabric 45 - (1) 1 1/2" x 2 1/2"
Fabric 46 - (1) 1 1/2" x 2 1/2"
Fabric 47 - (1) 1 1/2" x 2 1/2"
Fabric 48 - (1) 1 1/2" x 2 1/2"
Fabric 49 - (1) 1 1/2" x 2 1/2"
Fabric 50 - (1) 1 1/2" x 2 1/2"


Grey Holes VS Gold Fillers -  And Finally, some of the Grey Holes you will be sent the Gold filler fabrics for.  By now, you have most likely chosen if you want to use the Gold Fabrics, or continue piecing the fillers.  If you want to continue piecing the fillers, you will need to add the following to your first group of background strips. 

Fabric 35 - (1) 1 1/2" x 2 1/2"
Fabric 36 - (1) 1 1/2" x 2 1/2"
Fabric 37 - (1) 1 1/2" x 2 1/2"
Fabric 38 - (1) 1 1/2" x 2 1/2"
Fabric 43 - (1) 1 1/2" x 2 1/2"
Fabric 44 - (1) 1 1/2" x 2 1/2"
Fabric 45 - (2) 1 1/2" x 2 1/2" and (1) 1 1/2" x 4 1/2"
Fabric 46 - (2) 1 1/2" x 2 1/2" and (1) 1 1/2"x 4 1/2"
Fabric 47 - (1) 1 1/2" x 2 1/2"
Fabric 48 - (1) 1 1/2" x 2 1/2"
Fabric 49 - (1) 1 1/2" x 4 1/2"
Fabric 50 - (1) 1 1/2" x 4 1/2"


And now with all your Background Pieces cut, you can start  . . . 


We will start by sewing some Strip Sets together.   For all of these strip sets, press the seam allowance to the Larger Number fabric.   Also, I found it very helpful to leave my extra pieces of marked background fabric to the side of my piecing so it can be used as a guide. 

From Fabric 35, 36, 37, and 38 sew a 13 1/2" Strip Set together as shown.
From Fabric 38, 39, and 40 sew a 10 1/2" Strip Set together as shown.
From Fabric 41 and 42 sew a 9 1/2" Strip Set together as shown.
From Fabric 43, 44, 45 and 46 sew a 5 1/2" Strip Set together as shown.
From Fabric 47, 48, 49, and 50 sew a 3 1/2" Strip Set together as shown.
From Fabric 47, 48, 49, and 50 sew a 2 1/2" Strip Set together as shown.


 Now we will sew Blocks and Strip Sets.   For all of these, press the Seams Open.   And still, the guide is very helpful to keep handy and make sure you are always putting the Blocks at the bottom of the Strip Sets. 

Sew the 38/39/40 Strip Set and the Mini Heart Block together as shown.
Sew the 43/44/45/46 Strip Set and the Purple Small Framed Square together as shown.
Sew the 3 1/2" 47/48/49/50 Strip Set on top of the Red Small Framed Square and the 2 1/2" 47/48/49/50 Strip Set on bottom of the Red Small Framed Square as shown.


Sew the Mini Heart Unit and the 35/36/37 Strip Set together as shown.
Sew the 41/42 Strip Set, the Purple Square Unit, and the Red Square Unit together as shown.

Press the Seams Open. 


Sew the Sashed Mini Heart Unit and the Square in a Square Block together as shown.
Sew the Sashed Squares Unit and the Gardenvale Block together as shown.

Press the Seams Open. 


Finally, Sew the Sashed Heart Square Unit and the Sashed Squares Gardenvale Unit together as shown.  

Press the Seam Open. 


And your Group 1 - Section 1 is complete.  It should measure 16 1/2" wide by 19 1/2" high.

And that is it for BOHO Heart Block of the Month, Month 7 :) 

If you have any questions on this tutorial, please don't hesitate to email me at happyquiltingmelissa@gmail.com or leave a comment.  

Hope you have so much fun making all of this months blocks and then sewing them all together:)

 Looking forward to Next Month!!

Pin It!