Thursday, December 8, 2022

BOHO Heart Block of the Month - Month 7

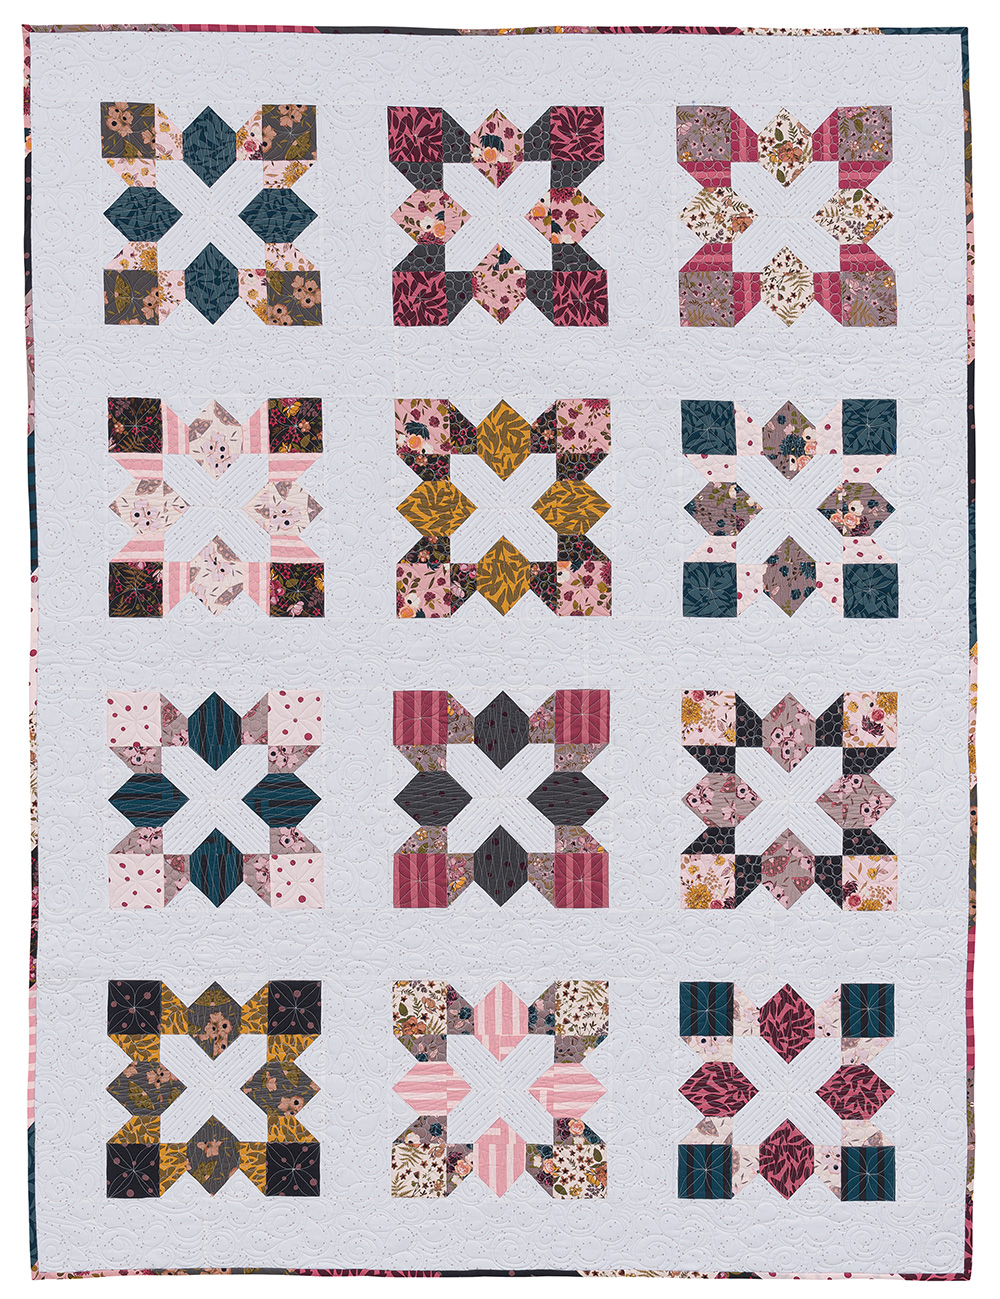
  It's Month 7 with my good friends at Stitchin' Heaven  doing their BOHO Heart Monthly Block of the Month program and that means another month of fun tutorials!!

Month 1                Month 2               Month 3             Month 4            Month 5               Month 6

Month 7                Month 8               Month 9            Month 10           Month 11              Month 12

And since each month has Lots and Lots of Tutorials in them . . . Here is a list to jump right to the tutorial you need for this month 7:  

Mini Heart Block                            Small Framed Square Blocks                Square in a Square Block

Gardenvale Block                          Cutting Background Strips                     Sewing Section 1


So you have your Month 7 BOHO Heart Packet . . .  Lets get started!!! 


We'll start with our first block, and it's more applique with the . . .


From your Month #7, Mini Heart bag, cut the fabrics according to page 1 of the supplemental cutting list. 


Using the cut pieces and the Mini Heart Block Directions from Month 3 make your Mini Heart Block.  The Mini Heart Block will be measuring 3 1/2" x 3 1/2" unfinished. 


And now we can move onto another set of familiar blocks, the . . .

Small Framed Square Block – 2 Blocks

From your Month #7, Small Framed Square bag, cut the fabrics according to page 1 of the supplemental cutting list.    


Using the cut pieces and the Mini Framed Square Block Directions from Month 2 make your block.  It is made the same way, just on a slightly larger scale.  Each of the Small Framed Square Block will be measuring 4 1/2" x 4 1/2" unfinished.  

And now we can move onto a new block, the . . .

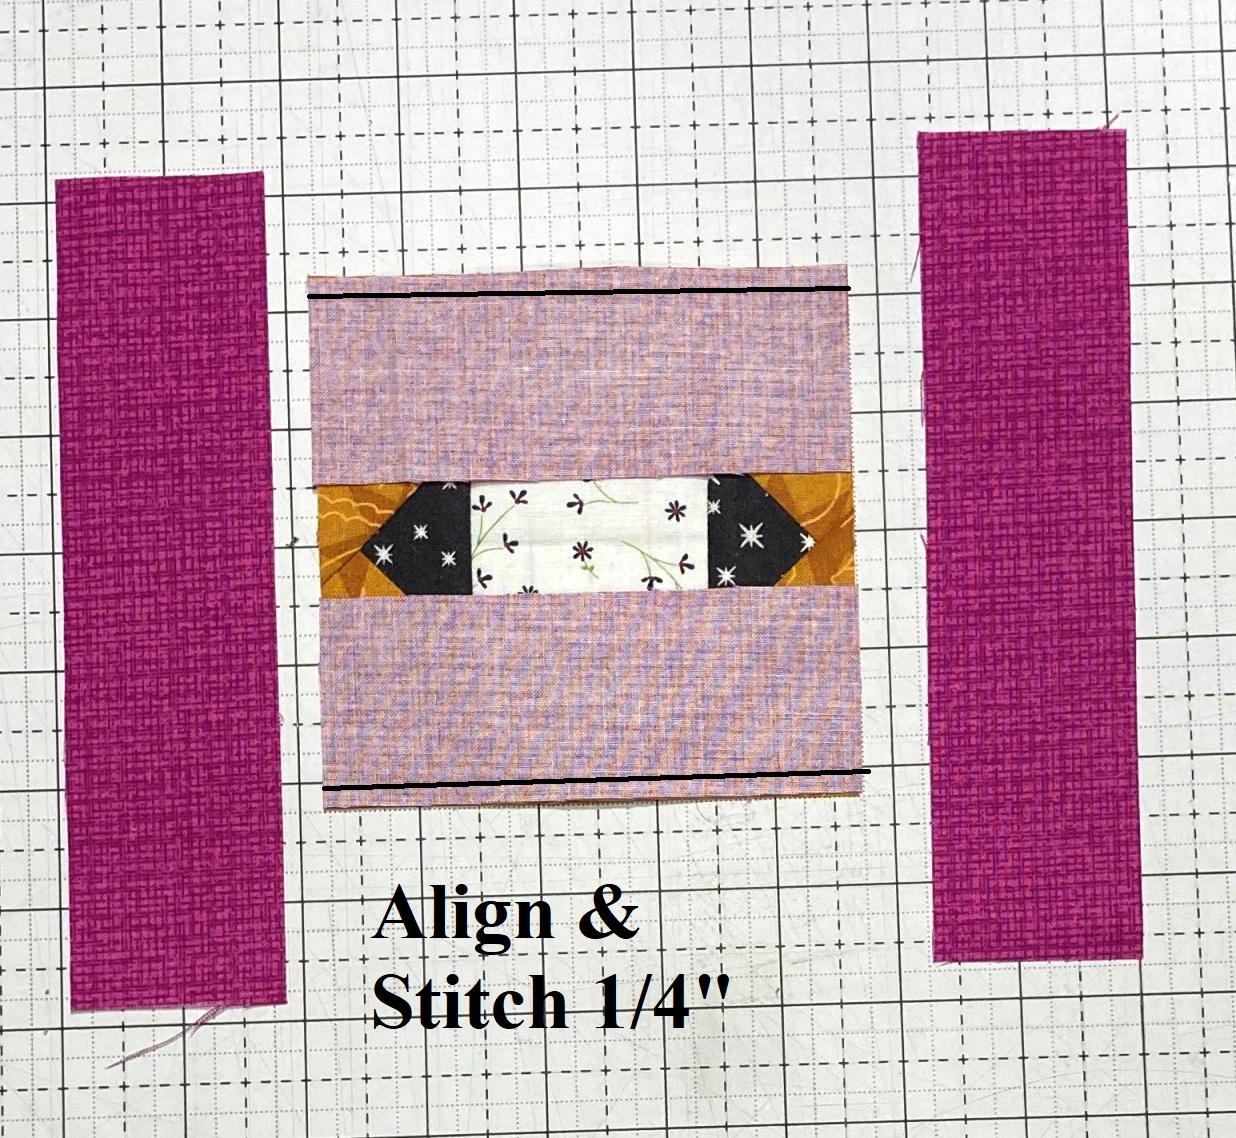
Square In A Square Block


From your Month #7, Square In A Square bag, cut the fabrics according to page 1 of the supplemental cutting list. 


 We will start with the White center square and 4 small Black triangles.  Finger crease each triangle in half once and the center white square in half twice. 

Place the side Black triangles onto the center White square with right sides together as shown aligning the finger creases.   Stitch a 1/4" seam along both edges.  

Press the seam allowance outwards to the Black triangles. 


Place the top and bottom Black triangles onto the center White square with right sides together as shown aligning the finger creases.   Trim the ears remaining from the previous step.  Stitch a 1/4" seam along both edges.  Press the seam allowance outwards to the Black triangles. 


And now we need to trim the square to 3 1/4" square.  To do this, align the 1/4" and 3" lines with the seam allowances of the 4 points.  Trim along the 2 edges.  


Now, rotate your block 180 degrees.  Align the newly cut edges with the 3 1/4" markings on your ruler.  Trim the remaining 2 edges so the unit is now 3 1/4" x 3 1/4".  


 Now we will add the Gold triangles in the same fashion.   Finger crease each triangle in half once and the Center Unit in half twice. 


Place the top and bottom Gold triangles onto the Center Unit with right sides together as shown aligning the finger creases.    Stitch a 1/4" seam along both edges.  Press the seam allowance outwards to the Gold triangles. 


Place the side Gold triangles onto the Center Unit with right sides together as shown aligning the finger creases.  Trim the ears remaining from the previous step.  Stitch a 1/4" seam along both edges.  Press the seam allowance outwards to the Gold triangles. 
 

Now, just like you trimmed before, trim this new unit to 4" square.   NOTE - The book says to trim to 4 1/2" square, but that is a misprint.  You should trim the Unit to 4" square, aligning the point seam allowances with the 3 3/4" and 1/4" marks on your ruler.  


Now we just frame the Square in a Square unit.  Layout the 4 Pink rectangles as shown. 


Place the top and bottom Pink rectangles onto the Center Unit as shown, aligning the raw edges with right sides together.   Sew a 1/4" seam along both edges.  


Press the seam allowances outwards to the Pink rectangles.  Now finally, place the side Pink rectangles onto the Center Unit as shown, aligning the raw edges with right sides together.   Sew a 1/4" seam along both edges.  Press the seam allowances outwards to the Pink rectangles.  


And just like that, you have a Square in a Square Block  that should measure 6 1/2" x 6 1/2" unfinished.

And that leaves us with our last block, and again, it is a familiar one as we are making the . . .


From your Month #7, Gardenvale bag, cut the fabrics according to page 1 of the supplemental cutting list. 
  

Using the cut pieces and the Gardenvale Block Directions from Month 1 make your Gardenvale Block that will be measuring 10 1/2" x 10 1/2" unfinished. 


And now all your Blocks are made and that means it is time to start putting them together, but first, we are going to need some more of those Low Volume Background strips!!

Cutting Background Strips

Start by pressing all of your Low Volume Background pieces.  I like to stack up 3 strips on top of one another, trim the selvages, and then cut as many 1 1/2" strips as I can.  If you cut super straight, you can get 2 strips from each fabric pieces.  


From the Low Volume Strips sent with your Month #7 package, cut the fabrics according to page 2 of the supplemental cutting list.  
Just like Month 1 & Month 4, There is no right or wrong order to number your strips, you can do your low volume strips in any order you like.
Also, most importantly, once you have cut all the pieces from one fabric, take care to keep them together and marked with the Number of that vertical row/fabric.  You are cutting the strips for Month 7, 8 and 9 so you will be keeping these grouped and marked for some time.  


Background Strips for Grey Holes -  And some more cutting.  Here is what you need to cut and group with the fabrics above to continue "piecing" the Grey Holes from the low volume strips like we did in Month 1-3 and Month 4-6.

Fabric 43 - (1) 1 1/2" x 2 1/2"
Fabric 44 - (1) 1 1/2" x 2 1/2"
Fabric 45 - (1) 1 1/2" x 2 1/2"
Fabric 46 - (1) 1 1/2" x 2 1/2"
Fabric 47 - (1) 1 1/2" x 2 1/2"
Fabric 48 - (1) 1 1/2" x 2 1/2"
Fabric 49 - (1) 1 1/2" x 2 1/2"
Fabric 50 - (1) 1 1/2" x 2 1/2"


Grey Holes VS Gold Fillers -  And Finally, some of the Grey Holes you will be sent the Gold filler fabrics for.  By now, you have most likely chosen if you want to use the Gold Fabrics, or continue piecing the fillers.  If you want to continue piecing the fillers, you will need to add the following to your first group of background strips. 

Fabric 35 - (1) 1 1/2" x 2 1/2"
Fabric 36 - (1) 1 1/2" x 2 1/2"
Fabric 37 - (1) 1 1/2" x 2 1/2"
Fabric 38 - (1) 1 1/2" x 2 1/2"
Fabric 43 - (1) 1 1/2" x 2 1/2"
Fabric 44 - (1) 1 1/2" x 2 1/2"
Fabric 45 - (2) 1 1/2" x 2 1/2" and (1) 1 1/2" x 4 1/2"
Fabric 46 - (2) 1 1/2" x 2 1/2" and (1) 1 1/2"x 4 1/2"
Fabric 47 - (1) 1 1/2" x 2 1/2"
Fabric 48 - (1) 1 1/2" x 2 1/2"
Fabric 49 - (1) 1 1/2" x 4 1/2"
Fabric 50 - (1) 1 1/2" x 4 1/2"


And now with all your Background Pieces cut, you can start  . . . 


We will start by sewing some Strip Sets together.   For all of these strip sets, press the seam allowance to the Larger Number fabric.   Also, I found it very helpful to leave my extra pieces of marked background fabric to the side of my piecing so it can be used as a guide. 

From Fabric 35, 36, 37, and 38 sew a 13 1/2" Strip Set together as shown.
From Fabric 38, 39, and 40 sew a 10 1/2" Strip Set together as shown.
From Fabric 41 and 42 sew a 9 1/2" Strip Set together as shown.
From Fabric 43, 44, 45 and 46 sew a 5 1/2" Strip Set together as shown.
From Fabric 47, 48, 49, and 50 sew a 3 1/2" Strip Set together as shown.
From Fabric 47, 48, 49, and 50 sew a 2 1/2" Strip Set together as shown.


 Now we will sew Blocks and Strip Sets.   For all of these, press the Seams Open.   And still, the guide is very helpful to keep handy and make sure you are always putting the Blocks at the bottom of the Strip Sets. 

Sew the 38/39/40 Strip Set and the Mini Heart Block together as shown.
Sew the 43/44/45/46 Strip Set and the Purple Small Framed Square together as shown.
Sew the 3 1/2" 47/48/49/50 Strip Set on top of the Red Small Framed Square and the 2 1/2" 47/48/49/50 Strip Set on bottom of the Red Small Framed Square as shown.


Sew the Mini Heart Unit and the 35/36/37 Strip Set together as shown.
Sew the 41/42 Strip Set, the Purple Square Unit, and the Red Square Unit together as shown.

Press the Seams Open. 


Sew the Sashed Mini Heart Unit and the Square in a Square Block together as shown.
Sew the Sashed Squares Unit and the Gardenvale Block together as shown.

Press the Seams Open. 


Finally, Sew the Sashed Heart Square Unit and the Sashed Squares Gardenvale Unit together as shown.  

Press the Seam Open. 


And your Group 1 - Section 1 is complete.  It should measure 16 1/2" wide by 19 1/2" high.

And that is it for BOHO Heart Block of the Month, Month 7 :) 

If you have any questions on this tutorial, please don't hesitate to email me at happyquiltingmelissa@gmail.com or leave a comment.  

Hope you have so much fun making all of this months blocks and then sewing them all together:)

 Looking forward to Next Month!!

Pin It!

Wednesday, December 7, 2022

Fast & Fun Lap Quilts - All the Quilts - All The Details!!!

Wow, I have had so much fun on the Fast & Fun Lap Quilts Book Tour and hope you have as well!!!  Thank you so much for all of the  Fast & Fun Lap Quilts Love!!!!  You all are just the best!!!  I have loved all of your emails, comments, and kind words on my new book :)    And now,  I can't wait to see all of your Fast & Fun Lap Quilts!!  You can share them with me via email at happyquiltingmelissa@gmail.com or add them on social media with the #FastandFunLapQuilts and #happyquiltingwithmc.   I just know you are going to love making your own Fast & Fun Lap Quilts!!!!


Fast & Fun Lap Quilts is available to order a signed copy directly from me, or you can get a copy from  your local quilt shop or wherever quilting books are sold.  Just in case you haven't snagged a copy yet ;)   

So for today's post . . .  I wanted to have a place that summed up all of the quilts from the book tour, the originals as well as the alternate versions I made as well.   Also, I wanted to be able to add to these as I can continue to add to when I make more Fast & Fun Lap Quilts :)

So here it goes Fast & Fun Lap Quilts - All the Quilts and All the Details  :)   


Quilt: Thunderbird, Bonus Fast & Fun Lap Quilt Pattern
Size: 60" x 72"
Fabrics Used - 1 Persimmon Layer Cake  by Basic Grey for Moda
                        3 1/4 Yards of Grunge White Paper for the Background
                        5/8 Yard of Persimmon Floral Yellow for Binding
                        3 1/2 Yards of Persimmon Floral Yellow for Backing
Quilting: All over Echoed Paisleys by me on an HQ Infinity


Quilt: Three in a Row, Original Version
Size: 54 1/2" x 65"
Fabrics Used - 1 One Fine Day Layer Cake  by Bonnie and Camille for Moda
                        3 1/4 Yards of Bella Solids Bleached White for the Background
                        5/8 Yard of One Fine Day Navy Dot for Binding
                        3 1/2 Yards of One Fine Day Aqua Sunnyside for Backing
Quilting: Custom Quilted Swirls, Wavy Crosshatch, Pebbles, and Echoed Ovals by me on an HQ Avante
Three in a Row, Original Version - Blog Post


Quilt: Three in a Row, Wild Meadow Version
Size: 54 1/2" x 65"
Fabrics Used - 1 Wild Meadow Layer Cake by Sweetfire Road for Moda
                        3 1/4 Yards of Spotted Powder for the Background
                        5/8 Yard of Wild Meadow Sweet Pea Berry Bramble Stripe for Binding
                        3 1/2 Yards of Wild Meadow Boysenberry Wildberry Blossoms for Backing
Quilting: All Over Quilted Wavy Lines by me on an HQ Avante Long Arm.
Three in a Row, Wild Meadow Version - Blog Post


Quilt: Keystone Corners, Original Version
Size: 60 1/2" x 60 1/2"
Fabrics Used - 1 Meander Layer Cake by Aneela Hoey for Moda
                        3 1/2 Yards of Meander Cloud Field for the Background
                        5/8 Yard of Meander Navy Tiny Square Dot for Binding
                        4 Yards of Meander Denim Foxes for Backing
Quilting: Custom Quilted Swirls, Straight Lines, Loops, and Cobblestones by me on an HQ Avante.
Keystone Corners, Original Version - Blog Post


Quilt: Keystone Corners, Fleur Noire Version
Size: 60 1/2" x 60 1/2"
Fabrics Used - 1 Fleur Noire 10" Stacker by My Minds Eye for Riley Blake Designs
                        3 1/2 Yards of Poplin Beach for the Background
                        5/8 Yard of 1/4" Black Stripe for Binding
                        4 Yards of Blossom Beach for Backing
Quilting: All Over Quilted L and E by me on an HQ Avante Long Arm.
Keystone Corners, Fleur Noire Version - Blog Post


Quilt: Keystone Corners, Ciao Bella Version
Size: 60 1/2" x 60 1/2"
Fabrics Used - 1 Ciao Bella 10" Stacker by Carina Gardner for Riley Blake Designs
                        3 1/2 Yards of Confetti Cottons Riley White for the Background
                        5/8 Yard of Ciao Bella Main Midnight for Binding
                        4 Yards of Blossom Peony for Backing
Quilting: All Over Quilted Wavy Arches by me on an HQ Avante Long Arm.
Keystone Corners, Ciao Bella Version - Blog Post


Quilt: Diamond Dash, Original Version
Size: 64 1/2" x 64 1/2"
Fabrics Used - 1 Seashore Drive Layer Cake by Sherri and Chelsi for Moda
                        3 3/4 Yards of Seashore Drive Sweet Pea Ivory for the Background
                        4 Yards of Seashore Drive Sky Pebble for Backing
Quilting: Custom Quilted Curly Q's, Ribbon Candy, and Echoed Arches by me on an HQ Avante.
Diamond Dash, Original Version - Blog Post


Quilt: Diamond Dash, Nantucket Summer
Size: 64 1/2" x 64 1/2"
Fabrics Used - 2 Nantucket Summer Layer Cakes by Camille Roskelley for Moda
                        3 3/4 Yards of Indigo Chambray for the Background
                        4 Yards of Nantucket Summer Cream Mulit for Backing
Quilting: All Over Loose Feathers by me on an HQ Avante Long Arm.
Diamond Dash, Nantucket Summer Version - Blog Post


Quilt: Diamond Dash, Red, White, and True
Size: 64 1/2" x 64 1/2"
Fabrics Used - 1 Red, White, & True 10" Stacker by Dani Mogstad for Riley Blake Designs 
                        3 3/4 Yards of  Denim Bee Cross Stitch Basic for the Background
                        4 Yards of Navy Sparkler for Backing
Quilting: All Over Swirls by me on an HQ Infinity Long Arm.
Diamond Dash, Red, White, and True Version - Blog Post


Quilt: Aurora, Original Version
Size: 68" x 68"
Fabrics Used - 1 Beautiful Day Layer Cake by Corey Yoder for Moda
                        4 1/8 Yards of Beautiful Day Cloud Star Gazing for the Background
                        5/8 Yard of Beautiful Day Slate Rose Buds for Binding
                        4 1/8 Yards of Beautiful Day Cloud Wild Rose Floral for Backing
Quilting: Custom Quilted Swirls, Echoed Arches, Straight Lines, and Pebbles by me on an HQ Avante.
Aurora, Original Version - Blog Post


Quilt: Aurora, Country Rose Version
Size: 68" x 68"
Fabrics Used - 1 Country Rose Layer Cake by Lella Boutique for Moda
                        4 1/8 Yards of Country Rose Charcoal Magic Dot for the Background
                        5/8 Yard of Country Rose Charcoal Climbing Vine for Binding
                        4 1/8 Yards of Country Rose Charcoal Country Boquet for Backing
Quilting: All Over Paisleys and Swirls by me on an HQ Avante Long Arm.
Aurora, Country Rose Version - Blog Post


Quilt: Aurora, Honeycomb Hill Version
Size: 68" x 68"
Fabrics Used - 1 Honeycomb Hill 10" Stacker by Katherine Lenius for Riley Blake Designs 
                        4 1/8 Yards of  Oxford Blossom for the Background
                        5/8 Yard of Honeycomb Hill Main Navy for Binding
                        4 1/8 Yards of Oxford Blossom for Backing
Quilting: All Over loose feathers by me on an HQ Infinity Long Arm.
Aurora, Honeycomb Hill Version - Blog Post


Quilt: Dutch Days, Original Version
Size: 72" x 72"
Fabrics Used - 1 Harmony 10" Stacker by Melissa Lee for Riley Blake Designs
                        2 7/8 Yards of Texture Cream for the Background
                        5/8 Yard of Harmony Grape Bloom for Binding
                        4 3/8 Yards of Blossom Apricot Blush for Backing
Quilting: Custom Quilted Curls and Echoed Arches by me on an HQ Avante.
Dutch Days, Original Version - Blog Post


Quilt: Dutch Days, Ombre Galaxy Version
Size: 72" x 72"
Fabrics Used - 1 Ombre Galaxy Fat Quarter Bundle by V and Co.  for Moda
                        2 7/8 Yards of Ombre Galaxy Putty for the Background
                        5/8 Yard of Ombre Galaxy Onyx for Binding
                        4 3/8 Yards of Ombre Galaxy Graphite Grey for Backing
Quilting: All Over Fireworks by me on an HQ Avante Long Arm.
Dutch Days, Ombre Galaxy Version - Blog Post


Quilt: Dutch Days, Ally's Garden Version
Size: 72" x 72"
Fabrics Used - 1 Ally's Garden 10" Stacker by Dani Mogstad for Riley Blake Designs
                        2 7/8 Yards of Texture White Basics for the Background
                        5/8 Yard of Ally's Garden Cream Floral for Binding
                        4 3/8 Yards of Sparkler Boy Boue for Backing
Quilting: All Over Loose Feathers by me on an HQ Infinity Long Arm.
Dutch Days, Ally's Garden Version - Blog Post


Quilt: Merry-Go-Round, Original Version
Size: 76 1/2" x 76 1/2"
Fabrics Used - 1 Indigo Garden 10" Stacker by Heather Peterson for Riley Blake Designs
                        4 7/8 Yards of Texture Cream for the Background
                        4 3/4 Yard of Large Hashtag Teal for Backing
Quilting: Custom Quilted Echoed Paisleys, Straight Lines, and Pebbles by me on an HQ Avante.
Merry-Go-Round, Original Version - Blog Post


Quilt: Merry-Go-Round, Low Volume Version
Size: 76 1/2" x 76 1/2"
Fabrics Used - Lots and Lots of Low Volume Scraps
                        4 7/8 Yards of Linen Dark Grey Texture for the Background
                        4 3/4 Yard of All About Plaid Hounstooth Black for Backing
Quilting: All Over Open Centered Swirls by me on an HQ Avante Long Arm.
Merry-Go-Round, Low Volume Version - Blog Post


Quilt: Jacks, Original Version
Size: 62 1/2" x 77 1/2"
Fabrics Used - 1 Paisley Rose Layer Cake by Crystal Manning for Moda
                         4 71/2 Yards of Bella Solids Porcelain for the Background
                         4 3/4 Yard of Paisley Rose Golden Rose Garden for Backing
Quilting: Custom Quilted Pebbles, Wishbone, Ribbon Candy, and Loop d loop by me on an HQ Avante.
Jacks, Original Version - Blog Post


Quilt: Jacks, Scrappy Rainbow Version
Size: 62 1/2" x 77 1/2"
Fabrics Used - Lots and Lots of Rainbow Scraps
                         4 71/2 Yards of Grunge Gris Fonce for the Background
                         4 3/4 Yard of Creativity Grows Blackboard You Are Loved for Backing
Quilting: All Over Echoed Paisleys by me on an HQ Avante Long Arm.
Jacks, Scrappy Rainbow Version - Blog Post


Quilt: Puzzle Box, Original Version
Size: 62" x 62"
Fabrics Used - 1 Morning Light Layer Cake by Linzee McCray for Moda
                         2 3/4 Yards of Morning Light Cloud Downy Phlox for the Background
                         3 7/8 Yard of Morning Light Dew Pansy Yardage for Backing
Quilting: Custom Quilted Meandering in Framed Boxes and Straight Lines by me on an HQ Avante.
Puzzle Box, Original Version - Blog Post


Quilt: Puzzle Box, Blossom Basics Version
Size: 62" x 62"
Fabrics Used - 1 Blossom Basics Fat Quarter Bundle by Christopher Thompson for Riley Blake Designs
                         2 3/4 Yards of Blossom Black for the Background
                         3 7/8 Yard of Daisy Tone on Tone Black Yardage for Backing
Quilting: All Over Echoed Loop D Loops by me on an HQ Avante Long Arm.
Puzzle Box, Blossom Basics Version - Blog Post


Quilt: Treasured, Original Version
Size: 52 1/2" x 68 1/2"
Fabrics Used - 1 Sonnet Dusk 10" Stacker by Corri Sheff for Riley Blake Designs
                        3 Yards of Blossom on White Rose Gold Sparkle for the Background
                        3 3/8 All About Plaids Tartan Black for Backing
Quilting: Custom Quilted in Wishbone, Pebbles, and Feathered Swirls by me on an HQ Avante.
Treasured, Original Version - Blog Post


Quilt: Treasured, Expressions Batik Version
Size: 52 1/2" x 68 1/2"
Fabrics Used - 1 Expression Batiks Meadow 10" Stacker for Riley Blake Designs
                        3 Yards of Hand Dyed Pale Pink Batik for the Background
                        3 3/8 Multi Wideback Expressions for Backing

Quilting: All Over Curly Q's by me on an HQ Avante Long Arm.
Treasured, Expressions Batik Version - Blog Post


And that is Fast & Fun Lap Quilts - All the Quilts and All the Details

Any other information you would like to have listed on these quilts please just let me know in the comments ;)

Oh, and I made a Button on the Side of the blog that will bring you straight to this post ;)  Any time you visit my blog you can just click on this button on the right hand side of my blog to be taken right to this post to see all about Fast & Fun Lap Quilts ;) 


Happy Quilting!!!


Pin It!